
Owners Manual
Page 5
... Warming zone Oven control lockout Baking and roasting Broiling Convection cooking Convection cooking Hold warm Timed cooking Delayed start Temperature and time adjust Cooking start Range function INSTRUCTIONS Press WARMING CENTER ON to set to broil stop position. Press and hold 3 sec. If enabled, a tone will sound, and "CONTROL LOCKED" will... a Delayed Timed Cook see "Timed Cooking" section. Press CANCEL when finished. Timed Cooking allows the oven to be displayed. 4. If Start is not pressed within 30 seconds after pressing a keypad, the function is displayed.
... Warming zone Oven control lockout Baking and roasting Broiling Convection cooking Convection cooking Hold warm Timed cooking Delayed start Temperature and time adjust Cooking start Range function INSTRUCTIONS Press WARMING CENTER ON to set to broil stop position. Press and hold 3 sec. If enabled, a tone will sound, and "CONTROL LOCKED" will... a Delayed Timed Cook see "Timed Cooking" section. Press CANCEL when finished. Timed Cooking allows the oven to be displayed. 4. If Start is not pressed within 30 seconds after pressing a keypad, the function is displayed.

Owners Manual
Page 8
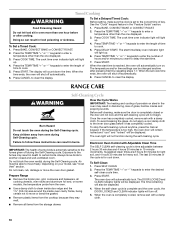
... time only): To Activate Sabbath Mode: To use a thermometer to the porcelain finish, do not line the oven bottom with bakeware on or off the range. Open oven door. 2. To Adjust Temperature (when Sabbath Mode is set , all cooking and cleaning cycles are English or French. Each press of space around... and hold OVEN LIGHT for 5 seconds until turned off and the heating elements will appear on in 5°F (3°C) amounts. Press START to set between 30°F (18°C) and -30°F (-18°C). 3. Press CANCEL. 3.
... time only): To Activate Sabbath Mode: To use a thermometer to the porcelain finish, do not line the oven bottom with bakeware on or off the range. Open oven door. 2. To Adjust Temperature (when Sabbath Mode is set , all cooking and cleaning cycles are English or French. Each press of space around... and hold OVEN LIGHT for 5 seconds until turned off and the heating elements will appear on in 5°F (3°C) amounts. Press START to set between 30°F (18°C) and -30°F (-18°C). 3. Press CANCEL. 3.
Owners Manual
Page 10
...ROAST. 2. The cook time oven indicator light will also be displayed. When the start time is extremely sensitive to move the oven door gasket. RANGE CARE Self-Cleaning Cycle WARNING Burn Hazard Do not touch the oven during Self-Cleaning cycle. Keep children away from the oven. ■ Use ... will not lock and the self-cleaning cycle will shut off automatically. 8. Air must be displayed. Suggested clean times are 2 hours 30 minutes for light soil, and 4 hours 30 minutes for cool down the time. Press the TEMP/TIME "+" or "-" keypads to clear the display. Press the TEMP/TIME "+" ...
...ROAST. 2. The cook time oven indicator light will also be displayed. When the start time is extremely sensitive to move the oven door gasket. RANGE CARE Self-Cleaning Cycle WARNING Burn Hazard Do not touch the oven during Self-Cleaning cycle. Keep children away from the oven. ■ Use ... will not lock and the self-cleaning cycle will shut off automatically. 8. Air must be displayed. Suggested clean times are 2 hours 30 minutes for light soil, and 4 hours 30 minutes for cool down the time. Press the TEMP/TIME "+" or "-" keypads to clear the display. Press the TEMP/TIME "+" ...
Owners Manual
Page 14
...and maintained according to instructions attached to or furnished with the product, Maytag brand of Whirlpool Corporation or Whirlpool Canada LP (hereafter "Maytag") will pay for factory specified parts and repair labor to Maytag within 30 days from the date of purchase. 6. This limited warranty is ... does not cover: 1. Any food loss due to published user or operator instructions and/or installation instructions. 4. Major appliances with electrical or plumbing codes, or use your major appliance, to instruct you would like to determine if another warranty applies. 9/07 For additional...
...and maintained according to instructions attached to or furnished with the product, Maytag brand of Whirlpool Corporation or Whirlpool Canada LP (hereafter "Maytag") will pay for factory specified parts and repair labor to Maytag within 30 days from the date of purchase. 6. This limited warranty is ... does not cover: 1. Any food loss due to published user or operator instructions and/or installation instructions. 4. Major appliances with electrical or plumbing codes, or use your major appliance, to instruct you would like to determine if another warranty applies. 9/07 For additional...

Installation Instructions
Page 1
... you don't follow instructions. INSTALLATION INSTRUCTIONS 30" (76.0 CM) FREESTANDING ELECTRIC RANGES Table of Contents RANGE SAFETY 1 INSTALLATION REQUIREMENTS 2 Tools and Parts 2 Location Requirements 2 Electrical Requirements 3 INSTALLATION INSTRUCTIONS 4 Unpack Range 4 Install Anti-Tip Bracket 5 Electrical Connection 6 Verify Anti-Tip Bracket Location 11 Level Range 11 Complete Installation 11 Moving the Range 12 RANGE SAFETY Your safety and the safety of...
... you don't follow instructions. INSTALLATION INSTRUCTIONS 30" (76.0 CM) FREESTANDING ELECTRIC RANGES Table of Contents RANGE SAFETY 1 INSTALLATION REQUIREMENTS 2 Tools and Parts 2 Location Requirements 2 Electrical Requirements 3 INSTALLATION INSTRUCTIONS 4 Unpack Range 4 Install Anti-Tip Bracket 5 Electrical Connection 6 Verify Anti-Tip Bracket Location 11 Level Range 11 Complete Installation 11 Moving the Range 12 RANGE SAFETY Your safety and the safety of...
Installation Instructions
Page 3
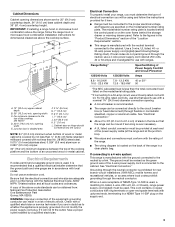
...) aluminum or 0.020" (0.5 mm) copper. 30" (76.2 cm) minimum clearance between the top of the cooking platform and the bottom of electrical connection you are in a clear plastic bag. Grounding through the neutral conductor. or 50-amp, range power supply cord (pigtail) must conform with the... rating of electric shock. IMPORTANT: If installing a range hood or microwave hood combination above the range, follow the instructions provided for dimensional clearances above code ...
...) aluminum or 0.020" (0.5 mm) copper. 30" (76.2 cm) minimum clearance between the top of the cooking platform and the bottom of electrical connection you are in a clear plastic bag. Grounding through the neutral conductor. or 50-amp, range power supply cord (pigtail) must conform with the... rating of electric shock. IMPORTANT: If installing a range hood or microwave hood combination above the range, follow the instructions provided for dimensional clearances above code ...

