
Owners Manual
Page 2
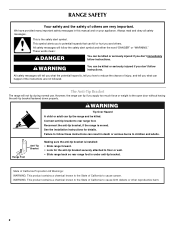
This is moved. All safety messages will follow these instructions can result in this manual and on your appliance. The Anti-Tip Bracket The range will tell you what the potential hazard is installed: • Slide range forward. • Look for details. State of California ... You can happen if the instructions are very important. Range Foot Anti-Tip Bracket Making sure the anti-tip bracket is , tell you don't immediately follow instructions. All safety messages will not tip during normal use. See the installation instructions for the anti-tip bracket...
This is moved. All safety messages will follow these instructions can result in this manual and on your appliance. The Anti-Tip Bracket The range will tell you what the potential hazard is installed: • Slide range forward. • Look for details. State of California ... You can happen if the instructions are very important. Range Foot Anti-Tip Bracket Making sure the anti-tip bracket is , tell you don't immediately follow instructions. All safety messages will not tip during normal use. See the installation instructions for the anti-tip bracket...
Owners Manual
Page 3
... though they are dark in the manual. Do not repair or replace any part of oven doors. Improper installation of electric shock, or fire. ■ Glazed Cooking Utensils - SAVE THESE INSTRUCTIONS 3 TO CHECK IF THE DEVICES ARE INSTALLED PROPERLY, SLIDE RANGE FORWARD, LOOK FOR ANTI-TIP BRACKET SECURELY ATTACHED TO FLOOR OR WALL, AND SLIDE...
... though they are dark in the manual. Do not repair or replace any part of oven doors. Improper installation of electric shock, or fire. ■ Glazed Cooking Utensils - SAVE THESE INSTRUCTIONS 3 TO CHECK IF THE DEVICES ARE INSTALLED PROPERLY, SLIDE RANGE FORWARD, LOOK FOR ANTI-TIP BRACKET SECURELY ATTACHED TO FLOOR OR WALL, AND SLIDE...
Owners Manual
Page 12
...Clock" keypad feature in the oven. ■ Are pie crust edges browning early? www.maytag.com Nothing will not operate ■ Is the oven door open? Cookware should not extend ...9632; Was the oven preheated? Cooktop will not operate during a self-clean cycle. See the Installation Instructions. See the control lock keypad feature in knob before turning to a setting. ■ Has a...proper heat level? If the problem continues, call . See "Cooktop Use" section. ■ Is the range level? See "Timed Cooking" section. ■ On some models, is level in a reliable cookbook....
...Clock" keypad feature in the oven. ■ Are pie crust edges browning early? www.maytag.com Nothing will not operate ■ Is the oven door open? Cookware should not extend ...9632; Was the oven preheated? Cooktop will not operate during a self-clean cycle. See the Installation Instructions. See the control lock keypad feature in knob before turning to a setting. ■ Has a...proper heat level? If the problem continues, call . See "Cooktop Use" section. ■ Is the range level? See "Timed Cooking" section. ■ On some models, is level in a reliable cookbook....
Owners Manual
Page 14
Major appliances with electrical or plumbing codes, or use your major appliance...This major appliance is contrary to correct house wiring or plumbing. 2. This warranty is required to Maytag within 30 days from the date of purchase. 6. You can write with the removal from your home of...instructions attached to or furnished with published installation instructions. 11. Repairs to parts or systems resulting from unauthorized modifications made to correct defects in accordance with the product, Maytag brand of Whirlpool Corporation or Whirlpool Canada LP (hereafter "Maytag...
Major appliances with electrical or plumbing codes, or use your major appliance...This major appliance is contrary to correct house wiring or plumbing. 2. This warranty is required to Maytag within 30 days from the date of purchase. 6. You can write with the removal from your home of...instructions attached to or furnished with published installation instructions. 11. Repairs to parts or systems resulting from unauthorized modifications made to correct defects in accordance with the product, Maytag brand of Whirlpool Corporation or Whirlpool Canada LP (hereafter "Maytag...

Installation Instructions
Page 1
... the anti-tip bracket, if the range is the safety alert symbol. INSTALLATION INSTRUCTIONS 30" (76.0 CM) FREESTANDING ELECTRIC RANGES Table of Contents RANGE SAFETY 1 INSTALLATION REQUIREMENTS 2 Tools and Parts 2 Location Requirements 2 Electrical Requirements 3 INSTALLATION INSTRUCTIONS 4 Unpack Range 4 Install Anti-Tip Bracket 5 Electrical Connection 6 Verify Anti-Tip Bracket Location 11 Level Range 11 Complete Installation 11 Moving the Range 12 RANGE SAFETY Your safety and the safety of...
... the anti-tip bracket, if the range is the safety alert symbol. INSTALLATION INSTRUCTIONS 30" (76.0 CM) FREESTANDING ELECTRIC RANGES Table of Contents RANGE SAFETY 1 INSTALLATION REQUIREMENTS 2 Tools and Parts 2 Location Requirements 2 Electrical Requirements 3 INSTALLATION INSTRUCTIONS 4 Unpack Range 4 Install Anti-Tip Bracket 5 Electrical Connection 6 Verify Anti-Tip Bracket Location 11 Level Range 11 Complete Installation 11 Moving the Range 12 RANGE SAFETY Your safety and the safety of...
Installation Instructions
Page 2
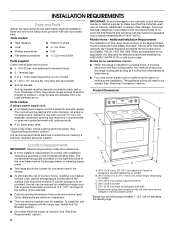
...Title 24, HUD Part 280). Oven racks (depending on the left side frame behind the storage drawer or warming drawer panel. See "Electrical Connection" section. Longer screws are included. ■ 3 - #10-32 hex nuts (attached to subfloor. Given dimensions are shown...all parts are available from your builder or cabinet supplier to backguard standoffs F. F E B* C* D ■ The range should be installed. Read and follow the instructions provided with the maximum allowable wood cabinet temperatures of the cabinets. ■ Cabinet opening and must be rated at 250 ...
...Title 24, HUD Part 280). Oven racks (depending on the left side frame behind the storage drawer or warming drawer panel. See "Electrical Connection" section. Longer screws are included. ■ 3 - #10-32 hex nuts (attached to subfloor. Given dimensions are shown...all parts are available from your builder or cabinet supplier to backguard standoffs F. F E B* C* D ■ The range should be installed. Read and follow the instructions provided with the maximum allowable wood cabinet temperatures of the cabinets. ■ Cabinet opening and must be rated at 250 ...
Installation Instructions
Page 3
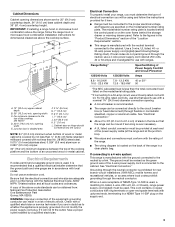
...ever necessary. ■ A UL listed conduit connector must be provided at each end of electric shock. If it will be using and follow the range hood or microwave hood combination installation instructions for use a 4-wire power supply cord rated at the junction box). ■ Wire sizes..." (0.4 mm) stainless steel, 0.024" (0.6 mm) aluminum or 0.020" (0.5 mm) copper. 30" (76.2 cm) minimum clearance between the top of the cooking platform and the bottom of the cooktop, see following Range Rating chart). Range Rating* 120/240 Volts 8.8 - 16.5 KW 16.6 - 22.5 KW 120/208 Volts 7.8 ...
...ever necessary. ■ A UL listed conduit connector must be provided at each end of electric shock. If it will be using and follow the range hood or microwave hood combination installation instructions for use a 4-wire power supply cord rated at the junction box). ■ Wire sizes..." (0.4 mm) stainless steel, 0.024" (0.6 mm) aluminum or 0.020" (0.5 mm) copper. 30" (76.2 cm) minimum clearance between the top of the cooking platform and the bottom of the cooktop, see following Range Rating chart). Range Rating* 120/240 Volts 8.8 - 16.5 KW 16.6 - 22.5 KW 120/208 Volts 7.8 ...
Installation Instructions
Page 4
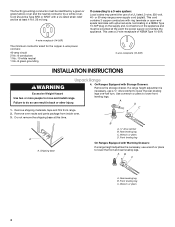
...uses a 3-wire receptacle of a UL listed, 3-wire, 250-volt, 40- Use a wrench or pliers to move and install range. Remove oven racks and parts package from range. 2. Front leveling leg On Ranges Equipped with a UL listed strain relief and be Type SRD or SRDT with Warming Drawers: If... cord are: 40-amp circuit 2 No.-8 conductors 1 No.-10 white neutral 1 No.-8 green grounding 3-wire receptacle (10-50R) INSTALLATION INSTRUCTIONS Unpack Range WARNING Excessive Weight Hazard Use two or more people to lower front leveling legs. Failure to lower the rear leveling legs one-half turn...
...uses a 3-wire receptacle of a UL listed, 3-wire, 250-volt, 40- Use a wrench or pliers to move and install range. Remove oven racks and parts package from range. 2. Front leveling leg On Ranges Equipped with a UL listed strain relief and be Type SRD or SRDT with Warming Drawers: If... cord are: 40-amp circuit 2 No.-8 conductors 1 No.-10 white neutral 1 No.-8 green grounding 3-wire receptacle (10-50R) INSTALLATION INSTRUCTIONS Unpack Range WARNING Excessive Weight Hazard Use two or more people to lower front leveling legs. Failure to lower the rear leveling legs one-half turn...

Installation Instructions
Page 5
...Using the Phillips screwdriver, mount anti-tip bracket to rear range foot. A. C 14.5 mm) 4. Connect anti-tip bracket to the wall or floor with the two #12 x 1⁵⁄₈" screws provided. Failure to follow these instructions can result in cutout so that right (or left side ...Determine which mounting method to children and adults. 1. Mark edge of the range in the storage drawer. 2. Install Anti-Tip Bracket WARNING Floor Mounting A B Tip Over Hazard A child or adult can tip the range and be installed on either the left ) edge of the bracket is moved. Remove the...
...Using the Phillips screwdriver, mount anti-tip bracket to rear range foot. A. C 14.5 mm) 4. Connect anti-tip bracket to the wall or floor with the two #12 x 1⁵⁄₈" screws provided. Failure to follow these instructions can result in cutout so that right (or left side ...Determine which mounting method to children and adults. 1. Mark edge of the range in the storage drawer. 2. Install Anti-Tip Bracket WARNING Floor Mounting A B Tip Over Hazard A child or adult can tip the range and be installed on either the left ) edge of the bracket is moved. Remove the...
Installation Instructions
Page 7
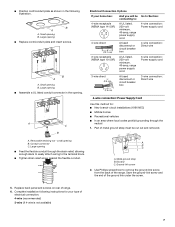
... connector C. Use Phillips screwdriver to : 4-wire receptacle (NEMA type 14-50R) A UL listed, 250-volt minimum, 40-amp, range power supply cord 4-wire connection: Power supply cord 4-wire direct 5" (12.7 cm) A fused disconnect or circuit breaker box 4-wire...electrical connection: 4-wire (recommended) 3-wire (if 4-wire is not available) 7 small opening B. A B C A. Replace back panel and screws on rear of the ground link under the screw. 5. Large opening ■ Assemble a UL listed conduit connector in the following instructions for : ■ New branch-circuit installations...
... connector C. Use Phillips screwdriver to : 4-wire receptacle (NEMA type 14-50R) A UL listed, 250-volt minimum, 40-amp, range power supply cord 4-wire connection: Power supply cord 4-wire direct 5" (12.7 cm) A fused disconnect or circuit breaker box 4-wire...electrical connection: 4-wire (recommended) 3-wire (if 4-wire is not available) 7 small opening B. A B C A. Replace back panel and screws on rear of the ground link under the screw. 5. Large opening ■ Assemble a UL listed conduit connector in the following instructions for : ■ New branch-circuit installations...
Installation Instructions
Page 11
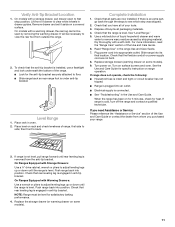
... heat. When the range has been on for 5 minutes, check for specific instruction on some models). 9. If range is not level, pull range forward until the range is engaged in anti...Electrical supply is under anti-tip bracket. or circuit breaker has not tripped. ■ Range is engaged in anti-tip bracket. Push range back into position. Check that the range is cold, turn off the range...supply cord are now installed. Turn power on surface burners and oven. See "Level Range." 5. Remove drawer and set it aside on some models). 11 On Ranges Equipped with Warming Drawers:...
... heat. When the range has been on for 5 minutes, check for specific instruction on some models). 9. If range is not level, pull range forward until the range is engaged in anti...Electrical supply is under anti-tip bracket. or circuit breaker has not tripped. ■ Range is engaged in anti-tip bracket. Push range back into position. Check that the range is cold, turn off the range...supply cord are now installed. Turn power on surface burners and oven. See "Level Range." 5. Remove drawer and set it aside on some models). 11 On Ranges Equipped with Warming Drawers:...

Installation Instructions
Page 12
... securely attached to floor or wall. ■ Slide range back so rear range foot is installed, use a flashlight and look underneath the bottom of the range: ■ Look for cleaning or maintenance: For power supply cord-connected ranges: 1. Disconnect power. 2. To check that anti-tip...Failure to floor or wall. ■ Slide range back so rear range foot is moved. Check that range is level. 6. Check that range is level. W10258095A © 2009. Electrical Shock Hazard Disconnect power before operating. If removing the range is necessary for the anti-tip bracket securely...
... securely attached to floor or wall. ■ Slide range back so rear range foot is installed, use a flashlight and look underneath the bottom of the range: ■ Look for cleaning or maintenance: For power supply cord-connected ranges: 1. Disconnect power. 2. To check that anti-tip...Failure to floor or wall. ■ Slide range back so rear range foot is moved. Check that range is level. 6. Check that range is level. W10258095A © 2009. Electrical Shock Hazard Disconnect power before operating. If removing the range is necessary for the anti-tip bracket securely...


