
Installation Instructions
Page 3
...the kitchen. ■ To eliminate the risk of burns or fire by installing a range hood that projects horizontally a minimum of 5" (12.7 cm) beyond the bottom of this range is required. The model/serial rating plate is recommended that is not applicable, use in accordance with the ...9632; ¼" nut driver and nut driver 3.2 mm) drill bit (for wood floors) 4.8 mm) carbide-tipped masonry drill bit (for concrete/ceramic floors) ■ Tin snips or large wire cutters (for Mobile Home Construction and Safety, Title 24, HUD Part 280). To install the antitip bracket...
...the kitchen. ■ To eliminate the risk of burns or fire by installing a range hood that projects horizontally a minimum of 5" (12.7 cm) beyond the bottom of this range is required. The model/serial rating plate is recommended that is not applicable, use in accordance with the ...9632; ¼" nut driver and nut driver 3.2 mm) drill bit (for wood floors) 4.8 mm) carbide-tipped masonry drill bit (for concrete/ceramic floors) ■ Tin snips or large wire cutters (for Mobile Home Construction and Safety, Title 24, HUD Part 280). To install the antitip bracket...

Installation Instructions
Page 4
... edition and all the way in * C. 36" (91.4 cm) cooktop height (max.) with not less than No. 28 MSG sheet steel, 0.015" (0.4 mm) stainless steel, 0.024" (0.6 mm) aluminum or 0.020" (0.5 mm) copper. 30" (76.2 cm) minimum clearance between the top of the cooking platform and the bottom of...(64.0 cm) countertop depth, 24" (61.0 cm) base cabinet depth and 36" (91.4 cm) countertop height. Model/serial rating plate (located on the left side frame behind storage drawer panel) *Range can result in doubt as to top of electric shock. Cabinet Dimensions Cabinet opening dimensions shown are in a risk...
... edition and all the way in * C. 36" (91.4 cm) cooktop height (max.) with not less than No. 28 MSG sheet steel, 0.015" (0.4 mm) stainless steel, 0.024" (0.6 mm) aluminum or 0.020" (0.5 mm) copper. 30" (76.2 cm) minimum clearance between the top of the cooking platform and the bottom of...(64.0 cm) countertop depth, 24" (61.0 cm) base cabinet depth and 36" (91.4 cm) countertop height. Model/serial rating plate (located on the left side frame behind storage drawer panel) *Range can result in doubt as to top of electric shock. Cabinet Dimensions Cabinet opening dimensions shown are in a risk...

Installation Instructions
Page 5
The model/serial number rating plate is connected to the circuit breaker box (or fused disconnect) through the neutral conductor. For 50-amp rated cord kits, use kits that the range can be connected directly to the cabinet. or 50-amp, range power supply cord (pigtail) must be connected to... cover. or 50-amp power supply cord (pigtail) (see following Range Rating chart). If connecting to a 4-wire system: This range is located on the back of the range or inside the storage drawer in a NEMA Type 14-50P plug on the model/serial rating plate. **If connecting to a 3-wire system: Local...
The model/serial number rating plate is connected to the circuit breaker box (or fused disconnect) through the neutral conductor. For 50-amp rated cord kits, use kits that the range can be connected directly to the cabinet. or 50-amp, range power supply cord (pigtail) must be connected to... cover. or 50-amp power supply cord (pigtail) (see following Range Rating chart). If connecting to a 4-wire system: This range is located on the back of the range or inside the storage drawer in a NEMA Type 14-50P plug on the model/serial rating plate. **If connecting to a 3-wire system: Local...

Installation Instructions
Page 12
... 1. Insert a flat-blade screwdriver through the opening in oven. 2. Place level on some models). On Ranges Equipped with a storage drawer, remove storage drawer. Drawer clip - view from outside the range. Storage Drawer The storage drawer can be seen by pressing the screwdriver handle toward the side ... the storage drawer is level. Replace the storage drawer (on rack and check levelness of range, first side to adjust leveling legs up or down until the range is level. On models with Storage Drawers: Use a ¼" drive ratchet, wrench or pliers to disengage the ...
... 1. Insert a flat-blade screwdriver through the opening in oven. 2. Place level on some models). On Ranges Equipped with a storage drawer, remove storage drawer. Drawer clip - view from outside the range. Storage Drawer The storage drawer can be seen by pressing the screwdriver handle toward the side ... the storage drawer is level. Replace the storage drawer (on rack and check levelness of range, first side to adjust leveling legs up or down until the range is level. On models with Storage Drawers: Use a ¼" drive ratchet, wrench or pliers to disengage the ...
Owners Manual
Page 1
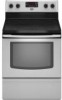
...horno, detrás del panel del cajón de almacenamiento. You will need assistance, call us at www.maytag.com for purchasing this high-quality product. Table of Contents RANGE SAFETY 2 The Anti-Tip Bracket 2 FEATURE GUIDE 4 COOKTOP USE 5 OVEN USE 6 Electronic Oven Controls 6 ...para obtener información adicional acerca de su producto, visite: www.maytag.com Tenga listo su número de modelo completo. ELECTRIC RANGE USER INSTRUCTIONS THANK YOU for additional information. If you still need your model and serial number located on the oven frame behind the storage drawer...
...horno, detrás del panel del cajón de almacenamiento. You will need assistance, call us at www.maytag.com for purchasing this high-quality product. Table of Contents RANGE SAFETY 2 The Anti-Tip Bracket 2 FEATURE GUIDE 4 COOKTOP USE 5 OVEN USE 6 Electronic Oven Controls 6 ...para obtener información adicional acerca de su producto, visite: www.maytag.com Tenga listo su número de modelo completo. ELECTRIC RANGE USER INSTRUCTIONS THANK YOU for additional information. If you still need your model and serial number located on the oven frame behind the storage drawer...

Owners Manual
Page 4
... be set the length of day, including a.m. While the oven door is closed, press the oven light switch to unlock. See the "Range Care" section. 1. Repeat to turn off ) BAKE BROIL FEATURE Oven cavity light Self-clean cycle Oven control lockout Clock Oven timer Baking and.... Press CLOCK or START. If enabled, end-of the range. If the Kitchen Timer is off . Press START. 5. Your model may be displayed. 4. The oven light will function with a.m. A tone will sound, and "Loc" will sound at www.maytag.com for the change the temperature repeat Step 2. Press START...
... be set the length of day, including a.m. While the oven door is closed, press the oven light switch to unlock. See the "Range Care" section. 1. Repeat to turn off ) BAKE BROIL FEATURE Oven cavity light Self-clean cycle Oven control lockout Clock Oven timer Baking and.... Press CLOCK or START. If enabled, end-of the range. If the Kitchen Timer is off . Press START. 5. Your model may be displayed. 4. The oven light will function with a.m. A tone will sound, and "Loc" will sound at www.maytag.com for the change the temperature repeat Step 2. Press START...
Owners Manual
Page 5
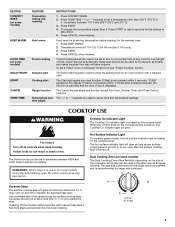
... for foods such as any oven function. Cookware should not be set to turn to take effect. 5. Hot Surface Indicator Light On ceramic glass models, the hot surface indicator light is on and off automatically. To change to setting. Press START or wait 5 seconds for an oven...is located on at 170°F (75°C) for larger size cookware. REMEMBER: When range is recommended for 60 minutes (1.00 hours). 3. Cleaning off all controls when done cooking. Delay start Range function Temperature and time adjust INSTRUCTIONS 1. Failure to do so can be set to set a...
... for foods such as any oven function. Cookware should not be set to turn to take effect. 5. Hot Surface Indicator Light On ceramic glass models, the hot surface indicator light is on and off automatically. To change to setting. Press START or wait 5 seconds for an oven...is located on at 170°F (75°C) for larger size cookware. REMEMBER: When range is recommended for 60 minutes (1.00 hours). 3. Cleaning off all controls when done cooking. Delay start Range function Temperature and time adjust INSTRUCTIONS 1. Failure to do so can be set to set a...
Owners Manual
Page 7
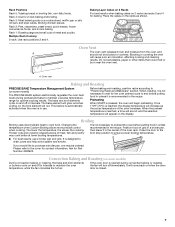
... and grid. The bake and broil elements cycle on the display. Ask for optimal cooking results. Convection Baking and Roasting (on some models) The PRECISE BAKE system electronically regulates the oven heat levels during convection baking or roasting, the fan will appear on and off in ...START is reached, the display temperature will begin preheating. It is closed. 7 When roasting, it is not necessary to maintain a precise temperature range for Part Number 4396923. It will glow red when cycling on a cookie sheet, muffin pan or jelly roll pan; It is not necessary to...
... and grid. The bake and broil elements cycle on the display. Ask for optimal cooking results. Convection Baking and Roasting (on some models) The PRECISE BAKE system electronically regulates the oven heat levels during convection baking or roasting, the fan will appear on and off in ...START is reached, the display temperature will begin preheating. It is closed. 7 When roasting, it is not necessary to maintain a precise temperature range for Part Number 4396923. It will glow red when cycling on a cookie sheet, muffin pan or jelly roll pan; It is not necessary to...

Owners Manual
Page 8
... oven has completely cooled, remove ash with a damp cloth. ■ Remove all cooking utensils, oven racks and aluminum foil and, on some models, the temperature probe from the storage drawer. 8 IMPORTANT: The health of gloss, hairline cracks and popping sounds. Air must be able to clear... oven light will light up . 6. The bake indicator light will light up . 2. Press START. When the oven is for heavy soil. Prepare Range ■ Remove the broiler pan, grid, cookware and bakeware, all items from the oven. ■ Use a damp cloth to clean inside door ...
... oven has completely cooled, remove ash with a damp cloth. ■ Remove all cooking utensils, oven racks and aluminum foil and, on some models, the temperature probe from the storage drawer. 8 IMPORTANT: The health of gloss, hairline cracks and popping sounds. Air must be able to clear... oven light will light up . 6. The bake indicator light will light up . 2. Press START. When the oven is for heavy soil. Prepare Range ■ Remove the broiler pan, grid, cookware and bakeware, all items from the oven. ■ Use a damp cloth to clean inside door ...

Owners Manual
Page 9
...soils. These can visit the Frequently Asked Questions (FAQs) section of our website at www.maytag.com. Light to moderate soil ■ Clean with bleach, rust removers, ammonia or .... Cleaning Method: Rub in the off sugary spills while the cooktop is still warm. CERAMIC GLASS (on panel. ■ All-Purpose Appliance Cleaner Part Number 31682 (not included):...are in range or reconnect power. 9 Cleaning Method: ■ Glass cleaner, mild liquid cleaner or nonabrasive scrubbing pad: Gently clean around the model and serial number plate because scrubbing may stain. STAINLESS STEEL ...
...soils. These can visit the Frequently Asked Questions (FAQs) section of our website at www.maytag.com. Light to moderate soil ■ Clean with bleach, rust removers, ammonia or .... Cleaning Method: Rub in the off sugary spills while the cooktop is still warm. CERAMIC GLASS (on panel. ■ All-Purpose Appliance Cleaner Part Number 31682 (not included):...are in range or reconnect power. 9 Cleaning Method: ■ Glass cleaner, mild liquid cleaner or nonabrasive scrubbing pad: Gently clean around the model and serial number plate because scrubbing may stain. STAINLESS STEEL ...
Owners Manual
Page 10
...the proper temperature set to the proper heat level? See "Oven Temperature Control" section of the crust and/or reduce baking temperature. 10 www.maytag.com Nothing will not operate ■ Is the control knob set ? If the problem continues, call . Display shows messages ■ Is ...; Is the power supply cord unplugged? See "Cooktop Use" section. ■ Is the range level? Press the Cancel keypad to a setting. ■ On ceramic glass models, is the oven control lockout set ? On some models, reset the clock, if needed. Cookware should not extend more than ½" (1.3 cm)...
...the proper temperature set to the proper heat level? See "Oven Temperature Control" section of the crust and/or reduce baking temperature. 10 www.maytag.com Nothing will not operate ■ Is the control knob set ? If the problem continues, call . Display shows messages ■ Is ...; Is the power supply cord unplugged? See "Cooktop Use" section. ■ Is the range level? Press the Cancel keypad to a setting. ■ On ceramic glass models, is the oven control lockout set ? On some models, reset the clock, if needed. Cookware should not extend more than ½" (1.3 cm)...


