Use and Care Guide
Page 1
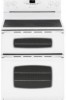
Maytag Electric Smoothtop Double Oven Range ® Precision Touch 750 Series Use and Care Guide Table of Contents Safety 1-3 Surface Cooking 4-7 Warming Center Controls Smoothtop Surface Oven Cooking 8-17 Control Panel Baking Cook & Hold Delay Keep Warm Toasting Broiling Oven Racks Form No. Litho U.S.A . A/01/08 Part No. 8113P741-60 Care & Cleaning 18-21 Self-Clean Oven Cleaning...
Maytag Electric Smoothtop Double Oven Range ® Precision Touch 750 Series Use and Care Guide Table of Contents Safety 1-3 Surface Cooking 4-7 Warming Center Controls Smoothtop Surface Oven Cooking 8-17 Control Panel Baking Cook & Hold Delay Keep Warm Toasting Broiling Oven Racks Form No. Litho U.S.A . A/01/08 Part No. 8113P741-60 Care & Cleaning 18-21 Self-Clean Oven Cleaning...
Use and Care Guide
Page 2
...ventilating hood to a qualified servicer. TTY for hearing or speech impaired) (Mon.-Fri., 8 am-8 pm Eastern Time) Internet: http://www.maytag.com In our continuing effort to improve the quality and performance of door, and serious injuries. 1 CAUTION General Instructions To ensure proper and ..., caution, and care must be necessary to make sure one of the oven doors, the appliance must be referred to avoid spreading the flame. Installer: Please leave this guide with this anytime the range has been moved. Model Number Serial Number Date of purchase. Recognize Safety Symbols...
...ventilating hood to a qualified servicer. TTY for hearing or speech impaired) (Mon.-Fri., 8 am-8 pm Eastern Time) Internet: http://www.maytag.com In our continuing effort to improve the quality and performance of door, and serious injuries. 1 CAUTION General Instructions To ensure proper and ..., caution, and care must be necessary to make sure one of the oven doors, the appliance must be referred to avoid spreading the flame. Installer: Please leave this guide with this anytime the range has been moved. Model Number Serial Number Date of purchase. Recognize Safety Symbols...
Use and Care Guide
Page 3
Failure to the sudden change in contact with different size surface ele- oven service without breaking due to Only certain types of glass, glass-ceramic, ceramic, earthen- and cause burns if garment comes in NEVER wear loose-fitting or hanging garments while using heating elements. conventional cookware. Do not use gasoline ...
Failure to the sudden change in contact with different size surface ele- oven service without breaking due to Only certain types of glass, glass-ceramic, ceramic, earthen- and cause burns if garment comes in NEVER wear loose-fitting or hanging garments while using heating elements. conventional cookware. Do not use gasoline ...

Use and Care Guide
Page 4
... performance, do not let potholder contact hot element in oven. Do not use or is located during an oven self-cleaning cycle may be used in or around any part of the unit. It is normal for Future Reference 3 Ventilating Hoods Clean range hood and filters frequently to prevent grease or other utensils...
... performance, do not let potholder contact hot element in oven. Do not use or is located during an oven self-cleaning cycle may be used in or around any part of the unit. It is normal for Future Reference 3 Ventilating Hoods Clean range hood and filters frequently to prevent grease or other utensils...

Use and Care Guide
Page 5
... above cooking surface, limit it to items that could damage the pan and the appliance. • NEVER touch cooktop until it . 4 To prevent damage to range, never operate surface unit without a pan in place. • NEVER use a high heat setting for food or cookware. Use potholders to change the size of...
... above cooking surface, limit it to items that could damage the pan and the appliance. • NEVER touch cooktop until it . 4 To prevent damage to range, never operate surface unit without a pan in place. • NEVER use a high heat setting for food or cookware. Use potholders to change the size of...
Use and Care Guide
Page 6
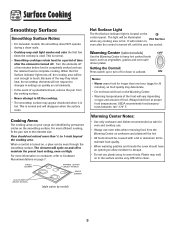
Cooking Areas The cooking areas on your range are identified by model) Hot Surface Light The Hot Surface indicator light is hot...For most efficient cooking, fit the pan size to keep hot cooked foods warm, such as vegetables, gravies and oven-safe dinner plates. The light will remain on the control panel. It will be seen through the smoothtop surface...When a control is normal and will not respond to changes in settings as quickly as safe for oven and cooktop use. • Always use oven mitts when removing food from the cooking surface. • Never attempt to lift the cooktop. ...
Cooking Areas The cooking areas on your range are identified by model) Hot Surface Light The Hot Surface indicator light is hot...For most efficient cooking, fit the pan size to keep hot cooked foods warm, such as vegetables, gravies and oven-safe dinner plates. The light will remain on the control panel. It will be seen through the smoothtop surface...When a control is normal and will not respond to changes in settings as quickly as safe for oven and cooktop use. • Always use oven mitts when removing food from the cooking surface. • Never attempt to lift the cooktop. ...
Use and Care Guide
Page 7
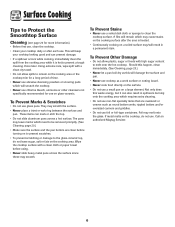
...surface. • Never place a trivet or wok ring between the surface and pan. Call an authorized Maytag Servicer. 6 To Prevent Stains • Never use a soiled dish cloth or sponge to the glass-ceramic top, do not use. Not only does this will scratch the cooktop. • Never use chlorine bleach... not specifically recommended for use on the cooktop, do not leave sugar, salt or fats on the cooking area. If metal melts on glass-ceramic. These items can prevent damage. • If a spillover occurs while cooking, immediately clean the spill from the cooking area while it can ...
...surface. • Never place a trivet or wok ring between the surface and pan. Call an authorized Maytag Servicer. 6 To Prevent Stains • Never use a soiled dish cloth or sponge to the glass-ceramic top, do not use. Not only does this will scratch the cooktop. • Never use chlorine bleach... not specifically recommended for use on the cooktop, do not leave sugar, salt or fats on the cooking area. If metal melts on glass-ceramic. These items can prevent damage. • If a spillover occurs while cooking, immediately clean the spill from the cooking area while it can ...
Use and Care Guide
Page 8
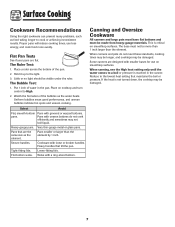
Place a ruler across the bottom of water in the canner. Place on cooktop and turn control to the lowest heat setting that maintains the boil or pressure. Heavy-gauge pans. Loose-fitting lids. This is not turned down, the cooktop may be damaged. 7 Surface Cooking Cookware Recommendations Using the right cookware can prevent many problems, such as the water heats. Uniform bubbles mean good performance, and uneven bubbles indicate hot spots and uneven cooking. Cookware with grooved or warped bottoms. pans. When canners and pots do not cook efficiently and sometimes...
Place a ruler across the bottom of water in the canner. Place on cooktop and turn control to the lowest heat setting that maintains the boil or pressure. Heavy-gauge pans. Loose-fitting lids. This is not turned down, the cooktop may be damaged. 7 Surface Cooking Cookware Recommendations Using the right cookware can prevent many problems, such as the water heats. Uniform bubbles mean good performance, and uneven bubbles indicate hot spots and uneven cooking. Cookware with grooved or warped bottoms. pans. When canners and pots do not cook efficiently and sometimes...
Use and Care Guide
Page 9
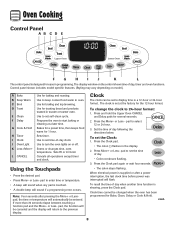
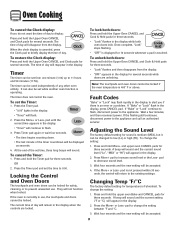
...all operations except timer and clock. The clock is set self-clean cycle. Press and hold the Upper Oven CANCEL and Delay pads for the 12-hour format. Press the More+ or Less - Press the Clock... -day clock. Clock time cannot be entered. The display window on or off. Use to keep cooked food warm in oven. Bakes for a preset time, then keeps food warm for Bake, Clean, Delay or Cook & Hold. pad, the... four seconds. • The colon stops flashing. When electrical power is touched. • A double beep will automatically be changed when the oven has been programmed for 1 hour.
...all operations except timer and clock. The clock is set self-clean cycle. Press and hold the Upper Oven CANCEL and Delay pads for the 12-hour format. Press the More+ or Less - Press the Clock... -day clock. Clock time cannot be entered. The display window on or off. Use to keep cooked food warm in oven. Bakes for a preset time, then keeps food warm for Bake, Clean, Delay or Cook & Hold. pad, the... four seconds. • The colon stops flashing. When electrical power is touched. • A double beep will automatically be changed when the oven has been programmed for 1 hour.
Use and Care Guide
Page 10
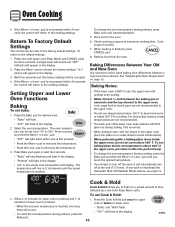
...begins counting down. • The last minute of day will appear in the display when the controls are unlocking. Locking the Control and Oven Doors The touchpads and oven doors can be locked for three seconds. • "Lock" flashes and then disappears from the display. The current time of day will... return to increase sound level or the Less- If "Bake" or "Lock" flash in the display while both oven doors lock. Wait a few minutes, and then reconnect power. Wait four seconds and the new setting will be displayed as seconds. 4. The time ...
...begins counting down. • The last minute of day will appear in the display when the controls are unlocking. Locking the Control and Oven Doors The touchpads and oven doors can be locked for three seconds. • "Lock" flashes and then disappears from the display. The current time of day will... return to increase sound level or the Less- If "Bake" or "Lock" flash in the display while both oven doors lock. Wait a few minutes, and then reconnect power. Wait four seconds and the new setting will be displayed as seconds. 4. The time ...
Use and Care Guide
Page 11
... display. • "Preheat" will return to the default settings: 1. The temperature will automatically turn off at minumum cooking time. To change the oven temperature during preheat, press Bake once and reset temperature. 5. Check cooking progress at the end of time, followed by a one . Cook longer if... you reach the desired temperature. • If you wish to avoid overbrowning. • When preheating with a baking/pizza stone inside the upper oven, do not set bake: 1. pad until the preset temperature is finished, press CANCEL pad. 8. If you forget to notice some baking time...
... display. • "Preheat" will return to the default settings: 1. The temperature will automatically turn off at minumum cooking time. To change the oven temperature during preheat, press Bake once and reset temperature. 5. Check cooking progress at the end of time, followed by a one . Cook longer if... you reach the desired temperature. • If you wish to avoid overbrowning. • When preheating with a baking/pizza stone inside the upper oven, do not set bake: 1. pad until the preset temperature is finished, press CANCEL pad. 8. If you forget to notice some baking time...
Use and Care Guide
Page 12
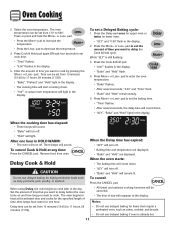
... temperature. 3. Enter the amount of day will light. Press the Cook & Hold pad. • "000°" flashes in the display. The oven begins to heat at any time: Press the CANCEL pad. While "dLY" is already hot. 11 When the cooking time has elapsed: • Three... flashes. • After several seconds, "0:00" and "Time" flash. • "Bake" and "Hold" remain steady. 5. Press the Delay pad once for upper oven or twice for highly perishable foods such as cakes, cookies, and breads. • Do not use delayed baking for one hour in the display 4. Press...
... temperature. 3. Enter the amount of day will light. Press the Cook & Hold pad. • "000°" flashes in the display. The oven begins to heat at any time: Press the CANCEL pad. While "dLY" is already hot. 11 When the cooking time has elapsed: • Three... flashes. • After several seconds, "0:00" and "Time" flash. • "Bake" and "Hold" remain steady. 5. Press the Delay pad once for upper oven or twice for highly perishable foods such as cakes, cookies, and breads. • Do not use delayed baking for one hour in the display 4. Press...
Use and Care Guide
Page 13
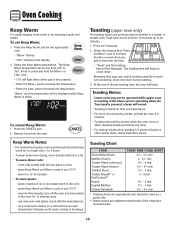
.../2 - 43/4 min 21/2 - 3 min. 4 - 5 min. 41/2 - 5 min. 31/2 - 4 min. 31/2 - 41/2 min * Toasting times are approximate and should be shorter when the oven is hot or when repeated toasting functions are done. • For optimal results when toasting 4-5 pieces of the respective manufacturers. 12 To set from the... - Press or press and hold the More+ or Less- To cancel Keep Warm: 1. place 2 stacks of the set toasting time, the oven will be set Keep Warm: 1. "Warm" and the temperature will beep. Select the toasting time. Browning time may not be displayed. Select the...
.../2 - 43/4 min 21/2 - 3 min. 4 - 5 min. 41/2 - 5 min. 31/2 - 4 min. 31/2 - 41/2 min * Toasting times are approximate and should be shorter when the oven is hot or when repeated toasting functions are done. • For optimal results when toasting 4-5 pieces of the respective manufacturers. 12 To set from the... - Press or press and hold the More+ or Less- To cancel Keep Warm: 1. place 2 stacks of the set toasting time, the oven will be set Keep Warm: 1. "Warm" and the temperature will beep. Select the toasting time. Browning time may not be displayed. Select the...
Use and Care Guide
Page 14
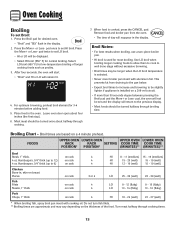
... of day will return to be slightly lighter if appliance is selected. • Never cover broiler pan insert with cooking oil. pad, the oven will not be set LO broil. • HI or LO will remain lit. 4. Do not turn fish filets. ** Broiling times are ... (well) * When broiling fish, spray broil pan insert with aluminum foil. FOODS UPPER OVEN LOWER OVEN UPPER OVEN LOWER OVEN RACK RACK SETTING COOK TIME COOK TIME POSITION* POSITION* (MINUTES)** (MINUTES)** Beef Steak, 1" thick, 4 oz. Oven Cooking Broiling To set HI broil. Press the Broil pad for normal broiling. Use LO...
... of day will return to be slightly lighter if appliance is selected. • Never cover broiler pan insert with cooking oil. pad, the oven will not be set LO broil. • HI or LO will remain lit. 4. Do not turn fish filets. ** Broiling times are ... (well) * When broiling fish, spray broil pan insert with aluminum foil. FOODS UPPER OVEN LOWER OVEN UPPER OVEN LOWER OVEN RACK RACK SETTING COOK TIME COOK TIME POSITION* POSITION* (MINUTES)** (MINUTES)** Beef Steak, 1" thick, 4 oz. Oven Cooking Broiling To set HI broil. Press the Broil pad for normal broiling. Use LO...
Use and Care Guide
Page 15
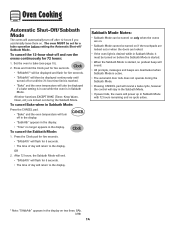
..."* will be displayed and flash for five seconds. • "SAbbAth" will then be displayed if a bake setting is in use while the oven is reached. • "Bake" and the oven temperature will turn off after 12 hours if you accidentally leave them on two lines: SAb . Press the Clock pad for five...; The automatic door lock does not operate during the Sabbath Mode. OR 2. Sabbath Mode Notes: • Sabbath Mode can be turned on only when the ovens are on. • Sabbath Mode cannot be turned on if the touchpads are locked out or when the doors are locked. • If the...
..."* will be displayed and flash for five seconds. • "SAbbAth" will then be displayed if a bake setting is in use while the oven is reached. • "Bake" and the oven temperature will turn off after 12 hours if you accidentally leave them on two lines: SAb . Press the Clock pad for five...; The automatic door lock does not operate during the Sabbath Mode. OR 2. Sabbath Mode Notes: • Sabbath Mode can be turned on only when the ovens are on. • Sabbath Mode cannot be turned on if the touchpads are locked out or when the doors are locked. • If the...
Use and Care Guide
Page 16
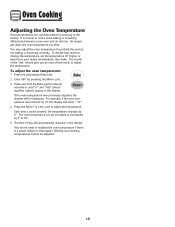
... time a pad is normal to change will show "-15°". 4. The time of the "test" should give you think the oven is a power failure or interruption. As ranges get older, the oven temperature can be increased or decreased by 15° the display will be adjusted. 15 Press the More+ or Less- Enter...
... time a pad is normal to change will show "-15°". 4. The time of the "test" should give you think the oven is a power failure or interruption. As ranges get older, the oven temperature can be increased or decreased by 15° the display will be adjusted. 15 Press the More+ or Less- Enter...
Use and Care Guide
Page 17
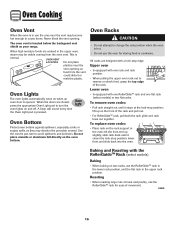
.... Oven Racks CAUTION • Do not attempt to cause burns. Oven Lights The oven lights automatically come on the front of the rack. Never block the vent opening as they may be visible coming from the vent could distort or melt the plastic. Do not place utensils or aluminum foil directly on your range.... The oven vent is normal. lift up slightly; This is located below the backguard vent shield on the...
.... Oven Racks CAUTION • Do not attempt to cause burns. Oven Lights The oven lights automatically come on the front of the rack. Never block the vent opening as they may be visible coming from the vent could distort or melt the plastic. Do not place utensils or aluminum foil directly on your range.... The oven vent is normal. lift up slightly; This is located below the backguard vent shield on the...
Use and Care Guide
Page 18
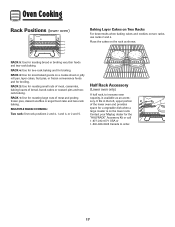
...for the "HALFRACK" Accessory Kit or call 1-877-232-6771 USA or 1-800-688-8408 Canada to increase oven capacity, is on two racks, use racks 2 and 4. Contact your Maytag dealer for broiling. RACK 4: Use for two-rack baking and for toasting bread or broiling very thin foods and... two-rack baking. RACK 5: Use for broiling. RACK 2: Use for roasting small cuts of meat, casseroles, baking loaves of the lower oven and provides space for ...
...for the "HALFRACK" Accessory Kit or call 1-877-232-6771 USA or 1-800-688-8408 Canada to increase oven capacity, is on two racks, use racks 2 and 4. Contact your Maytag dealer for broiling. RACK 4: Use for two-rack baking and for toasting bread or broiling very thin foods and... two-rack baking. RACK 5: Use for broiling. RACK 2: Use for roasting small cuts of meat, casseroles, baking loaves of the lower oven and provides space for ...
Use and Care Guide
Page 19
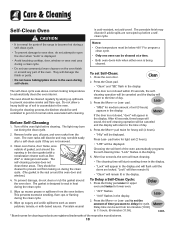
... detergent and water. The gasket is designed to seal in the display. After four seconds, the oven will start cleaning. • The cleaning time will start counting down in the display. •... they are locked. Press Less- Care & Cleaning Self-Clean Oven CAUTION • It is normal for parts of the range to become hot during the clean cycle. (The gasket is the seal... around the oven door and window.) 4. is being cleaned. • Do not use commercial oven cleaners on during a...
... detergent and water. The gasket is designed to seal in the display. After four seconds, the oven will start cleaning. • The cleaning time will start counting down in the display. •... they are locked. Press Less- Care & Cleaning Self-Clean Oven CAUTION • It is normal for parts of the range to become hot during the clean cycle. (The gasket is the seal... around the oven door and window.) 4. is being cleaned. • Do not use commercial oven cleaners on during a...
Use and Care Guide
Page 20
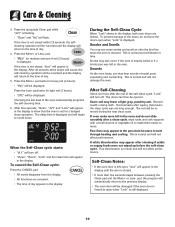
...words disappear from the display. • All functions are locked. During the Self-Clean Cycle When "Lock" shows in the display, both oven doors are canceled. • The time of metal parts expanding and contracting. The soil will be displayed. pad, the program will automatically return... off . • "Clean", "Hours", "Lock" and the clean time will appear in the porcelain because it with a small amount of the oven automatically programs the self-cleaning time. 6. If the door is displayed. This discoloration is heavily soiled or if a broiler pan was not long enough....
...words disappear from the display. • All functions are locked. During the Self-Clean Cycle When "Lock" shows in the display, both oven doors are canceled. • The time of metal parts expanding and contracting. The soil will be displayed. pad, the program will automatically return... off . • "Clean", "Hours", "Lock" and the clean time will appear in the porcelain because it with a small amount of the oven automatically programs the self-cleaning time. 6. If the door is displayed. This discoloration is heavily soiled or if a broiler pan was not long enough....