
Use and Care Guide
Page 2
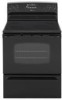
... from the appliance before operating it. ALLRANGCEASN IPAND CAUSE iNJURiES TO PERSONS o INSTALL ANTI-TIP DEVICE PACKED WiTH RANGE FOLLOW ALL iNSTALLATiON WARNING: 7o rednce risk of tipping of Purchase if _ou have questions, calh Maytag Customer Assistance 1-800-688-9900 USA 1-800-688-2002 Canada 1-800-688-2080... specifically recommended in the bracket slot. replace any paRRof your appliance unless it may become warm or hot. In Case of fire, electric shock, personal injury or damage to a qualified servicer. Use appliance only for future reference. The anti-tip device secures the rear ...
... from the appliance before operating it. ALLRANGCEASN IPAND CAUSE iNJURiES TO PERSONS o INSTALL ANTI-TIP DEVICE PACKED WiTH RANGE FOLLOW ALL iNSTALLATiON WARNING: 7o rednce risk of tipping of Purchase if _ou have questions, calh Maytag Customer Assistance 1-800-688-9900 USA 1-800-688-2002 Canada 1-800-688-2080... specifically recommended in the bracket slot. replace any paRRof your appliance unless it may become warm or hot. In Case of fire, electric shock, personal injury or damage to a qualified servicer. Use appliance only for future reference. The anti-tip device secures the rear ...
Use and Care Guide
Page 15
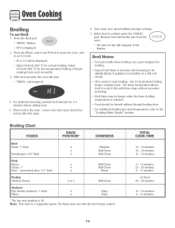
... When food is #5. The times may be longer when the lower broiling temperature is selected. ° Food should be slightly lighter if appliance is installed on a 208-volt circuit. , HI is a suggested guide. Place food in the display. The lower temperature allows food to cook to the well...10 minutes 22 - 26 minutes 8 - 12 minutes LO Broil 28 - 38 minutes 10- 15 minutes 8 - 12 minutes 14 Leave oven door open about four inches (the first stop]. 6, Turn meat once about halfway through broiling time. ° For additional broiling tips and temperatures, refer to set Broil: 1. Q To set...
... When food is #5. The times may be longer when the lower broiling temperature is selected. ° Food should be slightly lighter if appliance is installed on a 208-volt circuit. , HI is a suggested guide. Place food in the display. The lower temperature allows food to cook to the well...10 minutes 22 - 26 minutes 8 - 12 minutes LO Broil 28 - 38 minutes 10- 15 minutes 8 - 12 minutes 14 Leave oven door open about four inches (the first stop]. 6, Turn meat once about halfway through broiling time. ° For additional broiling tips and temperatures, refer to set Broil: 1. Q To set...
Use and Care Guide
Page 26
... name, address and telephone number. Proof of these warranties. b. Electric Range Warranty Full One Year Warranty Parts and Labor Forone (1) year from Maytag ServicessM,Maytag Customer Assistance. 25 parts listed below which fail during the first year: Canadian Residents Thiswarrant} covers omy :hose appliances installed in norma home use . 5. Transport the appliance to state. e. any...
... name, address and telephone number. Proof of these warranties. b. Electric Range Warranty Full One Year Warranty Parts and Labor Forone (1) year from Maytag ServicessM,Maytag Customer Assistance. 25 parts listed below which fail during the first year: Canadian Residents Thiswarrant} covers omy :hose appliances installed in norma home use . 5. Transport the appliance to state. e. any...
Installation Manual
Page 1
... install or service this range is not applicable, the Standard for Manufactured Home Installations 1982 (Manufactured Home Sites, Communities and Set-Ups), ANSI A225.1-1atest edition, or with cabinets that have a lower working temperature than 194°F, discoloration, delamination or melting may be sealed. INSTALLER: IN LEAVE THESE INSTRUCTIONS ON WITH THE APPLIANCE MANUAL Electric 30-inch...
... install or service this range is not applicable, the Standard for Manufactured Home Installations 1982 (Manufactured Home Sites, Communities and Set-Ups), ANSI A225.1-1atest edition, or with cabinets that have a lower working temperature than 194°F, discoloration, delamination or melting may be sealed. INSTALLER: IN LEAVE THESE INSTRUCTIONS ON WITH THE APPLIANCE MANUAL Electric 30-inch...

Installation Manual
Page 2
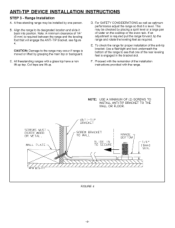
... USE OFTHE LOCAL ELECTRICAL INSPECTOR, FIGURE 1 NOTE: Figure may be avoided. To eliminate the risk of actual unit. If cabinet storage is to be provided, the risk can be reduced by installing a range hood that projects horizontally a minimum of 5 inches (13 cm) ...beyond the bottom of wood or metal cabinet is protected by reaching over heated surface units, cabinet storage space located above the surface units should be installed adjacent to (0" from) combustible walls 1, 2 & 3. "A" = 30 inches (76...
... USE OFTHE LOCAL ELECTRICAL INSPECTOR, FIGURE 1 NOTE: Figure may be avoided. To eliminate the risk of actual unit. If cabinet storage is to be provided, the risk can be reduced by installing a range hood that projects horizontally a minimum of 5 inches (13 cm) ...beyond the bottom of wood or metal cabinet is protected by reaching over heated surface units, cabinet storage space located above the surface units should be installed adjacent to (0" from) combustible walls 1, 2 & 3. "A" = 30 inches (76...
Installation Manual
Page 3
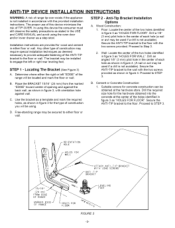
...3 -3- The bracket may be installed to the floor with the provided installation instructions. STEP 2 - Wood Construction: 1. a. Secure the ANTI-TIP bracket to STEP 3. D. ANTI-TIP DEVICE INSTALLATION INSTRUCTIONS WARNING: A risk of range tip-over exists if the appliance is not installed in accordance with the two screws... 1/8" (3 mm) pilot hole in the center of the holes identified in figure 3 as shown in figure 4. Free-standing range may require special installation techniques as shown in figure 4. (A nail or awl may be located and mark the floor or wall. Proceed to STEP ...
...3 -3- The bracket may be installed to the floor with the provided installation instructions. STEP 2 - Wood Construction: 1. a. Secure the ANTI-TIP bracket to STEP 3. D. ANTI-TIP DEVICE INSTALLATION INSTRUCTIONS WARNING: A risk of range tip-over exists if the appliance is not installed in accordance with the two screws... 1/8" (3 mm) pilot hole in the center of the holes identified in figure 3 as shown in figure 4. Free-standing range may require special installation techniques as shown in figure 4. (A nail or awl may be located and mark the floor or wall. Proceed to STEP ...
Installation Manual
Page 4
... TO WALL SLIDE IN TO SECURE [ 6mm ] RANGoE?I/4" MIN. U. This may be installed by one of the range to see figure 4. WALL PLATE ART# 9215-117 NOTE: USE A MINIMUM OF (2) SCREWS TO INSTALL ANTI-TIP BRACKET TO THE WALL OR FLOOR. Coil tops are lift-up top. To ...or lifted by placing a spirit level or a large pan of the installation instructions provided with a glass top have a non lift-up . SCREWS MUST ENTER WOOD QR METAL. FIGURE 4 -4- All freestanding ranges with the range. Align the range to the range may be checked by grasping the main top or backguard. A free-...
... TO WALL SLIDE IN TO SECURE [ 6mm ] RANGoE?I/4" MIN. U. This may be installed by one of the range to see figure 4. WALL PLATE ART# 9215-117 NOTE: USE A MINIMUM OF (2) SCREWS TO INSTALL ANTI-TIP BRACKET TO THE WALL OR FLOOR. Coil tops are lift-up top. To ...or lifted by placing a spirit level or a large pan of the installation instructions provided with a glass top have a non lift-up . SCREWS MUST ENTER WOOD QR METAL. FIGURE 4 -4- All freestanding ranges with the range. Align the range to the range may be checked by grasping the main top or backguard. A free-...
Installation Manual
Page 5
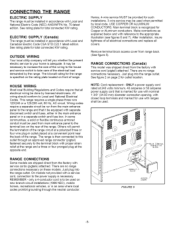
... to this outlet through the neutral conductor. The range is necessary. Just plug into the range outlet. On models not provided with reference to Local and National Electrical Codes. After installation, insure tightness of the range. ONLY a power supply cord rated at a ...convenient point near the back of all electrical connections and replace all electrical wiring be done by the range. CONNECTING THE RANGE ELECTRIC SUPPLY The range must be installed in accordance with Local and Canadian Electric Code CSA STD.C22.1 latest edition. All wiring should conform...
... to this outlet through the neutral conductor. The range is necessary. Just plug into the range outlet. On models not provided with reference to Local and National Electrical Codes. After installation, insure tightness of the range. ONLY a power supply cord rated at a ...convenient point near the back of all electrical connections and replace all electrical wiring be done by the range. CONNECTING THE RANGE ELECTRIC SUPPLY The range must be installed in accordance with Local and Canadian Electric Code CSA STD.C22.1 latest edition. All wiring should conform...
Installation Manual
Page 6
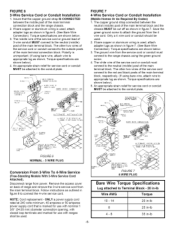
... 4-Wire Service (Free-Standing Models With 3-Wire Service Cord Attached), Disconnect range from the service cord or conduit must connect to connect the 4-wire service cord. RIB FIGURE 7 4-Wire Service Cord or Conduit Installation (Mobile Homes Or As Required By Codes) 1. The copper ground strap ...connected between the middle post of the main terminal connection block and the range chassis. 2. If bare copper or aluminum wiring is used , attach...
... 4-Wire Service (Free-Standing Models With 3-Wire Service Cord Attached), Disconnect range from the service cord or conduit must connect to connect the 4-wire service cord. RIB FIGURE 7 4-Wire Service Cord or Conduit Installation (Mobile Homes Or As Required By Codes) 1. The copper ground strap ...connected between the middle post of the main terminal connection block and the range chassis. 2. If bare copper or aluminum wiring is used , attach...


