
User Guide
Page 2
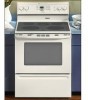
....Do not useanydevicesor accessoriesthat are not specifically recommended in this manual.Donot useeyelidcovers,stovetop grills or add-onoven convectionsystems. The useof devicesor accessoriesthat are notexpresslyrecommendedin this manual can create serious safety hazards, result in performanceproblems,and reducethe.... To ensure proper operationand to avoid damageto the applianceor possibleiniury, do not understand. Tocheck if deviceis properlyinstalled,lookunderneath range with hot heatingelements. NEVERpick up or move a flaming pan. > Oven: Smother fire or flame by closing the...
....Do not useanydevicesor accessoriesthat are not specifically recommended in this manual.Donot useeyelidcovers,stovetop grills or add-onoven convectionsystems. The useof devicesor accessoriesthat are notexpresslyrecommendedin this manual can create serious safety hazards, result in performanceproblems,and reducethe.... To ensure proper operationand to avoid damageto the applianceor possibleiniury, do not understand. Tocheck if deviceis properlyinstalled,lookunderneath range with hot heatingelements. NEVERpick up or move a flaming pan. > Oven: Smother fire or flame by closing the...
User Guide
Page 12
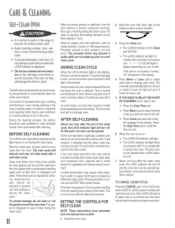
... point, the door can be cleaned to select clean time or change clean time. SETTINGTHE CONTROLSFOR SELF-CLEAN NOTE: These instructions cover automatic lock and manual lock models. 1. Close the ovendoor. Move the door lock lever right to prevent excessive smoking, flare-upsor flaming duringthe cleancycle. IFYOUWISHTO DELAYTHE START OF CLEANING...
... point, the door can be cleaned to select clean time or change clean time. SETTINGTHE CONTROLSFOR SELF-CLEAN NOTE: These instructions cover automatic lock and manual lock models. 1. Close the ovendoor. Move the door lock lever right to prevent excessive smoking, flare-upsor flaming duringthe cleancycle. IFYOUWISHTO DELAYTHE START OF CLEANING...
Installation Manual
Page 1
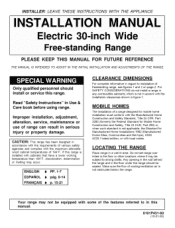
... where it may occur. Make sure the flow of 194°F. CAUTION: This range has been designed in regard to strong drafts. For SAFETY CONSIDERATIONS do not install a range in any combustible cabinetry which is not applicable, the Standard for Mobile Home Construction and...be subject to installation of freestanding range, see figures 1 and 2 on page 2. LOCATING THE RANGE Place range in figure 1. INSTALLER: IN LEAVE THESE INSTRUCTIONS ON WITH THE APPLIANCE MANUAl Electric 30-inch Wide Free-stand" e PLEASE KEEP THIS MANUAL FOR FUTURE REFERENCE THE MANUAL IS INTENDED TO ASSIST IN ...
... where it may occur. Make sure the flow of 194°F. CAUTION: This range has been designed in regard to strong drafts. For SAFETY CONSIDERATIONS do not install a range in any combustible cabinetry which is not applicable, the Standard for Mobile Home Construction and...be subject to installation of freestanding range, see figures 1 and 2 on page 2. LOCATING THE RANGE Place range in figure 1. INSTALLER: IN LEAVE THESE INSTRUCTIONS ON WITH THE APPLIANCE MANUAl Electric 30-inch Wide Free-stand" e PLEASE KEEP THIS MANUAL FOR FUTURE REFERENCE THE MANUAL IS INTENDED TO ASSIST IN ...
Installation Manual
Page 3
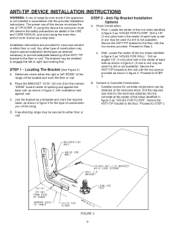
Locating The Bracket (See Figure 3) A. Floor: Locate the center of the two holes identified in the USE and CARE MANUAL and avoid using the oven door and/or lower drawer as a step stool. Drill an angled 1/8" (3 mm) pilot hole in the center of each hole (a ... FOR FLOOR". Secure the ANTI-TIP bracket to the floor or wall. Determine where either floor or wall. I I t [24 rnm] FROM EDGE OF RANGE MARKED EDGE OF RANGE ENTATION HOLE WALL HOLES FOR ATTACH ANTI-TIP BRACKET WITH LONG SCREWS -TIP BRACKET FOOT FIGURE 3 -3- STEP 1 - Use the bracket as a template and mark...
Locating The Bracket (See Figure 3) A. Floor: Locate the center of the two holes identified in the USE and CARE MANUAL and avoid using the oven door and/or lower drawer as a step stool. Drill an angled 1/8" (3 mm) pilot hole in the center of each hole (a ... FOR FLOOR". Secure the ANTI-TIP bracket to the floor or wall. Determine where either floor or wall. I I t [24 rnm] FROM EDGE OF RANGE MARKED EDGE OF RANGE ENTATION HOLE WALL HOLES FOR ATTACH ANTI-TIP BRACKET WITH LONG SCREWS -TIP BRACKET FOOT FIGURE 3 -3- STEP 1 - Use the bracket as a template and mark...


