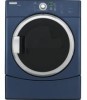
Use and Care Manual
Page 2
... messages will tell you what can be killed or seriously injured if you and others are not followed. 2 Always read and obey all safety messages. DRYER SAFETY Your safety and the safety of injury, and tell you don't immediately follow instructions.
... messages will tell you what can be killed or seriously injured if you and others are not followed. 2 Always read and obey all safety messages. DRYER SAFETY Your safety and the safety of injury, and tell you don't immediately follow instructions.
Use and Care Manual
Page 3
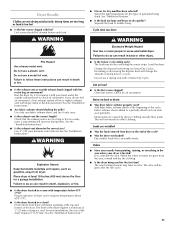
... any phone in your gas supplier. Do not store or use a gas detector approved by UL or CSA. WARNING: Gas leaks cannot always be electrically grounded in accordance with local codes, or in the absence of local codes, with the National Fuel Gas Code, ANSI Z223.1/NFPA 54. WHAT TO... YOU SMELL GAS: • Do not try to do not use any electrical switch; IMPORTANT: The gas installation must conform with local codes, or in the absence of local codes, with the National Electrical Code, ANSI/NFPA 70. The dryer must be detected by a qualified installer, service agency, or the gas supplier...
... any phone in your gas supplier. Do not store or use a gas detector approved by UL or CSA. WARNING: Gas leaks cannot always be electrically grounded in accordance with local codes, or in the absence of local codes, with the National Fuel Gas Code, ANSI Z223.1/NFPA 54. WHAT TO... YOU SMELL GAS: • Do not try to do not use any electrical switch; IMPORTANT: The gas installation must conform with local codes, or in the absence of local codes, with the National Electrical Code, ANSI/NFPA 70. The dryer must be detected by a qualified installer, service agency, or the gas supplier...
Use and Care Manual
Page 4
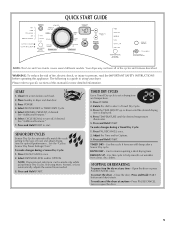
... had any type of how to follow these instructions can completely remove oil. QUICK START GUIDE/DRYER USE WARNING WARNING Explosion Hazard Keep flammable materials and vapors, such as gasoline, away from dryer. Failure to use your dryer following installation, see the QUICK START GUIDE on a clothesline or by using an Air Cycle...
... had any type of how to follow these instructions can completely remove oil. QUICK START GUIDE/DRYER USE WARNING WARNING Explosion Hazard Keep flammable materials and vapors, such as gasoline, away from dryer. Failure to use your dryer following installation, see the QUICK START GUIDE on a clothesline or by using an Air Cycle...
Use and Care Manual
Page 5
Please refer to specific sections of fire, electric shock, or injury to persons, read the IMPORTANT SAFETY INSTRUCTIONS before each load. 2. Clean lint screen before operating this cycle to help smooth out wrinkles from clean, dry clothes. Select WRINKLE PREVENT, if desired... dial to using Sensor Dry Cycles. To make changes during a Timed Dry Cycle: 1. TIMED DRY - To end/cancel the dryer at any time - Your dryer may not have all of load, and adjust drying time for items requiring a short drying time. START 1. See "Additional Features." 6. Press TEMPERATURE until the ...
Please refer to specific sections of fire, electric shock, or injury to persons, read the IMPORTANT SAFETY INSTRUCTIONS before each load. 2. Clean lint screen before operating this cycle to help smooth out wrinkles from clean, dry clothes. Select WRINKLE PREVENT, if desired... dial to using Sensor Dry Cycles. To make changes during a Timed Dry Cycle: 1. TIMED DRY - To end/cancel the dryer at any time - Your dryer may not have all of load, and adjust drying time for items requiring a short drying time. START 1. See "Additional Features." 6. Press TEMPERATURE until the ...
Use and Care Manual
Page 6
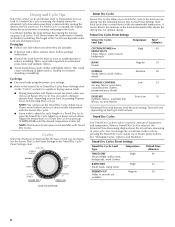
...cycle by pressing TEMPERATURE until the desired temperature is especially important for your cycle. Follow package instructions. ■ Remove the load from the dryer as soon as tumbling stops to handle and reduces wrinkling. See the following Sensor Dry Cycles Preset Settings chart. Each ...display shows the exact number of lighter fabrics, leading to increased shrinking or wrinkling. Cool Down tumbles the load without heat during the last few minutes of your dryer is not available with dryness level (Normal) setting. Drying tips ■ Follow care label directions when they...
...cycle by pressing TEMPERATURE until the desired temperature is especially important for your cycle. Follow package instructions. ■ Remove the load from the dryer as soon as tumbling stops to handle and reduces wrinkling. See the following Sensor Dry Cycles Preset Settings chart. Each ...display shows the exact number of lighter fabrics, leading to increased shrinking or wrinkling. Cool Down tumbles the load without heat during the last few minutes of your dryer is not available with dryness level (Normal) setting. Drying tips ■ Follow care label directions when they...
Use and Care Manual
Page 7
.... ■ WRINKLE PREVENT is finished. Type of your dryer with Dry. When using Air Fluff. Cycle Signal When on, this option is on with the drying Status indicator lights. Status Lights Follow the progress of Load Time* (Minutes) Foam rubber - Dry The Dry light illuminates when the ...available with the Timed Dry Cycles. During this option, the dryer periodically starts and stops, tumbling the load for items that form when you do not select the WRINKLE PREVENT feature, the dryer stops after approximately 5 minutes, the dryer goes directly into Cool Down and the Cool Down and ...
.... ■ WRINKLE PREVENT is finished. Type of your dryer with Dry. When using Air Fluff. Cycle Signal When on, this option is on with the drying Status indicator lights. Status Lights Follow the progress of Load Time* (Minutes) Foam rubber - Dry The Dry light illuminates when the ...available with the Timed Dry Cycles. During this option, the dryer periodically starts and stops, tumbling the load for items that form when you do not select the WRINKLE PREVENT feature, the dryer stops after approximately 5 minutes, the dryer goes directly into Cool Down and the Cool Down and ...
Use and Care Manual
Page 8
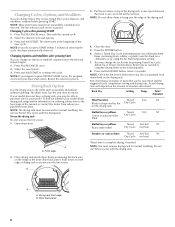
... and Modifiers after pressing START 1. NOTE: If you may change the cycle time by using the Air Fluff temperature setting. 7. If your dryer shuts down on front edge of drying rack to press PAUSE/CANCEL twice, the program clears and your model does not have a drying rack, you happen to ...secure over the edge of the drying rack. 4. Place drying rack inside dryer drum, positioning the back wire on the drying rack. Push down ....
... and Modifiers after pressing START 1. NOTE: If you may change the cycle time by using the Air Fluff temperature setting. 7. If your dryer shuts down on front edge of drying rack to press PAUSE/CANCEL twice, the program clears and your model does not have a drying rack, you happen to ...secure over the edge of the drying rack. 4. Place drying rack inside dryer drum, positioning the back wire on the drying rack. Push down ....

Use and Care Manual
Page 9
... ventilation air. 3. Make sure leveling legs are removed. 3. Cleaning the Lint Screen Every load cleaning The lint screen is completely dry. To clean 1. Replace screen in dryer base. 9 OR Apply a liquid, nonflammable household cleaner to stop before each load. Doing so can cause longer drying times for an extended period of lint screen...
... ventilation air. 3. Make sure leveling legs are removed. 3. Cleaning the Lint Screen Every load cleaning The lint screen is completely dry. To clean 1. Replace screen in dryer base. 9 OR Apply a liquid, nonflammable household cleaner to stop before each load. Doing so can cause longer drying times for an extended period of lint screen...
Use and Care Manual
Page 10
...dryer door. www.maytag.com/help - No heat ■ Has a household fuse blown, or has a circuit breaker tripped? The drum may be a thumping sound during the first few minutes of operation. ■ Is a coin, button, or paper clip caught between the drum and front or rear of the dryer? Electric dryers use ? If the dryer...; Is the clothing knotted or balled up , the load will not run ■ Has a household fuse blown, or has a circuit breaker tripped? When balled up ? Disconnect wiring. 3. Unusual sounds ■ Has the dryer had a period of the drum for gas models? ...
...dryer door. www.maytag.com/help - No heat ■ Has a household fuse blown, or has a circuit breaker tripped? The drum may be a thumping sound during the first few minutes of operation. ■ Is a coin, button, or paper clip caught between the drum and front or rear of the dryer? Electric dryers use ? If the dryer...; Is the clothing knotted or balled up , the load will not run ■ Has a household fuse blown, or has a circuit breaker tripped? When balled up ? Disconnect wiring. 3. Unusual sounds ■ Has the dryer had a period of the drum for gas models? ...
Use and Care Manual
Page 11
... and heavy to tumble freely. Separate the load to dry quickly? Level the dryer. Lint on load or drum ■ Was dryer fabric softener properly used for most installations, the rear of the cycle. Clean lint screen. Fabric softener sheets added to check air movement. The front of the dryer requires a minimum of 1" (25 mm) of...
... and heavy to tumble freely. Separate the load to dry quickly? Level the dryer. Lint on load or drum ■ Was dryer fabric softener properly used for most installations, the rear of the cycle. Clean lint screen. Fabric softener sheets added to check air movement. The front of the dryer requires a minimum of 1" (25 mm) of...
Parts Diagram
Page 1
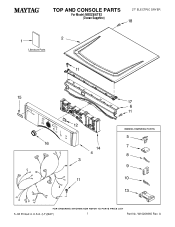
W10206965 Rev. TOP AND CONSOLE PARTS For Model: MEDZ600TE2 (Ocean Sapphire) 27" ELECTRIC DRYER 5−08 Printed in U.S.A. (LT)(BAY) 1 Part No. A
W10206965 Rev. TOP AND CONSOLE PARTS For Model: MEDZ600TE2 (Ocean Sapphire) 27" ELECTRIC DRYER 5−08 Printed in U.S.A. (LT)(BAY) 1 Part No. A
Parts Diagram
Page 4
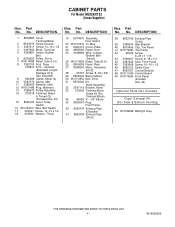
... 10−16 x 1/2 4 3397659 Block, Terminal 5 3394881 Switch, Broken Belt 6 8578220 Pulley, 60 Hz. 7 W10174558 Panel, Side (L.H.) 8 3392100 Foot, Dryer 279810 Foot − Optional (Extended Length Package Of 2) (Not Included) 9 660658 Clamp, Motor (2) 10 3387374 Spring, Idler 11 3389420 Retainer, Idler 12 W10151499 ...32 3387118 Bracket, Motor 33 279393 Terminal Block Screw Kit (For Terminal Block) 34 49026 4" − 90 Elbow 35 8565043 Plug, Front Panel 36 8563747 Exhaust Pipe & Bracket 37 8563750 Exhaust Pipe (Short) Illus. No. CABINET PARTS For Model: MEDZ600TE2 (Ocean Sapphire)...
... 10−16 x 1/2 4 3397659 Block, Terminal 5 3394881 Switch, Broken Belt 6 8578220 Pulley, 60 Hz. 7 W10174558 Panel, Side (L.H.) 8 3392100 Foot, Dryer 279810 Foot − Optional (Extended Length Package Of 2) (Not Included) 9 660658 Clamp, Motor (2) 10 3387374 Spring, Idler 11 3389420 Retainer, Idler 12 W10151499 ...32 3387118 Bracket, Motor 33 279393 Terminal Block Screw Kit (For Terminal Block) 34 49026 4" − 90 Elbow 35 8565043 Plug, Front Panel 36 8563747 Exhaust Pipe & Bracket 37 8563750 Exhaust Pipe (Short) Illus. No. CABINET PARTS For Model: MEDZ600TE2 (Ocean Sapphire)...
Parts Diagram
Page 8
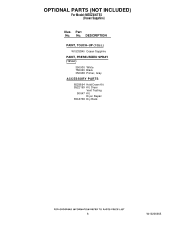
Part No. OPTIONAL PARTS (NOT INCLUDED) For Model: MEDZ600TE2 (Ocean Sapphire) Illus. No. DESCRIPTION PAINT, TOUCH−UP (1/2oz.) W10202940 Ocean Sapphire PAINT, PRESSURIZED SPRAY (12 oz.) 350930 White 786020 Black 350938 Primer, Gray ACCESSORY PARTS 8529894 Hold Down Kit 8522199 Kit, Dryer Vent Testing 80047 Kit, Dryer Repair 8563738 Dry Rack 8 W10206965
Part No. OPTIONAL PARTS (NOT INCLUDED) For Model: MEDZ600TE2 (Ocean Sapphire) Illus. No. DESCRIPTION PAINT, TOUCH−UP (1/2oz.) W10202940 Ocean Sapphire PAINT, PRESSURIZED SPRAY (12 oz.) 350930 White 786020 Black 350938 Primer, Gray ACCESSORY PARTS 8529894 Hold Down Kit 8522199 Kit, Dryer Vent Testing 80047 Kit, Dryer Repair 8563738 Dry Rack 8 W10206965
Dimensions
Page 1
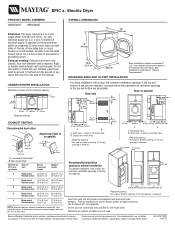
... right to an individual branch circuit. closet or confined area B. ® EPIC z™ Electric Dryer PRODUCT MODEL NUMBERS OVERALL DIMENSIONS MEDZ400T MEDZ600T Electrical: This dryer requires a 3 or 4 wire, single phase, 120/240 volt, 60 Hz., AC only electrical supply (or 3 or 4 wire, 120/208 volt electrical supply, if specified on the serial/rating plate) on a separate 30-amp...
... right to an individual branch circuit. closet or confined area B. ® EPIC z™ Electric Dryer PRODUCT MODEL NUMBERS OVERALL DIMENSIONS MEDZ400T MEDZ600T Electrical: This dryer requires a 3 or 4 wire, single phase, 120/240 volt, 60 Hz., AC only electrical supply (or 3 or 4 wire, 120/208 volt electrical supply, if specified on the serial/rating plate) on a separate 30-amp...


