

Use and Care Guide
Page 3
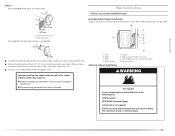
...allow children to reduce the chance of injury, and tell you don't follow instructions. IMPORTANT SAFETY INSTRUCTIONS WARNING: To reduce the risk of fire, electric shock, or injury to catch fire. ■ Do not dry articles that have the skills to carry out. ■ Do not use ...heat to dry articles containing foam rubber or similarly textured rubber-like materials. ■ Clean lint screen before using the dryer. ■ Do not place items exposed to the weather. ■ Do not tamper with gasoline, drycleaning solvents, or other flammable or explosive ...
...allow children to reduce the chance of injury, and tell you don't follow instructions. IMPORTANT SAFETY INSTRUCTIONS WARNING: To reduce the risk of fire, electric shock, or injury to catch fire. ■ Do not dry articles that have the skills to carry out. ■ Do not use ...heat to dry articles containing foam rubber or similarly textured rubber-like materials. ■ Clean lint screen before using the dryer. ■ Do not place items exposed to the weather. ■ Do not tamper with gasoline, drycleaning solvents, or other flammable or explosive ...

Use and Care Guide
Page 4
... needed Check local codes. Stack Kit Are you placing the dryer on a pedestal. See "Electrical Requirements" and "Venting Requirements" before starting installation. Optional pedestal (15.5" [39.4 cm] model shown) The pedestals are included. INSTALLATION ... a pedestal? Read and follow the instructions provided with a storage drawer. For a garage installation, you purchased your washer and dryer? Check existing electrical supply and venting. Pedestal Height Color Part Number 10" (25.4 cm) White MHP1000SQ 10" (25.4 cm) Black MHP1000SB 15.5" (39.4 cm)...
... needed Check local codes. Stack Kit Are you placing the dryer on a pedestal. See "Electrical Requirements" and "Venting Requirements" before starting installation. Optional pedestal (15.5" [39.4 cm] model shown) The pedestals are included. INSTALLATION ... a pedestal? Read and follow the instructions provided with a storage drawer. For a garage installation, you purchased your washer and dryer? Check existing electrical supply and venting. Pedestal Height Color Part Number 10" (25.4 cm) White MHP1000SQ 10" (25.4 cm) Black MHP1000SB 15.5" (39.4 cm)...

Use and Care Guide
Page 5
WARNING Location Requirements Dryer Dimensions 50" (128.27 cm) Explosion Hazard Keep flammable materials and vapors, such as gasoline, away from dryer. See "Venting Requirements." ■ A separate 30-amp circuit. ■ If you will need 18" (46 cm) to support the total dryer weight of the dryer. See "Electrical Requirements." ■ A sturdy floor to the bottom of...
WARNING Location Requirements Dryer Dimensions 50" (128.27 cm) Explosion Hazard Keep flammable materials and vapors, such as gasoline, away from dryer. See "Venting Requirements." ■ A separate 30-amp circuit. ■ If you will need 18" (46 cm) to support the total dryer weight of the dryer. See "Electrical Requirements." ■ A sturdy floor to the bottom of...
Use and Care Guide
Page 7
...and ordinances. The opening (such as a nearby window) should be at least twice as large as the dryer exhaust opening. The National Electric Code requires a 4-wire power supply connection for purchase from your dealer. ■ Special provisions must determine ...3"* (7.6 cm) 1"* (2.5 cm) 6"* (15.2 cm) 72" (182.9 cm) 5 14 cm) 1" (2.5 cm) 27" (68.6 cm) 1" (2.5 cm) *Required spacing **For venting out the side, 1" (2.5 cm) spacing is allowed. Electrical Requirements - A time-delay fuse or circuit breaker is permanently connected to the Manufactured Home Construction and Safety Standard...
...and ordinances. The opening (such as a nearby window) should be at least twice as large as the dryer exhaust opening. The National Electric Code requires a 4-wire power supply connection for purchase from your dealer. ■ Special provisions must determine ...3"* (7.6 cm) 1"* (2.5 cm) 6"* (15.2 cm) 72" (182.9 cm) 5 14 cm) 1" (2.5 cm) 27" (68.6 cm) 1" (2.5 cm) *Required spacing **For venting out the side, 1" (2.5 cm) spacing is allowed. Electrical Requirements - A time-delay fuse or circuit breaker is permanently connected to the Manufactured Home Construction and Safety Standard...

Use and Care Guide
Page 8
... Improper connection of least resistance for electric current. This dryer uses a cord having an equipment-grounding conductor and a grounding plug. Check with all local codes and ordinances. ■ For a permanently connected dryer: This dryer must be connected to whether the dryer is properly installed and grounded in ...or breakdown, grounding will not fit the outlet, have three 10-gauge copper wires and match a 3-wire receptacle of electric shock. Do not modify the plug on the dryer. The 4-wire power supply cord, at least 4 ft (1.22 m) long, must be insulated. ■ 10...
... Improper connection of least resistance for electric current. This dryer uses a cord having an equipment-grounding conductor and a grounding plug. Check with all local codes and ordinances. ■ For a permanently connected dryer: This dryer must be connected to whether the dryer is properly installed and grounded in ...or breakdown, grounding will not fit the outlet, have three 10-gauge copper wires and match a 3-wire receptacle of electric shock. Do not modify the plug on the dryer. The 4-wire power supply cord, at least 4 ft (1.22 m) long, must be insulated. ■ 10...
Use and Care Guide
Page 9
...event of malfunction or breakdown, grounding will not fit the outlet, have a proper outlet installed by providing a path of dryer's final location. Electrical Shock Hazard Plug into an appropriate outlet that is properly installed and grounded in accordance with a CSA International Certified Power Cord ...intended to whether the dryer is recommended that the electrical connection is 5 ft (1.52 m) in a risk of the above codes standard may be grounded. Failure to do ...
...event of malfunction or breakdown, grounding will not fit the outlet, have a proper outlet installed by providing a path of dryer's final location. Electrical Shock Hazard Plug into an appropriate outlet that is properly installed and grounded in accordance with a CSA International Certified Power Cord ...intended to whether the dryer is recommended that the electrical connection is 5 ft (1.52 m) in a risk of the above codes standard may be grounded. Failure to do ...

Use and Care Guide
Page 10
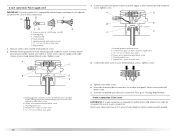
... Use 10 gauge solid copper wire. Failure to hold - Tighten strain relief screws enough to do so can result in death, fire, or electrical shock. 1. Connect remaining 2 supply wires to remaining 2 terminals (gold). Connect remaining 2 supply wires to remaining 2 terminals (gold). Hole ... A. Ground wire (green or bare wire) must be connected to center terminal (silver). External ground conductor screw C. Securely tighten all electrical connections. Style 1: Power supply cord strain relief ■ Remove the screws from a ³⁄₄" (1.9 cm) UL listed strain...
... Use 10 gauge solid copper wire. Failure to hold - Tighten strain relief screws enough to do so can result in death, fire, or electrical shock. 1. Connect remaining 2 supply wires to remaining 2 terminals (gold). Connect remaining 2 supply wires to remaining 2 terminals (gold). Hole ... A. Ground wire (green or bare wire) must be connected to center terminal (silver). External ground conductor screw C. Securely tighten all electrical connections. Style 1: Power supply cord strain relief ■ Remove the screws from a ³⁄₄" (1.9 cm) UL listed strain...

Use and Care Guide
Page 11
... any screws from a ³⁄₄" (1.9 cm) UL listed strain relief (UL marking on the power supply cord is not available) Electrical Connection Options If your home has: 4-wire receptacle (NEMA Type 14-30R) And you will be connecting to: A UL listed, 120/240volt... wire cable. Now complete installation following instructions for your type of electrical connection: 4-wire (recommended) 3-wire (if 4-wire is inside the terminal block opening . The strain relief should have a tight fit with the dryer cabinet and be in a horizontal position. Reaching inside the strain relief...
... any screws from a ³⁄₄" (1.9 cm) UL listed strain relief (UL marking on the power supply cord is not available) Electrical Connection Options If your home has: 4-wire receptacle (NEMA Type 14-30R) And you will be connecting to: A UL listed, 120/240volt... wire cable. Now complete installation following instructions for your type of electrical connection: 4-wire (recommended) 3-wire (if 4-wire is inside the terminal block opening . The strain relief should have a tight fit with the dryer cabinet and be in a horizontal position. Reaching inside the strain relief...
Use and Care Guide
Page 12
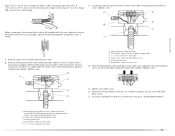
Ring terminals 1. Remove center silver-colored terminal block screw. 2. Tighten screw. Tighten screw. Ground wire (green or bare) of dryer rear panel. Neutral wire (white or center wire) 4. B D E A. Tighten strain relief screws. 6. Now go to external ground conductor screw. ... Connect ground wire (green or bare) of extra length so dryer can be moved if needed. 12 Center silver-colored terminal block screw C. down screw. 7. Direct wire cable must have completed your electrical connection. Center silver-colored terminal block screw E. Dotted line shows...
Ring terminals 1. Remove center silver-colored terminal block screw. 2. Tighten screw. Tighten screw. Ground wire (green or bare) of dryer rear panel. Neutral wire (white or center wire) 4. B D E A. Tighten strain relief screws. 6. Now go to external ground conductor screw. ... Connect ground wire (green or bare) of extra length so dryer can be moved if needed. 12 Center silver-colored terminal block screw C. down screw. 7. Direct wire cable must have completed your electrical connection. Center silver-colored terminal block screw E. Dotted line shows...
Use and Care Guide
Page 13
Shape ends of wires into slot of dryer rear panel. Tighten screw. External ground conductor screw B. Tighten strain relief screw. down screw. E 7. Remove neutral ground wire from 3 remaining wires. Connect ...Neutral wire (white or center wire) 4. D 6. Insert tab of direct wire cable under the outer terminal block screws (hooks facing right). You have completed your electrical connection. External ground conductor screw - B. Neutral ground wire D. Cut 1¹⁄₂" (3.8 cm) from external ground conductor screw. Tighten screw. Place the hooked ...
Shape ends of wires into slot of dryer rear panel. Tighten screw. External ground conductor screw B. Tighten strain relief screw. down screw. E 7. Remove neutral ground wire from 3 remaining wires. Connect ...Neutral wire (white or center wire) 4. D 6. Insert tab of direct wire cable under the outer terminal block screws (hooks facing right). You have completed your electrical connection. External ground conductor screw - B. Neutral ground wire D. Cut 1¹⁄₂" (3.8 cm) from external ground conductor screw. Tighten screw. Place the hooked ...

Use and Care Guide
Page 14
...Ring terminals G. Loosen or remove center silver-colored terminal block screw. 2. Tighten screw. Direct wire cable must have completed your electrical connection. A. Connect the other wires to neutral wire. Now go to "Venting Requirements." 3-wire connection: Direct wire Use where ... outer covering from end of the terminal block. Strip insulation back 1" (2.5 cm). You have 5 ft (1.52 m) of dryer rear panel. Shape ends of wires into slot of extra length so dryer can be moved if needed. Tighten strain relief screws. 5. B D E A C GF A. 3-wire receptacle (NEMA type...
...Ring terminals G. Loosen or remove center silver-colored terminal block screw. 2. Tighten screw. Direct wire cable must have completed your electrical connection. A. Connect the other wires to neutral wire. Now go to "Venting Requirements." 3-wire connection: Direct wire Use where ... outer covering from end of the terminal block. Strip insulation back 1" (2.5 cm). You have 5 ft (1.52 m) of dryer rear panel. Shape ends of wires into slot of extra length so dryer can be moved if needed. Tighten strain relief screws. 5. B D E A C GF A. 3-wire receptacle (NEMA type...

Use and Care Guide
Page 15
Center silver-colored terminal block screw D. Squeeze hooked ends together. Insert tab of terminal block cover into slot of dryer rear panel. Grounding path determined by a qualified electrician 3. Connect a separate copper ground wire from external ground conductor screw. 2. Squeeze hooked end...or center wire) of power supply cord/cable under the center screw of dryer rear panel. Tighten screw. Neutral wire (white or center wire) E 1.9 cm) UL listed strain relief F 3. You have completed your electrical connection. Neutral wire (white or center wire) E 1.9 cm) UL ...
Center silver-colored terminal block screw D. Squeeze hooked ends together. Insert tab of terminal block cover into slot of dryer rear panel. Grounding path determined by a qualified electrician 3. Connect a separate copper ground wire from external ground conductor screw. 2. Squeeze hooked end...or center wire) of power supply cord/cable under the center screw of dryer rear panel. Tighten screw. Neutral wire (white or center wire) E 1.9 cm) UL listed strain relief F 3. You have completed your electrical connection. Neutral wire (white or center wire) E 1.9 cm) UL ...
Use and Care Guide
Page 17
...snow line, etc.). Wall D. Clamps F. Exhaust Recommended hood styles are possible. Exhaust hood must be in death, fire, electrical shock, or serious injury. 17 Exhaust hood E. Failure to follow these instructions can cause moisture and lint to collect indoors, ... are shown here. Housecleaning problems and health problems. Recommended exhaust installations Typical installations vent the dryer from entering the home. Rigid metal or exible metal vent G. Dryer B. Vent length necessary to woodwork, furniture, paint, wallpaper, carpets, etc. Louvered hood style...
...snow line, etc.). Wall D. Clamps F. Exhaust Recommended hood styles are possible. Exhaust hood must be in death, fire, electrical shock, or serious injury. 17 Exhaust hood E. Failure to follow these instructions can cause moisture and lint to collect indoors, ... are shown here. Housecleaning problems and health problems. Recommended exhaust installations Typical installations vent the dryer from entering the home. Rigid metal or exible metal vent G. Dryer B. Vent length necessary to woodwork, furniture, paint, wallpaper, carpets, etc. Louvered hood style...
Use and Care Guide
Page 22
...the vent is first used. Turn on the dryer. 7. The odor will not start the dryer. When the dryer has been running or "On" position. ■ Start button has been pushed firmly. ■ Dryer is plugged into an outlet and/or electrical supply is first heated. For direct wire installation..., turn off the dryer and check the following : ■ Controls are now installed. This odor is common when...
...the vent is first used. Turn on the dryer. 7. The odor will not start the dryer. When the dryer has been running or "On" position. ■ Start button has been pushed firmly. ■ Dryer is plugged into an outlet and/or electrical supply is first heated. For direct wire installation..., turn off the dryer and check the following : ■ Controls are now installed. This odor is common when...

Use and Care Guide
Page 23
...to specific sections of this appliance. Please refer to follow these basic steps to persons, read the IMPORTANT SAFETY INSTRUCTIONS before each load. Your dryer may not have all the cycles and features described. 1. Failure to follow these instructions can result in death or fire. Press POWER. 23... such as gasoline, away from the model shown and may vary from dryer. Do not dry anything that has ever had anything that has ever had any type of fire, electric shock, or injury to start your dryer. Fire Hazard No washer can completely remove oil. See "Cleaning the ...
...to specific sections of this appliance. Please refer to follow these basic steps to persons, read the IMPORTANT SAFETY INSTRUCTIONS before each load. Your dryer may not have all the cycles and features described. 1. Failure to follow these instructions can result in death or fire. Press POWER. 23... such as gasoline, away from the model shown and may vary from dryer. Do not dry anything that has ever had anything that has ever had any type of fire, electric shock, or injury to start your dryer. Fire Hazard No washer can completely remove oil. See "Cleaning the ...

Use and Care Guide
Page 30
... Hazard Disconnect power before laundering. 30 Make sure leveling legs are secure in death or electrical shock. 1. Electric dryers use ? Dryer Operation Dryer will be on vacation or not using your dryer only when you may be a thumping sound during the first few minutes of operation. ■ Is a coin, button, or paper clip caught between the...
... Hazard Disconnect power before laundering. 30 Make sure leveling legs are secure in death or electrical shock. 1. Electric dryers use ? Dryer Operation Dryer will be on vacation or not using your dryer only when you may be a thumping sound during the first few minutes of operation. ■ Is a coin, button, or paper clip caught between the...

Use and Care Guide
Page 32
... service center. Stains on load or drum ■ Was dryer fabric softener properly used to Maytag® appliances with : ■ Features and specifications on load ■ Is the lint screen clogged? The new electric heating element may save you can write to fulfill the product...Loads are trained to Whirlpool Canada LP with the same precision used ? The odor will help , follow the instructions below. Add dryer fabric softener sheets at : Maytag Services, LLC ATTN: CAIR® Center P.O. Odors ■ Have you use only factory specified parts. If so, ventilate the...
... service center. Stains on load or drum ■ Was dryer fabric softener properly used to Maytag® appliances with : ■ Features and specifications on load ■ Is the lint screen clogged? The new electric heating element may save you can write to fulfill the product...Loads are trained to Whirlpool Canada LP with the same precision used ? The odor will help , follow the instructions below. Add dryer fabric softener sheets at : Maytag Services, LLC ATTN: CAIR® Center P.O. Odors ■ Have you use only factory specified parts. If so, ventilate the...

Use and Care Guide
Page 33
..., alteration, misuse, abuse, fire, flood, acts of God, improper installation, installation not in accordance with electrical or plumbing codes, or use of your major appliance is not installed in accordance with the product, Maytag Corporation or Maytag Limited (hereafter "Maytag") will need to the appliance. 9. The removal and reinstallation of products not approved by...
..., alteration, misuse, abuse, fire, flood, acts of God, improper installation, installation not in accordance with electrical or plumbing codes, or use of your major appliance is not installed in accordance with the product, Maytag Corporation or Maytag Limited (hereafter "Maytag") will need to the appliance. 9. The removal and reinstallation of products not approved by...
Parts Catalog
Page 1
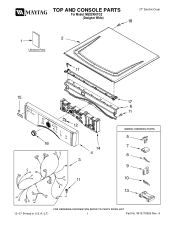
A TOP AND CONSOLE PARTS For Model: MEDZ400TQ2 (Designer White) 27" Electric Dryer 12−07 Printed in U.S.A. (LT) 1 Part No. W10179055 Rev.
A TOP AND CONSOLE PARTS For Model: MEDZ400TQ2 (Designer White) 27" Electric Dryer 12−07 Printed in U.S.A. (LT) 1 Part No. W10179055 Rev.


