
Use and Care Guide
Page 4
... cm) pedestal at least 9" (22.9 cm) above the oor. 4 Leveling legs NOTE: Do not use leveling legs if installing the dryer on a pedestal? Check existing electrical supply and venting. Ask for venting requirements. You have the option of purchasing pedestals of approximately 46" (116.8 cm) or 51.5" (...(15.5" [39.4 cm] model shown) The pedestals are included. For close-clearance installations between 28.65" (72.77 cm) and 34.15" (86.74 cm), see "Plan Vent System" section for Part Number 8572546. 4 To order, call the dealer from dryer drum. INSTALLATION INSTRUCTIONS Tools and ...
... cm) pedestal at least 9" (22.9 cm) above the oor. 4 Leveling legs NOTE: Do not use leveling legs if installing the dryer on a pedestal? Check existing electrical supply and venting. Ask for venting requirements. You have the option of purchasing pedestals of approximately 46" (116.8 cm) or 51.5" (...(15.5" [39.4 cm] model shown) The pedestals are included. For close-clearance installations between 28.65" (72.77 cm) and 34.15" (86.74 cm), see "Plan Vent System" section for Part Number 8572546. 4 To order, call the dealer from dryer drum. INSTALLATION INSTRUCTIONS Tools and ...

Use and Care Guide
Page 19
...(7.6 m) 17 ft (5.2 m) 4 Rigid metal 27 ft (8.2 m) 21 ft (6.4 m) Flexible metal 23 ft (7 m) 15 ft (4.6 m) 2. Examine the leveling legs. Use the straightest path possible. Failure to back. Stand the dryer up the dryer using a wood block. If connecting to the ...Hazard Use two or more people to finish turning the legs until it is clean. Gently lay the dryer on the corner posts until the diamond marking is secured to exhaust hood with 4" (10.2 cm)...5. Do not crush or kink vent. 3. (On gas models) Check that the vent is no kinks in "Plan Vent System."
...(7.6 m) 17 ft (5.2 m) 4 Rigid metal 27 ft (8.2 m) 21 ft (6.4 m) Flexible metal 23 ft (7 m) 15 ft (4.6 m) 2. Examine the leveling legs. Use the straightest path possible. Failure to back. Stand the dryer up the dryer using a wood block. If connecting to the ...Hazard Use two or more people to finish turning the legs until it is clean. Gently lay the dryer on the corner posts until the diamond marking is secured to exhaust hood with 4" (10.2 cm)...5. Do not crush or kink vent. 3. (On gas models) Check that the vent is no kinks in "Plan Vent System."

Use and Care Guide
Page 23
... rubber, or plastic must be dried on it (even after washing). WARNING: To reduce the risk of fire, electric shock, or injury to start your dryer. Please refer to follow these instructions can result in death, explosion, or fire. Clean lint screen before operating this ...manual for more detailed information. Place laundry into dryer and shut door. 3. DRYER USE WARNING Starting Your Dryer WARNING Explosion Hazard Keep flammable materials and vapors, such as gasoline, away from the model shown and may vary from dryer. Failure to specific sections of oil on a ...
... rubber, or plastic must be dried on it (even after washing). WARNING: To reduce the risk of fire, electric shock, or injury to start your dryer. Please refer to follow these instructions can result in death, explosion, or fire. Clean lint screen before operating this ...manual for more detailed information. Place laundry into dryer and shut door. 3. DRYER USE WARNING Starting Your Dryer WARNING Explosion Hazard Keep flammable materials and vapors, such as gasoline, away from the model shown and may vary from dryer. Failure to specific sections of oil on a ...

Use and Care Guide
Page 28
NOTE: If you happen to press Pause/Cancel twice, the program clears and your model allows drying rack usage and for information on ordering, please refer to shape and lay flat on front edge of dryer rack to secure over the edge of this manual or contact the dealer from whom ...front edge B. Press and hold . Place dryer rack inside dryer drum, positioning the back wire on top of items that can be able to complete drying. Press the POWER button. 6. Reset time as sweaters and pillows without tumbling. Rack Dry Setting Temp. If your model does not have a drying rack, you ...
NOTE: If you happen to press Pause/Cancel twice, the program clears and your model allows drying rack usage and for information on ordering, please refer to shape and lay flat on front edge of dryer rack to secure over the edge of this manual or contact the dealer from whom ...front edge B. Press and hold . Place dryer rack inside dryer drum, positioning the back wire on top of items that can be able to complete drying. Press the POWER button. 6. Reset time as sweaters and pillows without tumbling. Rack Dry Setting Temp. If your model does not have a drying rack, you ...

Use and Care Guide
Page 32
... air movement. When calling, please know the purchase date and the complete model and serial number of the cycle? ■ Was the dryer overloaded? Box 2370 Cleveland, TN 37320-2370 Please include a daytime phone ...fulfill the product warranty and provide after-warranty service, anywhere in Canada. Maytag® appliances designated service technicians are trained to your dryer is located? Odors ■ Have you can tumble freely. For further ..., please check "Troubleshooting." Clean lint screen. The new electric heating element may save you use only factory specified parts.
... air movement. When calling, please know the purchase date and the complete model and serial number of the cycle? ■ Was the dryer overloaded? Box 2370 Cleveland, TN 37320-2370 Please include a daytime phone ...fulfill the product warranty and provide after-warranty service, anywhere in Canada. Maytag® appliances designated service technicians are trained to your dryer is located? Odors ■ Have you can tumble freely. For further ..., please check "Troubleshooting." Clean lint screen. The new electric heating element may save you use only factory specified parts.

Use and Care Guide
Page 33
... location or is not installed in accordance with electrical or plumbing codes, or use . 4. You must be provided by a Maytag designated service company. You will pay for future reference. Dealer name Address Phone number Model number Serial number Purchase date 33 Service calls ...major appliance is operated and maintained according to instructions attached to or furnished with the product, Maytag Corporation or Maytag Limited (hereafter "Maytag") will need to know your complete model number and serial number. Service must provide proof of purchase or installation date for other ...
... location or is not installed in accordance with electrical or plumbing codes, or use . 4. You must be provided by a Maytag designated service company. You will pay for future reference. Dealer name Address Phone number Model number Serial number Purchase date 33 Service calls ...major appliance is operated and maintained according to instructions attached to or furnished with the product, Maytag Corporation or Maytag Limited (hereafter "Maytag") will need to know your complete model number and serial number. Service must provide proof of purchase or installation date for other ...
Parts Catalog
Page 1
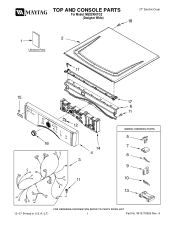
TOP AND CONSOLE PARTS For Model: MEDZ400TQ2 (Designer White) 27" Electric Dryer 12−07 Printed in U.S.A. (LT) 1 Part No. W10179055 Rev. A
TOP AND CONSOLE PARTS For Model: MEDZ400TQ2 (Designer White) 27" Electric Dryer 12−07 Printed in U.S.A. (LT) 1 Part No. W10179055 Rev. A
Parts Catalog
Page 2
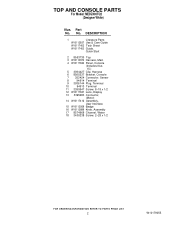
... Interface 15 W10112569 Badge 16 W10112899 Knob, Assembly 17 8574968 Channel, Water 18 3400238 Screw, 2−28 x 1/2 2 W10179055 Part No. TOP AND CONSOLE PARTS For Model: MEDZ400TQ2 (Designer White) Illus.
... Interface 15 W10112569 Badge 16 W10112899 Knob, Assembly 17 8574968 Channel, Water 18 3400238 Screw, 2−28 x 1/2 2 W10179055 Part No. TOP AND CONSOLE PARTS For Model: MEDZ400TQ2 (Designer White) Illus.
Parts Catalog
Page 4
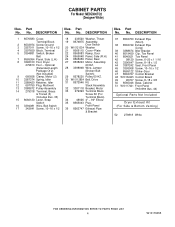
...18 x 3/8 50 8565046 Base, Cabinet 51 W10117421 Front Panel (Includes Illus. 44) Optional Parts Not Included Dryer Exhaust Kit (For Side & Bottom Venting) 52 279818 White 4 W10179055 CABINET PARTS For Model: MEDZ400TQ2 (Designer White) Illus. Part No. DESCRIPTION 1 8576583 Cover, Terminal Block 2 8533974 Screw Ground ... Switch 20 W10121334 Washer 21 8066115 Cover−Plate 22 8565083 Ramp, Door 24 8565048 Panel, Side (R.H.) 26 8565059 Panel, Rear 27 8538263 Motor, Assembly 60 HZ. 28 3398948 Wire, Jumper (Broken Belt Switch) 29 8578220 Pulley 60 HZ. 30 W10112954 Belt, ...
...18 x 3/8 50 8565046 Base, Cabinet 51 W10117421 Front Panel (Includes Illus. 44) Optional Parts Not Included Dryer Exhaust Kit (For Side & Bottom Venting) 52 279818 White 4 W10179055 CABINET PARTS For Model: MEDZ400TQ2 (Designer White) Illus. Part No. DESCRIPTION 1 8576583 Cover, Terminal Block 2 8533974 Screw Ground ... Switch 20 W10121334 Washer 21 8066115 Cover−Plate 22 8565083 Ramp, Door 24 8565048 Panel, Side (R.H.) 26 8565059 Panel, Rear 27 8538263 Motor, Assembly 60 HZ. 28 3398948 Wire, Jumper (Broken Belt Switch) 29 8578220 Pulley 60 HZ. 30 W10112954 Belt, ...

Parts Catalog
Page 6
...14 3387747 Heater Element 15 279457 Terminal Wire Kit (For Heater Element Wiring Harness Repair) Illus. No. Part No. BULKHEAD PARTS For Model: MEDZ400TQ2 (Designer White) Illus. Part No. Thread 20 690997 Ring, Tri 21 8536973 Roller, Support 22 8563728 Exhaust Pipe 23 W10153423 ...Housing, Outlet Assembly 24 W10049370 Lint Screen 25 W10153420 Complete Drum Assembly 26 W10109200 Screw, 11−16 x 3/4 27 W10166807 Seal, Drum 28 695240 Screw, 8−18 x 1/2 29 90767 Screw, 8−18 x 3/8 30 697770 Seal, Cover Plate 31 ...
...14 3387747 Heater Element 15 279457 Terminal Wire Kit (For Heater Element Wiring Harness Repair) Illus. No. Part No. BULKHEAD PARTS For Model: MEDZ400TQ2 (Designer White) Illus. Part No. Thread 20 690997 Ring, Tri 21 8536973 Roller, Support 22 8563728 Exhaust Pipe 23 W10153423 ...Housing, Outlet Assembly 24 W10049370 Lint Screen 25 W10153420 Complete Drum Assembly 26 W10109200 Screw, 11−16 x 3/4 27 W10166807 Seal, Drum 28 695240 Screw, 8−18 x 1/2 29 90767 Screw, 8−18 x 3/8 30 697770 Seal, Cover Plate 31 ...

Parts Catalog
Page 7
... 8580059 Door, Intermediate 17 8534022 Screw 18 8519356 Retainer (Upper) 19 W10112927 Pad, Door Handle 20 Door Seal (Not Servicable) W10179055 7 No. DOOR PARTS For Model: MEDZ400TQ2 (Designer White) Illus. No. DESCRIPTION 8 W10159996 Screw, 10−32 x .395 9 8519354 Retainer (Lower) 10 8578933 Door Assembly (Inner) (Includes Illus. 1 & 14 ) 11 355515...
... 8580059 Door, Intermediate 17 8534022 Screw 18 8519356 Retainer (Upper) 19 W10112927 Pad, Door Handle 20 Door Seal (Not Servicable) W10179055 7 No. DOOR PARTS For Model: MEDZ400TQ2 (Designer White) Illus. No. DESCRIPTION 8 W10159996 Screw, 10−32 x .395 9 8519354 Retainer (Lower) 10 8578933 Door Assembly (Inner) (Includes Illus. 1 & 14 ) 11 355515...
Parts Catalog
Page 8
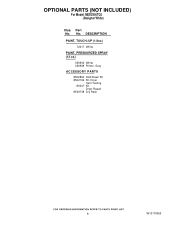
Part No. DESCRIPTION PAINT, TOUCH−UP (1/2oz.) 72017 White PAINT, PRESSURIZED SPRAY (12 oz.) 350930 White 350938 Primer, Gray ACCESSORY PARTS 8529894 Hold Down Kit 8522199 Kit, Dryer Vent Testing 80047 Kit, Dryer Repair 8563738 Dry Rack 8 W10179055 OPTIONAL PARTS (NOT INCLUDED) For Model: MEDZ400TQ2 (Designer White) Illus. No.
Part No. DESCRIPTION PAINT, TOUCH−UP (1/2oz.) 72017 White PAINT, PRESSURIZED SPRAY (12 oz.) 350930 White 350938 Primer, Gray ACCESSORY PARTS 8529894 Hold Down Kit 8522199 Kit, Dryer Vent Testing 80047 Kit, Dryer Repair 8563738 Dry Rack 8 W10179055 OPTIONAL PARTS (NOT INCLUDED) For Model: MEDZ400TQ2 (Designer White) Illus. No.


