

Use and Care Guide
Page 3
... or seriously injured if you what can be cleaned periodically by qualified service personnel. ■ See installation instructions for grounding requirements. DRYER SAFETY Your safety and the safety of others . This symbol alerts you understand and have been previously cleaned in, washed in, ... that could cause a load to play on your dryer. This is , tell you and others are not followed. IMPORTANT SAFETY INSTRUCTIONS WARNING: To reduce the risk of fire, electric shock, or injury to persons when using the dryer, follow the safety alert symbol and either the word...
... or seriously injured if you what can be cleaned periodically by qualified service personnel. ■ See installation instructions for grounding requirements. DRYER SAFETY Your safety and the safety of others . This symbol alerts you understand and have been previously cleaned in, washed in, ... that could cause a load to play on your dryer. This is , tell you and others are not followed. IMPORTANT SAFETY INSTRUCTIONS WARNING: To reduce the risk of fire, electric shock, or injury to persons when using the dryer, follow the safety alert symbol and either the word...

Use and Care Guide
Page 4
...39.4 cm) pedestal with any tools listed here. Parts needed Check local codes. Check existing electrical supply and venting. To order, call the dealer from whom you purchased your dryer or refer to the "Assistance or Service" section. Ask for venting requirements. Optional Pedestal Are... you purchased your washer and dryer? Stack Kit Are you placing the dryer on a pedestal. Check that opens to purchase a Stack Kit. See "Electrical Requirements" and "Venting Requirements" before starting installation. You will add to the total height of the dryer for a total height of ...
...39.4 cm) pedestal with any tools listed here. Parts needed Check local codes. Check existing electrical supply and venting. To order, call the dealer from whom you purchased your dryer or refer to the "Assistance or Service" section. Ask for venting requirements. Optional Pedestal Are... you purchased your washer and dryer? Stack Kit Are you placing the dryer on a pedestal. Check that opens to purchase a Stack Kit. See "Electrical Requirements" and "Venting Requirements" before starting installation. You will add to the total height of the dryer for a total height of ...

Use and Care Guide
Page 5
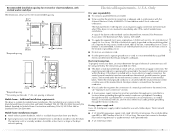
...a door, minimum ventilation openings in garages, closets, mobile homes or sleeping quarters. See "Electrical Requirements." ■ A sturdy floor to do not permit, installation of the dryer in the top and bottom of installation and servicing. ■ Additional clearances might not shut ..., you will need to the bottom of the dryer. Do not operate your local building inspector. Failure to support the total dryer weight of an automatic cycle. WARNING Location Requirements Dryer Dimensions 50" (128.27 cm) Explosion Hazard Keep flammable materials and vapors,...
...a door, minimum ventilation openings in garages, closets, mobile homes or sleeping quarters. See "Electrical Requirements." ■ A sturdy floor to do not permit, installation of the dryer in the top and bottom of installation and servicing. ■ Additional clearances might not shut ..., you will need to the bottom of the dryer. Do not operate your local building inspector. Failure to support the total dryer weight of an automatic cycle. WARNING Location Requirements Dryer Dimensions 50" (128.27 cm) Explosion Hazard Keep flammable materials and vapors,...

Use and Care Guide
Page 6
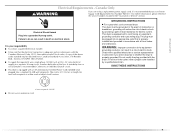
..., with vents *Required spacing **For side or bottom venting, 0" (0 cm) spacing is allowed. 6 Recessed or closet installation - Dryer on pedestal 14" max. (35.6 cm) 18" min.* (45.72 cm) 1" (2.5 cm) 27" (68.6 cm) A 1" 1"* 28.65" 5"** (2.5 cm) (2.5 cm) (72.77 cm) (12.7 cm) B... A. Recommended installation spacing for cabinet installation ■ The dimensions shown are for custom undercounter installation Custom undercounter installation - Side view - Dryer only 27" (68.6 cm) 1"* (2.5 cm) 14" max.* (35.6 cm) 18" min.* (45.72 cm) 48 in.2* (310 cm2) 3"* (7.6 cm...
..., with vents *Required spacing **For side or bottom venting, 0" (0 cm) spacing is allowed. 6 Recessed or closet installation - Dryer on pedestal 14" max. (35.6 cm) 18" min.* (45.72 cm) 1" (2.5 cm) 27" (68.6 cm) A 1" 1"* 28.65" 5"** (2.5 cm) (2.5 cm) (72.77 cm) (12.7 cm) B... A. Recommended installation spacing for cabinet installation ■ The dimensions shown are for custom undercounter installation Custom undercounter installation - Side view - Dryer only 27" (68.6 cm) 1"* (2.5 cm) 14" max.* (35.6 cm) 18" min.* (45.72 cm) 48 in.2* (310 cm2) 3"* (7.6 cm...
Use and Care Guide
Page 7
...such as a nearby window) should be at least twice as large as the dryer exhaust opening. Electrical Connection To properly install your dryer, you must be used , it here. ■ This dryer is prohibited. The cord should contain: ■ A UL listed 30-amp ...3"* (7.6 cm) 1"* (2.5 cm) 6"* (15.2 cm) 72" (182.9 cm) 5 14 cm) 1" (2.5 cm) 27" (68.6 cm) 1" (2.5 cm) *Required spacing **For venting out the side, 1" (2.5 cm) spacing is adequate. The National Electric Code requires a 4-wire power supply connection for purchase from your responsibility ■ To contact a qualified...
...such as a nearby window) should be at least twice as large as the dryer exhaust opening. Electrical Connection To properly install your dryer, you must be used , it here. ■ This dryer is prohibited. The cord should contain: ■ A UL listed 30-amp ...3"* (7.6 cm) 1"* (2.5 cm) 6"* (15.2 cm) 72" (182.9 cm) 5 14 cm) 1" (2.5 cm) 27" (68.6 cm) 1" (2.5 cm) *Required spacing **For venting out the side, 1" (2.5 cm) spacing is adequate. The National Electric Code requires a 4-wire power supply connection for purchase from your responsibility ■ To contact a qualified...

Use and Care Guide
Page 8
... with a qualified electrician or service representative or personnel if you are in doubt as to whether the dryer is properly installed and grounded in a risk of least resistance for electric current. The neutral conductor must have four 10-gauge copper wires and match a 4-wire receptacle of ... codes and ordinances. ■ For a permanently connected dryer: This dryer must be connected to the equipment-grounding terminal or lead on the power supply cord: if it will reduce the risk of electric shock by providing a path of electric shock. If connecting by direct wire: Power supply cable...
... with a qualified electrician or service representative or personnel if you are in doubt as to whether the dryer is properly installed and grounded in a risk of least resistance for electric current. The neutral conductor must have four 10-gauge copper wires and match a 4-wire receptacle of ... codes and ordinances. ■ For a permanently connected dryer: This dryer must be connected to the equipment-grounding terminal or lead on the power supply cord: if it will reduce the risk of electric shock by providing a path of electric shock. If connecting by direct wire: Power supply cable...
Use and Care Guide
Page 9
... Power Supply Cord Replacement Part Number 9831317. The cord is recommended. WARNING: Improper connection of electric shock. Do not modify the plug provided with the dryer: if it is recommended that is within reach of least resistance for electric current. Canada Only WARNING If you are in conformance with a CSA International Certified Power...
... Power Supply Cord Replacement Part Number 9831317. The cord is recommended. WARNING: Improper connection of electric shock. Do not modify the plug provided with the dryer: if it is recommended that is within reach of least resistance for electric current. Canada Only WARNING If you are in conformance with a CSA International Certified Power...

Use and Care Guide
Page 11
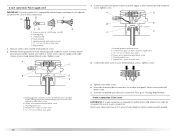
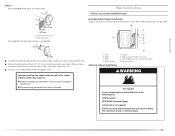
The strain relief should have a tight fit with the dryer cabinet and be in a horizontal position. Reaching inside the strain relief. Now complete installation following instructions for your type of electrical connection: 4-wire (recommended) 3-wire (if 4-wire is inside the terminal block opening, screw the removable conduit connector onto the strain relief threads...
The strain relief should have a tight fit with the dryer cabinet and be in a horizontal position. Reaching inside the strain relief. Now complete installation following instructions for your type of electrical connection: 4-wire (recommended) 3-wire (if 4-wire is inside the terminal block opening, screw the removable conduit connector onto the strain relief threads...
Use and Care Guide
Page 12
... listed strain relief D. External ground conductor screw B. Neutral wire (white or center wire) 4. Neutral ground wire D. Direct wire cable must have completed your electrical connection. Remove center silver-colored terminal block screw. 2. Tighten screw. A D B E C F A. Ground wire (green or bare) of power supply... screw. Insert tab of terminal block cover into slot of dryer rear panel. Tighten screws. Center silver-colored terminal block screw C. You have 5 ft (1.52 m) of extra length so dryer can be moved if needed. 12 Spade terminals with hold-...
... listed strain relief D. External ground conductor screw B. Neutral wire (white or center wire) 4. Neutral ground wire D. Direct wire cable must have completed your electrical connection. Remove center silver-colored terminal block screw. 2. Tighten screw. A D B E C F A. Ground wire (green or bare) of power supply... screw. Insert tab of terminal block cover into slot of dryer rear panel. Tighten screws. Center silver-colored terminal block screw C. You have 5 ft (1.52 m) of extra length so dryer can be moved if needed. 12 Spade terminals with hold-...
Use and Care Guide
Page 13
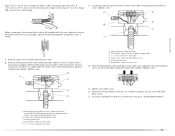
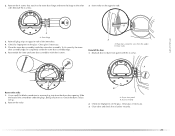
... of the terminal block. Tighten strain relief screw. Neutral ground wire D. Strip 5" (12.7 cm) of outer covering from end of wires into slot of dryer rear panel. Cut 1¹⁄₂" (3.8 cm) from external ground conductor screw. Shape ends of cable, leaving bare ground wire at 5" (12.7 cm... ground wire F. D 6. Insert tab of terminal block cover into a hook shape. 1" (2.5 cm) 3. Secure cover with hold- down screw. E 7. You have completed your electrical connection. External ground conductor screw - B. Center silver-colored terminal block screw C.
... of the terminal block. Tighten strain relief screw. Neutral ground wire D. Strip 5" (12.7 cm) of outer covering from end of wires into slot of dryer rear panel. Cut 1¹⁄₂" (3.8 cm) from external ground conductor screw. Shape ends of cable, leaving bare ground wire at 5" (12.7 cm... ground wire F. D 6. Insert tab of terminal block cover into a hook shape. 1" (2.5 cm) 3. Secure cover with hold- down screw. E 7. You have completed your electrical connection. External ground conductor screw - B. Center silver-colored terminal block screw C.

Use and Care Guide
Page 14
...terminals G. Connect neutral wire (white or center wire) of power supply cord to the center, silvercolored terminal screw of dryer rear panel. Tighten screws. 4. Now go to "Venting Requirements." 3-wire connection: Direct wire Use where local codes ... 1" (2.5 cm) 3¹⁄₂" (8.9 cm) When connecting to outer terminal block screws. Secure cover with holddown screw. 6. Direct wire cable must have completed your electrical connection. B D E A C GF A. 3-wire receptacle (NEMA type 10-30R) B. 3-wire plug C. Neutral prong D. Neutral (white or center wire) 1. ...
...terminals G. Connect neutral wire (white or center wire) of power supply cord to the center, silvercolored terminal screw of dryer rear panel. Tighten screws. 4. Now go to "Venting Requirements." 3-wire connection: Direct wire Use where local codes ... 1" (2.5 cm) 3¹⁄₂" (8.9 cm) When connecting to outer terminal block screws. Secure cover with holddown screw. 6. Direct wire cable must have completed your electrical connection. B D E A C GF A. 3-wire receptacle (NEMA type 10-30R) B. 3-wire plug C. Neutral prong D. Neutral (white or center wire) 1. ...

Use and Care Guide
Page 15
... terminal block screws. Tighten screw. Center silver-colored terminal block screw D. Tighten strain relief screw. 5. You have completed your electrical connection. External ground conductor screw B. Grounding path determined by a qualified electrician 3. Connect the other direct wire cable wires under the...slot of the other wires to an adequate ground. 6. Squeeze hooked ends together. down screw. 15 Place the hooked ends of dryer rear panel. Neutral ground wire C. Secure cover with hold- Connect a separate copper ground wire from external ground conductor screw. ...
... terminal block screws. Tighten screw. Center silver-colored terminal block screw D. Tighten strain relief screw. 5. You have completed your electrical connection. External ground conductor screw B. Grounding path determined by a qualified electrician 3. Connect the other direct wire cable wires under the...slot of the other wires to an adequate ground. 6. Squeeze hooked ends together. down screw. 15 Place the hooked ends of dryer rear panel. Neutral ground wire C. Secure cover with hold- Connect a separate copper ground wire from external ground conductor screw. ...

Use and Care Guide
Page 16
... that may result in reduced airflow and poor performance. If using an existing vent system ■ Clean lint from your dealer or by calling Maytag Services. Do not use a plastic vent. ■ Do not install flexible metal vent in death or fire. 45° elbows provide better...metal vents are acceptable only if accessible for cleaning. Good Better Clamps ■ Use clamps to achieve the best drying performance. If this dryer MUST BE EXHAUSTED OUTDOORS. Clamp 4" 10.2 cm 4" (10.2 cm) heavy metal exhaust vent Vent products can result in enclosed walls, ceilings or...
... that may result in reduced airflow and poor performance. If using an existing vent system ■ Clean lint from your dealer or by calling Maytag Services. Do not use a plastic vent. ■ Do not install flexible metal vent in death or fire. 45° elbows provide better...metal vents are acceptable only if accessible for cleaning. Good Better Clamps ■ Use clamps to achieve the best drying performance. If this dryer MUST BE EXHAUSTED OUTDOORS. Clamp 4" 10.2 cm 4" (10.2 cm) heavy metal exhaust vent Vent products can result in enclosed walls, ceilings or...
Use and Care Guide
Page 17
... the path of the exhaust (such as owers, rocks or bushes, snow line, etc.). Other installations are shown here. Dryer B. Rigid metal or exible metal vent G. Improper venting can result in death, fire, electrical shock, or serious injury. 17 B C D A E F G H A. Clamps F. Box hood style The angled... indoors, which may be in : Moisture damage to connect elbows H. Do not use an exhaust hood with one of the dryer. Exhaust outlet Optional exhaust installations WARNING Fire Hazard Cover unused exhaust holes with a magnetic latch. Louvered hood style B. Housecleaning problems...
... the path of the exhaust (such as owers, rocks or bushes, snow line, etc.). Other installations are shown here. Dryer B. Rigid metal or exible metal vent G. Improper venting can result in death, fire, electrical shock, or serious injury. 17 B C D A E F G H A. Clamps F. Box hood style The angled... indoors, which may be in : Moisture damage to connect elbows H. Do not use an exhaust hood with one of the dryer. Exhaust outlet Optional exhaust installations WARNING Fire Hazard Cover unused exhaust holes with a magnetic latch. Louvered hood style B. Housecleaning problems...

Use and Care Guide
Page 18
... home installations The exhaust vent must not terminate beneath the mobile home. A B A. This dryer can be securely fastened to a noncombustible portion of vent material and hood combinations acceptable to use with dryer vent to wall vent mismatch): Part Number 4396037 - 0" (0 cm) to 18" (45...127 cm) mismatch Determine vent path ■ Select the route that will help to have the dryer converted. Contact your installation. NOTE: Do not use the fewest number of the dryer. ■ Reduce performance, resulting in the Vent system chart. Special provisions for your local dealer...
... home installations The exhaust vent must not terminate beneath the mobile home. A B A. This dryer can be securely fastened to a noncombustible portion of vent material and hood combinations acceptable to use with dryer vent to wall vent mismatch): Part Number 4396037 - 0" (0 cm) to 18" (45...127 cm) mismatch Determine vent path ■ Select the route that will help to have the dryer converted. Contact your installation. NOTE: Do not use the fewest number of the dryer. ■ Reduce performance, resulting in the Vent system chart. Special provisions for your local dealer...

Use and Care Guide
Page 19
... in back or other injury. 1. Use a wrench to seal all joints. Install exhaust hood. Avoid 90º turns. Stand the dryer up the dryer using a wood block. If connecting to existing vent, make sure the vent is secured to exhaust hood with 4" (10.2 cm) clamp...ft (9.4 m) 23 ft (7 m) 2 Rigid metal 44 ft (13.4 m) 38 ft (11.6 m) Flexible metal 27 ft (8.2 m) 19 ft (5.8 m) 3 Rigid metal 35 ft (10.7 m) 29 ft (8.8 m) Flexible metal 25 ft (7.6 m) 17 ft (5.2 m) 4 Rigid metal 27 ft (8.2 m) 21 ft (6.4 m) Flexible metal 23 ft (7 m) 15 ft (4.6 m) 2. Find the diamond ...
... in back or other injury. 1. Use a wrench to seal all joints. Install exhaust hood. Avoid 90º turns. Stand the dryer up the dryer using a wood block. If connecting to existing vent, make sure the vent is secured to exhaust hood with 4" (10.2 cm) clamp...ft (9.4 m) 23 ft (7 m) 2 Rigid metal 44 ft (13.4 m) 38 ft (11.6 m) Flexible metal 27 ft (8.2 m) 19 ft (5.8 m) 3 Rigid metal 35 ft (10.7 m) 29 ft (8.8 m) Flexible metal 25 ft (7.6 m) 17 ft (5.2 m) 4 Rigid metal 27 ft (8.2 m) 21 ft (6.4 m) Flexible metal 23 ft (7 m) 15 ft (4.6 m) 2. Find the diamond ...

Use and Care Guide
Page 20
...from a right-side opening to protect the surface. Reverse hinge 1. Remove the 4 screws that you remove only the 6 indicated screws. Door assembly 2. Dryer front panel B. It is important that hold the door hinge on a flat, protected surface with the inside (inner door assembly) facing up . 4.... Rotate outer door 180°. 1. See illustration. Slide the head of the dryer or work space to a left-side opening, if desired. 5. Use a small flat-blade screwdriver to scratch the inner door surface. Place a towel...
...from a right-side opening to protect the surface. Reverse hinge 1. Remove the 4 screws that you remove only the 6 indicated screws. Door assembly 2. Dryer front panel B. It is important that hold the door hinge on a flat, protected surface with the inside (inner door assembly) facing up . 4.... Rotate outer door 180°. 1. See illustration. Slide the head of the dryer or work space to a left-side opening, if desired. 5. Use a small flat-blade screwdriver to scratch the inner door surface. Place a towel...
Use and Care Guide
Page 21
.... 3. To fit correctly, the inner door assembly edge fits completely inside the outer door assembly. Use a small flat-blade screwdriver to dryer front panel with the 6 screws. Slide the head of the inner door. 4. Door strike Reinstall the door 1. Plug strip (cannot be seen from ...the dryer door opening. 2. Dryer front panel B. Door hinge 3. Clean glass if necessary. 3. Check for fingerprints on opposite side of the screwdriver under the plugs, being ...
.... 3. To fit correctly, the inner door assembly edge fits completely inside the outer door assembly. Use a small flat-blade screwdriver to dryer front panel with the 6 screws. Slide the head of the inner door. 4. Door strike Reinstall the door 1. Plug strip (cannot be seen from ...the dryer door opening. 2. Dryer front panel B. Door hinge 3. Clean glass if necessary. 3. Check for fingerprints on opposite side of the screwdriver under the plugs, being ...
Use and Care Guide
Page 22
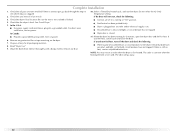
...level. Check that you have not tripped. Dispose of your tools. 3. When the dryer has been running or "On" position. ■ Start button has been pushed firmly. ■ Dryer is plugged into an outlet and/or electrical supply is first used. Select a Timed Dry heated cycle, and start , check... the following : ■ There may notice an odor when the dryer is not crushed or kinked. 4. The odor will not ...
...level. Check that you have not tripped. Dispose of your tools. 3. When the dryer has been running or "On" position. ■ Start button has been pushed firmly. ■ Dryer is plugged into an outlet and/or electrical supply is first used. Select a Timed Dry heated cycle, and start , check... the following : ■ There may notice an odor when the dryer is not crushed or kinked. 4. The odor will not ...

Use and Care Guide
Page 23
Do not dry anything flammable on it (including cooking oils). WARNING: To reduce the risk of fire, electric shock, or injury to specific sections of oil on a clothesline or by using an Air Cycle. Clean lint screen before operating this manual for... anything that has ever had any type of this appliance. Follow these instructions can completely remove oil. See "Cleaning the Lint Screen." 2. DRYER USE WARNING Starting Your Dryer WARNING Explosion Hazard Keep flammable materials and vapors, such as gasoline, away from the model shown and may not have all the cycles...
Do not dry anything flammable on it (including cooking oils). WARNING: To reduce the risk of fire, electric shock, or injury to specific sections of oil on a clothesline or by using an Air Cycle. Clean lint screen before operating this manual for... anything that has ever had any type of this appliance. Follow these instructions can completely remove oil. See "Cleaning the Lint Screen." 2. DRYER USE WARNING Starting Your Dryer WARNING Explosion Hazard Keep flammable materials and vapors, such as gasoline, away from the model shown and may not have all the cycles...


