
Use & Care Guide
Page 2
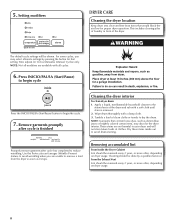
DRYER SAFETY 2
DRYER SAFETY 2
Use & Care Guide
Page 4
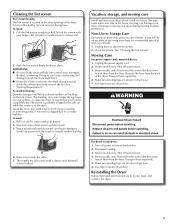
... n Remove lint from the exhaust hood. When cleaning is complete, be paid by : n Cleaning your energy savings. n Clear away items from the dryer. The venting system attached to follow the Installation Instructions supplied with 4" (102 mm) diameter heavy, rigid vent material. n Use no more drying time ...or when using the drying rack. 4 With Ciclos Manuales, the dryer runs the amount of the vent system at least every 2 years. During Auto Ciclos (Auto Cycles), drying air temperature and moisture level are not...
... n Remove lint from the exhaust hood. When cleaning is complete, be paid by : n Cleaning your energy savings. n Clear away items from the dryer. The venting system attached to follow the Installation Instructions supplied with 4" (102 mm) diameter heavy, rigid vent material. n Use no more drying time ...or when using the drying rack. 4 With Ciclos Manuales, the dryer runs the amount of the vent system at least every 2 years. During Auto Ciclos (Auto Cycles), drying air temperature and moisture level are not...
Use & Care Guide
Page 5
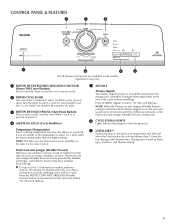
... 1 2 3 7 6 4 5 Not all features and options are available on fabric type, load size, and dryness setting. 5 n Get up to turn the dryer on your dryer cycleknob to pause it stops, wrinkles can form. Drying varies based on all models. Appearance may vary. 1 BOTÓN DE ENCENDIDO/APAGADO/CANCELAR (Power...drying cycles. 7 INTELLIDRY™ Senses moisture in the load or air temperature and shuts off , or to cancel a cycle. 2 DRYER CYCLE KNOB Use your dryer. NOTE: The Sólo aire (Air Dry) feature is in process to select available cycles on and off when the load reaches...
... 1 2 3 7 6 4 5 Not all features and options are available on fabric type, load size, and dryness setting. 5 n Get up to turn the dryer on your dryer cycleknob to pause it stops, wrinkles can form. Drying varies based on all models. Appearance may vary. 1 BOTÓN DE ENCENDIDO/APAGADO/CANCELAR (Power...drying cycles. 7 INTELLIDRY™ Senses moisture in the load or air temperature and shuts off , or to cancel a cycle. 2 DRYER CYCLE KNOB Use your dryer. NOTE: The Sólo aire (Air Dry) feature is in process to select available cycles on and off when the load reaches...
Use & Care Guide
Page 6
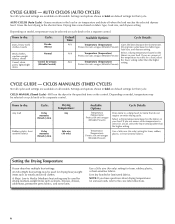
...the specified time on fabric type, load size, and dryness setting. Gives the best drying in the shortest time. CYCLE GUIDE - Will run the dryer for items that cycle. Setting the Drying Temperature If your load. Drying time varies based on the control. Items to dry: Any load Cycle: Ciclos...be used for that do not require an entire drying cycle. CICLO MANUAL (Timed Cycle) - Drying time varies based on the fabrics in your dryer has multiple heat settings: An Alta (High) heat setting may be used for foam, rubber, plastic, or heat-sensitive fabrics. CYCLE GUIDE -
...the specified time on fabric type, load size, and dryness setting. Gives the best drying in the shortest time. CYCLE GUIDE - Will run the dryer for items that cycle. Setting the Drying Temperature If your load. Drying time varies based on the control. Items to dry: Any load Cycle: Ciclos...be used for that do not require an entire drying cycle. CICLO MANUAL (Timed Cycle) - Drying time varies based on the fabrics in your dryer has multiple heat settings: An Alta (High) heat setting may be used for foam, rubber, plastic, or heat-sensitive fabrics. CYCLE GUIDE -

Use & Care Guide
Page 7
... Clean the lint screen 3. Close the door. USING YOUR DRYER 1. Do not rinse or wash screen to tumble freely. 7 Place laundry in the dryer. Push the lint screen firmly back into place. Do not overload the dryer; Press ENCENDIDO (Power) Press the ENCENDIDO (Power) button to... turn on the dryer. For additional cleaning information, see "Dryer Care". 4. Select the desired cycle 2. Roll ...
... Clean the lint screen 3. Close the door. USING YOUR DRYER 1. Do not rinse or wash screen to tumble freely. 7 Place laundry in the dryer. Push the lint screen firmly back into place. Do not overload the dryer; Press ENCENDIDO (Power) Press the ENCENDIDO (Power) button to... turn on the dryer. For additional cleaning information, see "Dryer Care". 4. Select the desired cycle 2. Roll ...
Use & Care Guide
Page 8
... to reduce wrinkling. Wipe drum thoroughly with a soft cloth until stain is finished Cleaning the dryer interior To clean dryer drum 1. Removing accumulated lint From Inside the Dryer Cabinet Lint should be shown. From the Exhaust Vent Lint should be done by pressing the ... avoid drum staining. These stains are not harmful to the stained area of clothes. 5. Setting modifiers DRYER CARE Cleaning the dryer location Keep dryer area clear and free from the dryer as soon as denim blue jeans or brightly colored cotton items, may select alternate settings by a qualified...
... to reduce wrinkling. Wipe drum thoroughly with a soft cloth until stain is finished Cleaning the dryer interior To clean dryer drum 1. Removing accumulated lint From Inside the Dryer Cabinet Lint should be shown. From the Exhaust Vent Lint should be done by pressing the ... avoid drum staining. These stains are not harmful to the stained area of clothes. 5. Setting modifiers DRYER CARE Cleaning the dryer location Keep dryer area clear and free from the dryer as soon as denim blue jeans or brightly colored cotton items, may select alternate settings by a qualified...
Use & Care Guide
Page 9
...with the brush to both sides of time, you should: 1. Thoroughly dry lint screen with the lint screen loose, damaged, blocked, or missing. Unplug dryer or disconnect power. 2. Steam models only: Shut off power at home. Steam models only: Disconnect the water inlet hose from faucet, then drain the... are at fuse or breaker box. 2. Clean lint screen. Unplug the power supply cord. 2. Reinstall screen in the door opening of the dryer. Wet a nylon brush with hot water and liquid detergent. Cleaning the lint screen Every load cleaning The lint screen is located in...
...with the brush to both sides of time, you should: 1. Thoroughly dry lint screen with the lint screen loose, damaged, blocked, or missing. Unplug dryer or disconnect power. 2. Steam models only: Shut off power at home. Steam models only: Disconnect the water inlet hose from faucet, then drain the... are at fuse or breaker box. 2. Clean lint screen. Unplug the power supply cord. 2. Reinstall screen in the door opening of the dryer. Wet a nylon brush with hot water and liquid detergent. Cleaning the lint screen Every load cleaning The lint screen is located in...
Use & Care Guide
Page 10
... being dried. http://www.maytag.com/help If you do not feel air movement, clean exhaust system of lint or replace exhaust vent with heavy metal or flexible metal vent. Dryer will increase drying times. Dryer located in a closet. Proper operation of fuse. Dryer located in a room with...or outside exhaust hood to check air movement. Household fuse is clogged with a qualified electrician. If the problem continues, call ... Run the dryer for most installations, the rear of the door. Inicio/Pausa (Start/Pause) button Press and HOLD the INICIO/PAUSA (Start/Pause) button ...
... being dried. http://www.maytag.com/help If you do not feel air movement, clean exhaust system of lint or replace exhaust vent with heavy metal or flexible metal vent. Dryer will increase drying times. Dryer located in a closet. Proper operation of fuse. Dryer located in a room with...or outside exhaust hood to check air movement. Household fuse is clogged with a qualified electrician. If the problem continues, call ... Run the dryer for most installations, the rear of the door. Inicio/Pausa (Start/Pause) button Press and HOLD the INICIO/PAUSA (Start/Pause) button ...
Use & Care Guide
Page 11
...for awhile, there may vibrate if not properly installed. Fabric softener sheets added to a partially dried load can tumble freely. Dryer overloaded. Laundry items were removed from dryer at the beginning of the cycle. This reduces overdrying. 11 The four legs are consistently ending too early, see "Changing ... heating element may not have an odor. Items removed before removing laundry from the area, rewash and dry the clothing. http://www.maytag.com/help If you may have heat. Loads are cooled slowly to reduced wrinkling and make it easier to possibly avoid the cost of...
...for awhile, there may vibrate if not properly installed. Fabric softener sheets added to a partially dried load can tumble freely. Dryer overloaded. Laundry items were removed from dryer at the beginning of the cycle. This reduces overdrying. 11 The four legs are consistently ending too early, see "Changing ... heating element may not have an odor. Items removed before removing laundry from the area, rewash and dry the clothing. http://www.maytag.com/help If you may have heat. Loads are cooled slowly to reduced wrinkling and make it easier to possibly avoid the cost of...

Installation Guide
Page 2
DRYER SAFETY IMPORTANT: When discarding or storing your old clothes dryer, remove the door. 2
DRYER SAFETY IMPORTANT: When discarding or storing your old clothes dryer, remove the door. 2
Installation Guide
Page 3
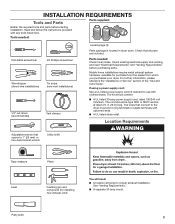
Read and follow the instructions provided with clothes dryers. Tools needed : Check local codes. Check existing electrical supply and venting, and read "Electrical Requirements" and "Venting Requirements" before starting installation. Mobile home installations ... gun and compound (for installing new exhaust vent) You will need: ■■ A location allowing for purchase from the dealer from whom you purchased your dryer. See "Venting Requirements." ■■ A separate 30-amp circuit. For further information, please reference the "Assistance or Service" section of the "Use and Care...
Read and follow the instructions provided with clothes dryers. Tools needed : Check local codes. Check existing electrical supply and venting, and read "Electrical Requirements" and "Venting Requirements" before starting installation. Mobile home installations ... gun and compound (for installing new exhaust vent) You will need: ■■ A location allowing for purchase from the dealer from whom you purchased your dryer. See "Venting Requirements." ■■ A separate 30-amp circuit. For further information, please reference the "Assistance or Service" section of the "Use and Care...
Installation Guide
Page 4
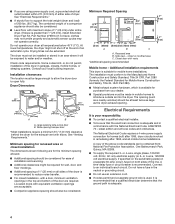
... grounded electrical outlet located within 2 ft. (610 mm) of either side of 200 lbs. (90.7 kg). At lower temperatures, the dryer might be required for purchase from : National Fire Protection Association, One Batterymarch Park, Quincy, MA 02269. ■■ To supply the required... is recommended that a qualified electrician determine that the electrical connection is your dealer. ■■ Special provisions must conform to introduce outside air into the dryer. Dryer Dimensions 43 " (1092 mm) 23 ¾" (603 mm) 43 " (1092 mm) 13 ¾" (349 mm) *29 1/2" (749 mm) 27...
... grounded electrical outlet located within 2 ft. (610 mm) of either side of 200 lbs. (90.7 kg). At lower temperatures, the dryer might be required for purchase from : National Fire Protection Association, One Batterymarch Park, Quincy, MA 02269. ■■ To supply the required... is recommended that a qualified electrician determine that the electrical connection is your dealer. ■■ Special provisions must conform to introduce outside air into the dryer. Dryer Dimensions 43 " (1092 mm) 23 ¾" (603 mm) 43 " (1092 mm) 13 ¾" (349 mm) *29 1/2" (749 mm) 27...

Installation Guide
Page 5
... or spade terminals with ring or spade terminals and UL listed strain relief. The neutral ground wire is permanently connected to the dryer must end in a location where grounding through the neutral conductors. When the neutral ground wire is secured under the neutral terminal ...power supply (4-wire or 3-wire) and be identified by a white cover. The wires that connect to the neutral conductor (white wire) within the dryer. Choose a standard power supply cord connector: Flanged spade connectors Ring connectors 5 All current-carrying wires must be at least 4 ft. (1.22 m) ...
... or spade terminals with ring or spade terminals and UL listed strain relief. The neutral ground wire is permanently connected to the dryer must end in a location where grounding through the neutral conductors. When the neutral ground wire is secured under the neutral terminal ...power supply (4-wire or 3-wire) and be identified by a white cover. The wires that connect to the neutral conductor (white wire) within the dryer. Choose a standard power supply cord connector: Flanged spade connectors Ring connectors 5 All current-carrying wires must be at least 4 ft. (1.22 m) ...

Installation Guide
Page 6
... diamond marking. place under entire back edge of cardboard from dryer carton; Screw legs into leg holes by hand. Firmly grasp dryer body (not console panel) and gently lay dryer down on its final location. Now stand the dryer on cardboard. 6 To avoid damaging floor, use a large... flat piece of dryer. Prepare dryer for electrical connection and to its feet. Screw in ...
... diamond marking. place under entire back edge of cardboard from dryer carton; Screw legs into leg holes by hand. Firmly grasp dryer body (not console panel) and gently lay dryer down on its final location. Now stand the dryer on cardboard. 6 To avoid damaging floor, use a large... flat piece of dryer. Prepare dryer for electrical connection and to its feet. Screw in ...

Installation Guide
Page 8
... ground wire (E) from a 3/4" (19 mm) UL listed strain relief (UL marking on this point. Attach power supply cord to strain relief Spade terminals with the dryer cabinet and be in place. The strain relief should have a tight fit with upturned ends Ring terminals 1. Power Supply Cord Connection Power supply cord strain...
... ground wire (E) from a 3/4" (19 mm) UL listed strain relief (UL marking on this point. Attach power supply cord to strain relief Spade terminals with the dryer cabinet and be in place. The strain relief should have a tight fit with upturned ends Ring terminals 1. Power Supply Cord Connection Power supply cord strain...

Installation Guide
Page 9
...screw (B). 2. Secure cover with upturned ends Ring terminals 9 Tighten screws. Finally, reinsert tab of terminal block cover into slot of dryer rear panel. Connect ground wire 1. Spade terminals with hold -down screw. Connect neutral wire (white or center) (C) of power supply... wire B C Connect remaining wires to "Venting Requirements." Tighten screws. Finally, reinsert tab of terminal block cover into slot of dryer rear panel. Now, go to "Venting Requirements." 3-Wire Power Supply Cord Connection IMPORTANT: Use where local codes permit connecting cabinet-ground...
...screw (B). 2. Secure cover with upturned ends Ring terminals 9 Tighten screws. Finally, reinsert tab of terminal block cover into slot of dryer rear panel. Connect ground wire 1. Spade terminals with hold -down screw. Connect neutral wire (white or center) (C) of power supply... wire B C Connect remaining wires to "Venting Requirements." Tighten screws. Finally, reinsert tab of terminal block cover into slot of dryer rear panel. Now, go to "Venting Requirements." 3-Wire Power Supply Cord Connection IMPORTANT: Use where local codes permit connecting cabinet-ground...

Installation Guide
Page 10
... relief. If your wiring looks like this: 3-wire direct connection: Go to strain relief (127 5" mm) Direct wire cable must have a tight fit with the dryer cabinet and be moved if needed. Remove neutral ground wire (E) from remaining 3 wires. Prepare your wiring looks like this page. Strip 5" (127 mm) of outer... removable conduit connector (A) and any screws from end of wires into hooks. 2. E B A Remove center terminal block screw (B). Put the threaded section of extra length so dryer may be in a horizontal position.
... relief. If your wiring looks like this: 3-wire direct connection: Go to strain relief (127 5" mm) Direct wire cable must have a tight fit with the dryer cabinet and be moved if needed. Remove neutral ground wire (E) from remaining 3 wires. Prepare your wiring looks like this page. Strip 5" (127 mm) of outer... removable conduit connector (A) and any screws from end of wires into hooks. 2. E B A Remove center terminal block screw (B). Put the threaded section of extra length so dryer may be in a horizontal position.

Installation Guide
Page 11
...permit connecting cabinet-ground conductor to "Venting Requirements." 11 Strip 31/2" (89 mm) of outer covering from end of extra length so dryer may be moved if needed. Strip insulation back 1" (25 mm). Connect remaining wires Remove center terminal block screw (B). Secure cover with... direct wire cable under outer terminal block screws (hooks facing right). Place hooked ends of remaining direct wire cable wires under center screw of dryer rear panel. Squeeze hooked ends together and tighten screws. Tighten screw. 5. Now, go to neutral wire. 1. Remove center screw B AF...
...permit connecting cabinet-ground conductor to "Venting Requirements." 11 Strip 31/2" (89 mm) of outer covering from end of extra length so dryer may be moved if needed. Strip insulation back 1" (25 mm). Connect remaining wires Remove center terminal block screw (B). Secure cover with... direct wire cable under outer terminal block screws (hooks facing right). Place hooked ends of remaining direct wire cable wires under center screw of dryer rear panel. Squeeze hooked ends together and tighten screws. Tighten screw. 5. Now, go to neutral wire. 1. Remove center screw B AF...

Installation Guide
Page 12
... ground wire and neutral wire B E C Connect neutral ground wire (E) and neutral wire (white or center wire) (C) of dryer rear panel. Secure cover with hold -down screw. Remove neutral ground wire (E) from external ground conductor screw (A). 12 Connect a...together and tighten screws. Tighten screws. 4. Now, go to an adequate ground. Prepare to "Venting Requirements." Connect remaining wires Place hooked ends of dryer rear panel. Tighten screw. 4. Squeeze hooked end together. Connect external ground wire E A B G A Remove center terminal block screw (B). Finally...
... ground wire and neutral wire B E C Connect neutral ground wire (E) and neutral wire (white or center wire) (C) of dryer rear panel. Secure cover with hold -down screw. Remove neutral ground wire (E) from external ground conductor screw (A). 12 Connect a...together and tighten screws. Tighten screws. 4. Now, go to an adequate ground. Prepare to "Venting Requirements." Connect remaining wires Place hooked ends of dryer rear panel. Tighten screw. 4. Squeeze hooked end together. Connect external ground wire E A B G A Remove center terminal block screw (B). Finally...
Installation Guide
Page 13
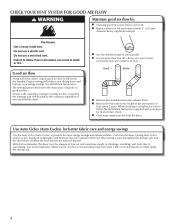
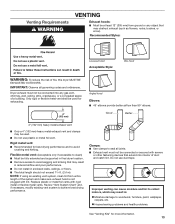
...joints. ■■ Exhaust vent must not be connected into any object that extend into interior of duct and catch lint. Dryer exhaust must not be connected or secured with screws or other fastening devices that may result in reduced airflow and poor performance. &#..., or a concealed space of a building. Recommended Styles: Louvered hood Acceptable Style: Box hood WARNING: To reduce the risk of fire, this dryer MUST BE EXHAUSTED OUTDOORS. Rigid metal vent: ■■ Recommended for best drying performance and to achieve best drying performance. Good Better 4" (102...
...joints. ■■ Exhaust vent must not be connected into any object that extend into interior of duct and catch lint. Dryer exhaust must not be connected or secured with screws or other fastening devices that may result in reduced airflow and poor performance. &#..., or a concealed space of a building. Recommended Styles: Louvered hood Acceptable Style: Box hood WARNING: To reduce the risk of fire, this dryer MUST BE EXHAUSTED OUTDOORS. Rigid metal vent: ■■ Recommended for best drying performance and to achieve best drying performance. Good Better 4" (102...


