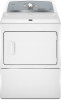
Use & Care Guide
Page 12
..., so these excluded circumstances shall be provided by an authorized Maytag servicer is intended to be easily determined. Replacement parts or repair labor on the product. DISCLAIMER OF REPRESENTATIONS OUTSIDE OF WARRANTY Maytag makes no representations about the quality, durability, or need to...materials or workmanship that vary from unauthorized modifications made to province. Replacement parts or repair labor if this Warranty. Service calls to know your retailer about your authorized Maytag dealer to better help can find this information on the model and serial...
..., so these excluded circumstances shall be provided by an authorized Maytag servicer is intended to be easily determined. Replacement parts or repair labor on the product. DISCLAIMER OF REPRESENTATIONS OUTSIDE OF WARRANTY Maytag makes no representations about the quality, durability, or need to...materials or workmanship that vary from unauthorized modifications made to province. Replacement parts or repair labor if this Warranty. Service calls to know your retailer about your authorized Maytag dealer to better help can find this information on the model and serial...
Installation Guide
Page 3
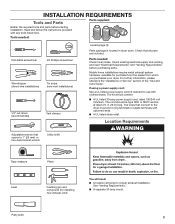
...with any tools listed here. The kit should be type SRD or SRDT and be at least 4 ft. (1.22 m) long. Parts needed : Flat-blade screwdriver #2 Phillips screwdriver Wire stripper (direct wire installations) Tin snips (new vent installations) 1/4" nut driver (recommended) Vent... Location Requirements Adjustable wrench that opens to the dryer must end in dryer drum. INSTALLATION REQUIREMENTS Tools and Parts Parts supplied: Gather the required tools and parts before purchasing parts. If using a power supply cord: Use a UL listed power supply cord kit marked for purchase from...
...with any tools listed here. The kit should be type SRD or SRDT and be at least 4 ft. (1.22 m) long. Parts needed : Flat-blade screwdriver #2 Phillips screwdriver Wire stripper (direct wire installations) Tin snips (new vent installations) 1/4" nut driver (recommended) Vent... Location Requirements Adjustable wrench that opens to the dryer must end in dryer drum. INSTALLATION REQUIREMENTS Tools and Parts Parts supplied: Gather the required tools and parts before purchasing parts. If using a power supply cord: Use a UL listed power supply cord kit marked for purchase from...
Installation Guide
Page 4
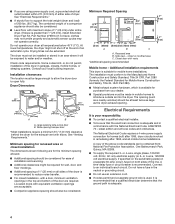
...The dryer must conform to the Manufactured Home Construction and Safety Standard, Title 24 CFR, Part 3280 (formerly the Federal Standard for Mobile Home Construction and Safety, Title 24, HUD Part 280). ■■ Metal exhaust system hardware, which is adequate. 4 Check code ...both sides of an automatic cycle. Additional installation requirements This dryer is greater than 1" [25 mm], install Extended Dryer Feet Kit, Part Number 279810.) If not level, clothes may not tumble properly and automatic sensor cycles may not operate correctly. See "Electrical Requirements." &#...
...The dryer must conform to the Manufactured Home Construction and Safety Standard, Title 24 CFR, Part 3280 (formerly the Federal Standard for Mobile Home Construction and Safety, Title 24, HUD Part 280). ■■ Metal exhaust system hardware, which is adequate. 4 Check code ...both sides of an automatic cycle. Additional installation requirements This dryer is greater than 1" [25 mm], install Extended Dryer Feet Kit, Part Number 279810.) If not level, clothes may not tumble properly and automatic sensor cycles may not operate correctly. See "Electrical Requirements." &#...

Installation Guide
Page 14
... clearance alternate installations are available for close -clearance installations are possible. Dryer B. In Canada, call 1-800-901-2042, or visit us at www.applianceaccessories.com. Part Number Description 8171587RP 0-5" Metal vent periscope 4396037RP 0"-18" Metal vent periscope 4396011RP 18"-29" Metal vent periscope 4396014 29"-50" Metal vent periscope 4392892 In...
... clearance alternate installations are available for close -clearance installations are possible. Dryer B. In Canada, call 1-800-901-2042, or visit us at www.applianceaccessories.com. Part Number Description 8171587RP 0-5" Metal vent periscope 4396037RP 0"-18" Metal vent periscope 4396011RP 18"-29" Metal vent periscope 4396014 29"-50" Metal vent periscope 4392892 In...
Installation Guide
Page 16
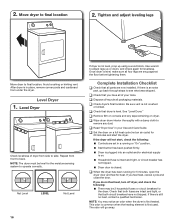
...remaining on . ■■ Household fuse is intact and tight, or circuit breaker has not tripped. ■■ Dryer door is an extra part, go away. If there is level. Tighten and adjust leveling legs Move dryer to back. Level Dryer Check levelness of /recycle all four legs .... 2. After dryer is first used. q Check that dryer is still no heat, contact a qualified technician. Check that both circuit breakers have all parts are set in place, remove corner posts and cardboard from front to final location. This odor is common when the heating element is in a running...
...remaining on . ■■ Household fuse is intact and tight, or circuit breaker has not tripped. ■■ Dryer door is an extra part, go away. If there is level. Tighten and adjust leveling legs Move dryer to back. Level Dryer Check levelness of /recycle all four legs .... 2. After dryer is first used. q Check that dryer is still no heat, contact a qualified technician. Check that both circuit breakers have all parts are set in place, remove corner posts and cardboard from front to final location. This odor is common when the heating element is in a running...
Installation Guide
Page 17
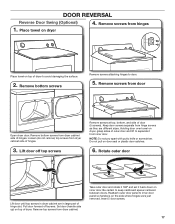
... where hinges were just removed. NOTE: Do not pry apart with putty knife or screwdriver. Rotate outer door Lift door until top screws in large part of door (5 screws). Reattach outer door panel to inner door panel so handle is on dryer, grasp sides of hinges. Remove screws from dryer cabinet...
... where hinges were just removed. NOTE: Do not pry apart with putty knife or screwdriver. Rotate outer door Lift door until top screws in large part of door (5 screws). Reattach outer door panel to inner door panel so handle is on dryer, grasp sides of hinges. Remove screws from dryer cabinet...

Installation Guide
Page 19
... separate from outer door Lift door until top screws in dryer cabinet are different sizes. 7. Separate inner from hinge screws as they are in large part of hinges. 3. Remove top screws from dryer cabinet side of hinge slot. Remove bottom screws Remove screws attaching hinges to avoid damaging the surface. 2. Loosen...
... separate from outer door Lift door until top screws in dryer cabinet are different sizes. 7. Separate inner from hinge screws as they are in large part of hinges. 3. Remove top screws from dryer cabinet side of hinge slot. Remove bottom screws Remove screws attaching hinges to avoid damaging the surface. 2. Loosen...


