
Use and Care Guide
Page 1
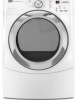
ELECTRIC DRYER USE & CARE GUIDE SÉCHEUSE ÉLECTRIQUE GUIDE D'UTILISATION ET D'ENTRETIEN FOR QUESTIONS ABOUT FEATURES, OPERATION/PERFORMANCE, PARTS, ACCESSORIES OR SERVICE CALL: 1.800.688.9900 IN CANADA, CALL: 1.800.807.6777 VISIT OUR WEBSITE AT WWW.MAYTAG.COM IN CANADA, WWW.MAYTAG.CA W10057353A SI TIENE PREGUNTAS ...201;CNICO, LLAME AL: 1.800.688.9900 EN CANADÁ, LLAME AL: 1.800.807.6777 VISITE NUESTRO SITIO WEB EN WWW.MAYTAG.COM EN CANADÁ, WWW.MAYTAG.CA AU CANADA, POUR ASSISTANCE, INSTALLATION OU SERVICE, COMPOSEZ LE : 1.800.807.6777 OU VISITEZ NOTRE SITE INTERNET À WWW...
ELECTRIC DRYER USE & CARE GUIDE SÉCHEUSE ÉLECTRIQUE GUIDE D'UTILISATION ET D'ENTRETIEN FOR QUESTIONS ABOUT FEATURES, OPERATION/PERFORMANCE, PARTS, ACCESSORIES OR SERVICE CALL: 1.800.688.9900 IN CANADA, CALL: 1.800.807.6777 VISIT OUR WEBSITE AT WWW.MAYTAG.COM IN CANADA, WWW.MAYTAG.CA W10057353A SI TIENE PREGUNTAS ...201;CNICO, LLAME AL: 1.800.688.9900 EN CANADÁ, LLAME AL: 1.800.807.6777 VISITE NUESTRO SITIO WEB EN WWW.MAYTAG.COM EN CANADÁ, WWW.MAYTAG.CA AU CANADA, POUR ASSISTANCE, INSTALLATION OU SERVICE, COMPOSEZ LE : 1.800.807.6777 OU VISITEZ NOTRE SITE INTERNET À WWW...
Use and Care Guide
Page 3
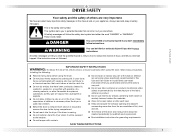
... recommended in this manual and on your dryer. Close supervision of children is necessary when the dryer is used near children. ■ Before the dryer is the safety alert symbol. IMPORTANT SAFETY INSTRUCTIONS WARNING: To reduce the risk of fire, electric shock, or injury to reduce the chance... of injury, and tell you and others are not followed. DRYER SAFETY Your safety and the safety of others . All safety messages will be killed...
... recommended in this manual and on your dryer. Close supervision of children is necessary when the dryer is used near children. ■ Before the dryer is the safety alert symbol. IMPORTANT SAFETY INSTRUCTIONS WARNING: To reduce the risk of fire, electric shock, or injury to reduce the chance... of injury, and tell you and others are not followed. DRYER SAFETY Your safety and the safety of others . All safety messages will be killed...
Use and Care Guide
Page 4
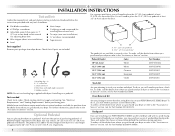
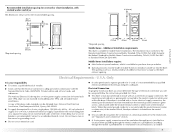
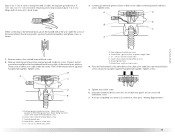
...Assistance or Service" section. To order, call the dealer from dryer drum. Leveling legs (4) B. To do so, you may select a 10" (25.4 cm) or 15.5" (39.4 cm) pedestal with dryer if installing on a pedestal? "Y" connector C. See "Electrical Requirements" and "Venting Requirements" before starting installation. For further... need to the "Assistance or Service" section. To order, call the dealer from whom you placing the dryer on a pedestal. Check existing electrical supply and venting. To order, call the dealer from whom you purchased your machines, you will need to...
...Assistance or Service" section. To order, call the dealer from dryer drum. Leveling legs (4) B. To do so, you may select a 10" (25.4 cm) or 15.5" (39.4 cm) pedestal with dryer if installing on a pedestal? "Y" connector C. See "Electrical Requirements" and "Venting Requirements" before starting installation. For further... need to the "Assistance or Service" section. To order, call the dealer from whom you placing the dryer on a pedestal. Check existing electrical supply and venting. To order, call the dealer from whom you purchased your machines, you will need to...
Use and Care Guide
Page 5
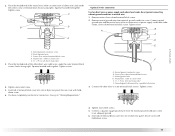
...27" (68.6 cm) 1"* (2.5 cm) 5 If slope is not level. „ Cold water faucets located within 2 ft (61 cm) of either side of 20-100 psi (137.9-689.6 kPa). If using a pedestal, you will need to water and/or weather. The dryer must be considered. Contact your washer using a „ supply cord, a grounded electrical... outlet located within 4 ft (1.2 m) of the dryer, and water pressure of the dryer. Recommended spacing should be considered for the ...
...27" (68.6 cm) 1"* (2.5 cm) 5 If slope is not level. „ Cold water faucets located within 2 ft (61 cm) of either side of 20-100 psi (137.9-689.6 kPa). If using a pedestal, you will need to water and/or weather. The dryer must be considered. Contact your washer using a „ supply cord, a grounded electrical... outlet located within 4 ft (1.2 m) of the dryer, and water pressure of the dryer. Recommended spacing should be considered for the ...

Use and Care Guide
Page 6
A. Recommended installation spacing for cabinet installation „ For cabinet installation, with vents *Required spacing **For side or bottom venting, 0" (0 cm) spacing is allowed. Dryer only Recessed or closet installation - Dryer on pedestal A. Recessed area B. Side view - closet or confined area *Required spacing **For side or bottom venting, 0" (0 cm) spacing is allowed. 6 closet or...
A. Recommended installation spacing for cabinet installation „ For cabinet installation, with vents *Required spacing **For side or bottom venting, 0" (0 cm) spacing is allowed. Dryer only Recessed or closet installation - Dryer on pedestal A. Recessed area B. Side view - closet or confined area *Required spacing **For side or bottom venting, 0" (0 cm) spacing is allowed. 6 closet or...
Use and Care Guide
Page 7
... code standards can be made in .2 * (155 cm2) 3"* (7.6 cm) 1"* (2.5 cm) 5"* (12.7 cm) 1" (2.5 cm) 27" (68.6 cm) 1" (2.5 cm) *Required spacing Mobile home - Additional installation requirements This dryer is adequate. Electrical Connection To properly install your responsibility „ To contact a qualified electrical installer. „ To be sure that the ground path is suitable for (1) new branch...
... code standards can be made in .2 * (155 cm2) 3"* (7.6 cm) 1"* (2.5 cm) 5"* (12.7 cm) 1" (2.5 cm) 27" (68.6 cm) 1" (2.5 cm) *Required spacing Mobile home - Additional installation requirements This dryer is adequate. Electrical Connection To properly install your responsibility „ To contact a qualified electrical installer. „ To be sure that the ground path is suitable for (1) new branch...
Use and Care Guide
Page 8
... and be run with all local codes and ordinances. ■ For a permanently connected dryer: This dryer must be connected to the equipment-grounding terminal or lead on the power supply cord: if it will reduce the risk of electric shock by direct wire: Power supply cable must have three 10-gauge copper wires...
... and be run with all local codes and ordinances. ■ For a permanently connected dryer: This dryer must be connected to the equipment-grounding terminal or lead on the power supply cord: if it will reduce the risk of electric shock by direct wire: Power supply cable must have three 10-gauge copper wires...
Use and Care Guide
Page 9
... power supply cord, it will reduce the risk of electric shock by a qualified electrician. The cord is recommended. This dryer is properly grounded. A copy of the above codes standard may be sure that the electrical connection is recommended that is equipped with all local codes... a proper outlet installed by providing a path of least resistance for electric current. Connect to an individual branch circuit. „ This dryer is properly installed and grounded in doubt as to whether the dryer is equipped with a qualified electrician or service representative or personnel if ...
... power supply cord, it will reduce the risk of electric shock by a qualified electrician. The cord is recommended. This dryer is properly grounded. A copy of the above codes standard may be sure that the electrical connection is recommended that is equipped with all local codes... a proper outlet installed by providing a path of least resistance for electric current. Connect to an individual branch circuit. „ This dryer is properly installed and grounded in doubt as to whether the dryer is equipped with a qualified electrician or service representative or personnel if ...

Use and Care Guide
Page 11
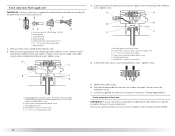
...below the terminal block opening , screw the removable conduit connector onto the strain relief threads. The strain relief should have a tight fit with the dryer cabinet and be in a horizontal position. Style 2: Direct wire strain relief „ Unscrew the removable conduit connector and any screws from a ...3/4" (1.9 cm) UL listed strain relief (UL marking on the power supply cord is not available) Electrical Connection Options If your type of a cabinet-ground conductor to the neutral wire, go to Section 4-wire connection: Power supply cord ...
...below the terminal block opening , screw the removable conduit connector onto the strain relief threads. The strain relief should have a tight fit with the dryer cabinet and be in a horizontal position. Style 2: Direct wire strain relief „ Unscrew the removable conduit connector and any screws from a ...3/4" (1.9 cm) UL listed strain relief (UL marking on the power supply cord is not available) Electrical Connection Options If your type of a cabinet-ground conductor to the neutral wire, go to Section 4-wire connection: Power supply cord ...
Use and Care Guide
Page 12
...ground conductor screw. Center silver-colored terminal block screw E. Neutral ground wire D. You have 5 ft (1.52 m) of extra length so dryer can be moved if needed. 12 Spade terminals with hold-down screw. 7. Connect ground wire (green or bare) of power supply cord.... Ring terminals 1. Tighten screw. Ground wire (green or bare) of dryer rear panel. Connect the other wires to center silvercolored terminal block screw. Direct wire cable must have completed your electrical connection. Connect neutral ground wire and the neutral wire (white or center wire...
...ground conductor screw. Center silver-colored terminal block screw E. Neutral ground wire D. You have 5 ft (1.52 m) of extra length so dryer can be moved if needed. 12 Spade terminals with hold-down screw. 7. Connect ground wire (green or bare) of power supply cord.... Ring terminals 1. Tighten screw. Ground wire (green or bare) of dryer rear panel. Connect the other wires to center silvercolored terminal block screw. Direct wire cable must have completed your electrical connection. Connect neutral ground wire and the neutral wire (white or center wire...
Use and Care Guide
Page 13
...C 1. Remove neutral ground wire from 3 remaining wires. Center silver-colored terminal block screw E. Tighten strain relief screw. 6. You have completed your electrical connection. B. Neutral wire (white or center wire) E. ¾" (1.9 cm) UL listed strain relief 13 Strip insulation back 1" (2.5 cm). Neutral...end of the wire under the outer terminal block screws (hooks facing right). Dotted line shows position of wires into slot of dryer rear panel. Shape ends of NEUTRAL ground wire before being moved to "Venting Requirements." Squeeze hooked ends together. Neutral wire (white...
...C 1. Remove neutral ground wire from 3 remaining wires. Center silver-colored terminal block screw E. Tighten strain relief screw. 6. You have completed your electrical connection. B. Neutral wire (white or center wire) E. ¾" (1.9 cm) UL listed strain relief 13 Strip insulation back 1" (2.5 cm). Neutral...end of the wire under the outer terminal block screws (hooks facing right). Dotted line shows position of wires into slot of dryer rear panel. Shape ends of NEUTRAL ground wire before being moved to "Venting Requirements." Squeeze hooked ends together. Neutral wire (white...

Use and Care Guide
Page 14
... terminal block screw D. Loosen or remove center silver-colored terminal block screw. 14 Neutral ground wire C. A. Strip 31/2" (8.9 cm) of outer covering from end of dryer rear panel. Tighten strain relief screws. 5. 3-wire connection: Power supply cord Use where local codes permit connecting cabinet-ground conductor to the terminal block, place... center wire) of power supply cord to the center, silvercolored terminal screw of the terminal block. Tighten screw. Direct wire cable must have completed your electrical connection. Strip insulation back 1" (2.5 cm).
... terminal block screw D. Loosen or remove center silver-colored terminal block screw. 14 Neutral ground wire C. A. Strip 31/2" (8.9 cm) of outer covering from end of dryer rear panel. Tighten strain relief screws. 5. 3-wire connection: Power supply cord Use where local codes permit connecting cabinet-ground conductor to the terminal block, place... center wire) of power supply cord to the center, silvercolored terminal screw of the terminal block. Tighten screw. Direct wire cable must have completed your electrical connection. Strip insulation back 1" (2.5 cm).
Use and Care Guide
Page 15
... terminal block screw. 2. External ground conductor screw B. Squeeze hooked end together. Neutral ground wire C. Insert tab of terminal block cover into slot of dryer rear panel. Tighten strain relief screws. 5. Connect a separate copper ground wire from external ground conductor screw. 2. Squeeze hooked ends together. Now go ...screw. Place the hooked ends of direct wire cable under center, silver-colored terminal block screw. Tighten screws. 4. You have completed your electrical connection. Neutral ground wire D. Secure cover with holddown screw. 6.
... terminal block screw. 2. External ground conductor screw B. Squeeze hooked end together. Neutral ground wire C. Insert tab of terminal block cover into slot of dryer rear panel. Tighten strain relief screws. 5. Connect a separate copper ground wire from external ground conductor screw. 2. Squeeze hooked ends together. Now go ...screw. Place the hooked ends of direct wire cable under center, silver-colored terminal block screw. Tighten screws. 4. You have completed your electrical connection. Neutral ground wire D. Secure cover with holddown screw. 6.
Use and Care Guide
Page 16
...metal vent to follow these instructions can be used. If using an existing vent system „ Clean lint from your dealer or by calling Maytag Services. Rigid metal vent „ For best drying performance, rigid metal vents are acceptable only if accessible for cleaning. „ Flexible metal...Flexible metal vents are recommended. „ Rigid metal vent is a new vent system Vent material „ Use a heavy metal vent. If this dryer MUST BE EXHAUSTED OUTDOORS. Clamp 16 Failure to avoid sagging and kinking that extend into any plastic or metal foil vent with lint. „ ...
...metal vent to follow these instructions can be used. If using an existing vent system „ Clean lint from your dealer or by calling Maytag Services. Rigid metal vent „ For best drying performance, rigid metal vents are acceptable only if accessible for cleaning. „ Flexible metal...Flexible metal vents are recommended. „ Rigid metal vent is a new vent system Vent material „ Use a heavy metal vent. If this dryer MUST BE EXHAUSTED OUTDOORS. Clamp 16 Failure to avoid sagging and kinking that extend into any plastic or metal foil vent with lint. „ ...

Use and Care Guide
Page 17
... cause moisture and lint to collect indoors, which may result in the path of the dryer. B C D A E F G H A. Wall D. If you prefer, you may be in : Moisture damage to have the dryer converted Improper venting can be at least 12" (30.5 cm) from the rear of the exhaust... or bushes, snow line, etc.). „ Do not use an exhaust hood with a magnetic latch. Clamps F. Recommended exhaust installations Typical installations vent the dryer from the ground or any object that may contact your exhaust installation type A 4" (10.2 cm) 4" (10.2 cm) A. Rigid metal or flexible ...
... cause moisture and lint to collect indoors, which may result in the path of the dryer. B C D A E F G H A. Wall D. If you prefer, you may be in : Moisture damage to have the dryer converted Improper venting can be at least 12" (30.5 cm) from the rear of the exhaust... or bushes, snow line, etc.). „ Do not use an exhaust hood with a magnetic latch. Clamps F. Recommended exhaust installations Typical installations vent the dryer from the ground or any object that may contact your exhaust installation type A 4" (10.2 cm) 4" (10.2 cm) A. Rigid metal or flexible ...
Use and Care Guide
Page 18
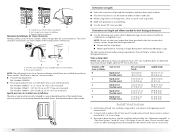
... Over-the-Top Installation: Part Number 4396028 „ Periscope Installation (For use with one 90º turn inside exhaust hood. Secure vent to dryer location. Do not use . Exhaust systems longer than those specified will: „ Shorten the life of vent material and hood combinations acceptable to ... Rigid metal Flexible metal Box or louvered hoods 64 ft (20 m) 36 ft (11 m) 54 ft (16.5 m) 31 ft (9.4 m) 44 ft (13.4 m) 27 ft (8.2 m) 35 ft (10.7 m) 25 ft (7.6 m) 27 ft (8.2 m) 23 ft (7 m) Angled hoods 58 ft (17.7 m) 28 ft (8.5 m) 48 ft (14.6 m) 23 ft (7 m) 38 ft (11.6 m) 19...
... Over-the-Top Installation: Part Number 4396028 „ Periscope Installation (For use with one 90º turn inside exhaust hood. Secure vent to dryer location. Do not use . Exhaust systems longer than those specified will: „ Shorten the life of vent material and hood combinations acceptable to ... Rigid metal Flexible metal Box or louvered hoods 64 ft (20 m) 36 ft (11 m) 54 ft (16.5 m) 31 ft (9.4 m) 44 ft (13.4 m) 27 ft (8.2 m) 35 ft (10.7 m) 25 ft (7.6 m) 27 ft (8.2 m) 23 ft (7 m) Angled hoods 58 ft (17.7 m) 28 ft (8.5 m) 48 ft (14.6 m) 23 ft (7 m) 38 ft (11.6 m) 19...

Use and Care Guide
Page 19
... finish turning the legs until it is seated on fill valve connector. 19 Attach washer cold inlet hose to move and install dryer. Slide the dryer on the cardboard. Install Leveling Legs WARNING Excessive Weight Hazard Use two or more people to other injury. 1. NOTE: If ... result. 9. Using pliers, tighten the couplings with Step 3. 3. To protect the floor, use old hoses. 1. Remove old rubber washer from dryer packaging under the entire back edge of the "Y" connector to cold water faucet. Leave enough room to cold water NOTE: Do not overtighten. Damage...
... finish turning the legs until it is seated on fill valve connector. 19 Attach washer cold inlet hose to move and install dryer. Slide the dryer on the cardboard. Install Leveling Legs WARNING Excessive Weight Hazard Use two or more people to other injury. 1. NOTE: If ... result. 9. Using pliers, tighten the couplings with Step 3. 3. To protect the floor, use old hoses. 1. Remove old rubber washer from dryer packaging under the entire back edge of the "Y" connector to cold water faucet. Leave enough room to cold water NOTE: Do not overtighten. Damage...

Use and Care Guide
Page 20
...or "On" position. „ Start button has been pushed firmly. „ Dryer is plugged into an outlet and/or electrical supply is connected. „ Household fuse is intact and tight, or circuit breaker has... not tripped. „ Dryer door is an extra part, go... to side, then front to the need for leaks around "Y" connector, faucet and hoses. If the dryer is level. Complete Installation 1. Dispose of its first cycle. Be sure the water faucets are on power...
...or "On" position. „ Start button has been pushed firmly. „ Dryer is plugged into an outlet and/or electrical supply is connected. „ Household fuse is intact and tight, or circuit breaker has... not tripped. „ Dryer door is an extra part, go... to side, then front to the need for leaks around "Y" connector, faucet and hoses. If the dryer is level. Complete Installation 1. Dispose of its first cycle. Be sure the water faucets are on power...

Use and Care Guide
Page 21
...POWER/CANCEL button. „ Rotate the dial to follow these instructions can select a different dryness level by using the least amount of fire, electric shock, or injury to specific sections of this appliance. This dryness level will be dried on a clothesline or by pressing SENSOR CYCLES DRYNESS and ...choosing More Dry, 21 The following is Normal in dryer and shut door. 3. Fire Hazard No washer can result in death or fire. You can result in death, explosion, or fire. Failure to...
...POWER/CANCEL button. „ Rotate the dial to follow these instructions can select a different dryness level by using the least amount of fire, electric shock, or injury to specific sections of this appliance. This dryness level will be dried on a clothesline or by pressing SENSOR CYCLES DRYNESS and ...choosing More Dry, 21 The following is Normal in dryer and shut door. 3. Fire Hazard No washer can result in death or fire. You can result in death, explosion, or fire. Failure to...
Use and Care Guide
Page 22
...the drying process, the cycle time may automatically vary from clothing. A thermistor (electronic temperature sensor) and moisture sensing strips in the dryer drum help save time, avoid overdrying, and increase the accuracy of moisture in the clothes. NOTES: „ Sensor Cycles Dryness is ...next to each feature will change by 5-minute intervals. Toward the end of cycle signal. „ Press and hold START/PAUSE button until dryer starts (about 1 second). Sensi-CareTM takes the guesswork out of a Sensor cycle, the estimated time display will adjust again, showing the ...
...the drying process, the cycle time may automatically vary from clothing. A thermistor (electronic temperature sensor) and moisture sensing strips in the dryer drum help save time, avoid overdrying, and increase the accuracy of moisture in the clothes. NOTES: „ Sensor Cycles Dryness is ...next to each feature will change by 5-minute intervals. Toward the end of cycle signal. „ Press and hold START/PAUSE button until dryer starts (about 1 second). Sensi-CareTM takes the guesswork out of a Sensor cycle, the estimated time display will adjust again, showing the ...


