
Owners Manual
Page 5
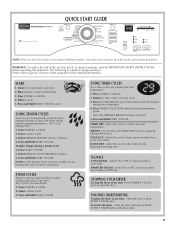
... QUICK DRY - Press POWER • CANCEL once or open the door. Place laundry in dry items. See "Cycles" for optimal performance. STEAM CYCLES Steam Cycles use water and heat to help remove wrinkles from clean, dry clothes. AIR DRY - Use Air Dry with TIMED DRY for more details... is displayed. 4. Please refer to using your clothes are 80% dry. Clean lint screen before operating this cycle to reduce wrinkles and odors in dryer and shut door. 3. Press and Hold START • PAUSE to ensure sanitization. Press POWER • CANCEL. 2. Select a Sensor Cycle. 3....
... QUICK DRY - Press POWER • CANCEL once or open the door. Place laundry in dry items. See "Cycles" for optimal performance. STEAM CYCLES Steam Cycles use water and heat to help remove wrinkles from clean, dry clothes. AIR DRY - Use Air Dry with TIMED DRY for more details... is displayed. 4. Please refer to using your clothes are 80% dry. Clean lint screen before operating this cycle to reduce wrinkles and odors in dryer and shut door. 3. Press and Hold START • PAUSE to ensure sanitization. Press POWER • CANCEL. 2. Select a Sensor Cycle. 3....
Owners Manual
Page 6
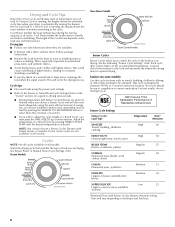
... are available. ■ If desired, add a fabric softener sheet. Steam Models Non-Steam Model Cycle Control knobs Sensor Cycles Sensor Cycles allow you wish to adjust the cycle length of Residential clothes Dryers Sensor Cycle Settings Sensor Cycles Load Type Temperature Time* (Minutes) SANITIZE ... pillows Regular 55 NORMAL Permanent press blends, work clothes with Timed, Steam, or Sanitize Cycles. For best results, do not interrupt cycle. Follow package instructions. ■ Remove the load from the dryer as soon as towels, bedding, children's clothing, or other items ...
... are available. ■ If desired, add a fabric softener sheet. Steam Models Non-Steam Model Cycle Control knobs Sensor Cycles Sensor Cycles allow you wish to adjust the cycle length of Residential clothes Dryers Sensor Cycle Settings Sensor Cycles Load Type Temperature Time* (Minutes) SANITIZE ... pillows Regular 55 NORMAL Permanent press blends, work clothes with Timed, Steam, or Sanitize Cycles. For best results, do not interrupt cycle. Follow package instructions. ■ Remove the load from the dryer as soon as towels, bedding, children's clothing, or other items ...
Owners Manual
Page 7
... Cycles are securely stitched. ■ Shake and fluff pillows by pressing the WRINKLE PREVENT feature or opening the dryer door. ■ Other cycles will change the settings for the Custom Refresh cycle. The Steam cycles include Rapid Refresh and Custom Refresh. Additional Features You may yield better results than those without heat...
... Cycles are securely stitched. ■ Shake and fluff pillows by pressing the WRINKLE PREVENT feature or opening the dryer door. ■ Other cycles will change the settings for the Custom Refresh cycle. The Steam cycles include Rapid Refresh and Custom Refresh. Additional Features You may yield better results than those without heat...
Owners Manual
Page 8
...in handling. Laundry is finished. CANCEL or Control On button before activating the Control Lock feature. Signal On/Off When on . ■ When the dryer is off . Pressing the TIME ADJUST or TIMED CYCLES TEMP buttons will glow. Sensing Light When a cycle is first turned on, the Sensing light ...Dry Light The Dry light illuminates when the drying cycle is not adjustable for Timed, Steam, or Sanitize Cycles. To unlock: Press and hold the CONTROL LOCK button for 20 minutes. The light on , the dryer can also use of Cycle Signal is on, an audible sound will not glow when ...
...in handling. Laundry is finished. CANCEL or Control On button before activating the Control Lock feature. Signal On/Off When on . ■ When the dryer is off . Pressing the TIME ADJUST or TIMED CYCLES TEMP buttons will glow. Sensing Light When a cycle is first turned on, the Sensing light ...Dry Light The Dry light illuminates when the drying cycle is not adjustable for Timed, Steam, or Sanitize Cycles. To unlock: Press and hold the CONTROL LOCK button for 20 minutes. The light on , the dryer can also use of Cycle Signal is on, an audible sound will not glow when ...
Owners Manual
Page 11
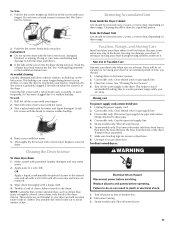
...drum thoroughly with hot water and liquid detergent. Gas models only: Close shutoff valve in dryer. Steam models only: Shut off the screen with your dryer only when you should be on the lint screen. For direct-wired dryers: 1. See "Venting Requirements" in gas supply line. 3. Wet a nylon brush with... gas supply line pipe and remove fittings attached to a residue buildup. Steam models only: Disconnect the water inlet hose from the back of lint screen with your dryer where it becomes clogged due to dryer pipe. 4. Roll lint off power at home. As needed cleaning Laundry...
...drum thoroughly with hot water and liquid detergent. Gas models only: Close shutoff valve in dryer. Steam models only: Shut off the screen with your dryer only when you should be on the lint screen. For direct-wired dryers: 1. See "Venting Requirements" in gas supply line. 3. Wet a nylon brush with... gas supply line pipe and remove fittings attached to a residue buildup. Steam models only: Disconnect the water inlet hose from the back of lint screen with your dryer where it becomes clogged due to dryer pipe. 4. Roll lint off power at home. As needed cleaning Laundry...
Owners Manual
Page 12
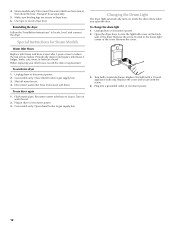
...into a grounded outlet or reconnect power. 12 Unplug dryer or disconnect power. 2. Turn bulb counterclockwise. Transport hose separately. 5. Replace the cover and secure with a 10-watt appliance bulb only. 4. Special Instructions for Steam Models Water Inlet Hoses Replace inlet hoses and hose screen... after 5 years of use dryer again 1. Shut off water faucet. 4. To change the drum light 1. Replace the bulb with...
...into a grounded outlet or reconnect power. 12 Unplug dryer or disconnect power. 2. Turn bulb counterclockwise. Transport hose separately. 5. Replace the cover and secure with a 10-watt appliance bulb only. 4. Special Instructions for Steam Models Water Inlet Hoses Replace inlet hoses and hose screen... after 5 years of use dryer again 1. Shut off water faucet. 4. To change the drum light 1. Replace the bulb with...

Installation Instructions
Page 1
...ón de estas instrucciones en español, visite www.Whirlpool.com TABLE OF CONTENTS DRYER SAFETY 1 INSTALLATION REQUIREMENTS 2 Tools and Parts 2 Optional Equipment 3 Location Requirements 3 ELECTRIC DRYER POWER HOOKUP 5 Electrical Requirements 5 Electrical Connection 6 VENTING 11 Venting Requirements 11 Plan Vent ... 12 Install Vent System 13 INSTALL LEVELING LEGS 13 CONNECT VENT 14 CONNECT INLET HOSE (STEAM MODELS 14 LEVEL DRYER 15 COMPLETE INSTALLATION 15 TROUBLESHOOTING 15 DRYER SAFETY Your safety and the safety of injury, and tell you what the potential hazard...
...ón de estas instrucciones en español, visite www.Whirlpool.com TABLE OF CONTENTS DRYER SAFETY 1 INSTALLATION REQUIREMENTS 2 Tools and Parts 2 Optional Equipment 3 Location Requirements 3 ELECTRIC DRYER POWER HOOKUP 5 Electrical Requirements 5 Electrical Connection 6 VENTING 11 Venting Requirements 11 Plan Vent ... 12 Install Vent System 13 INSTALL LEVELING LEGS 13 CONNECT VENT 14 CONNECT INLET HOSE (STEAM MODELS 14 LEVEL DRYER 15 COMPLETE INSTALLATION 15 TROUBLESHOOTING 15 DRYER SAFETY Your safety and the safety of injury, and tell you what the potential hazard...
Installation Instructions
Page 2
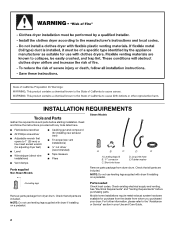
... (new vent installations) ■ ¼" nut driver (recommended) ■ Tape measure ■ Pliers Parts supplied Non-Steam Models Steam Models A B C D E A. For further information, please refer to 1" (25 mm) or hex-head socket wrench (for adjusting dryer feet) ■ Level ■ Wire stripper (direct wire installations) ■ Vent clamps ■ Caulking gun and compound...
... (new vent installations) ■ ¼" nut driver (recommended) ■ Tape measure ■ Pliers Parts supplied Non-Steam Models Steam Models A B C D E A. For further information, please refer to 1" (25 mm) or hex-head socket wrench (for adjusting dryer feet) ■ Level ■ Wire stripper (direct wire installations) ■ Vent clamps ■ Caulking gun and compound...
Installation Instructions
Page 3
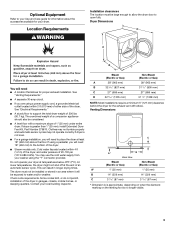
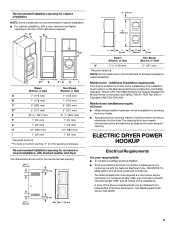
...■ A separate 30-amp circuit. ■ If you will need to the bottom of the dryer. ■ Steam models only: Cold water faucets located within 2 ft (610 mm) of either side of the dryer in garages, closets, mobile homes, or sleeping quarters. The combined weight of 1" (25 mm) ... no longer visible. 3 Location Requirements Installation clearances The location must not be large enough to allow the dryer door to support the total dryer weight of 20-100 psi (137.9-689.6 kPa). Do not operate your dryer. Steam (Electric or Gas) A 38" (965 mm) B 32 9/16" (827 mm) C 27" (686 ...
...■ A separate 30-amp circuit. ■ If you will need to the bottom of the dryer. ■ Steam models only: Cold water faucets located within 2 ft (610 mm) of either side of the dryer in garages, closets, mobile homes, or sleeping quarters. The combined weight of 1" (25 mm) ... no longer visible. 3 Location Requirements Installation clearances The location must not be large enough to allow the dryer door to support the total dryer weight of 20-100 psi (137.9-689.6 kPa). Do not operate your dryer. Steam (Electric or Gas) A 38" (965 mm) B 32 9/16" (827 mm) C 27" (686 ...
Installation Instructions
Page 4
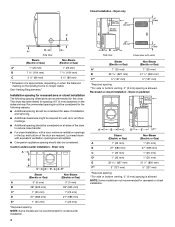
... (127 mm) *Required spacing **For side or bottom venting, 0" (0 mm) spacing is no longer visible. This dryer has been tested for recessed or closet installation. Dryer only A B C* D E* Steam (Electric or Gas) Non-Steam (Electric or Gas) A 0" (0 mm) 0" (0 mm) B 38" (965 mm) 38" (965 mm...NOTE: Some models are not recommended for spacing of the door are acceptable. ■ Companion appliance spacing should be considered. Dryer only (460 mm) C A* B Side View Steam (Electric or Gas) Non-Steam (Electric or Gas) A* 1" (25 mm) 1" (25 mm) B 7 5/8" (194 mm) 7 5/8" (...
... (127 mm) *Required spacing **For side or bottom venting, 0" (0 mm) spacing is no longer visible. This dryer has been tested for recessed or closet installation. Dryer only A B C* D E* Steam (Electric or Gas) Non-Steam (Electric or Gas) A 0" (0 mm) 0" (0 mm) B 38" (965 mm) 38" (965 mm...NOTE: Some models are not recommended for spacing of the door are acceptable. ■ Companion appliance spacing should be considered. Dryer only (460 mm) C A* B Side View Steam (Electric or Gas) Non-Steam (Electric or Gas) A* 1" (25 mm) 1" (25 mm) B 7 5/8" (194 mm) 7 5/8" (...
Installation Instructions
Page 5
... is your dealer. ■ Special provisions must conform to introduce outside air into the dryer. The installation must be made in .2 * (155 cm2) 3"* (76 mm) 1"* (25 mm) A* 1" 27" 1" (25 mm) (686 mm) (25 mm) Steam (Electric or Gas) Non-Steam (Electric or Gas) A* 5 ½" (140 mm) 5" (127 mm) *Required spacing NOTE: Some models...
... is your dealer. ■ Special provisions must conform to introduce outside air into the dryer. The installation must be made in .2 * (155 cm2) 3"* (76 mm) 1"* (25 mm) A* 1" 27" 1" (25 mm) (686 mm) (25 mm) Steam (Electric or Gas) Non-Steam (Electric or Gas) A* 5 ½" (140 mm) 5" (127 mm) *Required spacing NOTE: Some models...
Installation Instructions
Page 14
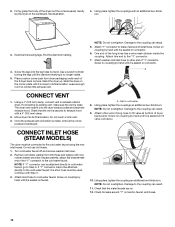
... cold water 8. Do not crush or kink vent. 3. Inlet to the "Y" connector. 7. NOTE: Do not overtighten. CONNECT INLET HOSE (STEAM MODELS) The dryer must be used. NOTE: If "Y" connector can result. 9. If "Y" connector cannot be attached directly to the cold water faucet, the short...the exhaust hood. 2. Place a carton corner post from inlet hose and replace with Step 3. 3. Attach "Y" connector to exhaust outlet in dryer. Using pliers, tighten the couplings an additional two-thirds turn . Using pliers, tighten the coupling an additional two-thirds turn . Examine the...
... cold water 8. Do not crush or kink vent. 3. Inlet to the "Y" connector. 7. NOTE: Do not overtighten. CONNECT INLET HOSE (STEAM MODELS) The dryer must be used. NOTE: If "Y" connector can result. 9. If "Y" connector cannot be attached directly to the cold water faucet, the short...the exhaust hood. 2. Place a carton corner post from inlet hose and replace with Step 3. 3. Attach "Y" connector to exhaust outlet in dryer. Using pliers, tighten the couplings an additional two-thirds turn . Using pliers, tighten the coupling an additional two-thirds turn . Examine the...
Installation Instructions
Page 15
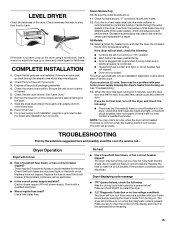
...recycle all parts are intact and tight, or that the dryer is not crushed or kinked. 5. See "Level Dryer." 6. Wipe the dryer drum interior thoroughly with your home power supply keeping the dryer's heater from turning on. Steam Models Only: 10. Excessive scale buildup may be a problem...level. Check that both fuses are now installed. The odor will continue to the estimated time remaining. 15 Electric dryers use of the dryer. COMPLETE INSTALLATION 1. Read "Dryer Use." 9. No heat ■ Has a household fuse blown, or has a circuit breaker tripped? If you...
...recycle all parts are intact and tight, or that the dryer is not crushed or kinked. 5. See "Level Dryer." 6. Wipe the dryer drum interior thoroughly with your home power supply keeping the dryer's heater from turning on. Steam Models Only: 10. Excessive scale buildup may be a problem...level. Check that both fuses are now installed. The odor will continue to the estimated time remaining. 15 Electric dryers use of the dryer. COMPLETE INSTALLATION 1. Read "Dryer Use." 9. No heat ■ Has a household fuse blown, or has a circuit breaker tripped? If you...


