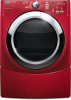
Owners Manual
Page 2
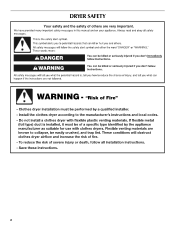
DRYER SAFETY 2
DRYER SAFETY 2
Owners Manual
Page 4
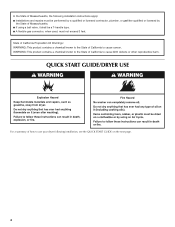
QUICK START GUIDE/DRYER USE For a summary of how to use your dryer following installation instructions apply: ■ Installations and repairs must be a T-handle type. ■ A flexible gas connector, when used, must not exceed 3 feet. In the State of Massachusetts. ■ If using a ball valve, it shall be performed by a qualified or licensed contractor, plumber, or gasfitter qualified or licensed by the State of Massachusetts, the following installation, see the QUICK START GUIDE on the next page. 4
QUICK START GUIDE/DRYER USE For a summary of how to use your dryer following installation instructions apply: ■ Installations and repairs must be a T-handle type. ■ A flexible gas connector, when used, must not exceed 3 feet. In the State of Massachusetts. ■ If using a ball valve, it shall be performed by a qualified or licensed contractor, plumber, or gasfitter qualified or licensed by the State of Massachusetts, the following installation, see the QUICK START GUIDE on the next page. 4
Owners Manual
Page 5
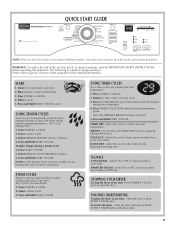
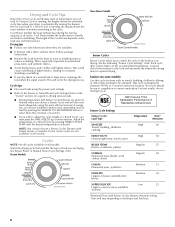
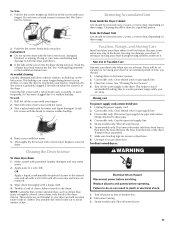
...this manual for more detailed information. Select ON or OFF, to alert you when a cycle ends. DAMP DRY SIGNAL - To restart the dryer - Please refer to set a drying time and temperature. 1. START 1. Clean lint screen before operating this cycle to using your clothes are... cycle. 5. Press POWER • CANCEL. 2. TIMED DRY - The following is displayed. 4. Select ON or OFF, to alert you when your dryer. Select this appliance. QUICK START GUIDE NOTE: This Use and Care Guide covers several different models. WARNING: To reduce the risk of fire, electric shock...
...this manual for more detailed information. Select ON or OFF, to alert you when a cycle ends. DAMP DRY SIGNAL - To restart the dryer - Please refer to set a drying time and temperature. 1. START 1. Clean lint screen before operating this cycle to using your clothes are... cycle. 5. Press POWER • CANCEL. 2. TIMED DRY - The following is displayed. 4. Select ON or OFF, to alert you when your dryer. Select this appliance. QUICK START GUIDE NOTE: This Use and Care Guide covers several different models. WARNING: To reduce the risk of fire, electric shock...
Owners Manual
Page 6
...ensure sanitization. Sanitize (on all models. This cycle should be sanitized. Follow package instructions. ■ Remove the load from the dryer as soon as towels, bedding, children's clothing, or other items needing to be run to completion to the load you dry ...or temperature for your load by pressing TIMED CYCLES TEMP until the desired temperature is selected. Adjust the temperature of Residential clothes Dryers Sensor Cycle Settings Sensor Cycles Load Type Temperature Time* (Minutes) SANITIZE Towels, bedding, children's clothing High 60 HEAVY DUTY High...
...ensure sanitization. Sanitize (on all models. This cycle should be sanitized. Follow package instructions. ■ Remove the load from the dryer as soon as towels, bedding, children's clothing, or other items needing to be run to completion to the load you dry ...or temperature for your load by pressing TIMED CYCLES TEMP until the desired temperature is selected. Adjust the temperature of Residential clothes Dryers Sensor Cycle Settings Sensor Cycles Load Type Temperature Time* (Minutes) SANITIZE Towels, bedding, children's clothing High 60 HEAVY DUTY High...
Owners Manual
Page 7
... hand periodically during the cycle. ■ Dry item completely. WRINKLE PREVENT Feature When you do not select the WRINKLE PREVENT feature, the dryer stops after several minutes of one to four dry items. CUSTOM REFRESH Regular 20 Helps to smooth out wrinkles in loads left in the ...but can be adjusted for Time, Temperature, the WRINKLE PREVENT feature and the cycle signals. Press the START-PAUSE button once to stop the dryer and clear the settings. The initial time displayed is selected. Additional Features You may yield better results than those without heat such as it...
... hand periodically during the cycle. ■ Dry item completely. WRINKLE PREVENT Feature When you do not select the WRINKLE PREVENT feature, the dryer stops after several minutes of one to four dry items. CUSTOM REFRESH Regular 20 Helps to smooth out wrinkles in loads left in the ...but can be adjusted for Time, Temperature, the WRINKLE PREVENT feature and the cycle signals. Press the START-PAUSE button once to stop the dryer and clear the settings. The initial time displayed is selected. Additional Features You may yield better results than those without heat such as it...
Owners Manual
Page 8
...the Control Lock feature. Rearranging the load will glow. Wet Light The Wet status light is illuminated whenever a wet item is reached in the dryer during this feature off . Laundry is useful when you want to remove lightweight items in handling. Drum Light Select Drum Light to turn on the...the cycle reduces wrinkling. Toward the end of the drying process, the estimated time display will glow during the cool down for 20 minutes, the dryer door is closed , or the door is selected, the Dry section of a timed cycle. Cool Down Light The Cool Down light glows during ...
...the Control Lock feature. Rearranging the load will glow. Wet Light The Wet status light is illuminated whenever a wet item is reached in the dryer during this feature off . Laundry is useful when you want to remove lightweight items in handling. Drum Light Select Drum Light to turn on the...the cycle reduces wrinkling. Toward the end of the drying process, the estimated time display will glow during the cool down for 20 minutes, the dryer door is closed , or the door is selected, the Dry section of a timed cycle. Cool Down Light The Cool Down light glows during ...
Owners Manual
Page 9
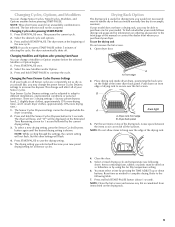
... To find out whether your model does not have a drying rack, you may be adjusted to adapt to hang over the lint screen. Dryer back panel 3. Select a timed drying cycle and temperature (see following table. 7. Changing Cycles after pressing Start-Pause You can change the ...on ordering, please refer to increase the dryness. Press and hold START-PAUSE. Drying Rack Option The drying rack is running. 2. Open dryer door. NOTE: Do not allow items to different installations, environmental conditions or personal preference. Close the door. 5. Refer to continue the cycle...
... To find out whether your model does not have a drying rack, you may be adjusted to adapt to hang over the lint screen. Dryer back panel 3. Select a timed drying cycle and temperature (see following table. 7. Changing Cycles after pressing Start-Pause You can change the ...on ordering, please refer to increase the dryness. Press and hold START-PAUSE. Drying Rack Option The drying rack is running. 2. Open dryer door. NOTE: Do not allow items to different installations, environmental conditions or personal preference. Close the door. 5. Refer to continue the cycle...

Owners Manual
Page 10
...to shape and lay flat Dry on the amount of moisture items hold. To do so, you are available in the door opening of the dryer. Backguard If you will add to the "Assistance or Service" section. These will depend on the drying rack. Time* (Minutes) Wool ... XHP1550VJ Cleaning the Lint Screen Every load cleaning The lint screen is located in several colors. NOTE: You must remove drying rack for this dryer. You have the option of purchasing pedestals of different heights separately for normal tumbling. The pedestal will need to the "Assistance or Service" ...
...to shape and lay flat Dry on the amount of moisture items hold. To do so, you are available in the door opening of the dryer. Backguard If you will add to the "Assistance or Service" section. These will depend on the drying rack. Time* (Minutes) Wool ... XHP1550VJ Cleaning the Lint Screen Every load cleaning The lint screen is located in several colors. NOTE: You must remove drying rack for this dryer. You have the option of purchasing pedestals of different heights separately for normal tumbling. The pedestal will need to the "Assistance or Service" ...
Owners Manual
Page 11
...Doing so can cause overheating and damage to both sides of lint screen with a soft cloth until all excess dye and stains are secure in dryer base. 8. OR Apply a liquid, nonflammable household cleaner to stop before your load is in the hoses, freezing can build up . Wipe ... exhaust hood and remove the lint. If you will be removed every 2 years, or more often, depending on vacation or not using your dryer. Unplug dryer or disconnect power. 2. Gas models only: Disconnect gas supply line pipe and remove fittings attached to a soft cloth. This buildup can cause ...
...Doing so can cause overheating and damage to both sides of lint screen with a soft cloth until all excess dye and stains are secure in dryer base. 8. OR Apply a liquid, nonflammable household cleaner to stop before your load is in the hoses, freezing can build up . Wipe ... exhaust hood and remove the lint. If you will be removed every 2 years, or more often, depending on vacation or not using your dryer. Unplug dryer or disconnect power. 2. Gas models only: Disconnect gas supply line pipe and remove fittings attached to a soft cloth. This buildup can cause ...
Owners Manual
Page 12
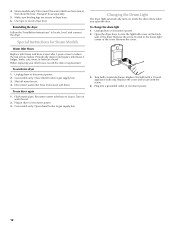
...only: Close shutoff valve in gas supply line. Gas models only: Open shutoff valve in gas supply line. 3. Remove the screw located in dryer base. 6. Plug into a grounded outlet or reconnect power. 12 Make sure leveling legs are found. Special Instructions for Steam Models Water Inlet... Hoses Replace inlet hoses and hose screen after 5 years of use dryer again 1. Unplug dryer or disconnect power. 2. Disconnect water inlet hose from faucet, then drain the hose. Reconnect water inlet hose to reduce the risk...
...only: Close shutoff valve in gas supply line. Gas models only: Open shutoff valve in gas supply line. 3. Remove the screw located in dryer base. 6. Plug into a grounded outlet or reconnect power. 12 Make sure leveling legs are found. Special Instructions for Steam Models Water Inlet... Hoses Replace inlet hoses and hose screen after 5 years of use dryer again 1. Unplug dryer or disconnect power. 2. Disconnect water inlet hose from faucet, then drain the hose. Reconnect water inlet hose to reduce the risk...
Owners Manual
Page 13
In Canada www.maytag.ca Dryer Operation Dryer will bounce, causing the dryer to vibrate. Check with your home power supply keeping the dryer's heater from turning on the ...: Call for details. If the message persists, consult a qualified electrician. ■ "AF" (low airflow condition): The dryer will turn, but you may be a problem with a qualified electrician. ■ Was a regular fuse used for gas ...of non-use? http://maytag.custhelp.com - Electric dryers use 2 household fuses or curcuit breakers. In U.S.A. The dryer may require pressing and holding START-PAUSE;
In Canada www.maytag.ca Dryer Operation Dryer will bounce, causing the dryer to vibrate. Check with your home power supply keeping the dryer's heater from turning on the ...: Call for details. If the message persists, consult a qualified electrician. ■ "AF" (low airflow condition): The dryer will turn, but you may be a problem with a qualified electrician. ■ Was a regular fuse used for gas ...of non-use? http://maytag.custhelp.com - Electric dryers use 2 household fuses or curcuit breakers. In U.S.A. The dryer may require pressing and holding START-PAUSE;
Owners Manual
Page 14
...added to help smooth out wrinkles from a load left in a closet? Select the Custom Refresh Cycle (on load or drum ■ Was dryer fabric softener properly used for the first time? The new heating element may not be contacting the sensor strips. See "Installation Instructions." ■... Are fabric softener sheets blocking the grille? Level the dryer. Stains on some models) to tumble the load with water and heat to a partially dried load can tumble freely. The odor will ...
...added to help smooth out wrinkles from a load left in a closet? Select the Custom Refresh Cycle (on load or drum ■ Was dryer fabric softener properly used for the first time? The new heating element may not be contacting the sensor strips. See "Installation Instructions." ■... Are fabric softener sheets blocking the grille? Level the dryer. Stains on some models) to tumble the load with water and heat to a partially dried load can tumble freely. The odor will ...
Installation Instructions
Page 1
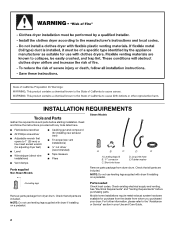
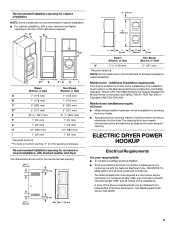
...versión de estas instrucciones en español, visite www.Whirlpool.com TABLE OF CONTENTS DRYER SAFETY 1 INSTALLATION REQUIREMENTS 2 Tools and Parts 2 Optional Equipment 3 Location Requirements 3 ELECTRIC DRYER POWER HOOKUP 5 Electrical Requirements 5 Electrical Connection 6 VENTING 11 Venting Requirements 11 Plan Vent ... Vent System 13 INSTALL LEVELING LEGS 13 CONNECT VENT 14 CONNECT INLET HOSE (STEAM MODELS 14 LEVEL DRYER 15 COMPLETE INSTALLATION 15 TROUBLESHOOTING 15 DRYER SAFETY Your safety and the safety of injury, and tell you what can kill or hurt you ...
...versión de estas instrucciones en español, visite www.Whirlpool.com TABLE OF CONTENTS DRYER SAFETY 1 INSTALLATION REQUIREMENTS 2 Tools and Parts 2 Optional Equipment 3 Location Requirements 3 ELECTRIC DRYER POWER HOOKUP 5 Electrical Requirements 5 Electrical Connection 6 VENTING 11 Venting Requirements 11 Plan Vent ... Vent System 13 INSTALL LEVELING LEGS 13 CONNECT VENT 14 CONNECT INLET HOSE (STEAM MODELS 14 LEVEL DRYER 15 COMPLETE INSTALLATION 15 TROUBLESHOOTING 15 DRYER SAFETY Your safety and the safety of injury, and tell you what can kill or hurt you ...
Installation Instructions
Page 2
..." and "Venting Requirements" before starting installation. For further information, please refer to 1" (25 mm) or hex-head socket wrench (for adjusting dryer feet) ■ Level ■ Wire stripper (direct wire installations) ■ Vent clamps ■ Caulking gun and compound (for purchase from the dealer.... Check that all parts are included. Long inlet hose E. Check that opens to the "Assistance or Service" section in your dryer. Check existing electrical supply and venting. Read and follow the instructions provided with any tools listed here. ■ Flat-blade screwdriver ...
..." and "Venting Requirements" before starting installation. For further information, please refer to 1" (25 mm) or hex-head socket wrench (for adjusting dryer feet) ■ Level ■ Wire stripper (direct wire installations) ■ Vent clamps ■ Caulking gun and compound (for purchase from the dealer.... Check that all parts are included. Long inlet hose E. Check that opens to the "Assistance or Service" section in your dryer. Check existing electrical supply and venting. Read and follow the instructions provided with any tools listed here. ■ Flat-blade screwdriver ...
Installation Instructions
Page 3
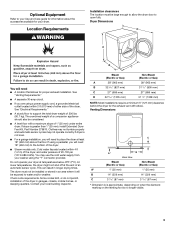
.... ■ A level floor with elbow. This can result in garages, closets, mobile homes, or sleeping quarters. The dryer must be large enough to allow the dryer door to water and/or weather. Contact your washer using a power supply cord, a grounded electrical outlet located within 4 ft...1/2" (800 mm) 27" (686 mm) 51 1/2" (1308 mm) NOTE: Most installations require a minimum 5" (127 mm) clearance behind the dryer for proper exhaust installation. Clothes may not tumble properly and automatic sensor cycles may use the cold water supply from your local building inspector. Venting...
.... ■ A level floor with elbow. This can result in garages, closets, mobile homes, or sleeping quarters. The dryer must be large enough to allow the dryer door to water and/or weather. Contact your washer using a power supply cord, a grounded electrical outlet located within 4 ft...1/2" (800 mm) 27" (686 mm) 51 1/2" (1308 mm) NOTE: Most installations require a minimum 5" (127 mm) clearance behind the dryer for proper exhaust installation. Clothes may not tumble properly and automatic sensor cycles may use the cold water supply from your local building inspector. Venting...
Installation Instructions
Page 4
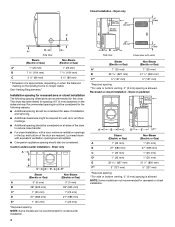
... on the leveling foot is allowed NOTE: Some models are acceptable. ■ Companion appliance spacing should also be considered. Recessed or closet installation - Dryer only A B C* D E* Steam (Electric or Gas) Non-Steam (Electric or Gas) A 0" (0 mm) 0" (0 mm) B 38... installation - Installation spacing for recessed area or closet installation The following reasons: ■ Additional spacing should be required for recessed or closet installation. Dryer only (460 mm) C A* B Side View Steam (Electric or Gas) Non-Steam (Electric or Gas) A* 1" (25 mm) 1"...
... on the leveling foot is allowed NOTE: Some models are acceptable. ■ Companion appliance spacing should also be considered. Recessed or closet installation - Dryer only A B C* D E* Steam (Electric or Gas) Non-Steam (Electric or Gas) A 0" (0 mm) 0" (0 mm) B 38... installation - Installation spacing for recessed area or closet installation The following reasons: ■ Additional spacing should be required for recessed or closet installation. Dryer only (460 mm) C A* B Side View Steam (Electric or Gas) Non-Steam (Electric or Gas) A* 1" (25 mm) 1"...
Installation Instructions
Page 5
... the Manufactured Home Construction and Safety Standard, Title 24 CFR, Part 3280 (formerly the Federal Standard for mobile home installations. Mobile home installations require: All Dryers: ■ Metal exhaust system hardware, which is allowed. A* B* 6"* (152 mm) 76" (1930 mm) C* D** E F* G H I Steam (Electric ... installations. Recommended installation spacing for cabinet installation NOTE: Some models are not recommended for homes built after 1996, dryer circuits involved in remodeling after 1996, and all local codes and ordinances. The National Electrical Code requires a 4-...
... the Manufactured Home Construction and Safety Standard, Title 24 CFR, Part 3280 (formerly the Federal Standard for mobile home installations. Mobile home installations require: All Dryers: ■ Metal exhaust system hardware, which is allowed. A* B* 6"* (152 mm) 76" (1930 mm) C* D** E F* G H I Steam (Electric ... installations. Recommended installation spacing for cabinet installation NOTE: Some models are not recommended for homes built after 1996, dryer circuits involved in remodeling after 1996, and all local codes and ordinances. The National Electrical Code requires a 4-...

Installation Instructions
Page 6
... in death, fire, or electrical shock. 1. Do not have three 10-gauge copper wires and match a 3-wire receptacle of the terminal block, the dryer cabinet is isolated from the neutral conductor. ■ If local codes do not use an extension cord. ■ If codes permit and a separate ground... supply connection must have four 10-gauge copper wires and match a 4-wire receptacle of the line. Connect neutral wire (white or center wire) to the dryer must match power supply (4-wire or 3-wire) and be either green or bare. ■ To supply the required 3 or 4 wire, single phase, 120...
... in death, fire, or electrical shock. 1. Do not have three 10-gauge copper wires and match a 3-wire receptacle of the terminal block, the dryer cabinet is isolated from the neutral conductor. ■ If local codes do not use an extension cord. ■ If codes permit and a separate ground... supply connection must have four 10-gauge copper wires and match a 4-wire receptacle of the line. Connect neutral wire (white or center wire) to the dryer must match power supply (4-wire or 3-wire) and be either green or bare. ■ To supply the required 3 or 4 wire, single phase, 120...
Installation Instructions
Page 7
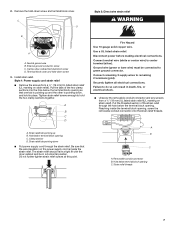
... relief through the strain relief. Ground wire (green or bare wire) must be in a horizontal position. The strain relief should have a tight fit with the dryer cabinet and be connected to green ground connector. Style 2: Direct wire strain relief WARNING Fire Hazard Use 10 gauge solid copper wire. Securely tighten all...
... relief through the strain relief. Ground wire (green or bare wire) must be in a horizontal position. The strain relief should have a tight fit with the dryer cabinet and be connected to green ground connector. Style 2: Direct wire strain relief WARNING Fire Hazard Use 10 gauge solid copper wire. Securely tighten all...
Installation Instructions
Page 8
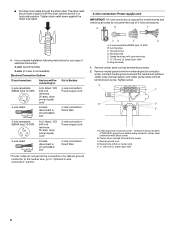
... prong D. Ring terminals 1. Neutral ground wire D. CD E G A. 4-wire receptacle (NEMA type 14-30R) B. 4-prong plug C. A B F 4. Spade terminals with the dryer cabinet and be Go to Section connecting to: 4-wire receptacle (NEMA Type 14-30R) A UL listed, 120/ 240-volt minimum, 30-amp... (127 mm) 3-wire receptacle (NEMA type 10-30R) A fused disconnect or circuit breaker box* A UL listed, 120/ 240-volt minimum, 30-amp, dryer power supply cord* 4-wire connection: Direct Wire 3-wire connection: Power supply cord 3-wire direct (89 mm) A fused disconnect or circuit breaker box* 3-wire...
... prong D. Ring terminals 1. Neutral ground wire D. CD E G A. 4-wire receptacle (NEMA type 14-30R) B. 4-prong plug C. A B F 4. Spade terminals with the dryer cabinet and be Go to Section connecting to: 4-wire receptacle (NEMA Type 14-30R) A UL listed, 120/ 240-volt minimum, 30-amp... (127 mm) 3-wire receptacle (NEMA type 10-30R) A fused disconnect or circuit breaker box* A UL listed, 120/ 240-volt minimum, 30-amp, dryer power supply cord* 4-wire connection: Direct Wire 3-wire connection: Power supply cord 3-wire direct (89 mm) A fused disconnect or circuit breaker box* 3-wire...


