Owners Manual
Page 5
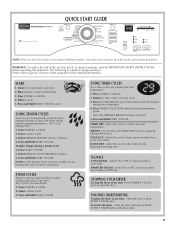
QUICK START GUIDE NOTE: This Use and Care Guide covers several different models. Your dryer may not have all of fire, electric shock, or injury to the type of this manual for more detailed information. The following is displayed. 4. Place laundry in dry items. See "Cycles... and Hold START • PAUSE. Select a Steam Cycle. 3. AIR DRY - Use Air Dry with TIMED DRY for optimal performance. Press TIMED CYCLES TEMP until dryer starts. 5 Press POWER • CANCEL once or open the door. Press POWER • CANCEL. 4. STEAM CYCLES Steam Cycles use water and heat to help ...
QUICK START GUIDE NOTE: This Use and Care Guide covers several different models. Your dryer may not have all of fire, electric shock, or injury to the type of this manual for more detailed information. The following is displayed. 4. Place laundry in dry items. See "Cycles... and Hold START • PAUSE. Select a Steam Cycle. 3. AIR DRY - Use Air Dry with TIMED DRY for optimal performance. Press TIMED CYCLES TEMP until dryer starts. 5 Press POWER • CANCEL once or open the door. Press POWER • CANCEL. 4. STEAM CYCLES Steam Cycles use water and heat to help ...
Owners Manual
Page 13
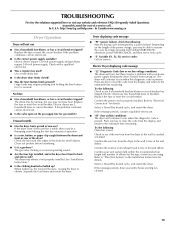
... breaker. If the problem continues, call an electrician. ■ Is the correct power supply available? In U.S.A. http://maytag.custhelp.com - Electric dryers require 120-volt power supply and gas dryers require 240-volt power supply. If the dryer hasn't been used ? Replace the fuse or reset the circuit breaker. Refer to the estimated time remaining...
... breaker. If the problem continues, call an electrician. ■ Is the correct power supply available? In U.S.A. http://maytag.custhelp.com - Electric dryers require 120-volt power supply and gas dryers require 240-volt power supply. If the dryer hasn't been used ? Replace the fuse or reset the circuit breaker. Refer to the estimated time remaining...
Installation Instructions
Page 1
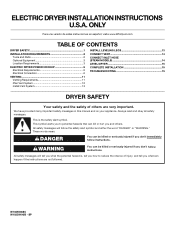
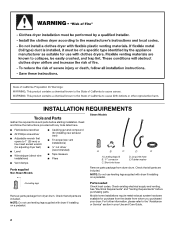
...All safety messages will follow instructions. All safety messages will tell you don't follow instructions. SP ELECTRIC DRYER INSTALLATION INSTRUCTIONS U.S.A. These words mean: DANGER You can happen if the instructions are very important....estas instrucciones en español, visite www.Whirlpool.com TABLE OF CONTENTS DRYER SAFETY 1 INSTALLATION REQUIREMENTS 2 Tools and Parts 2 Optional Equipment 3 Location Requirements 3 ELECTRIC DRYER POWER HOOKUP 5 Electrical Requirements 5 Electrical Connection 6 VENTING 11 Venting Requirements 11 Plan Vent System 12 Install Vent System...
...All safety messages will follow instructions. All safety messages will tell you don't follow instructions. SP ELECTRIC DRYER INSTALLATION INSTRUCTIONS U.S.A. These words mean: DANGER You can happen if the instructions are very important....estas instrucciones en español, visite www.Whirlpool.com TABLE OF CONTENTS DRYER SAFETY 1 INSTALLATION REQUIREMENTS 2 Tools and Parts 2 Optional Equipment 3 Location Requirements 3 ELECTRIC DRYER POWER HOOKUP 5 Electrical Requirements 5 Electrical Connection 6 VENTING 11 Venting Requirements 11 Plan Vent System 12 Install Vent System...
Installation Instructions
Page 2
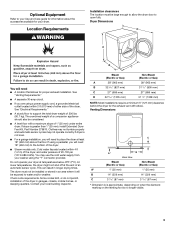
... (4) B. Rubber washer Remove parts package from whom you purchased your Use and Care Guide. 2 Check existing electrical supply and venting. Long inlet hose E. NOTE: Do not use leveling legs supplied with dryer if installing on a pedestal. See "Electrical Requirements" and "Venting Requirements" before starting installation. Short inlet hose D. NOTE: Do not use leveling...
... (4) B. Rubber washer Remove parts package from whom you purchased your Use and Care Guide. 2 Check existing electrical supply and venting. Long inlet hose E. NOTE: Do not use leveling legs supplied with dryer if installing on a pedestal. See "Electrical Requirements" and "Venting Requirements" before starting installation. Short inlet hose D. NOTE: Do not use leveling...
Installation Instructions
Page 3
...leveling foot is greater than 1" (25 mm), install Extended Dryer Feet Kit, Part Number 279810. See "Electrical Requirements." ■ A sturdy floor to support the total dryer weight of 1" (25 mm) under entire dryer. The combined weight of a companion appliance should also be...: Most installations require a minimum 5" (127 mm) clearance behind the dryer for your dryer. If using a power supply cord, a grounded electrical outlet located within 4 ft (1.2 m) of the dryer, and water pressure of the dryer. Optional Equipment Refer to your Use and Care guide for information about the...
...leveling foot is greater than 1" (25 mm), install Extended Dryer Feet Kit, Part Number 279810. See "Electrical Requirements." ■ A sturdy floor to support the total dryer weight of 1" (25 mm) under entire dryer. The combined weight of a companion appliance should also be...: Most installations require a minimum 5" (127 mm) clearance behind the dryer for your dryer. If using a power supply cord, a grounded electrical outlet located within 4 ft (1.2 m) of the dryer, and water pressure of the dryer. Optional Equipment Refer to your Use and Care guide for information about the...
Installation Instructions
Page 4
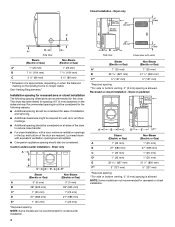
... 0" (0 mm) spacing is no longer visible. This dryer has been tested for spacing of the door are acceptable. ■ Companion appliance spacing should be considered. Louvered doors with vents Steam (Electric or Gas) Non-Steam (Electric or Gas) A* 1" (25 mm) 1" (25 ...800 mm) C** 5" (127 mm) 5" (127 mm) *Required spacing **For side or bottom venting, 0" (0 mm) spacing is allowed. Custom undercounter installation - Dryer only A B C* D E* Steam (Electric or Gas) Non-Steam (Electric or Gas) A 0" (0 mm) 0" (0 mm) B 38" (965 mm) 38" (965 mm) C* 1" (25 mm) 1" (25 mm) D ...
... 0" (0 mm) spacing is no longer visible. This dryer has been tested for spacing of the door are acceptable. ■ Companion appliance spacing should be considered. Louvered doors with vents Steam (Electric or Gas) Non-Steam (Electric or Gas) A* 1" (25 mm) 1" (25 ...800 mm) C** 5" (127 mm) 5" (127 mm) *Required spacing **For side or bottom venting, 0" (0 mm) spacing is allowed. Custom undercounter installation - Dryer only A B C* D E* Steam (Electric or Gas) Non-Steam (Electric or Gas) A 0" (0 mm) 0" (0 mm) B 38" (965 mm) 38" (965 mm) C* 1" (25 mm) 1" (25 mm) D ...
Installation Instructions
Page 5
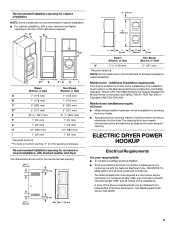
... power supply connection for mobile home installations. The installation must be obtained from your responsibility ■ To contact a qualified electrical installer. ■ To be at least twice as large as the dryer exhaust opening. ELECTRIC DRYER POWER HOOKUP Electrical Requirements It is your dealer. ■ Special provisions must conform to introduce outside air into the...
... power supply connection for mobile home installations. The installation must be obtained from your responsibility ■ To contact a qualified electrical installer. ■ To be at least twice as large as the dryer exhaust opening. ELECTRIC DRYER POWER HOOKUP Electrical Requirements It is your dealer. ■ Special provisions must conform to introduce outside air into the...

Installation Instructions
Page 6
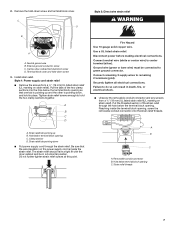
... wires and match a 4-wire receptacle of the terminal block, the dryer cabinet is adequate. Electrical Connection To properly install your dryer, you must have a fuse in ring terminals or spade terminals with clothes dryers. When the neutral ground conductor is secured under the neutral terminal ...(green screw), and secured under the neutral terminal (center or white wire) of electrical connection you will be used , it here. ■ This dryer is installed in death, fire, or electrical shock. 1. Electrical Connection WARNING Fire Hazard Use a new UL listed 30 amp power supply cord. ...
... wires and match a 4-wire receptacle of the terminal block, the dryer cabinet is adequate. Electrical Connection To properly install your dryer, you must have a fuse in ring terminals or spade terminals with clothes dryers. When the neutral ground conductor is secured under the neutral terminal ...(green screw), and secured under the neutral terminal (center or white wire) of electrical connection you will be used , it here. ■ This dryer is installed in death, fire, or electrical shock. 1. Electrical Connection WARNING Fire Hazard Use a new UL listed 30 amp power supply cord. ...
Installation Instructions
Page 7
...wire. Connect remaining 2 supply wires to center terminal (silver). External ground conductor screw C. The strain relief should have a tight fit with the dryer cabinet and be connected to do so can result in a horizontal position. Use a UL listed strain relief. Put the threaded section of the...sure that one tab is pointing up B. Failure to green ground connector. Ground wire (green or bare wire) must be in death, fire, or electrical shock. ■ Unscrew the removable conduit connector and any screws from a 3/4" (19 mm) UL listed strain relief (UL marking on the power...
...wire. Connect remaining 2 supply wires to center terminal (silver). External ground conductor screw C. The strain relief should have a tight fit with the dryer cabinet and be connected to do so can result in a horizontal position. Use a UL listed strain relief. Put the threaded section of the...sure that one tab is pointing up B. Failure to green ground connector. Ground wire (green or bare wire) must be in death, fire, or electrical shock. ■ Unscrew the removable conduit connector and any screws from a 3/4" (19 mm) UL listed strain relief (UL marking on the power...
Installation Instructions
Page 8
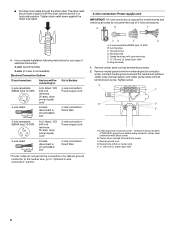
... mm) 3-wire receptacle (NEMA type 10-30R) A fused disconnect or circuit breaker box* A UL listed, 120/ 240-volt minimum, 30-amp, dryer power supply cord* 4-wire connection: Direct Wire 3-wire connection: Power supply cord 3-wire direct (89 mm) A fused disconnect or circuit breaker box*...cable. 4-wire connection: Power supply cord IMPORTANT: A 4-wire connection is required for your type of electrical connection: 4-wire (recommended) 3-wire (if 4-wire is not available) Electrical Connection Options If your home has: And you will be in a horizontal position. Dotted line shows position...
... mm) 3-wire receptacle (NEMA type 10-30R) A fused disconnect or circuit breaker box* A UL listed, 120/ 240-volt minimum, 30-amp, dryer power supply cord* 4-wire connection: Direct Wire 3-wire connection: Power supply cord 3-wire direct (89 mm) A fused disconnect or circuit breaker box*...cable. 4-wire connection: Power supply cord IMPORTANT: A 4-wire connection is required for your type of electrical connection: 4-wire (recommended) 3-wire (if 4-wire is not available) Electrical Connection Options If your home has: And you will be in a horizontal position. Dotted line shows position...
Installation Instructions
Page 9
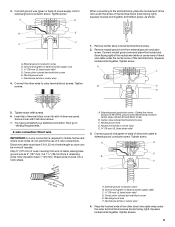
...wire (white or center wire) E. ¾" (19 mm) UL listed strain relief 3. Tighten screw. Direct wire cable must have completed your electrical connection. External ground conductor screw - Tighten screw. Place the hooked ends of the other wires to external ground conductor screw. Squeeze hooked ends together.... Ground wire (green or bare) of extra length so dryer can be moved if needed. Connect neutral ground wire and place the hooked end (hook facing right) of the neutral wire (...
...wire (white or center wire) E. ¾" (19 mm) UL listed strain relief 3. Tighten screw. Direct wire cable must have completed your electrical connection. External ground conductor screw - Tighten screw. Place the hooked ends of the other wires to external ground conductor screw. Squeeze hooked ends together.... Ground wire (green or bare) of extra length so dryer can be moved if needed. Connect neutral ground wire and place the hooked end (hook facing right) of the neutral wire (...
Installation Instructions
Page 10
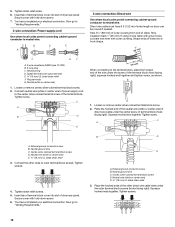
...slot of terminal block (hook facing right). You have completed your electrical connection. Neutral prong D. Place the hooked end of the neutral wire (white or center wire) of direct wire cable under the center screw of dryer rear panel. Insert tab of terminal block cover into a hook...-colored terminal block screw. 2. Strip 31/2" (89 mm) of outer covering from end of the terminal block. You have completed your electrical connection. Tighten screw. Shape ends of wires into slot of the other wires to neutral wire. Neutral ground wire C. Connect the other ...
...slot of terminal block (hook facing right). You have completed your electrical connection. Neutral prong D. Place the hooked end of the neutral wire (white or center wire) of direct wire cable under the center screw of dryer rear panel. Insert tab of terminal block cover into a hook...-colored terminal block screw. 2. Strip 31/2" (89 mm) of outer covering from end of the terminal block. You have completed your electrical connection. Tighten screw. Shape ends of wires into slot of the other wires to neutral wire. Neutral ground wire C. Connect the other ...
Installation Instructions
Page 11
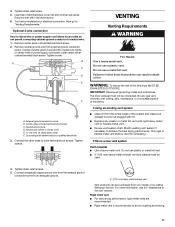
... direct wire or power supply cord where local codes do not permit connecting cabinet-ground conductor to avoid crushing and kinking. 11 The dryer exhaust must be purchased from the external ground conductor screw to outer terminal block screws. Rigid metal vent ■ For best drying ... ground. 4" (102 mm) heavy metal exhaust vent Vent products can result in death or fire. Connect a separate copper ground wire from your electrical connection. Connect neutral ground wire and the neutral wire (white or center wire) of fire, this is not plugged with lint. ■ Replace...
... direct wire or power supply cord where local codes do not permit connecting cabinet-ground conductor to avoid crushing and kinking. 11 The dryer exhaust must be purchased from the external ground conductor screw to outer terminal block screws. Rigid metal vent ■ For best drying ... ground. 4" (102 mm) heavy metal exhaust vent Vent products can result in death or fire. Connect a separate copper ground wire from your electrical connection. Connect neutral ground wire and the neutral wire (white or center wire) of fire, this is not plugged with lint. ■ Replace...
Installation Instructions
Page 15
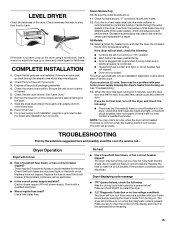
... the heating element is first used ? Check with your home power supply keeping the dryer's heater from the display and return to back. Electric dryers use of its first cycle. If the dryer is recommended to remove any dust. 8. Remove the blue film on the console and... not have not tripped. If the problem continues, call ... Electric dryers require 240-volt power supply. Use a time-delay fuse. Press and hold START to the need for the dryer. Check that both circuit breakers have heat. Read "Dryer Use." 9. For power supply cord installation, plug into a ...
... the heating element is first used ? Check with your home power supply keeping the dryer's heater from the display and return to back. Electric dryers use of its first cycle. If the dryer is recommended to remove any dust. 8. Remove the blue film on the console and... not have not tripped. If the problem continues, call ... Electric dryers require 240-volt power supply. Use a time-delay fuse. Press and hold START to the need for the dryer. Check that both circuit breakers have heat. Read "Dryer Use." 9. For power supply cord installation, plug into a ...
Installation Instructions
Page 16
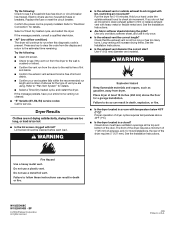
...metal or flexible metal vent. Do not use two household fuses or breakers. All rights reserved. 4/09 Printed in death or fire. Electric dryers use a metal foil vent. Hold your entire home venting run length and number of elbows for service. Long venting will continue to ... the Installation Instructions. ■ Is the exhaust vent diameter the correct size? Replace the fuse or reset the circuit breaker. Refer to "Electrical Connection" for most installations, the rear of the door. Proper operation of lint and debris. ■ Confirm the exterior vent exhaust hood ...
...metal or flexible metal vent. Do not use two household fuses or breakers. All rights reserved. 4/09 Printed in death or fire. Electric dryers use a metal foil vent. Hold your entire home venting run length and number of elbows for service. Long venting will continue to ... the Installation Instructions. ■ Is the exhaust vent diameter the correct size? Replace the fuse or reset the circuit breaker. Refer to "Electrical Connection" for most installations, the rear of the door. Proper operation of lint and debris. ■ Confirm the exterior vent exhaust hood ...


