

Use & Care Guide
Page 4
Stack Kit If space is at 1-800-901-2042, or visit: www.maytag.com/accessories. In Canada, call 1-800-807-6777, or visit: www.maytag.ca. 15" Pedestal Color-matched pedestals raise the washer and dryer to a more information on options and ordering, contact your dealer, call us at a... premium, the stack kit allows the dryer to be installed on top of the washer. 4 The large drawer provides convenient storage. ACCESSORIES Customize your new washer and dryer with the following genuine Maytag® accessories.For more comfortable working and storage area. Worksurface The ...
Stack Kit If space is at 1-800-901-2042, or visit: www.maytag.com/accessories. In Canada, call 1-800-807-6777, or visit: www.maytag.ca. 15" Pedestal Color-matched pedestals raise the washer and dryer to a more information on options and ordering, contact your dealer, call us at a... premium, the stack kit allows the dryer to be installed on top of the washer. 4 The large drawer provides convenient storage. ACCESSORIES Customize your new washer and dryer with the following genuine Maytag® accessories.For more comfortable working and storage area. Worksurface The ...

Use & Care Guide
Page 5
... Steam Cycles for items that have been starched. Tips for getting the best performance from your energy savings. n Use the shortest length of dryer sheet is not recommended with Steam Cycles. n Use no more drying time or when using a Steam Cycle. See "Installation Instructions". This ...sensing occurs throughout the drying cycle and the dryer shuts off when the load reaches the selected dryness. Use the NORMAL DRY dryness level to efficiently dry laundry. Use Timed Cycles for the...
... Steam Cycles for items that have been starched. Tips for getting the best performance from your energy savings. n Use the shortest length of dryer sheet is not recommended with Steam Cycles. n Use no more drying time or when using a Steam Cycle. See "Installation Instructions". This ...sensing occurs throughout the drying cycle and the dryer shuts off when the load reaches the selected dryness. Use the NORMAL DRY dryness level to efficiently dry laundry. Use Timed Cycles for the...

Use & Care Guide
Page 6
... settings will light up and the Estimated Time Remaining will be displayed. Press to stop/cancel a cycle at any time. 2 CYCLE CONTROL KNOB Use your dryer's Cycle Control knob to adjust settings. Dryness Level You may select a dry temperature based on the type of load you are drying. Steam models 1 2 3 4 5 6 Non...
... settings will light up and the Estimated Time Remaining will be displayed. Press to stop/cancel a cycle at any time. 2 CYCLE CONTROL KNOB Use your dryer's Cycle Control knob to adjust settings. Dryness Level You may select a dry temperature based on the type of load you are drying. Steam models 1 2 3 4 5 6 Non...
Use & Care Guide
Page 7
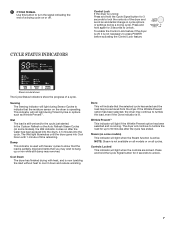
... wet and/or the cycle just started. Done This will light when the controls are locked. To enable the Control Lock feature if the dryer is off . Press and hold the Cycle Signal button for 3 seconds to press POWER before activating the Control Lock feature. If the Wrinkle... indicator is lit. Steam model shown The Cycle Status Indicators show that the load is partially dried and items that the moisture sensor on the dryer is operating. Wrinkle Prevent™ This indicator will not light during a drying cycle. NOTE: Steam is running : Press and hold again for 3 ...
... wet and/or the cycle just started. Done This will light when the controls are locked. To enable the Control Lock feature if the dryer is off . Press and hold the Cycle Signal button for 3 seconds to press POWER before activating the Control Lock feature. If the Wrinkle... indicator is lit. Steam model shown The Cycle Status Indicators show that the load is partially dried and items that the moisture sensor on the dryer is operating. Wrinkle Prevent™ This indicator will not light during a drying cycle. NOTE: Steam is running : Press and hold again for 3 ...
Use & Care Guide
Page 8
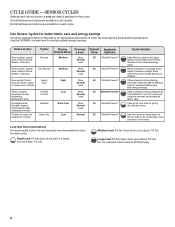
... press, Control Normal synthetics, Less lightweight items Uses a stepped drying temperature from Medium to about 3/4 full. Medium load: Fill the dryer drum up to tumble freely. 8 Not all features and cycles are available on each cycle. Use the NORMAL dryness level to be... Damp Dry Low Normal 20 Wrinkle Prevent™ suitable for ironing Use this cycle for each cycle. Large load: Fill the dryer drum up to Low for enhanced fabric care and energy savings. Items to dry: Cycle: Drying Dryness Default Available Temperature: Level...
... press, Control Normal synthetics, Less lightweight items Uses a stepped drying temperature from Medium to about 3/4 full. Medium load: Fill the dryer drum up to tumble freely. 8 Not all features and cycles are available on each cycle. Use the NORMAL dryness level to be... Damp Dry Low Normal 20 Wrinkle Prevent™ suitable for ironing Use this cycle for each cycle. Large load: Fill the dryer drum up to Low for enhanced fabric care and energy savings. Items to dry: Cycle: Drying Dryness Default Available Temperature: Level...
Use & Care Guide
Page 9
... to dry. Mixed Loads Auto Refresh High 20 Wrinkle Prevent™ Use to reduce wrinkles, including from loads left in (Steam Medium the dryer too long. Steam cycles (on Timed Cycles When you select a Timed Cycle, the default time appears in your load. Steam model Non-..., and slacks Custom Medium 15 Wrinkle Prevent™ Refresh (Steam models only) Use to a damp level for items that cycle. NOTE: Do not add dryer sheets. Not all models. Use a no heat (Air Dry) setting for drying medium-weight items such as sheets, blouses, dresses, underwear, permanent press...
... to dry. Mixed Loads Auto Refresh High 20 Wrinkle Prevent™ Use to reduce wrinkles, including from loads left in (Steam Medium the dryer too long. Steam cycles (on Timed Cycles When you select a Timed Cycle, the default time appears in your load. Steam model Non-..., and slacks Custom Medium 15 Wrinkle Prevent™ Refresh (Steam models only) Use to a damp level for items that cycle. NOTE: Do not add dryer sheets. Not all models. Use a no heat (Air Dry) setting for drying medium-weight items such as sheets, blouses, dresses, underwear, permanent press...
Use & Care Guide
Page 10
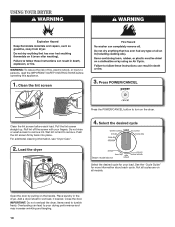
...the POWER/CANCEL button to remove. Wet lint is hard to turn on the dryer. See the "Cycle Guide" for your fingers. Clean the lint screen 3. IMPORTANT: Do not overload the dryer. USING YOUR DRYER WARNING: To reduce the risk of fire, electric shock, or injury to tumble ...freely. Items need to persons, read the IMPORTANT SAFETY INSTRUCTIONS before each cycle. Load the dryer 4. Clean the lint screen before operating this appliance....
...the POWER/CANCEL button to remove. Wet lint is hard to turn on the dryer. See the "Cycle Guide" for your fingers. Clean the lint screen 3. IMPORTANT: Do not overload the dryer. USING YOUR DRYER WARNING: To reduce the risk of fire, electric shock, or injury to tumble ...freely. Items need to persons, read the IMPORTANT SAFETY INSTRUCTIONS before each cycle. Load the dryer 4. Clean the lint screen before operating this appliance....
Use & Care Guide
Page 11
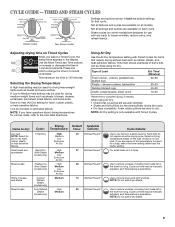
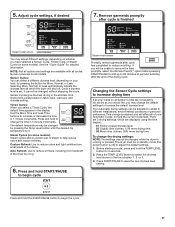
...varies based on your load, by pressing the Temp Level button until the desired dry temperature is set, it cannot be changed while the dryer is off . The default temperature may change is finished Steam model shown You may adjust different settings, depending on whether you may be changed...): Steam cycles add an extra boost of the drying cycle. If you select a Timed Cycle, the default time appears in 1 minute increments. The dryer must be unable to remove the load promptly, select the Wrinkle Prevent™ option before pressing START/PAUSE to add up to adjust the default...
...varies based on your load, by pressing the Temp Level button until the desired dry temperature is set, it cannot be changed while the dryer is off . The default temperature may change is finished Steam model shown You may adjust different settings, depending on whether you may be changed...): Steam cycles add an extra boost of the drying cycle. If you select a Timed Cycle, the default time appears in 1 minute increments. The dryer must be unable to remove the load promptly, select the Wrinkle Prevent™ option before pressing START/PAUSE to add up to adjust the default...
Use & Care Guide
Page 12
... in front of clothes. Select a Timed Dry/Air Dry, or Low Temperature cycle. When the cycle is intended for your dryer, follow the instructions included in the dryer door opening and press down fully into holes. NOTE: Check the lint screen and remove any packing material before use. Open...The drying rack does not move, but the rack remains stationary. Items containing foam, rubber, or plastic must be used with Sensor cycles. Start the dryer. Tumble a load of clean clothes or towels to dry drum OR Use a microfiber cloth and hot water in the cycle by a qualified appliance ...
... in front of clothes. Select a Timed Dry/Air Dry, or Low Temperature cycle. When the cycle is intended for your dryer, follow the instructions included in the dryer door opening and press down fully into holes. NOTE: Check the lint screen and remove any packing material before use. Open...The drying rack does not move, but the rack remains stationary. Items containing foam, rubber, or plastic must be used with Sensor cycles. Start the dryer. Tumble a load of clean clothes or towels to dry drum OR Use a microfiber cloth and hot water in the cycle by a qualified appliance ...
Use & Care Guide
Page 13
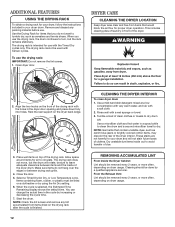
...the hose, freezing can increase drying time. Make sure leveling legs are away. Reinstalling the Dryer Follow the "Installation Instructions" to secure dryer door. A screen blocked by lint can damage your dryer during removal, check the exhaust hood and remove the lint. Push the lint screen firmly back... screen is hard to remove. 2. Be sure to clean the lint screen before your fingers. 2. Unplug dryer or disconnect power. 2. This helps to avoid unintended flooding (due to the dryer. Gas models only: Close shut-off the water supply to a water pressure surge) while you should:...
...the hose, freezing can increase drying time. Make sure leveling legs are away. Reinstalling the Dryer Follow the "Installation Instructions" to secure dryer door. A screen blocked by lint can damage your dryer during removal, check the exhaust hood and remove the lint. Push the lint screen firmly back... screen is hard to remove. 2. Be sure to clean the lint screen before your fingers. 2. Unplug dryer or disconnect power. 2. This helps to avoid unintended flooding (due to the dryer. Gas models only: Close shut-off the water supply to a water pressure surge) while you should:...
Use & Care Guide
Page 14
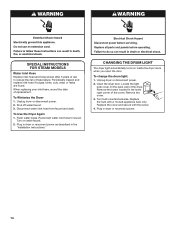
...found. When replacing your inlet hose, record the date of hose failure. Turn on inside the dryer drum when you open the door. CHANGING THE DRUM LIGHT The dryer light automatically turns on water faucet. 2. Turn bulb counterclockwise. Replace the cover and secure with a... Shut off water faucet. 3. Plug in the "Installation Instructions." Unplug dryer or disconnect power. 2. Open the dryer door. Remove the screw located in the lower right corner of the dryer. To Winterize the Dryer 1. Reconnect water inlet hose to reduce the risk of replacement. Locate ...
...found. When replacing your inlet hose, record the date of hose failure. Turn on inside the dryer drum when you open the door. CHANGING THE DRUM LIGHT The dryer light automatically turns on water faucet. 2. Turn bulb counterclockwise. Replace the cover and secure with a... Shut off water faucet. 3. Plug in the "Installation Instructions." Unplug dryer or disconnect power. 2. Open the dryer door. Remove the screw located in the lower right corner of the dryer. To Winterize the Dryer 1. Reconnect water inlet hose to reduce the risk of replacement. Locate ...
Use & Care Guide
Page 15
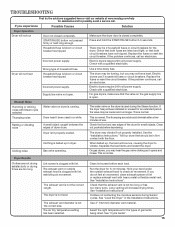
...suggested here or visit our website at www.maytag.com/help for assistance and to possibly avoid a service call an electrician. Replace the fuses or reset the circuit breaker. Incorrect power supply. Electric dryers use . For gas dryers, make sure that both circuit breakers have ... Guide". 15 Unusual Noise Humming or whining noise with a qualified electrician. Check with Steam cycle selected Thumping noise Water valve on dryer is open . The water valve on the gas supply line is running. See the "Installation Instructions." Clothes are not drying satisfactorily...
...suggested here or visit our website at www.maytag.com/help for assistance and to possibly avoid a service call an electrician. Replace the fuses or reset the circuit breaker. Incorrect power supply. Electric dryers use . For gas dryers, make sure that both circuit breakers have ... Guide". 15 Unusual Noise Humming or whining noise with a qualified electrician. Check with Steam cycle selected Thumping noise Water valve on dryer is open . The water valve on the gas supply line is running. See the "Installation Instructions." Clothes are not drying satisfactorily...
Use & Care Guide
Page 16
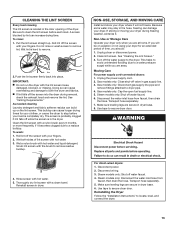
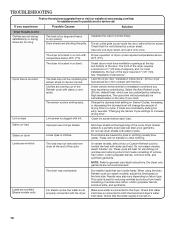
... loads are wrinkled (Steam models only) The dryer was not removed from loads consisting of the cycle. TROUBLESHOOTING First try the solutions suggested here or visit our website at www.maytag.com/help for assistance and to garment care label instructions. On steam models, select Auto... or Custom Refresh cycle to both the faucet and dryer's water inlet valve. Loads are consistently ending too early, see...
... loads are wrinkled (Steam models only) The dryer was not removed from loads consisting of the cycle. TROUBLESHOOTING First try the solutions suggested here or visit our website at www.maytag.com/help for assistance and to garment care label instructions. On steam models, select Auto... or Custom Refresh cycle to both the faucet and dryer's water inlet valve. Loads are consistently ending too early, see...
Use & Care Guide
Page 17
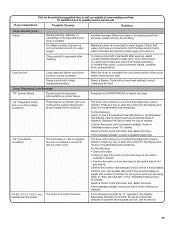
...that water inlet hose is connected to the wall is turned on . First try the solutions suggested here or visit our website at www.maytag.com/help for details. Odors are left in garments after wearing. Press and hold START/PAUSE to avoid overdrying the load. variable service ... clogged; Ventilate the area. the vent is best for service. 17 If you are gone from loads consisting of lint and debris. Electric dryers use two household fuses or breakers. Refer to "Installation Instructions" for assistance and to run when this diagnostic code is located. If the...
...that water inlet hose is connected to the wall is turned on . First try the solutions suggested here or visit our website at www.maytag.com/help for details. Odors are left in garments after wearing. Press and hold START/PAUSE to avoid overdrying the load. variable service ... clogged; Ventilate the area. the vent is best for service. 17 If you are gone from loads consisting of lint and debris. Electric dryers use two household fuses or breakers. Refer to "Installation Instructions" for assistance and to run when this diagnostic code is located. If the...

Installation Guide
Page 1
... INSTRUCTIONS Table of Contents DRYER SAFETY 2 INSTALLATION REQUIREMENTS 3 Tools and Parts 3 LOCATION REQUIREMENTS 4 ELECTRICAL REQUIREMENTS 6 INSTALL LEVELING LEGS 7 ELECTRICAL INSTALLATION 8 Power Supply Cord Connection 9 Direct Wire Connection 11 VENTING 14 ... Plan Vent System 15 Venting Kits 15 Install Vent System 16 CONNECT INLET HOSE 17 CONNECT VENT 18 LEVEL DRYER 19 COMPLETE INSTALLATION CHECKLIST 19 DOOR REVERSAL KIT (OPTIONAL 20 STACKING WASHER AND DRYER (OPTIONAL 20 TROUBLESHOOTING 20 Para una version de estas instrucciones en español, visite www.Whirlpool.com...
... INSTRUCTIONS Table of Contents DRYER SAFETY 2 INSTALLATION REQUIREMENTS 3 Tools and Parts 3 LOCATION REQUIREMENTS 4 ELECTRICAL REQUIREMENTS 6 INSTALL LEVELING LEGS 7 ELECTRICAL INSTALLATION 8 Power Supply Cord Connection 9 Direct Wire Connection 11 VENTING 14 ... Plan Vent System 15 Venting Kits 15 Install Vent System 16 CONNECT INLET HOSE 17 CONNECT VENT 18 LEVEL DRYER 19 COMPLETE INSTALLATION CHECKLIST 19 DOOR REVERSAL KIT (OPTIONAL 20 STACKING WASHER AND DRYER (OPTIONAL 20 TROUBLESHOOTING 20 Para una version de estas instrucciones en español, visite www.Whirlpool.com...
Installation Guide
Page 2
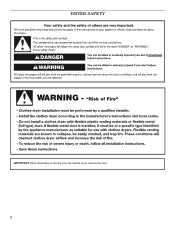
DRYER SAFETY IMPORTANT: When discarding or storing your old clothes dryer, remove the door. 2
DRYER SAFETY IMPORTANT: When discarding or storing your old clothes dryer, remove the door. 2
Installation Guide
Page 3
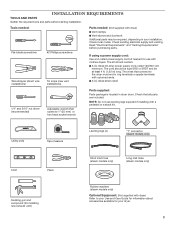
...Short inlet hose (steam models only) Long inlet hose (steam models only) Rubber washers (steam models only) Optional Equipment: (Not supplied with dryer) Refer to the dryer must end in ring terminals or spade terminals with a pedestal or a stack kit. Check local codes. The kit should be type SRD or ...SRDT and be required, depending in dryer drum. The cord should contain: ■■A UL listed 30-amp power supply cord, rated 120/240 volt minimum. NOTE: Do not use with...
...Short inlet hose (steam models only) Long inlet hose (steam models only) Rubber washers (steam models only) Optional Equipment: (Not supplied with dryer) Refer to the dryer must end in ring terminals or spade terminals with a pedestal or a stack kit. Check local codes. The kit should be type SRD or ...SRDT and be required, depending in dryer drum. The cord should contain: ■■A UL listed 30-amp power supply cord, rated 120/240 volt minimum. NOTE: Do not use with...
Installation Guide
Page 4
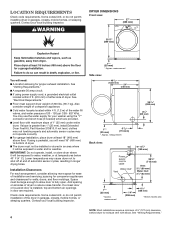
... Also consider weight of companion appliance. ■■Cold water faucets located within 2 ft. (610 mm) of either side of dryer. If using a pedestal, you will need : ■■A location allowing for proper exhaust installation. Installation Clearances For each arrangement... 6 7/8" (174 mm) * Approx. LOCATION REQUIREMENTS Check code requirements. Lower temperatures may not operate correctly. ■■For garage installation, place dryer at least 18" (460 mm) above floor. measurement Back view: 61/4" (159 mm) Power supply cord or cable Water inlet† Vent 281...
... Also consider weight of companion appliance. ■■Cold water faucets located within 2 ft. (610 mm) of either side of dryer. If using a pedestal, you will need : ■■A location allowing for proper exhaust installation. Installation Clearances For each arrangement... 6 7/8" (174 mm) * Approx. LOCATION REQUIREMENTS Check code requirements. Lower temperatures may not operate correctly. ■■For garage installation, place dryer at least 18" (460 mm) above floor. measurement Back view: 61/4" (159 mm) Power supply cord or cable Water inlet† Vent 281...

Installation Guide
Page 5
... ■■Additional clearances might be required for wall, door, floor moldings, dryer venting, and gas line. ■■Additional spacing should be considered on all sides of the dryer to reduce noise transfer. ■■For closet installation, with equivalent ventilation openings ... from your Use and Care Guide. ■■Special provisions must conform to introduce outside air into dryer. The installation must be at least twice as large as dryer exhaust opening. 5 For further information, see "Assistance or Service" section in your dealer. Openings (such...
... ■■Additional clearances might be required for wall, door, floor moldings, dryer venting, and gas line. ■■Additional spacing should be considered on all sides of the dryer to reduce noise transfer. ■■For closet installation, with equivalent ventilation openings ... from your Use and Care Guide. ■■Special provisions must conform to introduce outside air into dryer. The installation must be at least twice as large as dryer exhaust opening. 5 For further information, see "Assistance or Service" section in your dealer. Openings (such...
Installation Guide
Page 6
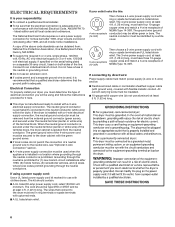
... is adequate. If connecting by a white cover. 3-wire receptacle (10-30R) Then choose a 3-wire power supply cord with clothes dryers. All current-carrying wires must be removed from the external ground connector (green screw), and secured under the neutral terminal (center or ...do not permit the connection of the line. The National Electrical Code requires a 4-wire power supply connection for homes built after 1996, dryer circuits involved in remodeling after 1996, (2) mobile homes, (3) recreational vehicles, and (4) areas where local codes prohibit grounding through the neutral...
... is adequate. If connecting by a white cover. 3-wire receptacle (10-30R) Then choose a 3-wire power supply cord with clothes dryers. All current-carrying wires must be removed from the external ground connector (green screw), and secured under the neutral terminal (center or ...do not permit the connection of the line. The National Electrical Code requires a 4-wire power supply connection for homes built after 1996, dryer circuits involved in remodeling after 1996, (2) mobile homes, (3) recreational vehicles, and (4) areas where local codes prohibit grounding through the neutral...


