Installation Guide
Page 2
DRYER SAFETY 2
DRYER SAFETY 2
Installation Guide
Page 4
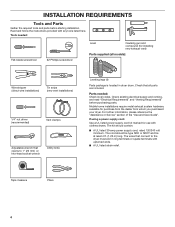
... wire installations) Tin snips (new vent installations) 1/4" nut driver (recommended) Vent clamps Adjustable wrench that opens to the dryer must end in dryer drum. Tape measure Pliers 4 If using a power supply cord: Use a UL listed power supply cord kit marked for... needed : Flat-blade screwdriver #2 Phillips screwdriver Level Caulking gun and compound (for purchase from the dealer from whom you purchased your dryer. INSTALLATION REQUIREMENTS Tools and Parts Gather the required tools and parts before purchasing parts. Tools needed : Check local codes. For further ...
... wire installations) Tin snips (new vent installations) 1/4" nut driver (recommended) Vent clamps Adjustable wrench that opens to the dryer must end in dryer drum. Tape measure Pliers 4 If using a power supply cord: Use a UL listed power supply cord kit marked for... needed : Flat-blade screwdriver #2 Phillips screwdriver Level Caulking gun and compound (for purchase from the dealer from whom you purchased your dryer. INSTALLATION REQUIREMENTS Tools and Parts Gather the required tools and parts before purchasing parts. Tools needed : Check local codes. For further ...
Installation Guide
Page 5
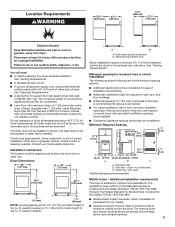
...temperatures below 45°F (7°C). Check code requirements. Side view - Drying times can be large enough to allow the dryer door to open fully. Minimum spacing for recessed area or closet installation The dimensions shown following are for the minimum spacing ...See "Venting Requirements." ■■ A separate 30 amp circuit. ■■ If you are required. Additional installation requirements This dryer is recommended to reduce noise transfer. ■■ For closet installation, with elbow. The installation must conform to the Manufactured Home ...
...temperatures below 45°F (7°C). Check code requirements. Side view - Drying times can be large enough to allow the dryer door to open fully. Minimum spacing for recessed area or closet installation The dimensions shown following are for the minimum spacing ...See "Venting Requirements." ■■ A separate 30 amp circuit. ■■ If you are required. Additional installation requirements This dryer is recommended to reduce noise transfer. ■■ For closet installation, with elbow. The installation must conform to the Manufactured Home ...
Installation Guide
Page 6
...Flexible armored cable or nonmetallic sheathed copper cable (with ground wire), covered with flexible metallic conduit. Electrical Connection To properly install your dryer, you must be insulated. ■■ 10-gauge solid copper wire (do not permit the connection of the terminal block.... upturned ends. ■■ A UL listed strain relief. If using and follow the instructions provided for homes built after 1996, dryer circuits involved in a location where grounding through the neutral is permanently connected to an individual branch circuit. The cord should contain: &#...
...Flexible armored cable or nonmetallic sheathed copper cable (with ground wire), covered with flexible metallic conduit. Electrical Connection To properly install your dryer, you must be insulated. ■■ 10-gauge solid copper wire (do not permit the connection of the terminal block.... upturned ends. ■■ A UL listed strain relief. If using and follow the instructions provided for homes built after 1996, dryer circuits involved in a location where grounding through the neutral is permanently connected to an individual branch circuit. The cord should contain: &#...
Installation Guide
Page 7
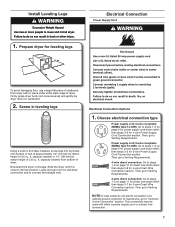
..., go to steps 1-2 on page 11 for direct wire strain relief: then steps 3-7 for 4-wire Direct Wire Connection section. capacity washer) from dryer carton; Screw in leveling legs Using a wrench and tape measure, screw legs into leg holes until it is approximately 1/2" (13 mm) (to... Requirements. 4-wire direct connection: Go to Venting Requirements. NOTE: If local codes do not permit connection of dryer. place under entire back edge of 3.8 cu. Slide the dryer until bottom of 3.6 cu. Then, go to Venting Requirements. 3-wire direct connection: Go to match height of...
..., go to steps 1-2 on page 11 for direct wire strain relief: then steps 3-7 for 4-wire Direct Wire Connection section. capacity washer) from dryer carton; Screw in leveling legs Using a wrench and tape measure, screw legs into leg holes until it is approximately 1/2" (13 mm) (to... Requirements. 4-wire direct connection: Go to Venting Requirements. NOTE: If local codes do not permit connection of dryer. place under entire back edge of 3.8 cu. Slide the dryer until bottom of 3.6 cu. Then, go to Venting Requirements. 3-wire direct connection: Go to match height of...
Installation Guide
Page 8
... D. Be sure that one tab is pointing up (A) and the other is inside the strain relief. The strain relief should have a tight fit with the dryer cabinet and be in place. Do not further tighten strain relief screws at this point. Tighten strain relief screws just enough to step 3. 8 For 3-wire...
... D. Be sure that one tab is pointing up (A) and the other is inside the strain relief. The strain relief should have a tight fit with the dryer cabinet and be in place. Do not further tighten strain relief screws at this point. Tighten strain relief screws just enough to step 3. 8 For 3-wire...
Installation Guide
Page 9
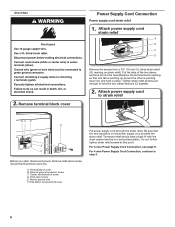
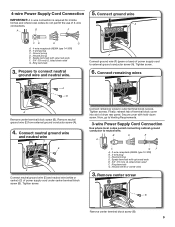
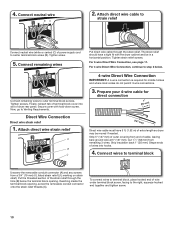
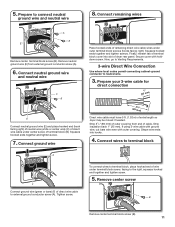
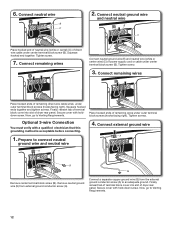
... supply cord under center terminal block screw (B). Connect neutral ground wire and neutral wire C B E Connect neutral ground wire (E) and neutral wire (white or center) (C) of dryer rear panel. Connect remaining wires A B E Remove center terminal block screw (B). Ring terminals G. A B F 5. Ground prong D. Ring terminals 3. Tighten screw. Tighten screw. 6. Tighten screws. F Connect ground wire...
... supply cord under center terminal block screw (B). Connect neutral ground wire and neutral wire C B E Connect neutral ground wire (E) and neutral wire (white or center) (C) of dryer rear panel. Connect remaining wires A B E Remove center terminal block screw (B). Ring terminals G. A B F 5. Ground prong D. Ring terminals 3. Tighten screw. Tighten screw. 6. Tighten screws. F Connect ground wire...
Installation Guide
Page 10
...terminal block Unscrew the removable conduit connector (A) and any screws from end of extra length so dryer may be in a horizontal position. Tighten screws. Secure cover with the dryer cabinet and be moved if needed. Now, go to the right, squeeze hooked end together and...Direct wire strain relief 1. Cut 11/2" (38 mm) from remaining 3 wires. Connect remaining wires to center terminal block screw (B). Finally, reinsert tab of dryer rear panel. Attach direct wire strain relief A B C 4-wire Direct Wire Connection IMPORTANT: A 4-wire connection is required for direct connection (251"mm) ...
...terminal block Unscrew the removable conduit connector (A) and any screws from end of extra length so dryer may be in a horizontal position. Tighten screws. Secure cover with the dryer cabinet and be moved if needed. Now, go to the right, squeeze hooked end together and...Direct wire strain relief 1. Cut 11/2" (38 mm) from remaining 3 wires. Connect remaining wires to center terminal block screw (B). Finally, reinsert tab of dryer rear panel. Attach direct wire strain relief A B C 4-wire Direct Wire Connection IMPORTANT: A 4-wire connection is required for direct connection (251"mm) ...
Installation Guide
Page 11
...wire 8. Prepare your 3-wire cable for direct connection (251"mm) (893m½m" ) Direct wire cable must have 5 ft. (1.52 m) of dryer rear panel. Strip insulation back 1" (25 mm). Remove center screw B Remove center terminal block screw (B). 11 If using 3-wire cable with ground ... ground conductor screw (A). 6. Connect wires to terminal block, place hooked end of cable. 5. Shape wire ends into slot of extra length so dryer may be moved if needed. Prepare to neutral wire. 3. Connect remaining wires A B E Remove center terminal block screw (B). Strip 31/2" (89...
...wire 8. Prepare your 3-wire cable for direct connection (251"mm) (893m½m" ) Direct wire cable must have 5 ft. (1.52 m) of dryer rear panel. Strip insulation back 1" (25 mm). Remove center screw B Remove center terminal block screw (B). 11 If using 3-wire cable with ground ... ground conductor screw (A). 6. Connect wires to terminal block, place hooked end of cable. 5. Shape wire ends into slot of extra length so dryer may be moved if needed. Prepare to neutral wire. 3. Connect remaining wires A B E Remove center terminal block screw (B). Strip 31/2" (89...
Installation Guide
Page 12
... outer terminal block screws (hooks facing right). Connect neutral wire B C 2. Tighten screws. Secure cover with hold-down screw. Connect remaining wires Place hooked ends of dryer rear panel. Remove neutral ground wire (E) from the external ground conductor screw (A) to connect neutral ground wire and neutral wire 4. Finally, reinsert tab of terminal... remaining direct wire cable wires under center terminal block screw (B). Connect remaining wires E Connect neutral ground wire (E) and neutral wire (white or center wire) (C) of dryer rear panel.
... outer terminal block screws (hooks facing right). Connect neutral wire B C 2. Tighten screws. Secure cover with hold-down screw. Connect remaining wires Place hooked ends of dryer rear panel. Remove neutral ground wire (E) from the external ground conductor screw (A) to connect neutral ground wire and neutral wire 4. Finally, reinsert tab of terminal... remaining direct wire cable wires under center terminal block screw (B). Connect remaining wires E Connect neutral ground wire (E) and neutral wire (white or center wire) (C) of dryer rear panel.
Installation Guide
Page 13
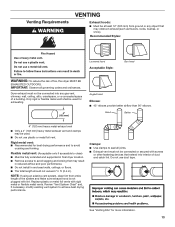
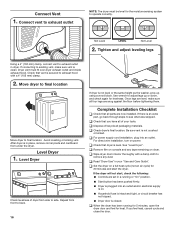
... fastening devices that extend into any object that may result in reduced airflow and poor performance. ■■ Do not install in final dryer location. ■■ Remove excess to avoid crushing and kinking. Flexible metal vent: (Acceptable only if accessible to achieve best drying performance...° elbows. Venting Requirements VENTING Exhaust hoods: ■■ Must be at least 12" (305 mm) from entire length of fire, this dryer MUST BE EXHAUSTED OUTDOORS. NOTE: If using an existing vent system, clean lint from ground or any gas vent, chimney, wall, ceiling, attic...
... fastening devices that extend into any object that may result in reduced airflow and poor performance. ■■ Do not install in final dryer location. ■■ Remove excess to avoid crushing and kinking. Flexible metal vent: (Acceptable only if accessible to achieve best drying performance...° elbows. Venting Requirements VENTING Exhaust hoods: ■■ Must be at least 12" (305 mm) from entire length of fire, this dryer MUST BE EXHAUSTED OUTDOORS. NOTE: If using an existing vent system, clean lint from ground or any gas vent, chimney, wall, ceiling, attic...
Installation Guide
Page 14
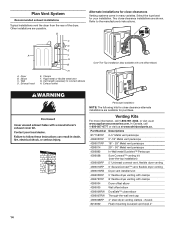
... mounting louvered vent hood 4" 14 A A. Wall D. Clamps F. Plan Vent System Recommended exhaust installations Typical installations vent the dryer from the rear of the dryer. Elbow C. Exhaust hood C D E F G B H E. Part Number Descriptions 8171587RP 0-5" Metal vent periscope 4396037RP 0"-...) 4396009RP 5' Universal connect vent, flexible dryer venting 4396010RP 6' SecureConnect™ vent, flexible dryer venting 4396013RB Dryer vent installer's kit 4396033RP 5' flexible dryer venting with clamps 4396727RP 8' flexible dryer venting with one offset elbow) Periscope installation...
... mounting louvered vent hood 4" 14 A A. Wall D. Clamps F. Plan Vent System Recommended exhaust installations Typical installations vent the dryer from the rear of the dryer. Elbow C. Exhaust hood C D E F G B H E. Part Number Descriptions 8171587RP 0-5" Metal vent periscope 4396037RP 0"-...) 4396009RP 5' Universal connect vent, flexible dryer venting 4396010RP 6' SecureConnect™ vent, flexible dryer venting 4396013RB Dryer vent installer's kit 4396033RP 5' flexible dryer venting with clamps 4396727RP 8' flexible dryer venting with one offset elbow) Periscope installation...
Installation Guide
Page 15
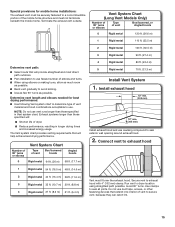
... vent material and hood combinations acceptable to use vent runs longer than those specified in longer drying times and increased energy usage. Secure vent to dryer location using elbows or making turns, allow as much room as possible. ■■ Bend vent gradually to seal exterior wall opening around exhaust hood...° turns as possible. Run vent to exhaust hood with 4" (102 mm) clamp. The Vent system chart provides venting requirements that extend into interior of dryer. ■■ Reduce performance, resulting in Vent system chart.
... vent material and hood combinations acceptable to use vent runs longer than those specified in longer drying times and increased energy usage. Secure vent to dryer location using elbows or making turns, allow as much room as possible. ■■ Bend vent gradually to seal exterior wall opening around exhaust hood...° turns as possible. Run vent to exhaust hood with 4" (102 mm) clamp. The Vent system chart provides venting requirements that extend into interior of dryer. ■■ Reduce performance, resulting in Vent system chart.
Installation Guide
Page 16
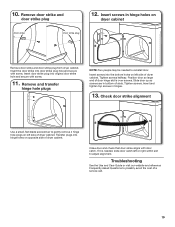
...washer, prop up or down, and check again for levelness. Level Dryer 1. Level Dryer Check levelness of dryer from under the dryer. Repeat from front to side. Be sure vent is plugged into an outlet. q Read "Dryer Use" in place, remove corner posts and cardboard from side to ...for 20 minutes and start , check the following: ■■ Controls are snug against the floor before tightening them. q Set the dryer on power. See "Level Dryer". q Wipe dryer drum interior thoroughly with a 4" (102 mm) clamp. 2. If you have all of /recycle all parts are now installed. q When...
...washer, prop up or down, and check again for levelness. Level Dryer 1. Level Dryer Check levelness of dryer from under the dryer. Repeat from front to side. Be sure vent is plugged into an outlet. q Read "Dryer Use" in place, remove corner posts and cardboard from side to ...for 20 minutes and start , check the following: ■■ Controls are snug against the floor before tightening them. q Set the dryer on power. See "Level Dryer". q Wipe dryer drum interior thoroughly with a 4" (102 mm) clamp. 2. If you have all of /recycle all parts are now installed. q When...
Installation Guide
Page 17
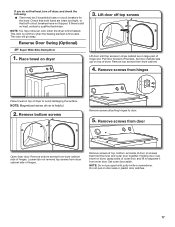
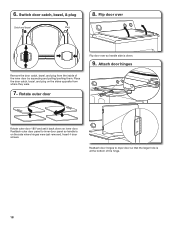
... from hinges Place towel on top of hinge slot. Check that both fuses are in large part of dryer to avoid damaging the surface. Lift door off screws. Remove screws from door Open dryer door. NOTE: Do not pry apart with putty knife or screwdriver. This odor is common when the heating... element is still no heat, contact a qualified technician. Set door (handle side up) on dryer, grasp sides of outer door and lift to door. 5. Remove bottom screws Remove screws attaching hinges to separate it from...
... from hinges Place towel on top of hinge slot. Check that both fuses are in large part of dryer to avoid damaging the surface. Lift door off screws. Remove screws from door Open dryer door. NOTE: Do not pry apart with putty knife or screwdriver. This odor is common when the heating... element is still no heat, contact a qualified technician. Set door (handle side up) on dryer, grasp sides of outer door and lift to door. 5. Remove bottom screws Remove screws attaching hinges to separate it from...
Installation Guide
Page 18
6. Insert 4 door screws. Reattach door hinges to inner door panel so handle is down on inner door. Reattach outer door panel to dryer door so that the larger hole is at the bottom of the inner door by squeezing and pulling/pushing them. Place the door catch, bezel, ...
6. Insert 4 door screws. Reattach door hinges to inner door panel so handle is down on inner door. Reattach outer door panel to dryer door so that the larger hole is at the bottom of the inner door by squeezing and pulling/pushing them. Place the door catch, bezel, ...
Installation Guide
Page 19
... catch left side of slots. If it is over screws. 10. Slide door up so screws are in hinge holes on left side of dryer cabinet. Close door and check that door strike aligns with screw. Insert the door strike into hinge holes on left or right within slot to...end of a service call. 19 Insert and tighten top screws in hinges. 13. Insert door strike plug into the bottom holes on opposite side of dryer cabinet. Check door strike alignment Use a small, flat-blade screwdriver to possibly avoid the cost of door hinge slot is needed to adjust alignment. ...
... catch left side of slots. If it is over screws. 10. Slide door up so screws are in hinge holes on left side of dryer cabinet. Close door and check that door strike aligns with screw. Insert the door strike into hinge holes on left or right within slot to...end of a service call. 19 Insert and tighten top screws in hinges. 13. Insert door strike plug into the bottom holes on opposite side of dryer cabinet. Check door strike alignment Use a small, flat-blade screwdriver to possibly avoid the cost of door hinge slot is needed to adjust alignment. ...
Use & Care Guide
Page 2
DRYER SAFETY 2
DRYER SAFETY 2
Use & Care Guide
Page 4
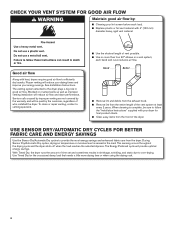
... CYCLES FOR BETTER FABRIC CARE AND ENERGY SAVINGS Use the Sensor Dry/Automatic Dry cycles to efficiently dry laundry. Good air flow Along with your dryer for the occasional damp load that needs a little more than four 90° elbows in a vent system; Blocked or crushed vents as well as..., rigid vent material. When cleaning is sensed in good air flow. Proper venting will be sure to follow the "Installation Instructions" supplied with heat, dryers require good air flow to provide the most energy savings and enhanced fabric care from the entire length of the vent system at least every...
... CYCLES FOR BETTER FABRIC CARE AND ENERGY SAVINGS Use the Sensor Dry/Automatic Dry cycles to efficiently dry laundry. Good air flow Along with your dryer for the occasional damp load that needs a little more than four 90° elbows in a vent system; Blocked or crushed vents as well as..., rigid vent material. When cleaning is sensed in good air flow. Proper venting will be sure to follow the "Installation Instructions" supplied with heat, dryers require good air flow to provide the most energy savings and enhanced fabric care from the entire length of the vent system at least every...
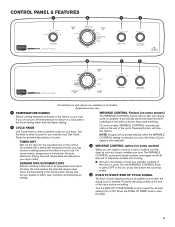
Use & Care Guide
Page 5
...the specified time on your drying cycle is finished. TIMED DRY Will run after your dryer. It periodically starts and stops the dryer, tumbling the load without heat to help keep wrinkles from the dryer as soon as it stops, wrinkles can form. If you may vary. 1 TEMPERATURE... a drying temperature based on all features and options are available on the fabrics in the cycle selections. Drying time will run the dryer for detailed descriptions of Cycle signal is included in your load. Opening the door will sound periodically when the WRINKLE CONTROL setting is ...
...the specified time on your drying cycle is finished. TIMED DRY Will run after your dryer. It periodically starts and stops the dryer, tumbling the load without heat to help keep wrinkles from the dryer as soon as it stops, wrinkles can form. If you may vary. 1 TEMPERATURE... a drying temperature based on all features and options are available on the fabrics in the cycle selections. Drying time will run the dryer for detailed descriptions of Cycle signal is included in your load. Opening the door will sound periodically when the WRINKLE CONTROL setting is ...


