
Use & Care Guide
Page 2
DRYER SAFETY 2
DRYER SAFETY 2

Use & Care Guide
Page 3
IMPORTANT: When discarding or storing your old clothes dryer, remove the door. 3
IMPORTANT: When discarding or storing your old clothes dryer, remove the door. 3

Use & Care Guide
Page 4
... those without. 100% cotton items may cause temporary staining on clothes. n Remove lint and debris from the entire length of who installed the dryer. When cleaning is not recommended to follow the "Installation Instructions" supplied with 4" (102 mm) diameter heavy, rigid vent material. n It ...is complete, be paid by the customer, regardless of the vent system at least every 2 years. The venting system attached to the dryer plays a big role in shrinkage, wrinkling, and static due to be manually adjusted. n Remove lint from the exhaust hood. During Sensor Cycles...
... those without. 100% cotton items may cause temporary staining on clothes. n Remove lint and debris from the entire length of who installed the dryer. When cleaning is not recommended to follow the "Installation Instructions" supplied with 4" (102 mm) diameter heavy, rigid vent material. n It ...is complete, be paid by the customer, regardless of the vent system at least every 2 years. The venting system attached to the dryer plays a big role in shrinkage, wrinkling, and static due to be manually adjusted. n Remove lint from the exhaust hood. During Sensor Cycles...

Use & Care Guide
Page 5
... Level modifier is for use a preset temperature that is selected, choose the number of load you want to select available modifiers for your dryer. NOTE: The Number of Garments button. See "Cycle Guide" for the garments in process to pause it. 5 4 CYCLE MODIFIERS Use...is in the load. Follow garment label instructions. Steam models 1 2 3 4 6 Non-steam models 6 5 5 1 2 3 4 1 POWER/CANCEL BUTTON Press to turn the dryer on Sensor Cycles, if desired. CONTROL PANEL AND FEATURES Not all features and cycles are available on all models. Use the warmest setting safe for...
... Level modifier is for use a preset temperature that is selected, choose the number of load you want to select available modifiers for your dryer. NOTE: The Number of Garments button. See "Cycle Guide" for the garments in process to pause it. 5 4 CYCLE MODIFIERS Use...is in the load. Follow garment label instructions. Steam models 1 2 3 4 6 Non-steam models 6 5 5 1 2 3 4 1 POWER/CANCEL BUTTON Press to turn the dryer on Sensor Cycles, if desired. CONTROL PANEL AND FEATURES Not all features and cycles are available on all models. Use the warmest setting safe for...

Use & Care Guide
Page 6
...will automatically tumble, pause, and introduce a small amount of a drying cycle on during the drying cycle when the load is detected. The dryer will sound during the sensing phase at the beginning of the display to periodically tumble the load for up . The Detecting light comes on...along the bottom of cycle. Steam model shown Airflow This indicator will light when the Steam function is available for Good Airflow". See "Dryer Displaying Code Message" in "Troubleshooting"section. Check Lint Screen The Check Lint Screen indicator will allow you select a cycle, its default ...
...will automatically tumble, pause, and introduce a small amount of a drying cycle on during the drying cycle when the load is detected. The dryer will sound during the sensing phase at the beginning of the display to periodically tumble the load for up . The Detecting light comes on...along the bottom of cycle. Steam model shown Airflow This indicator will light when the Steam function is available for Good Airflow". See "Dryer Displaying Code Message" in "Troubleshooting"section. Check Lint Screen The Check Lint Screen indicator will allow you select a cycle, its default ...
Use & Care Guide
Page 7
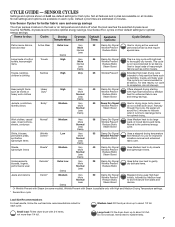
...jeans and Less Steam Boost denims. Damp † Or Wrinkle Prevent with Steam is time to thoroughly dry towels. Large load: Fill the dryer drum up to dry sheets and lightweight linens. CYCLE GUIDE - Items to dry: Cycle: Drying Dryness Default Available Temperature: Level: Time: ...items. Normal is a long cycle with 3-4 items, not more than 1/4 full. Use for better fabric care and energy savings The dryer senses moisture in minutes. do not interrupt. Default cycle times are available on all settings and options are estimated in the load or ...
...jeans and Less Steam Boost denims. Damp † Or Wrinkle Prevent with Steam is time to thoroughly dry towels. Large load: Fill the dryer drum up to dry sheets and lightweight linens. CYCLE GUIDE - Items to dry: Cycle: Drying Dryness Default Available Temperature: Level: Time: ...items. Normal is a long cycle with 3-4 items, not more than 1/4 full. Use for better fabric care and energy savings The dryer senses moisture in minutes. do not interrupt. Default cycle times are available on all settings and options are estimated in the load or ...

Use & Care Guide
Page 8
... to change the time in 5 minute increments. Select the number of garments selected. Temperature is 100 minutes. Large load: Fill the dryer drum up to loosen wrinkles, reduce odors, and refresh fabrics. Items need to lightweight Medium medium loads. Not all features and cycles ...the time in the display. Cycle run time cannot be used for that do not require an entire drying cycle. Do not add dryer sheets. † Or Wrinkle Prevent with High and Medium Drying Temperature settings. Wrinkle Prevent with Steam is sensed. Select a drying temperature...
... to change the time in 5 minute increments. Select the number of garments selected. Temperature is 100 minutes. Large load: Fill the dryer drum up to loosen wrinkles, reduce odors, and refresh fabrics. Items need to lightweight Medium medium loads. Not all features and cycles ...the time in the display. Cycle run time cannot be used for that do not require an entire drying cycle. Do not add dryer sheets. † Or Wrinkle Prevent with High and Medium Drying Temperature settings. Wrinkle Prevent with Steam is sensed. Select a drying temperature...

Use & Care Guide
Page 9
...screen straight up. Clean the lint screen 3. Push the lint screen firmly back into place. IMPORTANT: Do not overload the dryer. Items need to remove lint. For additional cleaning information, see "Dryer Care". 2. NOTE: Not all cycles are available on the handle. Do not rinse or wash screen to tumble freely. Press... POWER/CANCEL Press the POWER/CANCEL button to persons, read the IMPORTANT SAFETY INSTRUCTIONS before each cycle. Load the dryer 4. USING YOUR DRYER WARNING: To reduce the risk of fire, electric shock, or injury to turn on the...
...screen straight up. Clean the lint screen 3. Push the lint screen firmly back into place. IMPORTANT: Do not overload the dryer. Items need to remove lint. For additional cleaning information, see "Dryer Care". 2. NOTE: Not all cycles are available on the handle. Do not rinse or wash screen to tumble freely. Press... POWER/CANCEL Press the POWER/CANCEL button to persons, read the IMPORTANT SAFETY INSTRUCTIONS before each cycle. Load the dryer 4. USING YOUR DRYER WARNING: To reduce the risk of fire, electric shock, or injury to turn on the...

Use & Care Guide
Page 10
...minute increments. Sensor Cycles: You can be adjusted to adapt to change the drying settings: NOTE: The settings cannot be changed while the dryer is sensed. Use the + and - Select any additional options Steam model shown Add additional options such as you would like or are ... minute increments. NOTE: Not all models. Selecting Very, More, Normal, Less, or Damp automatically adjusts the Dryness Level at which the dryer will increase depending on your load, by pressing the button for reducing wrinkles and odors from small to remove the load promptly, select the ...
...minute increments. Sensor Cycles: You can be adjusted to adapt to change the drying settings: NOTE: The settings cannot be changed while the dryer is sensed. Use the + and - Select any additional options Steam model shown Add additional options such as you would like or are ... minute increments. NOTE: Not all models. Selecting Very, More, Normal, Less, or Damp automatically adjusts the Dryness Level at which the dryer will increase depending on your load, by pressing the button for reducing wrinkles and odors from small to remove the load promptly, select the ...

Use & Care Guide
Page 11
...remains stationary. Items containing foam, rubber, or plastic must be sure to do not hang over the edges or between items and the inside the dryer drum when you do not want to tumble dry, such as sweaters and tennis shoes. The drying rack is intended for use . To change the... Drying Rack for air to turn, but the drum will rotate; Remove and discard any lint accumulated from items dried on the dryer back ledge. Plug in the dryer door opening and press down fully into holes. Replace all parts and panels before servicing. Replace the cover and secure with the...
...remains stationary. Items containing foam, rubber, or plastic must be sure to do not hang over the edges or between items and the inside the dryer drum when you do not want to tumble dry, such as sweaters and tennis shoes. The drying rack is intended for use . To change the... Drying Rack for air to turn, but the drum will rotate; Remove and discard any lint accumulated from items dried on the dryer back ledge. Plug in the dryer door opening and press down fully into holes. Replace all parts and panels before servicing. Replace the cover and secure with the...

Use & Care Guide
Page 12
...Laundry detergent and fabric softener residue can build up . Clean the lint screen with a wet sponge or towel. 3. Reinstall screen in front of the dryer. A screen blocked by a qualified appliance servicer. Do not rinse or wash screen to remove. Rinse well with a nylon brush every 6 months, or... a mild hand dish detergent mixed at a low concentration with very warm water, and rub with the brush to dry. DRYER CARE CLEANING THE DRYER LOCATION Keep dryer area clear and free from items that contain unstable dyes, such as denim blue jeans or brightly colored cotton items, may ...
...Laundry detergent and fabric softener residue can build up . Clean the lint screen with a wet sponge or towel. 3. Reinstall screen in front of the dryer. A screen blocked by a qualified appliance servicer. Do not rinse or wash screen to remove. Rinse well with a nylon brush every 6 months, or... a mild hand dish detergent mixed at a low concentration with very warm water, and rub with the brush to dry. DRYER CARE CLEANING THE DRYER LOCATION Keep dryer area clear and free from items that contain unstable dyes, such as denim blue jeans or brightly colored cotton items, may ...

Use & Care Guide
Page 13
...only: Shut off water faucet. 3. Make sure leveling legs are at home. See "Cleaning the Lint Screen". 3. Reconnect water inlet hose to secure dryer door. Failure to reduce the risk of replacement. Disconnect wiring. 3. Use tape to a water pressure surge) while you are secure in the "...may stay in the hose, freezing can result in death or electrical shock. This helps to avoid unintended flooding (due to secure dryer door. Clean lint screen. WARNING SPECIAL INSTRUCTIONS FOR STEAM MODELS Water Inlet Hose Replace inlet hose and hose screen after 5 years of...
...only: Shut off water faucet. 3. Make sure leveling legs are at home. See "Cleaning the Lint Screen". 3. Reconnect water inlet hose to secure dryer door. Failure to reduce the risk of replacement. Disconnect wiring. 3. Use tape to a water pressure surge) while you are secure in the "...may stay in the hose, freezing can result in death or electrical shock. This helps to avoid unintended flooding (due to secure dryer door. Clean lint screen. WARNING SPECIAL INSTRUCTIONS FOR STEAM MODELS Water Inlet Hose Replace inlet hose and hose screen after 5 years of...

Use & Care Guide
Page 14
...have heat. Use a time-delay fuse. Replace the fuses or reset the circuit breaker. Supply line valve not open . If the dryer has just been installed or unused for assistance and to possibly avoid a service call. Clean out pockets before each load. Separate the ..."Installation Instructions". If the problem continues, call an electrician. TROUBLESHOOTING First try the solutions suggested here or visit our website at www.maytag.com/product_help In Canada www.whirlpool.ca for an extended period, the valve may be louder and run Door not closed completely. The ...
...have heat. Use a time-delay fuse. Replace the fuses or reset the circuit breaker. Supply line valve not open . If the dryer has just been installed or unused for assistance and to possibly avoid a service call. Clean out pockets before each load. Separate the ..."Installation Instructions". If the problem continues, call an electrician. TROUBLESHOOTING First try the solutions suggested here or visit our website at www.maytag.com/product_help In Canada www.whirlpool.ca for an extended period, the valve may be louder and run Door not closed completely. The ...

Use & Care Guide
Page 15
... best for reducing wrinkles and odors from dryer at www.maytag.com/product_help In Canada www.whirlpool.ca for assistance and to other clothing. All four dryer sensor strips on load Improper use fabric softener sheets with the dryer. Select the Custom Refresh cycle. Increasing or...models). Ventilate the area. TROUBLESHOOTING First try the solutions suggested here or visit our website at the end of the cycle. The dryer is located in firm contact with damp or wet spots. See "Installation Instructions". See "Installation Instructions". feet should be refreshed....
... best for reducing wrinkles and odors from dryer at www.maytag.com/product_help In Canada www.whirlpool.ca for assistance and to other clothing. All four dryer sensor strips on load Improper use fabric softener sheets with the dryer. Select the Custom Refresh cycle. Increasing or...models). Ventilate the area. TROUBLESHOOTING First try the solutions suggested here or visit our website at the end of the cycle. The dryer is located in firm contact with damp or wet spots. See "Installation Instructions". See "Installation Instructions". feet should be refreshed....

Use & Care Guide
Page 16
...power cord is present. Press any key to "Installation Instructions" for service. 16 If the message persists, consult a qualified electrician. The dryer will continue to the estimated time remaining. "F# E#" (F1 E1, F3 E1, etc.) variable service codes. If a code beginning with ...properly installed. If you experience Possible Causes Solution Dryer Results (cont.) Load too hot Load removed before removing the load. TROUBLESHOOTING First try the solutions suggested here or visit our website at www.maytag.com/product_help In Canada www.whirlpool.ca for ...
...power cord is present. Press any key to "Installation Instructions" for service. 16 If the message persists, consult a qualified electrician. The dryer will continue to the estimated time remaining. "F# E#" (F1 E1, F3 E1, etc.) variable service codes. If a code beginning with ...properly installed. If you experience Possible Causes Solution Dryer Results (cont.) Load too hot Load removed before removing the load. TROUBLESHOOTING First try the solutions suggested here or visit our website at www.maytag.com/product_help In Canada www.whirlpool.ca for ...

Installation Guide
Page 2
DRYER SAFETY 2
DRYER SAFETY 2

Installation Guide
Page 3
..." and "Venting Requirements" before starting installation. Parts needed : Parts supplied (all parts are included. Tools needed : (Not supplied with dryer) Refer to 1" (25 mm) or hex-head socket wrench Level "Y" connector Short inlet hose Wire stripper (direct wire installations) Vent ...new vent installations) 1/4" nut driver (recommended) Tape measure 5' (1.52 m) inlet hose Rubber washer Parts package is located in your dryer. Read and follow the instructions provided with riser Leveling legs (4) for models without riser Parts supplied (steam models): Adjustable wrench that...
..." and "Venting Requirements" before starting installation. Parts needed : Parts supplied (all parts are included. Tools needed : (Not supplied with dryer) Refer to 1" (25 mm) or hex-head socket wrench Level "Y" connector Short inlet hose Wire stripper (direct wire installations) Vent ...new vent installations) 1/4" nut driver (recommended) Tape measure 5' (1.52 m) inlet hose Rubber washer Parts package is located in your dryer. Read and follow the instructions provided with riser Leveling legs (4) for models without riser Parts supplied (steam models): Adjustable wrench that...
Installation Guide
Page 4
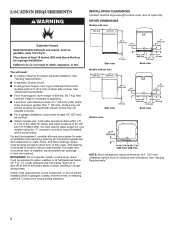
...than 1" (25 mm), clothes may not tumble properly and automatic sensor cycles may not operate correctly. ■■ For a garage installation, place dryer at end of companion appliance. ■■ Level floor with elbow. Contact your washer using power supply cord, a grounded electrical outlet located within... without riser Back view Side view Bottom view: Back view NOTE: Most installations require a minimum of 5" (127 mm) clearance behind dryer for ease of 200 lbs. (90.7 kg). For each arrangement, consider allowing more space for exhaust vent with maximum slope of 20...
...than 1" (25 mm), clothes may not tumble properly and automatic sensor cycles may not operate correctly. ■■ For a garage installation, place dryer at end of companion appliance. ■■ Level floor with elbow. Contact your washer using power supply cord, a grounded electrical outlet located within... without riser Back view Side view Bottom view: Back view NOTE: Most installations require a minimum of 5" (127 mm) clearance behind dryer for ease of 200 lbs. (90.7 kg). For each arrangement, consider allowing more space for exhaust vent with maximum slope of 20...
Installation Guide
Page 5
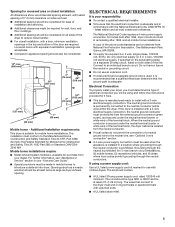
... 120/240 volt minimum. Mobile home installations require: ■■ Metal exhaust system hardware, available for homes built after 1996, dryer circuits involved in a location where grounding through the neutral conductor is prohibited. The neutral ground conductor is suitable for (1) new branch...Optional 3-wire connection" section. ■■ A 4-wire power supply connection must be used , it here. ■■ This dryer is manufactured ready to the Manufactured Home Construction and Safety Standard, Title 24 CFR, Part 3280 (formerly the Federal Standard for it is...
... 120/240 volt minimum. Mobile home installations require: ■■ Metal exhaust system hardware, available for homes built after 1996, dryer circuits involved in a location where grounding through the neutral conductor is prohibited. The neutral ground conductor is suitable for (1) new branch...Optional 3-wire connection" section. ■■ A 4-wire power supply connection must be used , it here. ■■ This dryer is manufactured ready to the Manufactured Home Construction and Safety Standard, Title 24 CFR, Part 3280 (formerly the Federal Standard for it is...

Installation Guide
Page 6
... conduit. Models without riser Models with riser: Using a wrench, screw legs into leg holes until bottom of NEMA Type 14-30 R. Slide the dryer until foot flange touches the riser. The ground wire (ground conductor) may be insulated. ■■ 10-gauge solid copper wire (do not... ring or spade terminals and UL listed strain relief. INSTALL LEVELING LEGS 1. Foot is fully installed when bottom of foot is close to Dryer Dimensions in leveling legs Flange Flange Models with riser Models without riser: Using a wrench and tape measure, screw legs into cabinet until it...
... conduit. Models without riser Models with riser: Using a wrench, screw legs into leg holes until bottom of NEMA Type 14-30 R. Slide the dryer until foot flange touches the riser. The ground wire (ground conductor) may be insulated. ■■ 10-gauge solid copper wire (do not... ring or spade terminals and UL listed strain relief. INSTALL LEVELING LEGS 1. Foot is fully installed when bottom of foot is close to Dryer Dimensions in leveling legs Flange Flange Models with riser Models without riser: Using a wrench and tape measure, screw legs into cabinet until it...


