
Use and Care Guide
Page 2
...happen if the instructions are known to potential hazards that can be performed by the appliance manufacturer as suitable for use with clothes dryers. This is , tell you don't follow instructions. We have provided many important safety messages in this manual and on your appliance... must be killed or seriously injured if you how to the manufacturer's instructions and local codes. - Flexible venting materials are not followed. DRYER SAFETY Your safety and the safety of fire. - You can kill or hurt you don't immediatel_ follow instructions. Save these instructions. ...
...happen if the instructions are known to potential hazards that can be performed by the appliance manufacturer as suitable for use with clothes dryers. This is , tell you don't follow instructions. We have provided many important safety messages in this manual and on your appliance... must be killed or seriously injured if you how to the manufacturer's instructions and local codes. - Flexible venting materials are not followed. DRYER SAFETY Your safety and the safety of fire. - You can kill or hurt you don't immediatel_ follow instructions. Save these instructions. ...
Use and Care Guide
Page 3
WARNING: Gas leaks cannot always be followed to minimize the risk of fire or explosion, or to light any appliance. = Do not touch any electrical switch; If a gas leak is detected, follow the "What to do not use any other appliance. - For more information, contact your gas supplier. ...the fire department. - IMPORTANT: The gas installation must be detected by UL or CSA. The dryer must be electrically grounded in accordance with local codes, or in the absence of local codes, with the National Electrical Code, ANSl/NFPA 70. do if you cannot reach your gas supplier, call your gas ...
WARNING: Gas leaks cannot always be followed to minimize the risk of fire or explosion, or to light any appliance. = Do not touch any electrical switch; If a gas leak is detected, follow the "What to do not use any other appliance. - For more information, contact your gas supplier. ...the fire department. - IMPORTANT: The gas installation must be detected by UL or CSA. The dryer must be electrically grounded in accordance with local codes, or in the absence of local codes, with the National Electrical Code, ANSl/NFPA 70. do if you cannot reach your gas supplier, call your gas ...

Use and Care Guide
Page 4
...items exposed to cause cancer. Failure to play on or in death, explosion, or fire. Fire Hazard No washer can result in the dryer. Items contaminated with cooking oils may contribute to a chemical reaction that could ignite or explode. [] Do not allow children to follow ...not dry anything flammable on it (including cooking oils}. iMPORTANT SAFETY iNSTRUCTiONS WARNING: To reduce the risk of fire, electric shock, or injury to persons when using the dryer, follow basic precautions, including the following installation, see the QUICK START GUIDE on the next page. 4 SAVE THESE...
...items exposed to cause cancer. Failure to play on or in death, explosion, or fire. Fire Hazard No washer can result in the dryer. Items contaminated with cooking oils may contribute to a chemical reaction that could ignite or explode. [] Do not allow children to follow ...not dry anything flammable on it (including cooking oils}. iMPORTANT SAFETY iNSTRUCTiONS WARNING: To reduce the risk of fire, electric shock, or injury to persons when using the dryer, follow basic precautions, including the following installation, see the QUICK START GUIDE on the next page. 4 SAVE THESE...

Use and Care Guide
Page 5
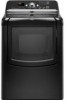
QUICK START GUIDE f ......... Your dryer may not have all of fire, electric shock, or injury to persons, read the IMPORTANT SAFETY INSTRUCTIONS before operating this appliance. iiiiiiiiiiiiiiiiiiiiiiii normal h_ d_i_k,_ bulky _o_t_ol delicate =a_,_l_ mexra_owm/ow ...
QUICK START GUIDE f ......... Your dryer may not have all of fire, electric shock, or injury to persons, read the IMPORTANT SAFETY INSTRUCTIONS before operating this appliance. iiiiiiiiiiiiiiiiiiiiiiii normal h_ d_i_k,_ bulky _o_t_ol delicate =a_,_l_ mexra_owm/ow ...

Use and Care Guide
Page 6
To reduce wrinkling, remove the load from the dryer as soon as an alternate temperature. Cycle tips • Dry most loads using the preset cycle settings. • Refer to the load you are drying. ... the initial preset temperature. Once selected, the new heat setting will aid in the cycle. Select the drying cycle that matches the type of your dryer is the preferred setting; NOTE: Not all cycles are available. Extra-I_ow * Preferred setting This is selected. The initial preset temperature is automatically sensing the...
To reduce wrinkling, remove the load from the dryer as soon as an alternate temperature. Cycle tips • Dry most loads using the preset cycle settings. • Refer to the load you are drying. ... the initial preset temperature. Once selected, the new heat setting will aid in the cycle. Select the drying cycle that matches the type of your dryer is the preferred setting; NOTE: Not all cycles are available. Extra-I_ow * Preferred setting This is selected. The initial preset temperature is automatically sensing the...

Use and Care Guide
Page 7
... models) Helps to smooth out wrinkles Add_, _ to_ sa modifiers ! In this cycle, a small amount of water is sprayed into the dryer drum after several minutes of tumbling with heat followed by a brief coo[ down . Timed Preset Cycle Settings Timed Cycles Load Type Default Temperature ... Cycle Modifiers Use the DRYNESS I_EVEL button to select dryness levels for drying clothes; The initial preset temperature is sprayed into the dryer drum after several minutes of tumbling with heat. Timed Cycle Modifiers Use the TEMP LEVEl_ button to select temperatures for items that ...
... models) Helps to smooth out wrinkles Add_, _ to_ sa modifiers ! In this cycle, a small amount of water is sprayed into the dryer drum after several minutes of tumbling with heat followed by a brief coo[ down . Timed Preset Cycle Settings Timed Cycles Load Type Default Temperature ... Cycle Modifiers Use the DRYNESS I_EVEL button to select dryness levels for drying clothes; The initial preset temperature is sprayed into the dryer drum after several minutes of tumbling with heat. Timed Cycle Modifiers Use the TEMP LEVEl_ button to select temperatures for items that ...

Use and Care Guide
Page 8
... is being sprayed into Cool Down. Promptly removing clothes at the end of the cycle reduces wrinkling. Rearranging the load will not illuminate. The dryer will illuminate. Damp Dry signa/beeps, if selected. Press DRUM I_IGHT at the end of time selected, and the Wet light will continue to...) option helps keep wrinkles from forming when you select the Wrinkle Prevent/Wrinkle Prevent Plus setting in the Normal cycle, this feature selected, the dryer tumbles the load intermittently for up to 120 minutes. • Get up to run for ease in the drying process. Follow the progress of...
... is being sprayed into Cool Down. Promptly removing clothes at the end of the cycle reduces wrinkling. Rearranging the load will not illuminate. The dryer will illuminate. Damp Dry signa/beeps, if selected. Press DRUM I_IGHT at the end of time selected, and the Wet light will continue to...) option helps keep wrinkles from forming when you select the Wrinkle Prevent/Wrinkle Prevent Plus setting in the Normal cycle, this feature selected, the dryer tumbles the load intermittently for up to 120 minutes. • Get up to run for ease in the drying process. Follow the progress of...

Use and Care Guide
Page 9
... tumbling. To findout whether your new preset Dryness I .eve[ settings cannot be adjusted to adapt to secure at the beginning of your dryer. button again until the desired Dryness I )o not allow items to increase the dryness. Press START/PAUSE. Press START/PAUSE to continue ...the cycle. Press the POWER/CANCEl_ button. 6. Dryer back panel 3. NOTE: I .eve[ setting is running. 2. There are consistently not as dry as you would like, you may change the preset...
... tumbling. To findout whether your new preset Dryness I .eve[ settings cannot be adjusted to adapt to secure at the beginning of your dryer. button again until the desired Dryness I )o not allow items to increase the dryness. Press START/PAUSE. Press START/PAUSE to continue ...the cycle. Press the POWER/CANCEl_ button. 6. Dryer back panel 3. NOTE: I .eve[ setting is running. 2. There are consistently not as dry as you would like, you may change the preset...

Use and Care Guide
Page 10
...indicator light to remind you to stop before each load. I .ow 60 Block to remove. Roll lint off screen with hot water. 3. DRYER CARE 2. Clean the lint screen with the brush to a residue buildup. Rinse screen with the lint screen loose, damaged, blocked, or missing.... Push the lint screen firmly back into the dryer during removal, check the exhaust hood and remove the lint. 10 Failure to remove lint. Every load cleaning 1. To wash 1. ctuadlrying timewilldepenodntheamounotf ...
...indicator light to remind you to stop before each load. I .ow 60 Block to remove. Roll lint off screen with hot water. 3. DRYER CARE 2. Clean the lint screen with the brush to a residue buildup. Rinse screen with the lint screen loose, damaged, blocked, or missing.... Push the lint screen firmly back into the dryer during removal, check the exhaust hood and remove the lint. 10 Failure to remove lint. Every load cleaning 1. To wash 1. ctuadlrying timewilldepenodntheamounotf ...

Use and Care Guide
Page 11
... avoid unintended flooding (due to do so can damage your dryer where it . When replacing your dryer and wi [not stain future loads of time, you are secure in death or electrical shock. 1. winterize it will be clone by a qualified person. For direct-wired dryers: 1. Apply a liquid, nonflammable household cleaner to faucet. These stains...
... avoid unintended flooding (due to do so can damage your dryer where it . When replacing your dryer and wi [not stain future loads of time, you are secure in death or electrical shock. 1. winterize it will be clone by a qualified person. For direct-wired dryers: 1. Apply a liquid, nonflammable household cleaner to faucet. These stains...

Use and Care Guide
Page 12
... to the estimated time remaining. The ryer will not run cleaned. 12 www.maytag.com/help - I)epending on the length of a service call an electrician. • Is the correct power supply available? Press any key to "Electrical Connection" for 2-5 seconds. Electric dryers use ? Replace the fuse or reset the circuit breaker. Refer to clear...
... to the estimated time remaining. The ryer will not run cleaned. 12 www.maytag.com/help - I)epending on the length of a service call an electrician. • Is the correct power supply available? Press any key to "Electrical Connection" for 2-5 seconds. Electric dryers use ? Replace the fuse or reset the circuit breaker. Refer to clear...

Use and Care Guide
Page 13
... freely. See "Additional Features." Smaller loads yield best results with temperature below 45°F (7°C) ? Failure to move and install dryer. Long venting will change the amount of the cycle. Use 4" (102 mm) diameter vent material. Failure to do so can stain...and synthetics. • Loads are still wrinkled following Steam cycles? I .oad cycle. Make sure water is turned on. Run the dryer for air movement. Select the CUSTOM REFRESH cycle (20 min. Check for 5-10 minutes. Failure to check air movement. Results may ...
... freely. See "Additional Features." Smaller loads yield best results with temperature below 45°F (7°C) ? Failure to move and install dryer. Long venting will change the amount of the cycle. Use 4" (102 mm) diameter vent material. Failure to do so can stain...and synthetics. • Loads are still wrinkled following Steam cycles? I .oad cycle. Make sure water is turned on. Run the dryer for air movement. Select the CUSTOM REFRESH cycle (20 min. Check for 5-10 minutes. Failure to check air movement. Results may ...

Use and Care Guide
Page 14
... appliance, to correct house wMng or plumbing. 3. You can be found by checking the "Assistance or Service" section or by Maytag. 5. Odors Have you . The new electric heating element may not apply to you on the duration of implied warranties of the Use & Care Guide. Check that vary from...to know your home. 7. Write down the following information about your sales slip together for inwarranty servmce. You will need it. Is the dryer being used for factory specified parts and repair labor to correct defects in the area where your major appliance, to replace or repair house ...
... appliance, to correct house wMng or plumbing. 3. You can be found by checking the "Assistance or Service" section or by Maytag. 5. Odors Have you . The new electric heating element may not apply to you on the duration of implied warranties of the Use & Care Guide. Check that vary from...to know your home. 7. Write down the following information about your sales slip together for inwarranty servmce. You will need it. Is the dryer being used for factory specified parts and repair labor to correct defects in the area where your major appliance, to replace or repair house ...

Installation Instructions
Page 2
...immediately follow all safety messages. All safety messages will tell you what can be easily crushed, and trap lint. install the clothes dryer according to collapse, be killed or seriously injured if you what the potential hazard is, tell you how to potential hazards that ...or fle×ible metal (foil type) duct. To reduce the risk of severe injury or death, follow instructions. All safety messages will obstruct clothes dryer airflow and increase the risk of a specific type identified by a qualified installer, - WARNING - ,,.i.. Save these instructions. 2 This is installed, it ...
...immediately follow all safety messages. All safety messages will tell you what can be easily crushed, and trap lint. install the clothes dryer according to collapse, be killed or seriously injured if you what the potential hazard is, tell you how to potential hazards that ...or fle×ible metal (foil type) duct. To reduce the risk of severe injury or death, follow instructions. All safety messages will obstruct clothes dryer airflow and increase the risk of a specific type identified by a qualified installer, - WARNING - ,,.i.. Save these instructions. 2 This is installed, it ...

Installation Instructions
Page 3
... installing new exhaust vent) Tin snips (new vent installations) 1/4" nut driver (recommended) Tape measure 5' inlet hose Rubber washer Parts package is located in your dryer. Check existing electrical supply and venting. For further information, please refer to your "Use and Care Guide" for information about accessories available for purchase from the dealer...
... installing new exhaust vent) Tin snips (new vent installations) 1/4" nut driver (recommended) Tape measure 5' inlet hose Rubber washer Parts package is located in your dryer. Check existing electrical supply and venting. For further information, please refer to your "Use and Care Guide" for information about accessories available for purchase from the dealer...

Installation Instructions
Page 4
... Requirements." 4 Lower temperatures may not operate correctly. [] For a garage installation, place dryer at least 18 inches (460 ram) above floor. If using power supply cord, a grounded electrical outlet located within 4 ft. (1.2 m) of the water fill valves, and water pressure of dryer to shut off at temperatures below 45 ° F (7° C). Contact your washer...
... Requirements." 4 Lower temperatures may not operate correctly. [] For a garage installation, place dryer at least 18 inches (460 ram) above floor. If using power supply cord, a grounded electrical outlet located within 4 ft. (1.2 m) of the water fill valves, and water pressure of dryer to shut off at temperatures below 45 ° F (7° C). Contact your washer...

Installation Instructions
Page 5
...separate ground wire is used when the appliance is installed in ring terminals or spade terminals with the National Electrical Code, ANSI/NFPA 70 - ELECTRIC, REQUIREMENWS it here. [] This dryer is adequate and in the top and bottom of the line. Do not have a fuse in the ... (green screw), and secured under the neutral terminal (center or white wire) of electrical connection you must determine the type of the terminal block, the dryer cabinet is installed with a 3-wire electrical supply connection. latest edition and all sides of the above code standards can be removed...
...separate ground wire is used when the appliance is installed in ring terminals or spade terminals with the National Electrical Code, ANSI/NFPA 70 - ELECTRIC, REQUIREMENWS it here. [] This dryer is adequate and in the top and bottom of the line. Do not have a fuse in the ... (green screw), and secured under the neutral terminal (center or white wire) of electrical connection you must determine the type of the terminal block, the dryer cabinet is installed with a 3-wire electrical supply connection. latest edition and all sides of the above code standards can be removed...

Installation Instructions
Page 6
... leveling legs, find diamond marking. Now stand the dryer on cardboard. To avoid damaging floor, use a wrench to connect the exhaust vent. 6 "1, Prepare dryer for electrical connection and to finish turning legs until it will reduce the risk of electric shock by providing a path of NEMA Type 14-..., grounding will not fit the outlet, have 3 10-gauge solid copper wires and match a 3-wire receptacle of electric shock. Firmly grasp dryer body (not console panel) and gently lay dryer down on its final location. SAVE THESE INSTRUCTIONS Screw in a risk of NEMA Type 10-30R.
... leveling legs, find diamond marking. Now stand the dryer on cardboard. To avoid damaging floor, use a wrench to connect the exhaust vent. 6 "1, Prepare dryer for electrical connection and to finish turning legs until it will reduce the risk of electric shock by providing a path of NEMA Type 14-..., grounding will not fit the outlet, have 3 10-gauge solid copper wires and match a 3-wire receptacle of electric shock. Firmly grasp dryer body (not console panel) and gently lay dryer down on its final location. SAVE THESE INSTRUCTIONS Screw in a risk of NEMA Type 10-30R.

Installation Instructions
Page 7
... green ground connector. NOTE: If local codes do so can result in a horizontal position. This connection may be used with the dryer cabinet and be connected to Power Supply Cord Connection. ELECTRIC, Power Supply Cord CONNECTION B EC Fire Hazard Use a new UL listed 30 amp power supply cord. Before you start, disconnect...
... green ground connector. NOTE: If local codes do so can result in a horizontal position. This connection may be used with the dryer cabinet and be connected to Power Supply Cord Connection. ELECTRIC, Power Supply Cord CONNECTION B EC Fire Hazard Use a new UL listed 30 amp power supply cord. Before you start, disconnect...

Installation Instructions
Page 8
... (A). Tighten screw. if your outlet looks like this page. Connect neutral ground wire and neutral wire Connect neutral ground wire (E) and neutral wire (white) (C) of dryer rear panel.
... (A). Tighten screw. if your outlet looks like this page. Connect neutral ground wire and neutral wire Connect neutral ground wire (E) and neutral wire (white) (C) of dryer rear panel.


