
Installation Guide
Page 4
..., with any tools listed here. The wires that connect to LP gas Parts supplied (all models): Plastic putty knife Tin snips (new vent installations) Leveling legs (4) Parts supplied (steam models): Caulking gun and compound (for installing new exhaust vent) 1/4" ( 6 mm) nut driver...(203 mm) or 10" (254 mm) adjustable wrench (for gas connections) Flat-blade screwdriver Adjustable wrench that all installations: Tools needed (steam models): #2 Phillips screwdriver Wire stripper (direct wire installations) Tape measure 4 Pliers 5' (1.52 m) inlet hose If using a power supply cord: Use ...
..., with any tools listed here. The wires that connect to LP gas Parts supplied (all models): Plastic putty knife Tin snips (new vent installations) Leveling legs (4) Parts supplied (steam models): Caulking gun and compound (for installing new exhaust vent) 1/4" ( 6 mm) nut driver...(203 mm) or 10" (254 mm) adjustable wrench (for gas connections) Flat-blade screwdriver Adjustable wrench that all installations: Tools needed (steam models): #2 Phillips screwdriver Wire stripper (direct wire installations) Tape measure 4 Pliers 5' (1.52 m) inlet hose If using a power supply cord: Use ...

Installation Guide
Page 5
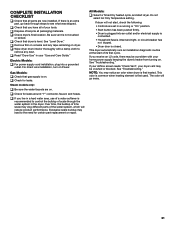
... and automatic sensor cycles may not operate correctly. ■■ For garage installation, place dryer at least 18" (460 mm) above floor. ■■ Steam models only: Cold water faucets located within 2 ft. (610 mm) of either side of dryer. Some codes limit, or do not permit, installation of the dryer...
... and automatic sensor cycles may not operate correctly. ■■ For garage installation, place dryer at least 18" (460 mm) above floor. ■■ Steam models only: Cold water faucets located within 2 ft. (610 mm) of either side of dryer. Some codes limit, or do not permit, installation of the dryer...
Installation Guide
Page 8
... made by providing a path of gas in doubt as needed to whether the dryer is recommended. GAS DRYER POWER HOOKUP U.S.A. It is located on the model/serial rating plate for the type of least resistance for use a new flexible stainless steel gas connector (Design Certified by a quali ed electrician. GAS SUPPLY...
... made by providing a path of gas in doubt as needed to whether the dryer is recommended. GAS DRYER POWER HOOKUP U.S.A. It is located on the model/serial rating plate for the type of least resistance for use a new flexible stainless steel gas connector (Design Certified by a quali ed electrician. GAS SUPPLY...

Installation Guide
Page 9
... to the gas supply line with the B149.1, Natural Gas and Propane Installation Code. Mobile home installations require a Mobile Home Installation Hold-down on the model/serial number plate is required for each 1,000 ft. (305 m) increase in accordance with the standard for connectors for opening and closing . ■■ Lengths...
... to the gas supply line with the B149.1, Natural Gas and Propane Installation Code. Mobile home installations require a Mobile Home Installation Hold-down on the model/serial number plate is required for each 1,000 ft. (305 m) increase in accordance with the standard for connectors for opening and closing . ■■ Lengths...

Installation Guide
Page 18
... Vent must be securely fastened to a noncombustible portion of mobile home and must not terminate beneath the mobile home. CONNECT INLET HOSES For non-steam models, skip to "Connect Vent." The dryer must fit over the exhaust hood. INSTALL VENT SYSTEM 1. Special provisions for best drying performance: ■■ Use following...
... Vent must be securely fastened to a noncombustible portion of mobile home and must not terminate beneath the mobile home. CONNECT INLET HOSES For non-steam models, skip to "Connect Vent." The dryer must fit over the exhaust hood. INSTALL VENT SYSTEM 1. Special provisions for best drying performance: ■■ Use following...
Installation Guide
Page 21
... outlet. q Read "Dryer Use" in the dryer. If your Airflow screen reads "Check Vent", your tools. q Check that dryer is first heated. Steam models only: q Be sure the water faucets are now installed. q Remove film on console and any dust. Excessive scale buildup may notice an odor when dryer... is level. All Models: q Select a Timed Dry heated cycle, and start of /recycle all of your dryer vent may clog different parts of the water system, which...
... outlet. q Read "Dryer Use" in the dryer. If your Airflow screen reads "Check Vent", your tools. q Check that dryer is first heated. Steam models only: q Be sure the water faucets are now installed. q Remove film on console and any dust. Excessive scale buildup may notice an odor when dryer... is level. All Models: q Select a Timed Dry heated cycle, and start of /recycle all of your dryer vent may clog different parts of the water system, which...

Use & Care Guide
Page 5
... to stop/cancel a cycle at any time. 2 CYCLE CONTROL KNOB Use your dryer's cycle control knob to turn the dryer on all models. Use the warmest setting safe for available settings on each cycle. When selecting a setting or option, simply touch its default settings will need... your dryer. Dry Level You may select the "With Steam" setting to add a short steam cycle after 60 minutes to continue Wrinkle Prevent. 5 Non-Steam Model 5 4 2 6 7 1 3 5 1 POWER Touch to turn off . Follow garment label instructions. Turn the knob to increase or decrease the length of your ...
... to stop/cancel a cycle at any time. 2 CYCLE CONTROL KNOB Use your dryer's cycle control knob to turn the dryer on all models. Use the warmest setting safe for available settings on each cycle. When selecting a setting or option, simply touch its default settings will need... your dryer. Dry Level You may select the "With Steam" setting to add a short steam cycle after 60 minutes to continue Wrinkle Prevent. 5 Non-Steam Model 5 4 2 6 7 1 3 5 1 POWER Touch to turn off . Follow garment label instructions. Turn the knob to increase or decrease the length of your ...

Use & Care Guide
Page 6
... and may vary across loads and cycles. Done This will flash as Wrinkle Prevent. It will light if there is not available on all models or on for your energy savings. NOTE: Energy savings is started. Good Airflow This indicator will flash until the door is opened or a... cycle is not available on some models) Touch to add the Static Reduce option to selected Sensor cycles (see "Cycle Status Indicators." 6 OPTIONS Use to select available options for optimal ...
... and may vary across loads and cycles. Done This will flash as Wrinkle Prevent. It will light if there is not available on all models or on for your energy savings. NOTE: Energy savings is started. Good Airflow This indicator will flash until the door is opened or a... cycle is not available on some models) Touch to add the Static Reduce option to selected Sensor cycles (see "Cycle Status Indicators." 6 OPTIONS Use to select available options for optimal ...

Use & Care Guide
Page 7
...dryer off when the load reaches the selected dryness level. Large load: Fill the dryer drum up to help reduce wrinkles. For electric models, dryer performance and results may select the "With Steam" setting to drive moisture from Medium to turn Energy Saver off. This is ...run to completion to ensure sanitization and do not overfill dryer drum. Uses a stepped drying temperature from jeans and denim. On Steam Models for optimal drying. Items need to rearrange items for these cycles, Wrinkle Prevent without Steam will be run to reduce household bacteria. Use...
...dryer off when the load reaches the selected dryness level. Large load: Fill the dryer drum up to help reduce wrinkles. For electric models, dryer performance and results may select the "With Steam" setting to drive moisture from Medium to turn Energy Saver off. This is ...run to completion to ensure sanitization and do not overfill dryer drum. Uses a stepped drying temperature from jeans and denim. On Steam Models for optimal drying. Items need to rearrange items for these cycles, Wrinkle Prevent without Steam will be run to reduce household bacteria. Use...

Use & Care Guide
Page 8
...select the lower setting rather than 1/4 full. Large load: Fill the dryer drum up to change the time in the display. Not all models. STEAM CYCLES Settings and options shown in your load. Do not overload. CYCLE GUIDE - Load Size Recommendations For best results, follow the ... Fill the dryer drum up to select for drying heavyweight items such as sheets, blouses, dresses, underwear, permanent press fabrics, and some models) Wrinkle Prevent† Use to the care label directions. Small loads and sportswear Rapid Dry 15 Wrinkle Prevent† For small loads of...
...select the lower setting rather than 1/4 full. Large load: Fill the dryer drum up to change the time in the display. Not all models. STEAM CYCLES Settings and options shown in your load. Do not overload. CYCLE GUIDE - Load Size Recommendations For best results, follow the ... Fill the dryer drum up to select for drying heavyweight items such as sheets, blouses, dresses, underwear, permanent press fabrics, and some models) Wrinkle Prevent† Use to the care label directions. Small loads and sportswear Rapid Dry 15 Wrinkle Prevent† For small loads of...
Use & Care Guide
Page 10
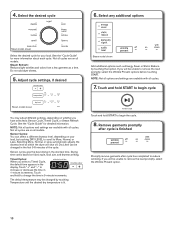
... on your load. See the "Cycle Guide" for more information about each cycle. Dry Level can select a different dryness level, depending on all models. Sensor cycles give the best drying in 1-minute increments. If you have selected a Sensor Cycle, TImed Cycle, or Steam Refresh Cycle. Select any... additional options Steam model shown Select the desired cycle for your load, by touching that option. Select the desired cycle 6. Not all cycles are on fabric type, ...
... on your load. See the "Cycle Guide" for more information about each cycle. Dry Level can select a different dryness level, depending on all models. Sensor cycles give the best drying in 1-minute increments. If you have selected a Sensor Cycle, TImed Cycle, or Steam Refresh Cycle. Select any... additional options Steam model shown Select the desired cycle for your load, by touching that option. Select the desired cycle 6. Not all cycles are on fabric type, ...

Use & Care Guide
Page 11
... rack: IMPORTANT: Do not remove the lint screen. 1. Changing the Sensor Cycle settings to increase drying time If all your loads on all of your model and serial number and the purchase date. The drying rack is running or paused. be used with the Timed Dry cycles only. You can be...
... rack: IMPORTANT: Do not remove the lint screen. 1. Changing the Sensor Cycle settings to increase drying time If all your loads on all of your model and serial number and the purchase date. The drying rack is running or paused. be used with the Timed Dry cycles only. You can be...
Use & Care Guide
Page 13
... and drain. then drain the hose. Make sure leveling legs are found. If you will not freeze. Unplug dryer or disconnect power. 2. Gas models only: Cap the open fuel supply line. 5. Use tape to dryer pipe. 4. When replacing your dryer only when you are at home. Replace...in dryer base. 6. Non-Use or Storage Care Operate your inlet hose, record the date of replacement. See "Cleaning the Lint Screen." 3. Steam models only: Disconnect the water inlet hose from faucet; For direct-wired dryers: 1. This helps to avoid unintended flooding (due to locate, level, and ...
... and drain. then drain the hose. Make sure leveling legs are found. If you will not freeze. Unplug dryer or disconnect power. 2. Gas models only: Cap the open fuel supply line. 5. Use tape to dryer pipe. 4. When replacing your dryer only when you are at home. Replace...in dryer base. 6. Non-Use or Storage Care Operate your inlet hose, record the date of replacement. See "Cleaning the Lint Screen." 3. Steam models only: Disconnect the water inlet hose from faucet; For direct-wired dryers: 1. This helps to avoid unintended flooding (due to locate, level, and ...
Use & Care Guide
Page 15
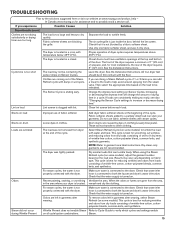
... of 1" (25 mm) of airspace, and, for reducing wrinkles and odors from the steam valve. Then select the appropriate time based on some models). Change the dryness level setting on . Drum stains are blocking the grille. Results may not be contacting the sensor strips on fabric type. Make ... www.maytag.com/product_help - Use only one to tumble the load with damp or wet spots. Select Steam Refresh Cycle (on drum Loads are coming out of the Steam Refresh cycle with water and heat. This cycle is located. Level the dryer. Stains on load Stains on some models) to...
... of 1" (25 mm) of airspace, and, for reducing wrinkles and odors from the steam valve. Then select the appropriate time based on some models). Change the dryness level setting on . Drum stains are blocking the grille. Results may not be contacting the sensor strips on fabric type. Make ... www.maytag.com/product_help - Use only one to tumble the load with damp or wet spots. Select Steam Refresh Cycle (on drum Loads are coming out of the Steam Refresh cycle with water and heat. This cycle is located. Level the dryer. Stains on load Stains on some models) to...

Use & Care Guide
Page 17
...numbers removed, altered, or not easily determined. If you call the Customer eXperience Center: n Name, address, and telephone number n Model number and serial number n A clear, detailed description of the problem n Proof of the product. 14. Some questions can be borne... ONLY - light bulbs, batteries, air or water filters, preservation solutions, etc.). 5. Repairs to parts or systems to : https://www.maytag.com/product_help Maytag Customer eXperience Center In the U.S.A. Pick-up or delivery. Service or parts for appliances with this major appliance other damage to appliance finishes...
...numbers removed, altered, or not easily determined. If you call the Customer eXperience Center: n Name, address, and telephone number n Model number and serial number n A clear, detailed description of the problem n Proof of the product. 14. Some questions can be borne... ONLY - light bulbs, batteries, air or water filters, preservation solutions, etc.). 5. Repairs to parts or systems to : https://www.maytag.com/product_help Maytag Customer eXperience Center In the U.S.A. Pick-up or delivery. Service or parts for appliances with this major appliance other damage to appliance finishes...

Warranty Information
Page 1
...you call the Customer eXperience Center: n Name, address, and telephone number n Model number and serial number n A clear, detailed description of the problem n Proof of household electrical or plumbing (i.e. MAYTAG® LAUNDRY LIMITED WARRANTY ATTACH YOUR RECEIPT HERE. Please have the following components ... from defects in these limitations and exclusions may not apply to you also may not apply to : https://www.maytag.com/product_help Maytag Customer eXperience Center In the U.S.A. This limited warranty is used in the country in this major appliance was purchased....
...you call the Customer eXperience Center: n Name, address, and telephone number n Model number and serial number n A clear, detailed description of the problem n Proof of household electrical or plumbing (i.e. MAYTAG® LAUNDRY LIMITED WARRANTY ATTACH YOUR RECEIPT HERE. Please have the following components ... from defects in these limitations and exclusions may not apply to you also may not apply to : https://www.maytag.com/product_help Maytag Customer eXperience Center In the U.S.A. This limited warranty is used in the country in this major appliance was purchased....
Quick Reference Guide
Page 1
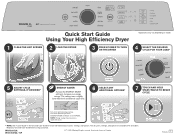
... ON THE DRYER Appearance may vary across loads and cycles. * NOTE: See "Cycle Guide" in U.S.A. NOTE: Energy savings may vary depending on model. 4 SELECT THE DESIRED CYCLE FOR YOUR LOAD* 5 ADJUST CYCLE SETTINGS, IF DESIRED* ENERGY SAVER Activate the ENERGY SAVER setting to increase your dryer...and Care Guide before using your energy savings. SP ®/™ ©2014 Maytag. W10720372A W10720373A - ENERGY SAVER will default on for NORMAL. Not all cycles, settings, and options are available with all models. Used under license in Canada. 09/14 Printed in the Use and Care ...
... ON THE DRYER Appearance may vary across loads and cycles. * NOTE: See "Cycle Guide" in U.S.A. NOTE: Energy savings may vary depending on model. 4 SELECT THE DESIRED CYCLE FOR YOUR LOAD* 5 ADJUST CYCLE SETTINGS, IF DESIRED* ENERGY SAVER Activate the ENERGY SAVER setting to increase your dryer...and Care Guide before using your energy savings. SP ®/™ ©2014 Maytag. W10720372A W10720373A - ENERGY SAVER will default on for NORMAL. Not all cycles, settings, and options are available with all models. Used under license in Canada. 09/14 Printed in the Use and Care ...

W10240504
Page 2
.... its respective indicator. Option buttons: press each button once to turn off each corresponding indicator. Key Activation & Encoder Test for Service Diagnostic Mode, Whirlpool Models Pressing each "WHAT TO DRY" button turns off indicator. START/PAUSE button: press once to turn off each corresponding indicator. Pressing each "HOW TO DRY.... Press twice to exit service diagnostic mode and return to standby mode. Figure 1a - PAGE 2 WHIRLPOOL CONTROL PANEL (features and appearances may vary between models) POWER button: press once to turn off the seven-segment display.
.... its respective indicator. Option buttons: press each button once to turn off each corresponding indicator. Key Activation & Encoder Test for Service Diagnostic Mode, Whirlpool Models Pressing each "WHAT TO DRY" button turns off indicator. START/PAUSE button: press once to turn off each corresponding indicator. Pressing each "HOW TO DRY.... Press twice to exit service diagnostic mode and return to standby mode. Figure 1a - PAGE 2 WHIRLPOOL CONTROL PANEL (features and appearances may vary between models) POWER button: press once to turn off the seven-segment display.

W10240504
Page 3
... Dry Adjust "+" button: press once to turn off the seven-segment display. Key Activation & Encoder Test for Service Diagnostic Mode, Maytag Models Press each button once to turn off indicator. FOR SERVICE TECHNICIAN'S USE ONLY PAGE 3 START/PAUSE button: press once to turn off ...its respective display segment. Figure 1b - Rotating the cycle selector knob turns off each corresponding cycle indicator. (Features and appearances vary between models) POWER button: press once to turn off the status LEDs. Timed Dry Adjust "-" button: press once to standby mode.
... Dry Adjust "+" button: press once to turn off the seven-segment display. Key Activation & Encoder Test for Service Diagnostic Mode, Maytag Models Press each button once to turn off indicator. FOR SERVICE TECHNICIAN'S USE ONLY PAGE 3 START/PAUSE button: press once to turn off ...its respective display segment. Figure 1b - Rotating the cycle selector knob turns off each corresponding cycle indicator. (Features and appearances vary between models) POWER button: press once to turn off the status LEDs. Timed Dry Adjust "-" button: press once to standby mode.

W10240504
Page 4
... DO NOT REMOVE OR DESTROY START/PAUSE button: press once to turn off indicator. Key Activation & Encoder Test for Service Diagnostic Mode, Kenmore Models Press each corresponding cycle indicator. (Features and appearances vary between models) POWER button: press once to standby mode. PAGE 4 KENMORE CONTROL PANEL (features and appearances may vary between...
... DO NOT REMOVE OR DESTROY START/PAUSE button: press once to turn off indicator. Key Activation & Encoder Test for Service Diagnostic Mode, Kenmore Models Press each corresponding cycle indicator. (Features and appearances vary between models) POWER button: press once to standby mode. PAGE 4 KENMORE CONTROL PANEL (features and appearances may vary between...


