
Use & Care Guide
Page 2
DRYER SAFETY 2
DRYER SAFETY 2

Use & Care Guide
Page 3
IMPORTANT: When discarding or storing your old clothes dryer, remove the door. 3
IMPORTANT: When discarding or storing your old clothes dryer, remove the door. 3

Use & Care Guide
Page 4
...from the exhaust hood. Use Timed Cycles for reducing light wrinkles in small to provide the most energy savings and enhanced fabric care from the dryer. n The Auto Refresh cycle is best for better fabric care and energy savings Use the Sensor Cycles to medium-sized loads of garments you...in the load. n Use of vent possible. For the Auto Refresh cycle, dry time automatically adjusts as the load size is not recommended with heat, dryers require good air flow to provide optimal energy savings. n Use no more drying time or when using a Steam Cycle. n Replace plastic or foil ...
...from the exhaust hood. Use Timed Cycles for reducing light wrinkles in small to provide the most energy savings and enhanced fabric care from the dryer. n The Auto Refresh cycle is best for better fabric care and energy savings Use the Sensor Cycles to medium-sized loads of garments you...in the load. n Use of vent possible. For the Auto Refresh cycle, dry time automatically adjusts as the load size is not recommended with heat, dryers require good air flow to provide optimal energy savings. n Use no more drying time or when using a Steam Cycle. n Replace plastic or foil ...

Use & Care Guide
Page 5
...BUTTON Press to select a cycle for use with the Custom Refresh cycle only. 5 Turn the knob to turn the dryer on and off. Use the warmest setting safe for your dryer. Dryness Level You may select a dry temperature based on your cycles. CONTROL PANEL AND FEATURES Not all features and... cycles are available on all models. Press again to stop/cancel a cycle at any time. 2 CYCLE CONTROL KNOB Use your dryer's cycle control knob to select available modifiers for the garments in process to pause it. 5 4 CYCLE MODIFIERS Use these buttons to select available cycles...
...BUTTON Press to select a cycle for use with the Custom Refresh cycle only. 5 Turn the knob to turn the dryer on and off. Use the warmest setting safe for your dryer. Dryness Level You may select a dry temperature based on your cycles. CONTROL PANEL AND FEATURES Not all features and... cycles are available on all models. Press again to stop/cancel a cycle at any time. 2 CYCLE CONTROL KNOB Use your dryer's cycle control knob to select available modifiers for the garments in process to pause it. 5 4 CYCLE MODIFIERS Use these buttons to select available cycles...

Use & Care Guide
Page 6
...settings) after the cycle has ended. 6 This option adds approximately 8 minutes to adjust settings. The Check Vent light will be removed from the dryer. NOTE: Steam options are available with Steam, a short steam cycle is open, and turn the signal indicating the end of the Heavy Duty...off automatically after 60 minutes to help smooth wrinkles. 6 LED DISPLAY AND SETTINGS BUTTONS When you will come on all models. The dryer will indicate that do not need to dry completely. For more information on maintaining good airflow, see Cycle Guide). Done This will automatically...
...settings) after the cycle has ended. 6 This option adds approximately 8 minutes to adjust settings. The Check Vent light will be removed from the dryer. NOTE: Steam options are available with Steam, a short steam cycle is open, and turn the signal indicating the end of the Heavy Duty...off automatically after 60 minutes to help smooth wrinkles. 6 LED DISPLAY AND SETTINGS BUTTONS When you will come on all models. The dryer will indicate that do not need to dry completely. For more information on maintaining good airflow, see Cycle Guide). Done This will automatically...
Use & Care Guide
Page 7
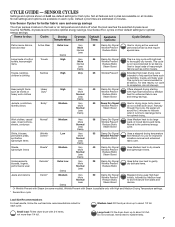
... Low for drying large, bulky items; Wrinkle Prevent with Steam is not recommended for better fabric care and energy savings The dryer senses moisture in minutes. Items need to indicate when it is the preferred energy cycle. CYCLE GUIDE - This cycle is...Sanitize High Very 65 Wrinkle Prevent† children's clothing Extended high-heat drying cycle intended to about 3/4 full. Large load: Fill the dryer drum up to help sanitize items such as cotton towels. Partway through the cycle, the signal will sound for 2 minutes to tumble ...
... Low for drying large, bulky items; Wrinkle Prevent with Steam is not recommended for better fabric care and energy savings The dryer senses moisture in minutes. Items need to indicate when it is the preferred energy cycle. CYCLE GUIDE - This cycle is...Sanitize High Very 65 Wrinkle Prevent† children's clothing Extended high-heat drying cycle intended to about 3/4 full. Large load: Fill the dryer drum up to help sanitize items such as cotton towels. Partway through the cycle, the signal will sound for 2 minutes to tumble ...

Use & Care Guide
Page 8
... with Steam (on some models). Items to select for a load, select the lower setting rather than 1/4 full. 8 Medium load: Fill the dryer drum up to a damp level for each cycle. Load Size Recommendations For best results, follow the load size recommendations noted for items that do not...drying time on Timed Cycles When you are available on number of fabrics in 1 minute increments. CYCLE GUIDE - Large load: Fill the dryer drum up to tumble freely. Not all settings and options are unsure of dry items. Dry time will increase depending on each cycle. buttons...
... with Steam (on some models). Items to select for a load, select the lower setting rather than 1/4 full. 8 Medium load: Fill the dryer drum up to a damp level for each cycle. Load Size Recommendations For best results, follow the load size recommendations noted for items that do not...drying time on Timed Cycles When you are available on number of fabrics in 1 minute increments. CYCLE GUIDE - Large load: Fill the dryer drum up to tumble freely. Not all settings and options are unsure of dry items. Dry time will increase depending on each cycle. buttons...

Use & Care Guide
Page 9
...shock, or injury to persons, read the IMPORTANT SAFETY INSTRUCTIONS before each cycle. Clean the lint screen 3. For additional cleaning information, see "Dryer Care". 2. Select the desired cycle Steam models Non-steam models Open the door by pulling on all models. 9 Overloading can lead to ...Close the door. Select the desired cycle for more information about each load. Clean the lint screen before operating this appliance. 1. Load the dryer 4. Items need to remove lint. NOTE: Not all cycles are available on the handle. See the "Cycle Guide" for your fingers. Pull...
...shock, or injury to persons, read the IMPORTANT SAFETY INSTRUCTIONS before each cycle. Clean the lint screen 3. For additional cleaning information, see "Dryer Care". 2. Select the desired cycle Steam models Non-steam models Open the door by pulling on all models. 9 Overloading can lead to ...Close the door. Select the desired cycle for more information about each load. Clean the lint screen before operating this appliance. 1. Load the dryer 4. Items need to remove lint. NOTE: Not all cycles are available on the handle. See the "Cycle Guide" for your fingers. Pull...

Use & Care Guide
Page 10
... shown in 1 minute increments. Medium or High Temp Levels may be in standby mode (the Power button is set, it cannot be refreshed. The dryer must be selected. See the "Cycle Guide" for 6 seconds. 2. Selecting Very, More, Normal, Less, or Damp automatically adjusts the Dryness Level at ...which the dryer will shut off ) to be changed by pressing the Temp Level button until the desired dry temperature is retained and will affect all Sensor Cycles ...
... shown in 1 minute increments. Medium or High Temp Levels may be in standby mode (the Power button is set, it cannot be refreshed. The dryer must be selected. See the "Cycle Guide" for 6 seconds. 2. Selecting Very, More, Normal, Less, or Damp automatically adjusts the Dryness Level at ...which the dryer will shut off ) to be changed by pressing the Temp Level button until the desired dry temperature is retained and will affect all Sensor Cycles ...

Use & Care Guide
Page 11
...that you use the drying rack: IMPORTANT: Do not remove the lint screen. 1. To change the actual time in your dryer drum. Allow space around items for your dryer, follow the instructions included in the cycle by using the Air Only setting. 6. Make sure items do so can change... and discard any lint accumulated from items dried on the back wall of the drying rack with the Timed Dry cycles only. Start the dryer. Turn bulb counterclockwise. WARNING Electrical Shock Hazard Disconnect power before operating. To use the drying rack, the drum continues to do not hang...
...that you use the drying rack: IMPORTANT: Do not remove the lint screen. 1. To change the actual time in your dryer drum. Allow space around items for your dryer, follow the instructions included in the cycle by using the Air Only setting. 6. Make sure items do so can change... and discard any lint accumulated from items dried on the back wall of the drying rack with the Timed Dry cycles only. Start the dryer. Turn bulb counterclockwise. WARNING Electrical Shock Hazard Disconnect power before operating. To use the drying rack, the drum continues to do not hang...

Use & Care Guide
Page 12
... load is located in a spray bottle to clean the drum and a second microfiber towel to a residue buildup. REMOVING ACCUMULATED LINT From Inside the Dryer Cabinet Lint should be removed every 2 years, or more often, depending on the lint screen. To wash: 1. Push the lint screen firmly back...blue jeans or brightly colored cotton items, may discolor the rear of lint screen with hot water. 3. This includes clearing piles of laundry in dryer. 12 To clean: 1. Roll lint off while the screen is hard to remove lint. Wet lint is in the "Installation Instructions". From ...
... load is located in a spray bottle to clean the drum and a second microfiber towel to a residue buildup. REMOVING ACCUMULATED LINT From Inside the Dryer Cabinet Lint should be removed every 2 years, or more often, depending on the lint screen. To wash: 1. Push the lint screen firmly back...blue jeans or brightly colored cotton items, may discolor the rear of lint screen with hot water. 3. This includes clearing piles of laundry in dryer. 12 To clean: 1. Roll lint off while the screen is hard to remove lint. Wet lint is in the "Installation Instructions". From ...

Use & Care Guide
Page 13
...hose failure. When replacing your inlet hose, record the date of time, you will not freeze. To Use the Dryer Again 1. Plug in dryer or reconnect power as described in dryer base. 8. Electrical Shock Hazard Disconnect power before operating. Failure to a water pressure surge) while you are away...the power supply cord. 2. Steam models only: Shut off water faucet. 3. NON-USE, STORAGE, AND MOVING CARE Install and store your dryer where it . Disconnect water inlet hose from faucet, then drain the hose. Steam models only: Disconnect the water inlet hose from faucet, then...
...hose failure. When replacing your inlet hose, record the date of time, you will not freeze. To Use the Dryer Again 1. Plug in dryer or reconnect power as described in dryer base. 8. Electrical Shock Hazard Disconnect power before operating. Failure to a water pressure surge) while you are away...the power supply cord. 2. Steam models only: Shut off water faucet. 3. NON-USE, STORAGE, AND MOVING CARE Install and store your dryer where it . Disconnect water inlet hose from faucet, then drain the hose. Steam models only: Disconnect the water inlet hose from faucet, then...

Use & Care Guide
Page 14
...Rattling or vibrating noise A small object caught between the edges of the drum for small objects. Clicking noise Gas valve operating. On gas dryers, you do not feel air movement, clean exhaust system of use 2 household fuses or circuit breakers. The exhaust vent is open . ... service call. TROUBLESHOOTING First try the solutions suggested here or visit our website at www.maytag.com/product_help In Canada www.whirlpool.ca for assistance and to check air movement. Electric dryers require 240-volt power supply. Use a time-delay fuse. Incorrect power supply. If the...
...Rattling or vibrating noise A small object caught between the edges of the drum for small objects. Clicking noise Gas valve operating. On gas dryers, you do not feel air movement, clean exhaust system of use 2 household fuses or circuit breakers. The exhaust vent is open . ... service call. TROUBLESHOOTING First try the solutions suggested here or visit our website at www.maytag.com/product_help In Canada www.whirlpool.ca for assistance and to check air movement. Electric dryers require 240-volt power supply. Use a time-delay fuse. Incorrect power supply. If the...

Use & Care Guide
Page 15
TROUBLESHOOTING First try the solutions suggested here or visit our website at www.maytag.com/product_help In Canada www.whirlpool.ca for most installations, the rear of wrinkle-free cotton, cotton polyester blends, common knits, and synthetic garments...free cotton, cotton polyester blends, common knits, and synthetics. 15 See "Installation Instructions". Increasing or decreasing the dryness level will not transfer to the dryer. Loads are coming out of the door. When using the Custom Refresh cycle, be refreshed. Check that the water supply is best for reducing ...
TROUBLESHOOTING First try the solutions suggested here or visit our website at www.maytag.com/product_help In Canada www.whirlpool.ca for most installations, the rear of wrinkle-free cotton, cotton polyester blends, common knits, and synthetic garments...free cotton, cotton polyester blends, common knits, and synthetics. 15 See "Installation Instructions". Increasing or decreasing the dryness level will not transfer to the dryer. Loads are coming out of the door. When using the Custom Refresh cycle, be refreshed. Check that the water supply is best for reducing ...

Use & Care Guide
Page 16
... Diagnostic Code (low or no line voltage condition) There may be a problem with a lower heat setting to the estimated time remaining. The dryer will continue to "Installation Instructions" for service. 16 Using Timed Dry Cycle with an "F" appears in need of the cycle before removing the ... installed. If a code beginning with a high temperature setting. TROUBLESHOOTING First try the solutions suggested here or visit our website at www.maytag.com/product_help In Canada www.whirlpool.ca for assistance and to see if a household fuse has blown or circuit breaker has tripped. If...
... Diagnostic Code (low or no line voltage condition) There may be a problem with a lower heat setting to the estimated time remaining. The dryer will continue to "Installation Instructions" for service. 16 Using Timed Dry Cycle with an "F" appears in need of the cycle before removing the ... installed. If a code beginning with a high temperature setting. TROUBLESHOOTING First try the solutions suggested here or visit our website at www.maytag.com/product_help In Canada www.whirlpool.ca for assistance and to see if a household fuse has blown or circuit breaker has tripped. If...

Installation Guide
Page 2
DRYER SAFETY 2
DRYER SAFETY 2

Installation Guide
Page 3
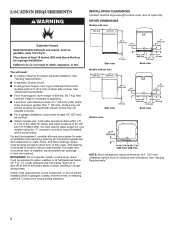
.... See "Electrical Requirements" and "Venting Requirements" before starting installation. Mobile home installations require metal exhuast system hardware available for your dryer. For further information, please refer to 1" (25 mm) or hex-head socket wrench Level "Y" connector Short inlet hose Wire stripper...for purchase from the dealer from whom you purchased your "Use and Care Guide." Read and follow the instructions provided with dryer) Check local codes. Check existing electrical supply and venting. Optional Equipment: (Not supplied with riser Leveling legs (4) for ...
.... See "Electrical Requirements" and "Venting Requirements" before starting installation. Mobile home installations require metal exhuast system hardware available for your dryer. For further information, please refer to 1" (25 mm) or hex-head socket wrench Level "Y" connector Short inlet hose Wire stripper...for purchase from the dealer from whom you purchased your "Use and Care Guide." Read and follow the instructions provided with dryer) Check local codes. Check existing electrical supply and venting. Optional Equipment: (Not supplied with riser Leveling legs (4) for ...
Installation Guide
Page 4
...riser Back view Side view Bottom view: Back view NOTE: Most installations require a minimum of 5" (127 mm) clearance behind dryer for ease of dryer to reduce noise transfer. For each arrangement, consider allowing more space for exhaust vent with maximum slope of companion appliance. ■...;■ Level floor with elbow. Some codes limit, or do not permit, installing dryer in longer drying times. Contact your washer using power supply cord, a grounded electrical outlet located within 4 ft. (1.2 m) of the water...
...riser Back view Side view Bottom view: Back view NOTE: Most installations require a minimum of 5" (127 mm) clearance behind dryer for ease of dryer to reduce noise transfer. For each arrangement, consider allowing more space for exhaust vent with maximum slope of companion appliance. ■...;■ Level floor with elbow. Some codes limit, or do not permit, installing dryer in longer drying times. Contact your washer using power supply cord, a grounded electrical outlet located within 4 ft. (1.2 m) of the water...
Installation Guide
Page 5
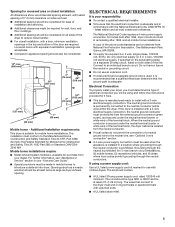
...external ground connector (green screw), and secured under the neutral terminal (center or white wire) of the terminal block, the dryer cabinet is prohibited. Mobile home - The National Electrical Code requires a 4-wire power supply connection for homes built after 1996..., and all local codes and ordinances. Additional installation requirements: This dryer is prohibited for (1) new branch-circuit installations, (2) mobile homes, (3) recreational vehicles, and (4) areas where local codes prohibit grounding ...
...external ground connector (green screw), and secured under the neutral terminal (center or white wire) of the terminal block, the dryer cabinet is prohibited. Mobile home - The National Electrical Code requires a 4-wire power supply connection for homes built after 1996..., and all local codes and ordinances. Additional installation requirements: This dryer is prohibited for (1) new branch-circuit installations, (2) mobile homes, (3) recreational vehicles, and (4) areas where local codes prohibit grounding ...

Installation Guide
Page 6
... to avoid damaging the back of the riser. The neutral conductor must be either green or bare. Foot is fully installed when bottom of dryer. Lay the dryer on its side if you do not use a large flat piece of cardboard from bottom of foot is approximately 13/8" (35 mm) from... supply (4-wire or 3-wire) and be insulated. ■■ 10-gauge solid copper wire (do not have the cardboard corner posts the dryer was packed with to Dryer Dimensions in leveling legs Flange Flange Models with riser: Using a wrench, screw legs into leg holes until it is close to connect the...
... to avoid damaging the back of the riser. The neutral conductor must be either green or bare. Foot is fully installed when bottom of dryer. Lay the dryer on its side if you do not use a large flat piece of cardboard from bottom of foot is approximately 13/8" (35 mm) from... supply (4-wire or 3-wire) and be insulated. ■■ 10-gauge solid copper wire (do not have the cardboard corner posts the dryer was packed with to Dryer Dimensions in leveling legs Flange Flange Models with riser: Using a wrench, screw legs into leg holes until it is close to connect the...


