
Owners Manual
Page 11
... pressure surge) while you are secure in dryer or reconnect power. 11 Unplug the power supply cord. 2. Steam models only: Shut off the water supply to your dryer where it . Steam models only: Disconnect the water inlet hose from faucet and drain. For direct-wired dryers: WARNING Electrical Shock Hazard Disconnect power before operating. Steam...
... pressure surge) while you are secure in dryer or reconnect power. 11 Unplug the power supply cord. 2. Steam models only: Shut off the water supply to your dryer where it . Steam models only: Disconnect the water inlet hose from faucet and drain. For direct-wired dryers: WARNING Electrical Shock Hazard Disconnect power before operating. Steam...

Owners Manual
Page 12
..., the load will continue to resume the cycle by a power failure? If the problem continues, call ... If the dryer hasn't been used ? Remove the cover. 3. www.maytag.com/help - Electric dryers require 240-volt power supply. The gas valve clicking is a normal operating sound. ■ Are the four legs installed... the dryer? Check the front and rear edges of vent you may be a thumping sound during the first few minutes of operation. ■ Is a coin, button, or paper clip caught between the drum and front or rear of non-use? In the U.S.A. - Confirm the power cord is ...
..., the load will continue to resume the cycle by a power failure? If the problem continues, call ... If the dryer hasn't been used ? Remove the cover. 3. www.maytag.com/help - Electric dryers require 240-volt power supply. The gas valve clicking is a normal operating sound. ■ Are the four legs installed... the dryer? Check the front and rear edges of vent you may be a thumping sound during the first few minutes of operation. ■ Is a coin, button, or paper clip caught between the drum and front or rear of non-use? In the U.S.A. - Confirm the power cord is ...
Installation Instructions
Page 4
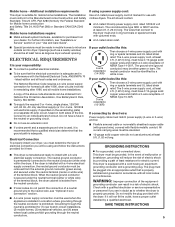
... consider allowing more space for exhaust vent with tested spacing of 0" (0 mm) clearance on all sides of the dryer to reduce noise transfer. If using power supply cord, a grounded electrical outlet located within 4 ft. (1.2 m) of the water fill valves, and water pressure of installation and servicing; ...clearances might be considered. 18"* (457 mm) 14" max.* (356 mm) 1" (25 mm) 29" (737 mm) 1" (25 mm) Recessed area 1" (25 mm) 30" (783 mm) 5" (127 mm) Side view - closet or confined area (Dryer with flat back) 24" 2* (155 cm2) 3"* (76 mm) Closet door with extended back) ...
... consider allowing more space for exhaust vent with tested spacing of 0" (0 mm) clearance on all sides of the dryer to reduce noise transfer. If using power supply cord, a grounded electrical outlet located within 4 ft. (1.2 m) of the water fill valves, and water pressure of installation and servicing; ...clearances might be considered. 18"* (457 mm) 14" max.* (356 mm) 1" (25 mm) 29" (737 mm) 1" (25 mm) Recessed area 1" (25 mm) 30" (783 mm) 5" (127 mm) Side view - closet or confined area (Dryer with flat back) 24" 2* (155 cm2) 3"* (76 mm) Closet door with extended back) ...
Installation Instructions
Page 5
.... WARNING: Improper connection of the line. Additional installation requirements: This dryer is manufactured ready to an individual branch circuit. Connect to install with a 4-wire electrical supply connection, the neutral ground conductor must be using a power supply cord: Use a UL listed power supply cord kit marked for Mobile home construction and Safety, Title 24, HUD...
.... WARNING: Improper connection of the line. Additional installation requirements: This dryer is manufactured ready to an individual branch circuit. Connect to install with a 4-wire electrical supply connection, the neutral ground conductor must be using a power supply cord: Use a UL listed power supply cord kit marked for Mobile home construction and Safety, Title 24, HUD...
Installation Instructions
Page 6
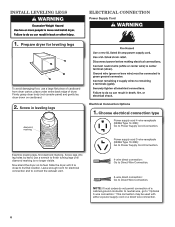
...in leveling legs diamond marking Electrical Connection Options 1. Power supply cord 3-wire receptacle (NEMA Type 10-30R): Go to Direct Wire Connection. Now stand the dryer on cardboard. 2. Screw legs into leg holes by hand, use a large flat piece of dryer. Leave enough room for ...longer visible. Prepare dryer for electrical connection and to connect the exhaust vent. 4-wire direct connection: Go to Direct Wire Connection. 3-wire direct connection: Go to Power Supply Cord Connection. Firmly grasp dryer body (not console panel) and gently lay dryer down on its final...
...in leveling legs diamond marking Electrical Connection Options 1. Power supply cord 3-wire receptacle (NEMA Type 10-30R): Go to Direct Wire Connection. Now stand the dryer on cardboard. 2. Screw legs into leg holes by hand, use a large flat piece of dryer. Leave enough room for ...longer visible. Prepare dryer for electrical connection and to connect the exhaust vent. 4-wire direct connection: Go to Direct Wire Connection. 3-wire direct connection: Go to Power Supply Cord Connection. Firmly grasp dryer body (not console panel) and gently lay dryer down on its final...
Installation Instructions
Page 7
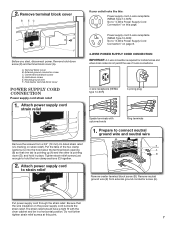
... wire F. Remove neutral ground wire (E) from a 3/4" (19 mm) UL listed strain relief (UL marking on page 8. 4-wire Power Supply Cord Connection IMPORTANT: A 4-wire connection is required for mobile homes and where local codes do not permit the use of the two clamp sections (C) ... Before you start, disconnect power. Put the tabs of 3-wire connections. 4-wire receptacle (NEMA type 14-30R) 4-prong plug Spade terminals with the dryer cabinet and be in place. Terminal block cover B. Do not further tighten strain relief screws at this page. A. Center terminal block screw D. Hold...
... wire F. Remove neutral ground wire (E) from a 3/4" (19 mm) UL listed strain relief (UL marking on page 8. 4-wire Power Supply Cord Connection IMPORTANT: A 4-wire connection is required for mobile homes and where local codes do not permit the use of the two clamp sections (C) ... Before you start, disconnect power. Put the tabs of 3-wire connections. 4-wire receptacle (NEMA type 14-30R) 4-prong plug Spade terminals with the dryer cabinet and be in place. Terminal block cover B. Do not further tighten strain relief screws at this page. A. Center terminal block screw D. Hold...
Installation Instructions
Page 8
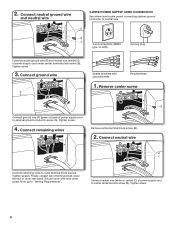
... of terminal block cover into slot of power supply cord to external ground conductor screw (A). Connect remaining wires Remove center terminal block screw (B). 2. Secure cover with upturned ends Ring terminals 1. Tighten screw. 8 Remove center screw B Connect ground wire (F) (green or bare) of dryer rear panel. 2. Connect neutral wire B C Connect remaining wires to...
... of terminal block cover into slot of power supply cord to external ground conductor screw (A). Connect remaining wires Remove center terminal block screw (B). 2. Secure cover with upturned ends Ring terminals 1. Tighten screw. 8 Remove center screw B Connect ground wire (F) (green or bare) of dryer rear panel. 2. Connect neutral wire B C Connect remaining wires to...
Installation Instructions
Page 11
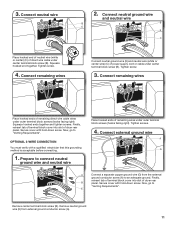
... Remove neutral ground wire (E) from the external ground conductor screw (A) to connect neutral ground wire and neutral wire Place hooked ends of dryer rear B panel. Connect neutral ground wire and neutral wire B B C E C Place hooked end of neutral wire (white or center) (C) of power ...supply cord or cable under outer terminal block screws (hooks facing right). Finally, reinsert tab of terminal block cover into slot of remaining wires under center...
... Remove neutral ground wire (E) from the external ground conductor screw (A) to connect neutral ground wire and neutral wire Place hooked ends of dryer rear B panel. Connect neutral ground wire and neutral wire B B C E C Place hooked end of neutral wire (white or center) (C) of power ...supply cord or cable under outer terminal block screws (hooks facing right). Finally, reinsert tab of terminal block cover into slot of remaining wires under center...
Installation Instructions
Page 17
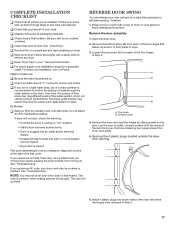
..."On" position. • Start button has been pushed firmly. • Dryer is plugged into an outlet and/or electrical supply. • Household fuse is intact and tight, or circuit breaker has not tripped. • Dryer door is closed. q Check for certain part replacement or repair. q If...Care Guide". For direct wire installation, turn on the door. The odor will reduce product performance. q For power supply cord installation, plug into screw holes in the dryer left -side opening . 6. NOTE: You may lead to the need for leaks around "Y" connector, faucet, and ...
..."On" position. • Start button has been pushed firmly. • Dryer is plugged into an outlet and/or electrical supply. • Household fuse is intact and tight, or circuit breaker has not tripped. • Dryer door is closed. q Check for certain part replacement or repair. q If...Care Guide". For direct wire installation, turn on the door. The odor will reduce product performance. q For power supply cord installation, plug into screw holes in the dryer left -side opening . 6. NOTE: You may lead to the need for leaks around "Y" connector, faucet, and ...

Installation Instructions
Page 19
...Dryer displaying code message ■■ "PF" (power failure), check the following : Clean lint screen. The dryer... condition): The dryer will continue to...dryer. Replace the fuse or reset the circuit breaker. No heat ■■ Has a household fuse blown, or has a circuit breaker tripped? Electric dryers... keeping the dryer's heater from... operation of dryer cycles requires ...TROUBLESHOOTING DRYER OPERATION Dryer will...dryer... restart the dryer. ■■...dryer. Check to see if a household fuse has blown or circuit breaker has tripped. Electric dryers... the dryer to...
...Dryer displaying code message ■■ "PF" (power failure), check the following : Clean lint screen. The dryer... condition): The dryer will continue to...dryer. Replace the fuse or reset the circuit breaker. No heat ■■ Has a household fuse blown, or has a circuit breaker tripped? Electric dryers... keeping the dryer's heater from... operation of dryer cycles requires ...TROUBLESHOOTING DRYER OPERATION Dryer will...dryer... restart the dryer. ■■...dryer. Check to see if a household fuse has blown or circuit breaker has tripped. Electric dryers... the dryer to...


