

Use and Care Guide
Page 3
...you and others are not followed. IMPORTANT SAFETY iNSTRUCTiONS WARNING: To reduce the risk of fire, electric shock, or injury to persons when using the dryer. [] Do not place items exposed to potential hazards that could ignite or explode. [] Do ...iii_iiii_!ii_iii_i!ii_iii_i!i_iiii_i!i_iiii_i_i_)!i_i}_iii_ii!i!__i_!_i_!_i_!_i_!_i_!_i_!i__!i__!i_!i_!i_i!_i_i_i_i_i_i_i_i_i_i_i_i_i_i_i_i_i_i_i_i_i_i_i_i_i_i_i_i_i_i_i_i_i_i_i_i_i_!ii_i_i_i_i_i_i_i_i_i_i_i_i_i_i_i_i_i_ DRYER SAFETY Your safety and the safety of others . Items contaminated with cooking oils may contribute to a chemical ...
...you and others are not followed. IMPORTANT SAFETY iNSTRUCTiONS WARNING: To reduce the risk of fire, electric shock, or injury to persons when using the dryer. [] Do not place items exposed to potential hazards that could ignite or explode. [] Do ...iii_iiii_!ii_iii_i!ii_iii_i!i_iiii_i!i_iiii_i_i_)!i_i}_iii_ii!i!__i_!_i_!_i_!_i_!_i_!_i_!i__!i__!i_!i_!i_i!_i_i_i_i_i_i_i_i_i_i_i_i_i_i_i_i_i_i_i_i_i_i_i_i_i_i_i_i_i_i_i_i_i_i_i_i_i_!ii_i_i_i_i_i_i_i_i_i_i_i_i_i_i_i_i_i_ DRYER SAFETY Your safety and the safety of others . Items contaminated with cooking oils may contribute to a chemical ...

Use and Care Guide
Page 4
... opens to 1" (2.5 cm) or hex-head socket wrench (for adjusting dryer feet) • Wire stripper (direct wire installations/ • I.evel • Caulking gun and compound (for Part Number 8212640. 4 See "Electrical Requirements" and "Venting Requirements" before starting installation. For a garage installation... parts are available in several colors. lb order, call the dealer from whom you placing the dryer on a pedestal. Parts needed Check local codes. Check existing electrical supply and venting. Optlonal pedestal f 1_._ /39.4 cm] model shown) The pedestals are included...
... opens to 1" (2.5 cm) or hex-head socket wrench (for adjusting dryer feet) • Wire stripper (direct wire installations/ • I.evel • Caulking gun and compound (for Part Number 8212640. 4 See "Electrical Requirements" and "Venting Requirements" before starting installation. For a garage installation... parts are available in several colors. lb order, call the dealer from whom you placing the dryer on a pedestal. Parts needed Check local codes. Check existing electrical supply and venting. Optlonal pedestal f 1_._ /39.4 cm] model shown) The pedestals are included...

Use and Care Guide
Page 5
... (96.52 Cm) / {80crn) _/ \_ 27" (68.6 cm) *Most installations require a minimum 5" (12.7 cm) clearance exhaust vent with a maximum slope of the dryer in garages, closets, mobile homes or sleeping quarters. Dryer Dimensions Explosion Hazard Keep flammable materials and vapors, such... as gasoline, away from dryer. Installation clearances The location must not be considered for this dryer. See "Venting Requirements." Recommended spacing should also be considered. • A level floor with elbow. See "Electrical Requirements." • A sturdy floor to...
... (96.52 Cm) / {80crn) _/ \_ 27" (68.6 cm) *Most installations require a minimum 5" (12.7 cm) clearance exhaust vent with a maximum slope of the dryer in garages, closets, mobile homes or sleeping quarters. Dryer Dimensions Explosion Hazard Keep flammable materials and vapors, such... as gasoline, away from dryer. Installation clearances The location must not be considered for this dryer. See "Venting Requirements." Recommended spacing should also be considered. • A level floor with elbow. See "Electrical Requirements." • A sturdy floor to...

Use and Care Guide
Page 6
... pedestal __ II I 14"max.*_,_ /1=.16"rain.* (2.5 cm) (68.6 cm) A '' 1".1I"_- 31,/2"--_16"d (2.5cm) (2.5cm) (89cm) (12.7cm) B A. Dryer only looo" m_ )A_, _fff_ (9366.5"2mcimn).W' _ 4, 1"* ---_tt.,_--27"_ (2.5cm) n (69.6era) _- 1"* 2.6cm) *Required spacing Closet installation - C}oset door with a door, minimum ventilation openings in the top of the cabinet are required. 7"* (17...
... pedestal __ II I 14"max.*_,_ /1=.16"rain.* (2.5 cm) (68.6 cm) A '' 1".1I"_- 31,/2"--_16"d (2.5cm) (2.5cm) (89cm) (12.7cm) B A. Dryer only looo" m_ )A_, _fff_ (9366.5"2mcimn).W' _ 4, 1"* ---_tt.,_--27"_ (2.5cm) n (69.6era) _- 1"* 2.6cm) *Required spacing Closet installation - C}oset door with a door, minimum ventilation openings in the top of the cabinet are required. 7"* (17...

Use and Care Guide
Page 7
... do not permit the connection of electrical connection you must be made in . 2 * (310crn2) __ T )__ 3"* (7.6 crn) m i]iiiiii::__ii',_ill o * Required spacing 24in} * (155cm2) 3"* (7.6 crn) iii iii'_ 2//12 1"* (2.5 crn) m 76" (193 crn) \- // - ..... -- * Required spacing (12.7crn) _ 1" --_ (2.5 cm) -_- 27"_ 68.6 cm 2.5 cm Mobile home - Additional installation requirements This dryer is prohibited. A time-delay fuse...
... do not permit the connection of electrical connection you must be made in . 2 * (310crn2) __ T )__ 3"* (7.6 crn) m i]iiiiii::__ii',_ill o * Required spacing 24in} * (155cm2) 3"* (7.6 crn) iii iii'_ 2//12 1"* (2.5 crn) m 76" (193 crn) \- // - ..... -- * Required spacing (12.7crn) _ 1" --_ (2.5 cm) -_- 27"_ 68.6 cm 2.5 cm Mobile home - Additional installation requirements This dryer is prohibited. A time-delay fuse...

Use and Care Guide
Page 8
... neutral conductor must be connected to the equipment-grounding terminal or lead on the power supply cord: if it will reduce the risk of electric shock by providing a path of least resistance for use aluminum/. [] At least 5 ft (1.52 m) long. The plug must be ...conductor must be insulated. [] 10-gauge solid copper wire (do not use with flexible metallic conduit. listed power supply cord kit marked for electric current. This dryer uses a cord having an equipment-grounding conductor and a grounding plug. SAVE THESE INSTRUCTIONS 8 If using a power supply cord: Use a ...
... neutral conductor must be connected to the equipment-grounding terminal or lead on the power supply cord: if it will reduce the risk of electric shock by providing a path of least resistance for use aluminum/. [] At least 5 ft (1.52 m) long. The plug must be ...conductor must be insulated. [] 10-gauge solid copper wire (do not use with flexible metallic conduit. listed power supply cord kit marked for electric current. This dryer uses a cord having an equipment-grounding conductor and a grounding plug. SAVE THESE INSTRUCTIONS 8 If using a power supply cord: Use a ...

Use and Care Guide
Page 9
..., 1 78 Rexdale Blvd., toronto, ON M9W 1 R3 CANADA. • [b supply the required 4 wire, single phase, 120/240 volt, 60 Hz., AC only electrical supply on a separate 30-amp circuit, fused on both sides of dryer's final location. A copy of the above codes standard may be plugged into a grounded 4 prong outlet. .... _ •_ 51...
..., 1 78 Rexdale Blvd., toronto, ON M9W 1 R3 CANADA. • [b supply the required 4 wire, single phase, 120/240 volt, 60 Hz., AC only electrical supply on a separate 30-amp circuit, fused on both sides of dryer's final location. A copy of the above codes standard may be plugged into a grounded 4 prong outlet. .... _ •_ 51...

Use and Care Guide
Page 10
... Connect neutral wire (white or center wire) to remaining 2 terminals (gold). Connect remaining 2 supply wires to center terminal (silver). Securely tighten all electrical connections. z / A. Style 1 : Power supply cord strain relief • Remove the screws from a %" (1.9 cm) U[. Put the tabs of...pointing down, and hold -down 10 Failure to do so can result in death, fire, or electrical shock. Disconnect power. 2. Remove the hold in death, fire, or electrical shock. 1. Fxternal ground conductor scr_'w C. (o_'ntel; Hole below the terminal block opening ...
... Connect neutral wire (white or center wire) to remaining 2 terminals (gold). Connect remaining 2 supply wires to center terminal (silver). Securely tighten all electrical connections. z / A. Style 1 : Power supply cord strain relief • Remove the screws from a %" (1.9 cm) U[. Put the tabs of...pointing down, and hold -down 10 Failure to do so can result in death, fire, or electrical shock. Disconnect power. 2. Remove the hold in death, fire, or electrical shock. 1. Fxternal ground conductor scr_'w C. (o_'ntel; Hole below the terminal block opening ...

Use and Care Guide
Page 11
...relief thr_'ad_ 4. Now complete installation following 4-wire (recommended) 3-wire (if 4-wire is not available) instructions for your type of electrical connection: Electrical Connection Options If your home has: 4-wire receptacle (NEMA Type 14-30R) And you will be in a horizontal position. Style 2:..., screw the removable conduit connector onto the strain relief threads. listed strain relief (UI. listed, 120/240volt minimum, 30-amp, dryer power supply cord* Direct Wire 3-wire connection: Power supply cord 3-wire direct A fused disconnect or 3-wire connection: circuit breaker box...
...relief thr_'ad_ 4. Now complete installation following 4-wire (recommended) 3-wire (if 4-wire is not available) instructions for your type of electrical connection: Electrical Connection Options If your home has: 4-wire receptacle (NEMA Type 14-30R) And you will be in a horizontal position. Style 2:..., screw the removable conduit connector onto the strain relief threads. listed strain relief (UI. listed, 120/240volt minimum, 30-amp, dryer power supply cord* Direct Wire 3-wire connection: Power supply cord 3-wire direct A fused disconnect or 3-wire connection: circuit breaker box...

Use and Care Guide
Page 12
...wires to external ground conductor screw. A. C_'nte'r silver-colored te'rminal block screw C. Neutral ground wire D. Direct wire cable must have completed your electrical connection. Tighten screw. Neutral wir_" (white or center wire') 4. Tighten strain relief screws. 6. down screw. 7. You have 5 ft (1.52 ...ceptacle eNEMA type 14-30R) B. 4-prong plug C. Connect neutral ground wire and the neutral wire (white or center wire) of dryer rear paneh Secure cover with upturned ends F. Insert tab of terminal block cover into slot of power supply cord under center, silver-colored...
...wires to external ground conductor screw. A. C_'nte'r silver-colored te'rminal block screw C. Neutral ground wire D. Direct wire cable must have completed your electrical connection. Tighten screw. Neutral wir_" (white or center wire') 4. Tighten strain relief screws. 6. down screw. 7. You have 5 ft (1.52 ...ceptacle eNEMA type 14-30R) B. 4-prong plug C. Connect neutral ground wire and the neutral wire (white or center wire) of dryer rear paneh Secure cover with upturned ends F. Insert tab of terminal block cover into slot of power supply cord under center, silver-colored...

Use and Care Guide
Page 13
Cut 11/2" (3.8 cm) from 3 remaining ends of wires into slot of dryer rear panel. Shape Connect ground wire/green screw. Remove center silver-colored terminal block screw. 2. Connect neutral ground wire and place the hooked end (hook ... 1" ground wire at 5" back 1" (2.5 cm). C_ulter silver-colored terminal block scr_'w E. Neutral wire (white or center wire) E. Secure cover with hold- You have completed your electrical connection. Neutral ground wire D.
Cut 11/2" (3.8 cm) from 3 remaining ends of wires into slot of dryer rear panel. Shape Connect ground wire/green screw. Remove center silver-colored terminal block screw. 2. Connect neutral ground wire and place the hooked end (hook ... 1" ground wire at 5" back 1" (2.5 cm). C_ulter silver-colored terminal block scr_'w E. Neutral wire (white or center wire) E. Secure cover with hold- You have completed your electrical connection. Neutral ground wire D.

Use and Care Guide
Page 14
... the screw of the terminal block (hook facing right), squeeze hooked end together and tighten screw, as shown. Direct wire cable must have completed your electrical connection. If using 3-wire cable with ground wire, cut bare wire even with Lip turned ends E. %" (1.9 crnJ U[ list_,d strain relief f. Neutral... wir_" C. Ce'nter silver-color_'d t_'rminal block screw D. Tighten screw. Tighten strain relief screws. 5. You have 5 ft (1.52 rn) of dryer rear paneh Secure cover with hold- Strip insulation back 1" (2.5 cm). Ring terminals G. Shape ends of wires into slot of extra length so...
... the screw of the terminal block (hook facing right), squeeze hooked end together and tighten screw, as shown. Direct wire cable must have completed your electrical connection. If using 3-wire cable with ground wire, cut bare wire even with Lip turned ends E. %" (1.9 crnJ U[ list_,d strain relief f. Neutral... wir_" C. Ce'nter silver-color_'d t_'rminal block screw D. Tighten screw. Tighten strain relief screws. 5. You have 5 ft (1.52 rn) of dryer rear paneh Secure cover with hold- Strip insulation back 1" (2.5 cm). Ring terminals G. Shape ends of wires into slot of extra length so...

Use and Care Guide
Page 15
... screw B. Secure cover with hold- Neutral wire (white or center wire) E. _" (t.9 cm) U[ listed strain relief 3, Place the hooked ends of dryer rear panel. Insert tab of terminal block cover into slot of the other wires to "Venting Requirements." down screw. 6. Now go to outer terminal !! ...neutral wire (white or center wire) of direct wire cable under the center screw of dryer rear panel. Neutral ground wire D. block screws. You have completed your electrical connection. Squeeze hooked ends together. Squeeze hooked end together. Remove center silver-colored terminal...
... screw B. Secure cover with hold- Neutral wire (white or center wire) E. _" (t.9 cm) U[ listed strain relief 3, Place the hooked ends of dryer rear panel. Insert tab of terminal block cover into slot of the other wires to "Venting Requirements." down screw. 6. Now go to outer terminal !! ...neutral wire (white or center wire) of direct wire cable under the center screw of dryer rear panel. Neutral ground wire D. block screws. You have completed your electrical connection. Squeeze hooked ends together. Squeeze hooked end together. Remove center silver-colored terminal...
Use and Care Guide
Page 16
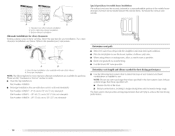
If using an existing vent system • Clean lint from your dealer or by calling Maytag Services. Do not use duct tape. For more information, see the "Assistance or Service" section. 16 IMPORTANT: Observe all joints. Good Better Clamps Use clamps... recommended to avoid crushing and kinking. can be purchased from the entire length of fire, this is in enclosed walls, ceilings or floors. If this dryer MUST BE EXHAUSTED OUTDOORS. Flexible metal vent • Flexible metal vents are recommended. • Rigid metal vent is not plugged with lint. • Replace ...
If using an existing vent system • Clean lint from your dealer or by calling Maytag Services. Do not use duct tape. For more information, see the "Assistance or Service" section. 16 IMPORTANT: Observe all joints. Good Better Clamps Use clamps... recommended to avoid crushing and kinking. can be purchased from the entire length of fire, this is in enclosed walls, ceilings or floors. If this dryer MUST BE EXHAUSTED OUTDOORS. Flexible metal vent • Flexible metal vents are recommended. • Rigid metal vent is not plugged with lint. • Replace ...

Use and Care Guide
Page 17
... • Do not use an exhaust hood with one of the dryer. Wall D. fxhaust hood E. Exhaust outlet metal vent to connect elbows Optional exhaust installations This dryer can be in death, fire, electrical shock, or serious injury. Exhaust Recommended hood styles are possible. Other..., etc. [] Housecleaning problems and health problems• Choose your exhaust installation type Recommended exhaust installations Typical installations vent the dryer from the ground or any object that may be converted to follow these instructions can cause moisture and lint to collect indoors...
... • Do not use an exhaust hood with one of the dryer. Wall D. fxhaust hood E. Exhaust outlet metal vent to connect elbows Optional exhaust installations This dryer can be in death, fire, electrical shock, or serious injury. Exhaust Recommended hood styles are possible. Other..., etc. [] Housecleaning problems and health problems• Choose your exhaust installation type Recommended exhaust installations Typical installations vent the dryer from the ground or any object that may be converted to follow these instructions can cause moisture and lint to collect indoors...
Use and Care Guide
Page 18
... type of the mobile home structure and must not terminate beneath the mobile home. NOTE: Do not use . Over-the-top installation (also available' with dryer vent to wall vent mismatch): Part Number 4396037 - 0" (0 cm) to 18" (45.72 cm) mismatch Part Number 4396011 - 1 8" (45....Service" section to order. • Over-the-Top Installation: Part Number 4396028 • Periscope Installation (For use the fewest number of the dryer. • Reduce performance, resulting in many varieties. The Vent system chart provides venting requirements that will provide the straightest and most direct path ...
... type of the mobile home structure and must not terminate beneath the mobile home. NOTE: Do not use . Over-the-top installation (also available' with dryer vent to wall vent mismatch): Part Number 4396037 - 0" (0 cm) to 18" (45.72 cm) mismatch Part Number 4396011 - 1 8" (45....Service" section to order. • Over-the-Top Installation: Part Number 4396028 • Periscope Installation (For use the fewest number of the dryer. • Reduce performance, resulting in many varieties. The Vent system chart provides venting requirements that will provide the straightest and most direct path ...

Use and Care Guide
Page 19
...ft (7.6 m) 17 ft (5.2 m) 4 Rigid metal 27 ft (8.2 m) 21 ft (6.4 m) Flexible metal 23 ft (7 m) 15 ft (4.6 m) 1. Examine the leveling legs. Leave enough room to exhaust hood with a 4" (10.2 cm) clamp. 2. If connecting to do so can result in dryer. Number of 90 ° turns or elbows Type ... 1. Avoid 90 '_ turns. Screw the legs into its final location. L See "Determine vent path" in the flexible gas line. 4. Move dryer into the leg holes by hand. Firmly grasp the body of the vent to its final location. Using a 4" (10.2 cm) clamp, connect...
...ft (7.6 m) 17 ft (5.2 m) 4 Rigid metal 27 ft (8.2 m) 21 ft (6.4 m) Flexible metal 23 ft (7 m) 15 ft (4.6 m) 1. Examine the leveling legs. Leave enough room to exhaust hood with a 4" (10.2 cm) clamp. 2. If connecting to do so can result in dryer. Number of 90 ° turns or elbows Type ... 1. Avoid 90 '_ turns. Screw the legs into its final location. L See "Determine vent path" in the flexible gas line. 4. Move dryer into the leg holes by hand. Firmly grasp the body of the vent to its final location. Using a 4" (10.2 cm) clamp, connect...
Use and Care Guide
Page 20
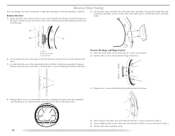
... 4, Remove the 6 screws to release the outer door assembly from a right-side opening to the other side, and snap in Step 2. 5. Open the dryer door. Unsnap the handle from the outer door assembly, move it to a left-side opening last (second from Step 1. C. Remove the door. 3. Reverse... the hinge and hinge bracket 1. Move hinge to the door, \ \ 4. Move handle bracket to the door. Dryer B. It is important that you remove only the 6 indicated screws. 3_ Remove the 2 screws that hold the handle bracket to the other side and reattach...
... 4, Remove the 6 screws to release the outer door assembly from a right-side opening to the other side, and snap in Step 2. 5. Open the dryer door. Unsnap the handle from the outer door assembly, move it to a left-side opening last (second from Step 1. C. Remove the door. 3. Reverse... the hinge and hinge bracket 1. Move hinge to the door, \ \ 4. Move handle bracket to the door. Dryer B. It is important that you remove only the 6 indicated screws. 3_ Remove the 2 screws that hold the handle bracket to the other side and reattach...

Use and Care Guide
Page 21
...Dispose of/recycle all of your tools. 3. For direct wire • Plug into a grounded outlet and/or electrical supply is on, • Household fuse is intact and tight, or circuit breaker has not tripped. • Dryer door is plugged into a grounded 4 prong outlet. [urn on the side. [b fit correctly, the inside ... the head of the screwdriver under the top portion of the door opening on power. 7. Style 2: Remove the label. • Peel off the dryer and check the following : • Controls are set in the middle and at the bottom. Check that all parts are intact and tight, or ...
...Dispose of/recycle all of your tools. 3. For direct wire • Plug into a grounded outlet and/or electrical supply is on, • Household fuse is intact and tight, or circuit breaker has not tripped. • Dryer door is plugged into a grounded 4 prong outlet. [urn on the side. [b fit correctly, the inside ... the head of the screwdriver under the top portion of the door opening on power. 7. Style 2: Remove the label. • Peel off the dryer and check the following : • Controls are set in the middle and at the bottom. Check that all parts are intact and tight, or ...

Use and Care Guide
Page 22
... shut door. 3. Follow these instructions or fire. To use an Automatic Cycle • Point the dial to specific sections of fire, electric shock, or injury to start your dryer. Remaining Wet O Da'_qP O Cool Down O Extra Care 0 Control Locked O Casu De'icateJ/(t_O_/ffSuper Dehcate U _ Rapid Dry _/...Air Cycle. Rotate the dial to lock / unlock control Pause Explosion Hazard Keep flammable materials and vapors, such as gasoline, away from dryer. The preset settings and drying time for the cycle chosen will be dried on it (including cooking oils). CYCLE END SIGNAL Hold ...
... shut door. 3. Follow these instructions or fire. To use an Automatic Cycle • Point the dial to specific sections of fire, electric shock, or injury to start your dryer. Remaining Wet O Da'_qP O Cool Down O Extra Care 0 Control Locked O Casu De'icateJ/(t_O_/ffSuper Dehcate U _ Rapid Dry _/...Air Cycle. Rotate the dial to lock / unlock control Pause Explosion Hazard Keep flammable materials and vapors, such as gasoline, away from dryer. The preset settings and drying time for the cycle chosen will be dried on it (including cooking oils). CYCLE END SIGNAL Hold ...