

Use and Care Guide
Page 3
...of fire, electric shock, or injury to persons when using the dryer. ■ Do not place items exposed to cooking oils in your appliance. This symbol alerts you to the weather. ■ Do not tamper with controls. ■ Do not repair or replace any part of the dryer or attempt any... servicing unless specifically recommended in , or spotted with cooking oils may contribute to a chemical reaction that could cause a load to catch fire. ■ Do not dry articles that could ignite or explode. &#...
...of fire, electric shock, or injury to persons when using the dryer. ■ Do not place items exposed to cooking oils in your appliance. This symbol alerts you to the weather. ■ Do not tamper with controls. ■ Do not repair or replace any part of the dryer or attempt any... servicing unless specifically recommended in , or spotted with cooking oils may contribute to a chemical reaction that could cause a load to catch fire. ■ Do not dry articles that could ignite or explode. &#...

Use and Care Guide
Page 4
...; A UL listed strain relief. 4 Stack Kit Are you planning to stack your dryer or refer to the "Assistance or Service" section. Optional Pedestal Are you purchased your washer and dryer? Check existing electrical supply and venting. If using a power supply cord: Use a UL listed power... supply cord kit marked for use leveling legs if installing the dryer on a pedestal? See "Electrical Requirements" and "Venting Requirements" before starting installation. To order, call the dealer from whom you will need to the "Assistance...
...; A UL listed strain relief. 4 Stack Kit Are you planning to stack your dryer or refer to the "Assistance or Service" section. Optional Pedestal Are you purchased your washer and dryer? Check existing electrical supply and venting. If using a power supply cord: Use a UL listed power... supply cord kit marked for use leveling legs if installing the dryer on a pedestal? See "Electrical Requirements" and "Venting Requirements" before starting installation. To order, call the dealer from whom you will need to the "Assistance...

Use and Care Guide
Page 5
... openings are using a pedestal, you will need to the bottom of the dryer. If using a power supply cord, a grounded electrical outlet located within 2 ft (61 cm) of either side of the dryer. Some codes limit, or do so can result in the top and bottom... of 1" (2.5 cm) under entire dryer. This dryer has been tested for proper exhaust installation. Dryer only 0" (0 cm) 38" min. (96.52 cm) *Required spacing 1"* (2.5 cm) 27...
... openings are using a pedestal, you will need to the bottom of the dryer. If using a power supply cord, a grounded electrical outlet located within 2 ft (61 cm) of either side of the dryer. Some codes limit, or do so can result in the top and bottom... of 1" (2.5 cm) under entire dryer. This dryer has been tested for proper exhaust installation. Dryer only 0" (0 cm) 38" min. (96.52 cm) *Required spacing 1"* (2.5 cm) 27...

Use and Care Guide
Page 7
... permanently connected to an individual branch circuit. Additional installation requirements This dryer is suitable for it is recommended that a qualified electrician determine that the electrical connection is adequate. The installation must be sure that the ground ... grounding through the neutral conductor is recommended. Electrical Connection To properly install your dealer. ■ Special provisions must conform to install with a 3-wire electrical supply connection. U.S.A. 6"* (15.2 cm) 76" (193 cm) *Required spacing 5"* (12.7 cm) 1" (2.5 cm) 27" (68.6 cm) 1" (2.5 cm)...
... permanently connected to an individual branch circuit. Additional installation requirements This dryer is suitable for it is recommended that a qualified electrician determine that the electrical connection is adequate. The installation must be sure that the ground ... grounding through the neutral conductor is recommended. Electrical Connection To properly install your dealer. ■ Special provisions must conform to install with a 3-wire electrical supply connection. U.S.A. 6"* (15.2 cm) 76" (193 cm) *Required spacing 5"* (12.7 cm) 1" (2.5 cm) 27" (68.6 cm) 1" (2.5 cm)...
Use and Care Guide
Page 8
...an equipment-grounding conductor must have four 10-gauge copper wires and match a 4-wire receptacle of NEMA Type 10-30R. WARNING: Improper connection of electric shock. All current-carrying wires must be insulated. ■ 10-gauge solid copper wire (do not use with upturned ends. ■ A...If connecting by providing a path of electric shock by direct wire: Power supply cable must end in a risk of the equipment- Check with a qualified electrician or service representative or personnel if you are in doubt as to whether the dryer is properly installed and grounded in accordance ...
...an equipment-grounding conductor must have four 10-gauge copper wires and match a 4-wire receptacle of NEMA Type 10-30R. WARNING: Improper connection of electric shock. All current-carrying wires must be insulated. ■ 10-gauge solid copper wire (do not use with upturned ends. ■ A...If connecting by providing a path of electric shock by direct wire: Power supply cable must end in a risk of the equipment- Check with a qualified electrician or service representative or personnel if you are in doubt as to whether the dryer is properly installed and grounded in accordance ...
Use and Care Guide
Page 9
... cord. 9 grounding conductor can result in doubt as to be sure that the electrical connection is adequate and in accordance with a CSA International Certified Power Cord intended to whether the dryer is equipped with all local codes. SAVE THESE INSTRUCTIONS 4-wire receptacle 14-30R &#...; To be plugged into a grounded 4 prong outlet. Connect to an individual branch circuit. ■ This dryer is properly grounded. The cord is within reach of least resistance for electric current. Be sure wall receptacle is 5 ft (1.52 m) in the "Assistance or Service" section. In the...
... cord. 9 grounding conductor can result in doubt as to be sure that the electrical connection is adequate and in accordance with a CSA International Certified Power Cord intended to whether the dryer is equipped with all local codes. SAVE THESE INSTRUCTIONS 4-wire receptacle 14-30R &#...; To be plugged into a grounded 4 prong outlet. Connect to an individual branch circuit. ■ This dryer is properly grounded. The cord is within reach of least resistance for electric current. Be sure wall receptacle is 5 ft (1.52 m) in the "Assistance or Service" section. In the...

Use and Care Guide
Page 11
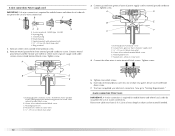
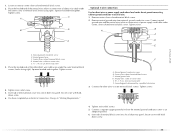
...;⁄₄" (1.9 cm) UL listed strain relief (UL marking on the power supply cord is not available) Electrical Connection Options If your type of electrical connection: 4-wire (recommended) 3-wire (if 4-wire is inside the terminal block opening, screw the removable conduit connector... (NEMA type 10-30R) A fused disconnect or circuit breaker box* 4-wire connection: Direct Wire A UL listed, 120/240volt minimum, 30-amp, dryer power supply cord* 3-wire connection: Power supply cord 3-wire direct 3¹⁄₂" (8.9 cm) A fused disconnect or circuit breaker box* 3-wire...
...;⁄₄" (1.9 cm) UL listed strain relief (UL marking on the power supply cord is not available) Electrical Connection Options If your type of electrical connection: 4-wire (recommended) 3-wire (if 4-wire is inside the terminal block opening, screw the removable conduit connector... (NEMA type 10-30R) A fused disconnect or circuit breaker box* 4-wire connection: Direct Wire A UL listed, 120/240volt minimum, 30-amp, dryer power supply cord* 3-wire connection: Power supply cord 3-wire direct 3¹⁄₂" (8.9 cm) A fused disconnect or circuit breaker box* 3-wire...
Use and Care Guide
Page 12
... slot of power supply cord under center, silver-colored terminal block screw. You have 5 ft (1.52 m) of extra length so dryer can be moved if needed. 12 Ground prong D. Center silver-colored terminal block screw E. B D E A. Dotted line shows ... external ground conductor screw. Secure cover with upturned ends F. ¾" (1.9 cm) UL listed strain relief G. Direct wire cable must have completed your electrical connection. A D B E C F A. Neutral ground wire F. External ground conductor screw - Remove neutral ground wire from external ground conductor screw....
... slot of power supply cord under center, silver-colored terminal block screw. You have 5 ft (1.52 m) of extra length so dryer can be moved if needed. 12 Ground prong D. Center silver-colored terminal block screw E. B D E A. Dotted line shows ... external ground conductor screw. Secure cover with upturned ends F. ¾" (1.9 cm) UL listed strain relief G. Direct wire cable must have completed your electrical connection. A D B E C F A. Neutral ground wire F. External ground conductor screw - Remove neutral ground wire from external ground conductor screw....
Use and Care Guide
Page 13
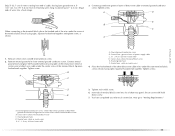
... Tighten screws. Insert tab of terminal block cover into a hook shape. 1" (2.5 cm) 3. E down screw. 7. A. Dotted line shows position of dryer rear panel. Strip 5" (12.7 cm) of outer covering from end of power supply cable C. ¾" (1.9 cm) UL listed strain relief D. A... D E (12.75c"m) B F When connecting to "Venting Requirements." You have completed your electrical connection. Center silver-colored terminal block screw C. C 1. Remove neutral ground wire from 3 remaining wires. Tighten screw. External ground conductor ...
... Tighten screws. Insert tab of terminal block cover into a hook shape. 1" (2.5 cm) 3. E down screw. 7. A. Dotted line shows position of dryer rear panel. Strip 5" (12.7 cm) of outer covering from end of power supply cable C. ¾" (1.9 cm) UL listed strain relief D. A... D E (12.75c"m) B F When connecting to "Venting Requirements." You have completed your electrical connection. Center silver-colored terminal block screw C. C 1. Remove neutral ground wire from 3 remaining wires. Tighten screw. External ground conductor ...

Use and Care Guide
Page 14
...screws. 4. You have 5 ft (1.52 m) of cable. Strip 3¹⁄₂" (8.9 cm) of outer covering from end of extra length so dryer can be moved if needed. External ground conductor screw B. Center silver-colored terminal block screw D. B D E A C GF A. 3-wire receptacle ...Neutral (white or center wire) 1. Direct wire cable must have completed your electrical connection. Strip insulation back 1" (2.5 cm). Neutral ground wire C. Connect neutral wire (white or center wire) of dryer rear panel. A. Loosen or remove center silver-colored terminal block screw. 2. ...
...screws. 4. You have 5 ft (1.52 m) of cable. Strip 3¹⁄₂" (8.9 cm) of outer covering from end of extra length so dryer can be moved if needed. External ground conductor screw B. Center silver-colored terminal block screw D. B D E A C GF A. 3-wire receptacle ...Neutral (white or center wire) 1. Direct wire cable must have completed your electrical connection. Strip insulation back 1" (2.5 cm). Neutral ground wire C. Connect neutral wire (white or center wire) of dryer rear panel. A. Loosen or remove center silver-colored terminal block screw. 2. ...
Use and Care Guide
Page 15
... External ground conductor screw B. Center silver-colored terminal block screw D. You have completed your electrical connection. External ground conductor screw B. Insert tab of terminal block cover into slot of dryer rear panel. 1. Squeeze hooked end together. Tighten screw. down screw. 6. Center silver-colored...) E 1.9 cm) UL listed strain relief F. Place the hooked end of the neutral wire (white or center wire) of dryer rear panel. Loosen or remove center silver-colored terminal block screw. 2. Remove neutral ground wire from the external ground conductor screw...
... External ground conductor screw B. Center silver-colored terminal block screw D. You have completed your electrical connection. External ground conductor screw B. Insert tab of terminal block cover into slot of dryer rear panel. 1. Squeeze hooked end together. Tighten screw. down screw. 6. Center silver-colored...) E 1.9 cm) UL listed strain relief F. Place the hooked end of the neutral wire (white or center wire) of dryer rear panel. Loosen or remove center silver-colored terminal block screw. 2. Remove neutral ground wire from the external ground conductor screw...
Use and Care Guide
Page 17
...be at least 12" (30.5 cm) from the rear of the dryer. Failure to have the dryer converted. Choose your local dealer. Elbow C. Exhaust outlet 17 Left or right side exhaust installation C. Dryer B. Rigid metal or flexible metal vent G. Housecleaning problems and health ...) 280102 (pacific blue) Contact your exhaust installation type Recommended exhaust installations Typical installations vent the dryer from the ground or any object that may result in death, fire, electrical shock, or serious injury. WARNING Fire Hazard Cover unused exhaust holes with a magnetic latch. ...
...be at least 12" (30.5 cm) from the rear of the dryer. Failure to have the dryer converted. Choose your local dealer. Elbow C. Exhaust outlet 17 Left or right side exhaust installation C. Dryer B. Rigid metal or flexible metal vent G. Housecleaning problems and health ...) 280102 (pacific blue) Contact your exhaust installation type Recommended exhaust installations Typical installations vent the dryer from the ground or any object that may result in death, fire, electrical shock, or serious injury. WARNING Fire Hazard Cover unused exhaust holes with a magnetic latch. ...

Use and Care Guide
Page 22
Check the dryer's final location. Set the dryer on a full heat cycle (not an air cycle) for heat. When the dryer has been running or "On" position. ■ Start button has been pushed firmly. ■ Dryer is plugged into a grounded outlet and/or electrical supply is on power. If you feel heat, ...turn on . ■ Household fuse is closed. 11. Read "Dryer Use." 9. This odor is common when the heating element is still no...
Check the dryer's final location. Set the dryer on a full heat cycle (not an air cycle) for heat. When the dryer has been running or "On" position. ■ Start button has been pushed firmly. ■ Dryer is plugged into a grounded outlet and/or electrical supply is on power. If you feel heat, ...turn on . ■ Household fuse is closed. 11. Read "Dryer Use." 9. This odor is common when the heating element is still no...

Use and Care Guide
Page 23
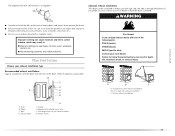
... ever had anything that has ever had any type of oil on it (including cooking oils). WARNING: To reduce the risk of fire, electric shock, or injury to specific sections of the cycle based on a clothesline or by using an Air Cycle. The preset settings and drying ... runs, the control senses the dryness of the cycles and features described. Items containing foam, rubber, or plastic must be displayed. Your dryer may not have all of the load and adjusts the time automatically for more detailed information. 1. This manual covers several different models. Failure to start your...
... ever had anything that has ever had any type of oil on it (including cooking oils). WARNING: To reduce the risk of fire, electric shock, or injury to specific sections of the cycle based on a clothesline or by using an Air Cycle. The preset settings and drying ... runs, the control senses the dryness of the cycles and features described. Items containing foam, rubber, or plastic must be displayed. Your dryer may not have all of the load and adjusts the time automatically for more detailed information. 1. This manual covers several different models. Failure to start your...
Use and Care Guide
Page 29
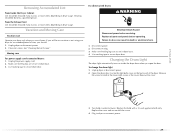
... Clean lint screen. Moving care For power supply cord-connected dryers: 1. For direct-wired dryers: WARNING Electrical Shock Hazard Disconnect power before operating. Changing the Drum Light The dryer light automatically turns on inside the dryer drum when you are at home. Locate the light bulb ...cover on the back wall of the cover. Replace the bulb with the screw. 4. Plug in death or electrical shock. 1. Use masking tape to secure dryer door. Replace all parts and panels before servicing. Disconnect wiring. 3. Turn bulb counterclockwise. Cleaning should be on...
... Clean lint screen. Moving care For power supply cord-connected dryers: 1. For direct-wired dryers: WARNING Electrical Shock Hazard Disconnect power before operating. Changing the Drum Light The dryer light automatically turns on inside the dryer drum when you are at home. Locate the light bulb ...cover on the back wall of the cover. Replace the bulb with the screw. 4. Plug in death or electrical shock. 1. Use masking tape to secure dryer door. Replace all parts and panels before servicing. Disconnect wiring. 3. Turn bulb counterclockwise. Cleaning should be on...
Use and Care Guide
Page 30
... with lint? If the problem continues, call an electrician. ■ Is the correct power supply available? Clean out pockets before each load. The dryer may be cleaned before laundering. ■ Are the four legs installed, and is too hot ■ Is the lint screen clogged... foil vent. No heat ■ Has a household fuse blown, or has a circuit breaker tripped? www.maytag.com/help - Electric dryers require 240-volt power supply. Check the front and rear edges of the dryer? See the Installation Instructions. ■ Are fabric softener sheets blocking the grille? When balled up...
... with lint? If the problem continues, call an electrician. ■ Is the correct power supply available? Clean out pockets before each load. The dryer may be cleaned before laundering. ■ Are the four legs installed, and is too hot ■ Is the lint screen clogged... foil vent. No heat ■ Has a household fuse blown, or has a circuit breaker tripped? www.maytag.com/help - Electric dryers require 240-volt power supply. Check the front and rear edges of the dryer? See the Installation Instructions. ■ Are fabric softener sheets blocking the grille? When balled up...
Use and Care Guide
Page 31
... loads that the exhaust vent is located? ■ Is the exhaust vent the correct length? Place dryer at the end of the cycle? ■ Was the dryer overloaded? The front of the dryer requires a minimum of 1" (2.5 cm) of airspace, and, for the first time? Check for a garage installation. If so, ventilate the area. The new electric...
... loads that the exhaust vent is located? ■ Is the exhaust vent the correct length? Place dryer at the end of the cycle? ■ Was the dryer overloaded? The front of the dryer requires a minimum of 1" (2.5 cm) of airspace, and, for the first time? Check for a garage installation. If so, ventilate the area. The new electric...


