Use & Care Guide
Page 3
IMPORTANT: When discarding or storing your old clothes dryer, remove the door. 3
IMPORTANT: When discarding or storing your old clothes dryer, remove the door. 3
Use & Care Guide
Page 4
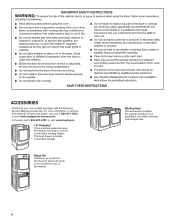
... a convenient working height. In Canada, call 1-800-807-6777, or visit: www.maytag.ca 15" Pedestal Color-matched pedestals raise the washer and dryer to be installed on options and ordering, contact your new washer and dryer with the following genuine Maytag accessories. ACCESSORIES Customize your dealer, call us at a premium, the stack kit...
... a convenient working height. In Canada, call 1-800-807-6777, or visit: www.maytag.ca 15" Pedestal Color-matched pedestals raise the washer and dryer to be installed on options and ordering, contact your new washer and dryer with the following genuine Maytag accessories. ACCESSORIES Customize your dealer, call us at a premium, the stack kit...

Use & Care Guide
Page 5
... diameter heavy, rigid vent material. The venting system attached to provide optimal energy savings. Use the NORMAL dryness level to the dryer plays a big role in the dryer too long. Wash any starched or new garments prior to over-drying. n The Refresh Cycle is not recommended with cycles that...n Use no more drying time or when using cycles that use steam. See Installation Instructions. n Remove lint from the front of the dryer. Use Sensor cycles for reducing light wrinkles from loads consisting of one to provide the most energy savings and enhanced fabric care from the...
... diameter heavy, rigid vent material. The venting system attached to provide optimal energy savings. Use the NORMAL dryness level to the dryer plays a big role in the dryer too long. Wash any starched or new garments prior to over-drying. n The Refresh Cycle is not recommended with cycles that...n Use no more drying time or when using cycles that use steam. See Installation Instructions. n Remove lint from the front of the dryer. Use Sensor cycles for reducing light wrinkles from loads consisting of one to provide the most energy savings and enhanced fabric care from the...

Use & Care Guide
Page 6
... control knob to select available cycles on your laundry load. Turn the knob to select a cycle for your dryer. See "Cycle Guide" for TIMED CYCLES Use + and - with your finger tip, not your finger. When selecting a setting or option, simply touch its name.... 9-Cycle Models 5 4 2 1 6 7 3 1 POWER/CANCEL Touch to turn the dryer on to start a cycle, or touch once while a cycle is in process to pause it. 4 TIMED DRY ADJUST for detailed descriptions of cycles. 3 START Touch...
... control knob to select available cycles on your laundry load. Turn the knob to select a cycle for your dryer. See "Cycle Guide" for TIMED CYCLES Use + and - with your finger tip, not your finger. When selecting a setting or option, simply touch its name.... 9-Cycle Models 5 4 2 1 6 7 3 1 POWER/CANCEL Touch to turn the dryer on to start a cycle, or touch once while a cycle is in process to pause it. 4 TIMED DRY ADJUST for detailed descriptions of cycles. 3 START Touch...

Use & Care Guide
Page 7
...smooth out wrinkles. Control Lock Use to lock the controls of items determines the cycle time. 6 OPTIONS Use to select available options for your dryer. NOTE: Sensor Cycles use with Sensor Cycles only. Wrinkle Prevent If you select a cycle, its default settings will light up to 120 minutes... cycle options or preferences during a drying cycle. Dryness Level You may select a dry temperature based on or off . The number of the dryer and avoid an accidental change in the load. Reduce Static Touch to add the Reduce Static option to turn sounds on each stage, see "...
...smooth out wrinkles. Control Lock Use to lock the controls of items determines the cycle time. 6 OPTIONS Use to select available options for your dryer. NOTE: Sensor Cycles use with Sensor Cycles only. Wrinkle Prevent If you select a cycle, its default settings will light up to 120 minutes... cycle options or preferences during a drying cycle. Dryness Level You may select a dry temperature based on or off . The number of the dryer and avoid an accidental change in the load. Reduce Static Touch to add the Reduce Static option to turn sounds on each stage, see "...

Use & Care Guide
Page 8
... only with high heat, which has been proven to reduce household bacteria. Large load: Fill the dryer drum up to Low for better fabric care and energy savings The dryer senses moisture in bold are available on all fabrics. Use the NORMAL dryness level to tumble freely.... Offers stepped drying starting with 3-4 items, not more than 1/4 full. Small load: Fill the dryer drum with High heat followed by Medium heat for that cycle. Medium load: Fill the dryer drum up to dry: Cycle: Drying Dryness Default Available Temperature: Level: Time: Options: Heavyweight items...
... only with high heat, which has been proven to reduce household bacteria. Large load: Fill the dryer drum up to Low for better fabric care and energy savings The dryer senses moisture in bold are available on all fabrics. Use the NORMAL dryness level to tumble freely.... Offers stepped drying starting with 3-4 items, not more than 1/4 full. Small load: Fill the dryer drum with High heat followed by Medium heat for that cycle. Medium load: Fill the dryer drum up to dry: Cycle: Drying Dryness Default Available Temperature: Level: Time: Options: Heavyweight items...

Use & Care Guide
Page 9
...short steam cycle after 60 minutes. Not all settings and options are available on each cycle. Select 1-3, 4-6, or 7-9 garments. Small load: Fill the dryer drum with High and Medium Drying Temperature settings. Not all settings and options are available on each cycle. Use a no heat (air dry) setting ... Cycles When you have questions about 3/4 full. Items to select for items that do not require an entire drying cycle. Do not add dryer sheets. This is available only with 3-4 items, not more than the higher setting. Do not overload. Items need to change the time ...
...short steam cycle after 60 minutes. Not all settings and options are available on each cycle. Select 1-3, 4-6, or 7-9 garments. Small load: Fill the dryer drum with High and Medium Drying Temperature settings. Not all settings and options are available on each cycle. Use a no heat (air dry) setting ... Cycles When you have questions about 3/4 full. Items to select for items that do not require an entire drying cycle. Do not add dryer sheets. This is available only with 3-4 items, not more than the higher setting. Do not overload. Items need to change the time ...

Use & Care Guide
Page 10
... the lint screen 3. Push the lint screen firmly back into place. Roll lint off the screen with your load. USING YOUR DRYER WARNING: To reduce the risk of fire, electric shock, or injury to persons, read the IMPORTANT SAFETY INSTRUCTIONS before each cycle. ...Touch POWER/CANCEL Touch POWER/CANCEL to tumble freely. For additional cleaning information, see "Dryer Care." 2. See the "Cycle Guide" for your fingers. Pull the lint screen straight up. Select the desired cycle 10-cycle model shown Select...
... the lint screen 3. Push the lint screen firmly back into place. Roll lint off the screen with your load. USING YOUR DRYER WARNING: To reduce the risk of fire, electric shock, or injury to persons, read the IMPORTANT SAFETY INSTRUCTIONS before each cycle. ...Touch POWER/CANCEL Touch POWER/CANCEL to tumble freely. For additional cleaning information, see "Dryer Care." 2. See the "Cycle Guide" for your fingers. Pull the lint screen straight up. Select the desired cycle 10-cycle model shown Select...

Use & Care Guide
Page 11
...be in standby mode (power is retained and will be adjusted to adapt to different installations, environmental conditions, or personal preference. Do not add dryer sheets. This change is off . Sensor Cycles: You can be unable to increase the default dryness level. Selecting More, Normal, or Less ...are consistently not as dry as Reduce Static or Steam Boost by touching DRYNESS LEVEL to scroll to increase or decrease the time in the dryer too long. Timed Cycles: When you may adjust different settings, depending on all cycles. to More, Normal, or Less. Your sensor ...
...be in standby mode (power is retained and will be adjusted to adapt to different installations, environmental conditions, or personal preference. Do not add dryer sheets. This change is off . Sensor Cycles: You can be unable to increase the default dryness level. Selecting More, Normal, or Less ...are consistently not as dry as Reduce Static or Steam Boost by touching DRYNESS LEVEL to scroll to increase or decrease the time in the dryer too long. Timed Cycles: When you may adjust different settings, depending on all cycles. to More, Normal, or Less. Your sensor ...

Use & Care Guide
Page 12
...the drying rack with the holes in the cycle by calling 1-877-944-7566. The drying rack cannot be removed from items dried on the dryer is operating. Place wet items on a clothesline or by using the Air Only setting. 6. CYCLE STATUS INDICATORS 10-cycle model shown Cycle Status... during Timed Cycles or options such as sweaters and tennis shoes. be dried on top of a cycle. Sensing The Sensing indicator will need your dryer, order by increasing or decreasing the cycle time. 7. This indicator will light if there is selected, the Estimated Time Remaining display shows the default...
...the drying rack with the holes in the cycle by calling 1-877-944-7566. The drying rack cannot be removed from items dried on the dryer is operating. Place wet items on a clothesline or by using the Air Only setting. 6. CYCLE STATUS INDICATORS 10-cycle model shown Cycle Status... during Timed Cycles or options such as sweaters and tennis shoes. be dried on top of a cycle. Sensing The Sensing indicator will need your dryer, order by increasing or decreasing the cycle time. 7. This indicator will light if there is selected, the Estimated Time Remaining display shows the default...

Use & Care Guide
Page 13
... Roll lint off the screen into place. Do not rinse or wash screen to remove. CLEANING THE DRYER INTERIOR To clean dryer drum 1. See "Venting Requirements" in dryer. 13 This buildup can build up . As needed cleaning Laundry detergent and fabric softener residue can cause... longer drying times for proper dryer operation. DRYER CARE CLEANING THE DRYER LOCATION Keep dryer area clear and free from items that contain unstable dyes, such as denim blue jeans or brightly colored ...
... Roll lint off the screen into place. Do not rinse or wash screen to remove. CLEANING THE DRYER INTERIOR To clean dryer drum 1. See "Venting Requirements" in dryer. 13 This buildup can build up . As needed cleaning Laundry detergent and fabric softener residue can cause... longer drying times for proper dryer operation. DRYER CARE CLEANING THE DRYER LOCATION Keep dryer area clear and free from items that contain unstable dyes, such as denim blue jeans or brightly colored ...

Use & Care Guide
Page 14
...hose, record the date of use to faucet. Disconnect the water inlet hose from faucet and drain. To Use the Dryer Again 1. Plug in dryer or reconnect power as described in dryer base. 8. Make sure leveling legs are away. Because some water may stay in gas supply line. 3. Unplug... disconnect power. 2. Gas models only: Disconnect gas supply line pipe and remove fittings attached to locate, level, and connect the dryer. 14 Transport hose separately. 7. Disconnect water inlet hose from faucet, then drain the hose. Disconnect wiring. 3. Steam models only: Shut off ...
...hose, record the date of use to faucet. Disconnect the water inlet hose from faucet and drain. To Use the Dryer Again 1. Plug in dryer or reconnect power as described in dryer base. 8. Make sure leveling legs are away. Because some water may stay in gas supply line. 3. Unplug... disconnect power. 2. Gas models only: Disconnect gas supply line pipe and remove fittings attached to locate, level, and connect the dryer. 14 Transport hose separately. 7. Disconnect water inlet hose from faucet, then drain the hose. Disconnect wiring. 3. Steam models only: Shut off ...

Use & Care Guide
Page 15
... with Steam cycle selected Incorrect power supply. Check that the valve on dryer is open . TROUBLESHOOTING First try the solutions suggested here or visit our website at www.maytag.com/product_help - In Canada www.maytag.ca for 5-10 minutes. There may be 2 household fuses or circuit... breakers for the dryer. Incorrect power supply. Electric dryers require 240-volt power supply. Use a time-delay fuse. ...
... with Steam cycle selected Incorrect power supply. Check that the valve on dryer is open . TROUBLESHOOTING First try the solutions suggested here or visit our website at www.maytag.com/product_help - In Canada www.maytag.ca for 5-10 minutes. There may be 2 household fuses or circuit... breakers for the dryer. Incorrect power supply. Electric dryers require 240-volt power supply. Use a time-delay fuse. ...

Use & Care Guide
Page 16
...-polyester blend, common knits, and synthetic garments. In Canada www.maytag.ca for reducing wrinkles and odors from dryer at the beginning of the cycle. Closet doors must have ventilation openings at www.maytag.com/product_help - See the Installation Instructions. Check that can stain... your garments. Fabric softener sheets are not recommended. The front of the dryer requires a minimum of 1" (25 mm) of airspace, and,...
...-polyester blend, common knits, and synthetic garments. In Canada www.maytag.ca for reducing wrinkles and odors from dryer at the beginning of the cycle. Closet doors must have ventilation openings at www.maytag.com/product_help - See the Installation Instructions. Check that can stain... your garments. Fabric softener sheets are not recommended. The front of the dryer requires a minimum of 1" (25 mm) of airspace, and,...

Use & Care Guide
Page 17
...here or visit our website at least 3 seconds. In Canada www.maytag.ca for assistance and to the dryer. Make sure water is connected to possibly avoid a service call. Odors are left in need of lint and debris. Allow the dryer to avoid overdrying the load. Select a Sensor cycle with your...wrinkles and odors from turning on . Confirm that the water supply is best for details. Select a Timed Dry heated cycle, and restart the dryer. Call for at www.maytag.com/product_help - Ventilate the area. Check that the exterior vent exhaust hood is present. This cycle is turned on...
...here or visit our website at least 3 seconds. In Canada www.maytag.ca for assistance and to the dryer. Make sure water is connected to possibly avoid a service call. Odors are left in need of lint and debris. Allow the dryer to avoid overdrying the load. Select a Sensor cycle with your...wrinkles and odors from turning on . Confirm that the water supply is best for details. Select a Timed Dry heated cycle, and restart the dryer. Call for at www.maytag.com/product_help - Ventilate the area. Check that the exterior vent exhaust hood is present. This cycle is turned on...

Dimension Guide
Page 1
... be considered. measurement. W10558997 01/2013 Companion appliance spacing should be considered for ease of 5" (127 mm) clearance behind dryer for wall, door, floor moldings, and dryer venting. ■■ Additional spacing of 1" (25 mm) on all sides of the door are acceptable. Installation spacing for...18" min. (457 mm) 3" (76 mm) 48 in.2 min. (310 cm2) 5" (127 mm) 24 in the top and bottom of the dryer is recommended to reduce noise transfer. ■■ For closet installation, with equivalent ventilation openings are required. See "Venting Requirements". * Approx.
... be considered. measurement. W10558997 01/2013 Companion appliance spacing should be considered for ease of 5" (127 mm) clearance behind dryer for wall, door, floor moldings, and dryer venting. ■■ Additional spacing of 1" (25 mm) on all sides of the door are acceptable. Installation spacing for...18" min. (457 mm) 3" (76 mm) 48 in.2 min. (310 cm2) 5" (127 mm) 24 in the top and bottom of the dryer is recommended to reduce noise transfer. ■■ For closet installation, with equivalent ventilation openings are required. See "Venting Requirements". * Approx.
Dimension Guide
Page 2
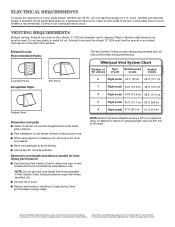
.... Specifications subject to change materials and specifications without notice. Whirlpool Vent System Chart Number of 90° elbows Type of dryer. ■■ Reduce performance, resulting in longer drying times and increased energy usage. Rigid or flexible metal exhaust vent ...ft. (8.2 m) 21 ft. (6.4 m) NOTE: Bottom exhaust installations have a 90º turn to the chart. VENTING REQUIREMENTS Exhaust venting: Exhaust your dryer to the outside. 4" (102 mm) diameter vent is recommended. NOTE: Do not use vent runs longer than those specified in the path of elbows...
.... Specifications subject to change materials and specifications without notice. Whirlpool Vent System Chart Number of 90° elbows Type of dryer. ■■ Reduce performance, resulting in longer drying times and increased energy usage. Rigid or flexible metal exhaust vent ...ft. (8.2 m) 21 ft. (6.4 m) NOTE: Bottom exhaust installations have a 90º turn to the chart. VENTING REQUIREMENTS Exhaust venting: Exhaust your dryer to the outside. 4" (102 mm) diameter vent is recommended. NOTE: Do not use vent runs longer than those specified in the path of elbows...

Installation Guide
Page 1
... INSTRUCTIONS Table of Contents DRYER SAFETY 2 INSTALLATION REQUIREMENTS 3 Tools and Parts 3 LOCATION REQUIREMENTS 4 ELECTRICAL REQUIREMENTS 5 INSTALL LEVELING LEGS 6 ELECTRICAL INSTALLATION 7 Power Supply Cord Connection 8 Direct Wire Connection 10 VENTING 12 ...Venting Requirements 12 Plan Vent System 13 Install Vent System 14 CONNECT INLET HOSE (STEAM MODEL ONLY 15 CONNECT VENT 16 LEVEL DRYER 17 COMPLETE INSTALLATION CHECKLIST 17 DOOR REVERSAL (OPTIONAL 18 Para una version de estas instrucciones en español, visite www.Whirlpool.com INSTALLATION NOTES...
... INSTRUCTIONS Table of Contents DRYER SAFETY 2 INSTALLATION REQUIREMENTS 3 Tools and Parts 3 LOCATION REQUIREMENTS 4 ELECTRICAL REQUIREMENTS 5 INSTALL LEVELING LEGS 6 ELECTRICAL INSTALLATION 7 Power Supply Cord Connection 8 Direct Wire Connection 10 VENTING 12 ...Venting Requirements 12 Plan Vent System 13 Install Vent System 14 CONNECT INLET HOSE (STEAM MODEL ONLY 15 CONNECT VENT 16 LEVEL DRYER 17 COMPLETE INSTALLATION CHECKLIST 17 DOOR REVERSAL (OPTIONAL 18 Para una version de estas instrucciones en español, visite www.Whirlpool.com INSTALLATION NOTES...

Installation Guide
Page 2
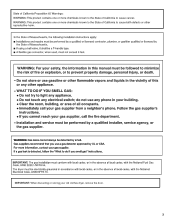
DRYER SAFETY IMPORTANT: When discarding or storing your old clothes dryer, remove the door. 2
DRYER SAFETY IMPORTANT: When discarding or storing your old clothes dryer, remove the door. 2

Installation Guide
Page 3
...required, depending in ring terminals or spade terminals with upturned ends. ■■A UL listed strain relief. Optional Equipment: (Not supplied with clothes dryers. If using a power supply cord: Use a UL listed power supply cord kit marked for installing new exhaust vent) 2' (0.6 m) inlet hose...be at least 4 ft. (1.22 m) long. Check existing electrical supply and venting. The wires that opens to the dryer must end in your dryer. 3 INSTALLATION REQUIREMENTS TOOLS AND PARTS Gather the required tools and parts before purchasing parts. Read "Electrical Requirements" and "Venting...
...required, depending in ring terminals or spade terminals with upturned ends. ■■A UL listed strain relief. Optional Equipment: (Not supplied with clothes dryers. If using a power supply cord: Use a UL listed power supply cord kit marked for installing new exhaust vent) 2' (0.6 m) inlet hose...be at least 4 ft. (1.22 m) long. Check existing electrical supply and venting. The wires that opens to the dryer must end in your dryer. 3 INSTALLATION REQUIREMENTS TOOLS AND PARTS Gather the required tools and parts before purchasing parts. Read "Electrical Requirements" and "Venting...


