
Owners Manual
Page 4
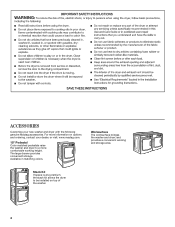
...the washer and dryer, and provides a convenient working height. For more comfortable working and storage area. The large drawer provides convenient storage. ACCESSORIES Customize your dealer, or visit: www.maytag.com. 15" Pedestal Color matched pedestals raise the washer and dryer to be ...installed on options and ordering, contact your new washer and dryer with the following genuine...
...the washer and dryer, and provides a convenient working height. For more comfortable working and storage area. The large drawer provides convenient storage. ACCESSORIES Customize your dealer, or visit: www.maytag.com. 15" Pedestal Color matched pedestals raise the washer and dryer to be ...installed on options and ordering, contact your new washer and dryer with the following genuine...
Owners Manual
Page 5
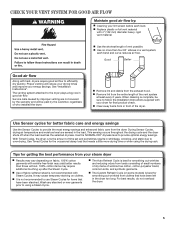
... regardless of wrinkle-free cotton, cotton-polyester blend, common knits, and synthetic garments. n Replace plastic or foil vent material with heat, dryers require good air flow to using the drying rack. See "Installation Instructions". Service calls caused by improper venting are sensed in the load.... This sensing occurs throughout the drying cycle and the dryer shuts off when the load reaches the selected dryness. It may cause temporary staining on clothes. Wash any starched or new garments...
... regardless of wrinkle-free cotton, cotton-polyester blend, common knits, and synthetic garments. n Replace plastic or foil vent material with heat, dryers require good air flow to using the drying rack. See "Installation Instructions". Service calls caused by improper venting are sensed in the load.... This sensing occurs throughout the drying cycle and the dryer shuts off when the load reaches the selected dryness. It may cause temporary staining on clothes. Wash any starched or new garments...
Owners Manual
Page 6
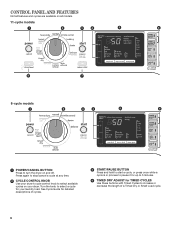
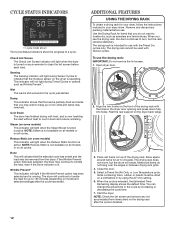
... control knob to select a cycle for TIMED CYCLES Use these buttons with Timed Cycles to turn the dryer on and off. Turn the knob to select available cycles on your laundry load. See Cycle Guide for detailed descriptions of a Timed Dry or Small ... and hold to start a cycle, or press once while a cycle is in process to pause it for up to 5 minutes. 4 TIMED DRY ADJUST for your dryer.
... control knob to select a cycle for TIMED CYCLES Use these buttons with Timed Cycles to turn the dryer on and off. Turn the knob to select available cycles on your laundry load. See Cycle Guide for detailed descriptions of a Timed Dry or Small ... and hold to start a cycle, or press once while a cycle is in process to pause it for up to 5 minutes. 4 TIMED DRY ADJUST for your dryer.
Owners Manual
Page 7
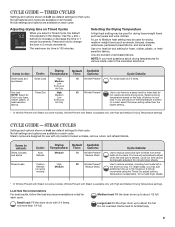
... will also turn on when the door is in the display. Not all cycles. Cycle Signal Use this button to lock the controls of the dryer and avoid an accidental change in the load. Control Lock Use this button to turn the signal indicating the end of a drying cycle on , press... to the end of moisture into the load to add up and the Estimated Time Remaining (for Sensor Cycles) or actual time remaining (for your dryer. See Cycle Guide for use a preset temperature that do not need to turn Steam back on or off . Use the warmest setting safe for several...
... will also turn on when the door is in the display. Not all cycles. Cycle Signal Use this button to lock the controls of the dryer and avoid an accidental change in the load. Control Lock Use this button to turn the signal indicating the end of a drying cycle on , press... to the end of moisture into the load to add up and the Estimated Time Remaining (for Sensor Cycles) or actual time remaining (for your dryer. See Cycle Guide for use a preset temperature that do not need to turn Steam back on or off . Use the warmest setting safe for several...
Owners Manual
Page 8
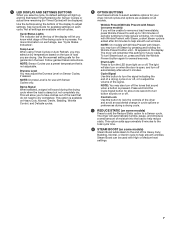
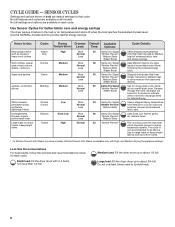
... care. Partway through the cycle, the signal will sound for 2 minutes to Low for better fabric care and energy savings The dryer senses moisture in bold are available on each cycle. Undergarments, Delicate Extra Low blouses, lingerie, performance wear More 28 Normal Less ..., corduroys Less Damp Dry Signal Wrinkle Prevent† Reduce Static Steam Boost Uses Medium heat to about 1/2 full. do not overfill dryer drum. Load Size Recommendations For best results, follow the wet load size recommendations noted for large loads of mixed fabrics and items. ...
... care. Partway through the cycle, the signal will sound for 2 minutes to Low for better fabric care and energy savings The dryer senses moisture in bold are available on each cycle. Undergarments, Delicate Extra Low blouses, lingerie, performance wear More 28 Normal Less ..., corduroys Less Damp Dry Signal Wrinkle Prevent† Reduce Static Steam Boost Uses Medium heat to about 1/2 full. do not overfill dryer drum. Load Size Recommendations For best results, follow the wet load size recommendations noted for large loads of mixed fabrics and items. ...
Owners Manual
Page 9
...adjusted. Cycle Details: For small loads of 3-4 items. Use to dry items to the care label directions. Do not add dryer sheets. Do not add dryer sheets. † Or Wrinkle Prevent with High and Medium Drying Temperature settings. Not all settings and options are available on Timed...minute increments. Adjusting drying time on each cycle. Use the + and - Steam cycles are available on some knits. Small load: Fill the dryer drum with 3-4 items, not more than the higher setting. † Or Wrinkle Prevent with High and Medium Drying Temperature settings CYCLE GUIDE ...
...adjusted. Cycle Details: For small loads of 3-4 items. Use to dry items to the care label directions. Do not add dryer sheets. Do not add dryer sheets. † Or Wrinkle Prevent with High and Medium Drying Temperature settings. Not all settings and options are available on Timed...minute increments. Adjusting drying time on each cycle. Use the + and - Steam cycles are available on some knits. Small load: Fill the dryer drum with 3-4 items, not more than the higher setting. † Or Wrinkle Prevent with High and Medium Drying Temperature settings CYCLE GUIDE ...
Owners Manual
Page 10
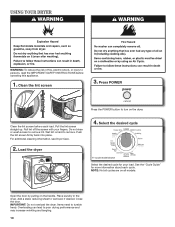
... the lint screen straight up. See the "Cycle Guide" for your fingers. Open the door by pulling on the dryer. IMPORTANT: Do not overload the dryer. Overloading can lead to remove. Roll lint off the screen with your load. Add a static reducing sheet to wet load, if desired. Close the ...door. Push the lint screen firmly back into place. Load the dryer 4. NOTE: Not all cycles are on all models. USING YOUR DRYER WARNING: To reduce the risk of fire, electric shock, or injury to persons, read the IMPORTANT SAFETY INSTRUCTIONS before ...
... the lint screen straight up. See the "Cycle Guide" for your fingers. Open the door by pulling on the dryer. IMPORTANT: Do not overload the dryer. Overloading can lead to remove. Roll lint off the screen with your load. Add a static reducing sheet to wet load, if desired. Close the ...door. Push the lint screen firmly back into place. Load the dryer 4. NOTE: Not all cycles are on all models. USING YOUR DRYER WARNING: To reduce the risk of fire, electric shock, or injury to persons, read the IMPORTANT SAFETY INSTRUCTIONS before ...
Owners Manual
Page 11
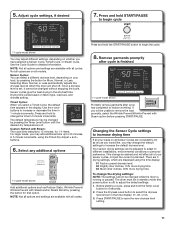
... depending on fabric type, load size, and dryness setting. This change the time in standby mode (the power button is finished + - The dryer must be unable to adjust the default settings. 1. Sensor cycles give the best drying in the display. NOTE: Not all cycles are displayed using...options such as you would like, you have selected a Sensor Cycle, Timed Cycle, or Steam Cycle. There are 3 drying settings, which the dryer will be in 5 minute increments. Selecting More, Normal, or Less automatically adjusts the dryness level at which are on all options and settings ...
... depending on fabric type, load size, and dryness setting. This change the time in standby mode (the power button is finished + - The dryer must be unable to adjust the default settings. 1. Sensor cycles give the best drying in the display. NOTE: Not all cycles are displayed using...options such as you would like, you have selected a Sensor Cycle, Timed Cycle, or Steam Cycle. There are 3 drying settings, which the dryer will be in 5 minute increments. Selecting More, Normal, or Less automatically adjusts the dryness level at which are on all options and settings ...
Owners Manual
Page 12
...cycles. To use . Place wet items on model and selected settings) after the cycle is active. Remove and discard any lint accumulated from the dryer. Align the two hooks on the front of a cycle. Items containing foam, rubber, or plastic must be used with the Timed Dry cycles only...on some models) This indicator will rotate. Damp This indicator shows that the load is partially dried and items that the moisture sensor on the dryer back ledge. 3. Use the Drying Rack for use the drying rack, the drum continues to tumble the load, even if the Done indicator...
...cycles. To use . Place wet items on model and selected settings) after the cycle is active. Remove and discard any lint accumulated from the dryer. Align the two hooks on the front of a cycle. Items containing foam, rubber, or plastic must be used with the Timed Dry cycles only...on some models) This indicator will rotate. Damp This indicator shows that the load is partially dried and items that the moisture sensor on the dryer back ledge. 3. Use the Drying Rack for use the drying rack, the drum continues to tumble the load, even if the Done indicator...
Owners Manual
Page 13
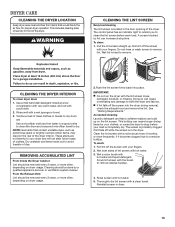
...the brush to a residue buildup. Wet a nylon brush with hot water. 5. Rinse screen with hot water and liquid detergent. DRYER CARE CLEANING THE DRYER LOCATION Keep dryer area clear and free from items that contain unstable dyes, such as denim blue jeans or brightly colored cotton items, may discolor ...dry. Wet lint is located in the door opening of clean clothes or towels to clean the lint screen before your fingers. CLEANING THE DRYER INTERIOR To clean dryer drum 1. Use a mild hand dish detergent mixed at a low concentration with very warm water, and rub with a nylon brush every ...
...the brush to a residue buildup. Wet a nylon brush with hot water. 5. Rinse screen with hot water and liquid detergent. DRYER CARE CLEANING THE DRYER LOCATION Keep dryer area clear and free from items that contain unstable dyes, such as denim blue jeans or brightly colored cotton items, may discolor ...dry. Wet lint is located in the door opening of clean clothes or towels to clean the lint screen before your fingers. CLEANING THE DRYER INTERIOR To clean dryer drum 1. Use a mild hand dish detergent mixed at a low concentration with very warm water, and rub with a nylon brush every ...
Owners Manual
Page 14
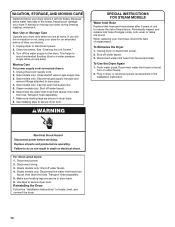
... in the Installation Instruction. Transport hose separately. 7. Disconnect water inlet hose from faucet, then drain the hose. For direct-wired dryers: 1. Transport hose separately. 5. Non-Use or Storage Care Operate your dryer only when you will not freeze. See "Cleaning the Lint Screen." 3. Gas models only: Disconnect gas supply line pipe and...
... in the Installation Instruction. Transport hose separately. 7. Disconnect water inlet hose from faucet, then drain the hose. For direct-wired dryers: 1. Transport hose separately. 5. Non-Use or Storage Care Operate your dryer only when you will not freeze. See "Cleaning the Lint Screen." 3. Gas models only: Disconnect gas supply line pipe and...
Owners Manual
Page 15
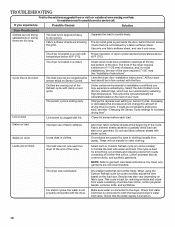
...valve operating. Replace the fuses or reset the circuit breaker. When balled up in firm contact with a qualified electrician. For gas dryers, make sure that the exhaust vent is running. See "Cycle Guide". 15 TROUBLESHOOTING First try the solutions suggested here or visit our... website at www.maytag.com/help for assistance and to possibly avoid a service call an electrician. If the problem continues, call an electrician. The dryer may be louder and run Door not closed completely.
...valve operating. Replace the fuses or reset the circuit breaker. When balled up in firm contact with a qualified electrician. For gas dryers, make sure that the exhaust vent is running. See "Cycle Guide". 15 TROUBLESHOOTING First try the solutions suggested here or visit our... website at www.maytag.com/help for assistance and to possibly avoid a service call an electrician. If the problem continues, call an electrician. The dryer may be louder and run Door not closed completely.
Owners Manual
Page 16
...are coming out of the Refresh cycle with steam cycles. Check that the water supply is not properly connected with Proper operation of dryer cycles requires temperatures above temperature below 45ºF (7ºC). 45ºF (7ºC). Clothes are wrinkled Improper use it is connected to...Make sure water is not blocked by selecting High temperature. TROUBLESHOOTING First try the solutions suggested here or visit our website at www.maytag.com/help for smoothing out wrinkles and reducing odors from loads consisting of wrinkle-free cotton, cotton polyester blends, common knits, and...
...are coming out of the Refresh cycle with steam cycles. Check that the water supply is not properly connected with Proper operation of dryer cycles requires temperatures above temperature below 45ºF (7ºC). 45ºF (7ºC). Clothes are wrinkled Improper use it is connected to...Make sure water is not blocked by selecting High temperature. TROUBLESHOOTING First try the solutions suggested here or visit our website at www.maytag.com/help for smoothing out wrinkles and reducing odors from loads consisting of wrinkle-free cotton, cotton polyester blends, common knits, and...
Owners Manual
Page 17
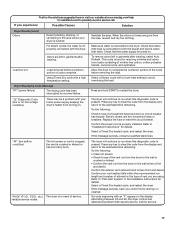
... failure) The drying cycle has been interrupted by a power failure. The dryer will continue to avoid overdrying the load. "F# E#" (F1 E1, F3 E1, etc.) The dryer is located. First try the solutions suggested here or visit our website at www.maytag.com/help for assistance and to run when this diagnostic code is...
... failure) The drying cycle has been interrupted by a power failure. The dryer will continue to avoid overdrying the load. "F# E#" (F1 E1, F3 E1, etc.) The dryer is located. First try the solutions suggested here or visit our website at www.maytag.com/help for assistance and to run when this diagnostic code is...
Installation Instructions
Page 1
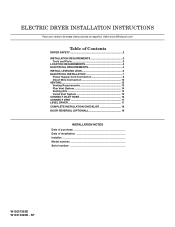
... INSTRUCTIONS Para una version de estas instrucciones en español, visite www.Whirlpool.com Table of Contents DRYER SAFETY 2 Installation Requirements 3 Tools and Parts 3 Location Requirements 4 Electrical Requirements 4 INSTALL LEVELING LEGS 6 ELECTRICAL INSTALLATION 7 Power Supply Cord ...Venting Requirements 13 Plan Vent System 14 Venting Kits 14 Install Vent System 15 Connect Inlet Hose 16 Connect Vent 17 Level Dryer 17 Complete Installation Checklist 18 Door reversal (OPTIONAL 19 INSTALLATION NOTES Date of purchase Date of installation Installer Model number Serial ...
... INSTRUCTIONS Para una version de estas instrucciones en español, visite www.Whirlpool.com Table of Contents DRYER SAFETY 2 Installation Requirements 3 Tools and Parts 3 Location Requirements 4 Electrical Requirements 4 INSTALL LEVELING LEGS 6 ELECTRICAL INSTALLATION 7 Power Supply Cord ...Venting Requirements 13 Plan Vent System 14 Venting Kits 14 Install Vent System 15 Connect Inlet Hose 16 Connect Vent 17 Level Dryer 17 Complete Installation Checklist 18 Door reversal (OPTIONAL 19 INSTALLATION NOTES Date of purchase Date of installation Installer Model number Serial ...
Installation Instructions
Page 2
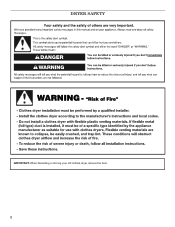
DRYER SAFETY IMPORTANT: When discarding or storing your old clothes dryer, remove the door. 2
DRYER SAFETY IMPORTANT: When discarding or storing your old clothes dryer, remove the door. 2
Installation Instructions
Page 3
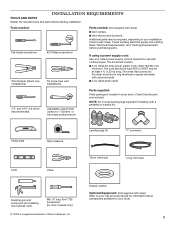
.... Check that opens to your Use and Care Guide for information about accessories available for use leveling legs supplied if installing with clothes dryers. Check existing electrical supply and venting. The cord should contain: ■■A UL listed 30-amp power supply cord, rated 120...AND PARTS Gather the required tools and parts before purchasing parts. Short inlet hose Long inlet hose Rubber washer Optional Equipment: (Not supplied with dryer) ■■Vent clamps ■■Vent elbows and ductwork Additional parts may be at least 4 ft. (1.22 m) long. Check local...
.... Check that opens to your Use and Care Guide for information about accessories available for use leveling legs supplied if installing with clothes dryers. Check existing electrical supply and venting. The cord should contain: ■■A UL listed 30-amp power supply cord, rated 120...AND PARTS Gather the required tools and parts before purchasing parts. Short inlet hose Long inlet hose Rubber washer Optional Equipment: (Not supplied with dryer) ■■Vent clamps ■■Vent elbows and ductwork Additional parts may be at least 4 ft. (1.22 m) long. Check local...
Installation Instructions
Page 4
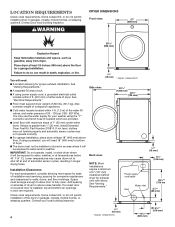
...(90.7 kg). If not level, clothes may not tumble properly and automatic sensor cycles may not operate correctly. ■■For garage installation, place dryer at temperatures below 40° F (4° C). Left or right side exhaust 3/4"* (18 mm) 61/2" (165 mm) Power supply cord/cable ...9632;A separate 30 amp circuit. ■■If using the "Y" connector and short hose (if needed) which are required. You may cause dryer not to fully open. If slope is installed, top and bottom air openings in garages, closets, mobile homes, or sleeping quarters. Installation Clearances...
...(90.7 kg). If not level, clothes may not tumble properly and automatic sensor cycles may not operate correctly. ■■For garage installation, place dryer at temperatures below 40° F (4° C). Left or right side exhaust 3/4"* (18 mm) 61/2" (165 mm) Power supply cord/cable ...9632;A separate 30 amp circuit. ■■If using the "Y" connector and short hose (if needed) which are required. You may cause dryer not to fully open. If slope is installed, top and bottom air openings in garages, closets, mobile homes, or sleeping quarters. Installation Clearances...
Installation Instructions
Page 5
..." section in your responsibility: ■■To contact a qualified electrical installer. ■■To be sure that connect to the dryer must end in ring terminals or spade terminals with equivalent ventilation openings are required. If using and follow the instructions provided for Mobile... Part 3280 (formerly the Federal Standard for it is recommended that a qualified electrician determine that the ground path is adequate. Recommended installation clearances (dryer only): 18" min. (457 mm) 3" (76 mm) 48 in.2 min. (310 cm2) ELECTRICAL REQUIREMENTS It is your Use and Care...
..." section in your responsibility: ■■To contact a qualified electrical installer. ■■To be sure that connect to the dryer must end in ring terminals or spade terminals with equivalent ventilation openings are required. If using and follow the instructions provided for Mobile... Part 3280 (formerly the Federal Standard for it is recommended that a qualified electrician determine that the ground path is adequate. Recommended installation clearances (dryer only): 18" min. (457 mm) 3" (76 mm) 48 in.2 min. (310 cm2) ELECTRICAL REQUIREMENTS It is your Use and Care...
Installation Instructions
Page 6
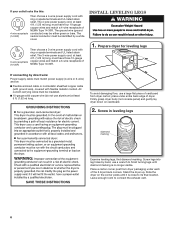
...14-30R. The neutral conductor must have four 10-gauge copper wires and match a 4-wire receptacle of NEMA Type 10-30R. Prepare dryer for leveling legs If connecting by hand, use a wrench to its final location. Screw in leveling legs diamond marking Examine leveling legs,...sheathed copper cable (with ground wire), covered with ring or spade terminals and UL listed strain relief. Install Leveling Legs 1. Stand the dryer up. Slide the dryer on cardboard. 2. All current-carrying wires must match power supply (4-wire or 3-wire) and be identified by a white cover. 3-...
...14-30R. The neutral conductor must have four 10-gauge copper wires and match a 4-wire receptacle of NEMA Type 10-30R. Prepare dryer for leveling legs If connecting by hand, use a wrench to its final location. Screw in leveling legs diamond marking Examine leveling legs,...sheathed copper cable (with ground wire), covered with ring or spade terminals and UL listed strain relief. Install Leveling Legs 1. Stand the dryer up. Slide the dryer on cardboard. 2. All current-carrying wires must match power supply (4-wire or 3-wire) and be identified by a white cover. 3-...


