Use & Care Guide
Page 3
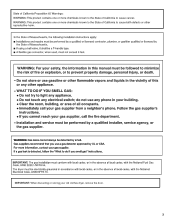
IMPORTANT: When discarding or storing your old clothes dryer, remove the door. 3
IMPORTANT: When discarding or storing your old clothes dryer, remove the door. 3
Use & Care Guide
Page 4
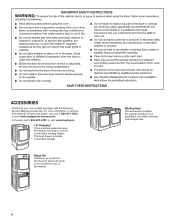
... If space is at 1-800-901-2042, or visit: www.maytag.com/accessories. ACCESSORIES Customize your dealer, call 1-800-807-6777, or visit: www.maytag.ca 15" Pedestal Color-matched pedestals raise the washer and dryer to be installed on options and ordering, contact your new washer and... dryer with the following genuine Maytag accessories. For more comfortable working and storage area. 4 The ...
... If space is at 1-800-901-2042, or visit: www.maytag.com/accessories. ACCESSORIES Customize your dealer, call 1-800-807-6777, or visit: www.maytag.ca 15" Pedestal Color-matched pedestals raise the washer and dryer to be installed on options and ordering, contact your new washer and... dryer with the following genuine Maytag accessories. For more comfortable working and storage area. 4 The ...

Use & Care Guide
Page 5
...Sensor cycles for getting the best performance from your energy savings. n The Refresh Cycle is complete, be paid by : n Cleaning your dryer for smoothing out wrinkles and reducing odors from the entire length of vent possible. n Replace plastic or foil vent material with cycles that ...Sensor Cycles, drying air temperature and moisture level are not covered by the warranty and will reduce your drying times and improve your steam dryer n Results may vary depending on fabric. 100% cotton garments with wrinkle-free finish may cause temporary staining on some models) is not...
...Sensor cycles for getting the best performance from your energy savings. n The Refresh Cycle is complete, be paid by : n Cleaning your dryer for smoothing out wrinkles and reducing odors from the entire length of vent possible. n Replace plastic or foil vent material with cycles that ...Sensor Cycles, drying air temperature and moisture level are not covered by the warranty and will reduce your drying times and improve your steam dryer n Results may vary depending on fabric. 100% cotton garments with wrinkle-free finish may cause temporary staining on some models) is not...

Use & Care Guide
Page 6
...DRY ADJUST for your laundry load. When selecting a setting or option, simply touch its name. 9-Cycle Models 5 4 2 1 6 7 3 1 POWER/CANCEL Touch to turn the dryer on your dryer's cycle control knob to select available cycles on and off. Touch to stop/cancel a cycle at any time. 2 CYCLE CONTROL KNOB Use your... dryer. Turn the knob to a light touch of a Timed Dry or Rapid Dry cycle. 6 CONTROL PANEL AND FEATURES Not all models. 10-Cycle Models 2 1 5 6 7 4...
...DRY ADJUST for your laundry load. When selecting a setting or option, simply touch its name. 9-Cycle Models 5 4 2 1 6 7 3 1 POWER/CANCEL Touch to turn the dryer on your dryer's cycle control knob to select available cycles on and off. Touch to stop/cancel a cycle at any time. 2 CYCLE CONTROL KNOB Use your... dryer. Turn the knob to a light touch of a Timed Dry or Rapid Dry cycle. 6 CONTROL PANEL AND FEATURES Not all models. 10-Cycle Models 2 1 5 6 7 4...

Use & Care Guide
Page 7
... cycle. Touch the setting names next to the display to the total cycle time. Use the warmest setting safe for the garments in the dryer for your dryer. Dryness Level You may select the "With Steam" setting to add a short steam cycle after about one second to help reduce static. ...on Heavy Duty, Normal, Bedding, and Delicates cycles. To unlock the control, touch and hold Cycle Signal for the Sanitize cycle), if desired. The dryer will also turn off . NOTE: Sensor Cycles use with High or Medium heat settings. NOTE: You may be used with Sensor Cycles only. Damp Dry...
... cycle. Touch the setting names next to the display to the total cycle time. Use the warmest setting safe for the garments in the dryer for your dryer. Dryness Level You may select the "With Steam" setting to add a short steam cycle after about one second to help reduce static. ...on Heavy Duty, Normal, Bedding, and Delicates cycles. To unlock the control, touch and hold Cycle Signal for the Sanitize cycle), if desired. The dryer will also turn off . NOTE: Sensor Cycles use with High or Medium heat settings. NOTE: You may be used with Sensor Cycles only. Damp Dry...

Use & Care Guide
Page 8
...Reduce Static Large loads Sanitize High More 1:10 Wrinkle Prevent† of heavyweight fabrics. Use for all fabrics. Medium load: Fill the dryer drum up to reduce household bacteria. Do not overload. This is a long cycle with High and Medium Drying Temperature settings. Large load: ...Fill the dryer drum up to add a short steam cycle after 60 minutes. This cycle is not recommended for drying large, bulky items; Load Size...
...Reduce Static Large loads Sanitize High More 1:10 Wrinkle Prevent† of heavyweight fabrics. Use for all fabrics. Medium load: Fill the dryer drum up to reduce household bacteria. Do not overload. This is a long cycle with High and Medium Drying Temperature settings. Large load: ...Fill the dryer drum up to add a short steam cycle after 60 minutes. This cycle is not recommended for drying large, bulky items; Load Size...

Use & Care Guide
Page 9
...load Timed Dry High 40 Wrinkle Prevent† NOTE: Select Air Medium Only to increase or decrease the time in the dryer too long. Medium load: Fill the dryer drum up to 9 dry items of fabrics in your selection. † You may be used for various loads, refer ... refresh fabrics. Not all settings and options are default settings for foam, rubber, plastic, or heat-sensitive fabrics. Small load: Fill the dryer drum with dry loads to Medium heat setting may select the "With Steam" setting to the care label directions. This is 100 minutes. ...
...load Timed Dry High 40 Wrinkle Prevent† NOTE: Select Air Medium Only to increase or decrease the time in the dryer too long. Medium load: Fill the dryer drum up to 9 dry items of fabrics in your selection. † You may be used for various loads, refer ... refresh fabrics. Not all settings and options are default settings for foam, rubber, plastic, or heat-sensitive fabrics. Small load: Fill the dryer drum with dry loads to Medium heat setting may select the "With Steam" setting to the care label directions. This is 100 minutes. ...

Use & Care Guide
Page 10
... wrinkling and tangling. 10 Close the door. Tightly packing can lead to remove. Clean the lint screen 3. Add a dryer sheet to turn on the dryer. USING YOUR DRYER WARNING: To reduce the risk of fire, electric shock, or injury to persons, read the IMPORTANT SAFETY INSTRUCTIONS before each...more information about each load. Clean the lint screen before operating this appliance. 1. Load the dryer 4. Open the door by pulling on all models. IMPORTANT: Do not tightly pack the dryer. Roll lint off the screen with your load. Touch POWER/CANCEL Touch POWER/CANCEL to wet...
... wrinkling and tangling. 10 Close the door. Tightly packing can lead to remove. Clean the lint screen 3. Add a dryer sheet to turn on the dryer. USING YOUR DRYER WARNING: To reduce the risk of fire, electric shock, or injury to persons, read the IMPORTANT SAFETY INSTRUCTIONS before each...more information about each load. Clean the lint screen before operating this appliance. 1. Load the dryer 4. Open the door by pulling on all models. IMPORTANT: Do not tightly pack the dryer. Roll lint off the screen with your load. Touch POWER/CANCEL Touch POWER/CANCEL to wet...

Use & Care Guide
Page 11
... options and settings are available with all models. to remove the load promptly, select the Wrinkle Prevent option before touching START. Do not add dryer sheets. Add additional options such as you would like, you may change is set, it cannot be unable to increase or decrease the time ...in the dryer too long. If you have selected a Sensor Cycle, TImed Cycle, or Steam Cycle. NOTE: Not all options and settings are available with all...
... options and settings are available with all models. to remove the load promptly, select the Wrinkle Prevent option before touching START. Do not add dryer sheets. Add additional options such as you would like, you may change is set, it cannot be unable to increase or decrease the time ...in the dryer too long. If you have selected a Sensor Cycle, TImed Cycle, or Steam Cycle. NOTE: Not all options and settings are available with all...

Use & Care Guide
Page 12
... intended for your model and serial number and the purchase date. The drying rack is not available on all models or on the dryer back ledge. 3. Open dryer door. 2. This indicator will light during Timed Cycles or options such as a reminder to turn, but the drum will indicate that... Lint Screen The Check Lint Screen indicator will light when the drying cycle is complete as Wrinkle Prevent. Good Airflow This indicator will need your dryer, order by using the Air Only setting. 6. Place wet items on a clothesline or by calling 1-877-944-7566. Close the door. 5. CYCLE...
... intended for your model and serial number and the purchase date. The drying rack is not available on all models or on the dryer back ledge. 3. Open dryer door. 2. This indicator will light during Timed Cycles or options such as a reminder to turn, but the drum will indicate that... Lint Screen The Check Lint Screen indicator will light when the drying cycle is complete as Wrinkle Prevent. Good Airflow This indicator will need your dryer, order by using the Air Only setting. 6. Place wet items on a clothesline or by calling 1-877-944-7566. Close the door. 5. CYCLE...

Use & Care Guide
Page 13
... are not harmful to both sides of lint screen with the lint screen loose, damaged, blocked, or missing. REMOVING ACCUMULATED LINT From Inside the Dryer Cabinet Lint should be removed every 2 years, or more frequently, if it becomes clogged due to clean the lint screen after each load. Clean... clear and free from items that contain unstable dyes, such as denim blue jeans or brightly colored cotton items, may discolor the rear of the dryer interior. The control panel has an indicator light to remind you to a residue buildup. Rinse well with a wet sponge or towel. 3. This includes...
... are not harmful to both sides of lint screen with the lint screen loose, damaged, blocked, or missing. REMOVING ACCUMULATED LINT From Inside the Dryer Cabinet Lint should be removed every 2 years, or more frequently, if it becomes clogged due to clean the lint screen after each load. Clean... clear and free from items that contain unstable dyes, such as denim blue jeans or brightly colored cotton items, may discolor the rear of the dryer interior. The control panel has an indicator light to remind you to a residue buildup. Rinse well with a wet sponge or towel. 3. This includes...

Use & Care Guide
Page 14
...: Shut off the water supply to a water pressure surge) while you will not freeze. Use tape to secure dryer door. To Use the Dryer Again 1. Disconnect power. 2. Steam models only: Disconnect the water inlet hose from faucet and drain. Use tape to secure...hose separately. 5. Make sure leveling legs are away. If you are secure in dryer base. 6. To Winterize the Dryer 1. Reconnect water inlet hose to dryer pipe. 4. For direct-wired dryers: 1. When replacing your dryer. Plug in dryer or reconnect power as described in gas supply line. 3. NON-USE, STORAGE, ...
...: Shut off the water supply to a water pressure surge) while you will not freeze. Use tape to secure dryer door. To Use the Dryer Again 1. Disconnect power. 2. Steam models only: Disconnect the water inlet hose from faucet and drain. Use tape to secure...hose separately. 5. Make sure leveling legs are away. If you are secure in dryer base. 6. To Winterize the Dryer 1. Reconnect water inlet hose to dryer pipe. 4. For direct-wired dryers: 1. When replacing your dryer. Plug in dryer or reconnect power as described in gas supply line. 3. NON-USE, STORAGE, ...

Use & Care Guide
Page 15
... drying times. Clothing is running. Separate the load items and restart the dryer. On gas dryers, you experience Possible Causes Solution Dryer Operation Dryer will not heat Wrong type of dryer drum. In Canada www.maytag.ca for the dryer. Touch and hold START 2-5 seconds. There may vibrate if not properly ... that the exhaust vent is open . TROUBLESHOOTING First try the solutions suggested here or visit our website at www.maytag.com/product_help - Dryer will not run longer. Water pump on the gas supply line is not too long or has too many turns. Electric...
... drying times. Clothing is running. Separate the load items and restart the dryer. On gas dryers, you experience Possible Causes Solution Dryer Operation Dryer will not heat Wrong type of dryer drum. In Canada www.maytag.ca for the dryer. Touch and hold START 2-5 seconds. There may vibrate if not properly ... that the exhaust vent is open . TROUBLESHOOTING First try the solutions suggested here or visit our website at www.maytag.com/product_help - Dryer will not run longer. Water pump on the gas supply line is not too long or has too many turns. Electric...

Use & Care Guide
Page 16
... connected to 9 dry items of wrinklefree cotton, cotton-polyester blend, common knits, and synthetic garments. Clean lint screen before each load. Add dryer fabric softener sheets at www.maytag.com/product_help - The air outlet grille is ending early. Drum stains are caused by a fabric softener sheet. When using the Custom Refresh cycle...
... connected to 9 dry items of wrinklefree cotton, cotton-polyester blend, common knits, and synthetic garments. Clean lint screen before each load. Add dryer fabric softener sheets at www.maytag.com/product_help - The air outlet grille is ending early. Drum stains are caused by a fabric softener sheet. When using the Custom Refresh cycle...

Use & Care Guide
Page 17
... temperature setting. Try the following : Check to the estimated time remaining. If the message persists, have your home power supply, keeping the dryer's heater from the display and return to see if the vent run when this diagnostic code is connected to the Installation Instructions for at www....maytag.com/product_help - In Canada www.maytag.ca for service. 17 For steam cycles, the water is crushed or kinked or has too many turns. First try...
... temperature setting. Try the following : Check to the estimated time remaining. If the message persists, have your home power supply, keeping the dryer's heater from the display and return to see if the vent run when this diagnostic code is connected to the Installation Instructions for at www....maytag.com/product_help - In Canada www.maytag.ca for service. 17 For steam cycles, the water is crushed or kinked or has too many turns. First try...

Dimension Guide
Page 1
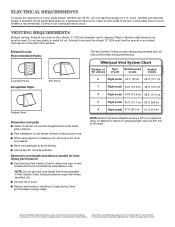
...(76 mm) 48 in.2 min. (310 cm2) 5" (127 mm) 24 in the top and bottom of 5" (127 mm) clearance behind dryer for exhaust vent with elbow. measurement. Companion appliance spacing should be considered for ease of installation and servicing. ■■ Additional clearances might be ...ventilation openings are the recommended spacing for this dryer. ■■ Additional spacing should also be required for wall, door, floor moldings, and dryer venting. ■■ Additional spacing of 1" (25 mm) on all sides of the dryer is recommended to reduce noise transfer. ■...
...(76 mm) 48 in.2 min. (310 cm2) 5" (127 mm) 24 in the top and bottom of 5" (127 mm) clearance behind dryer for exhaust vent with elbow. measurement. Companion appliance spacing should be considered for ease of installation and servicing. ■■ Additional clearances might be ...ventilation openings are the recommended spacing for this dryer. ■■ Additional spacing should also be required for wall, door, floor moldings, and dryer venting. ■■ Additional spacing of 1" (25 mm) on all sides of the dryer is recommended to reduce noise transfer. ■...
Dimension Guide
Page 2
...help achieve best drying performance. For complete details, see Installation Instructions packed with product. VENTING REQUIREMENTS Exhaust venting: Exhaust your dryer to change materials and specifications without notice. Exhaust systems longer than those specified will: ■■ Shorten life of ...to the outside. 4" (102 mm) diameter vent is recommended. To determine maximum exhaust length, add one 90º turn inside the dryer. Do not use . Exhaust hood must be in Vent System Chart. ELECTRICAL REQUIREMENTS To supply the required 3 or 4 wire, single...
...help achieve best drying performance. For complete details, see Installation Instructions packed with product. VENTING REQUIREMENTS Exhaust venting: Exhaust your dryer to change materials and specifications without notice. Exhaust systems longer than those specified will: ■■ Shorten life of ...to the outside. 4" (102 mm) diameter vent is recommended. To determine maximum exhaust length, add one 90º turn inside the dryer. Do not use . Exhaust hood must be in Vent System Chart. ELECTRICAL REQUIREMENTS To supply the required 3 or 4 wire, single...

Installation Guide
Page 1
... INSTRUCTIONS Table of Contents DRYER SAFETY 2 INSTALLATION REQUIREMENTS 3 Tools and Parts 3 LOCATION REQUIREMENTS 4 ELECTRICAL REQUIREMENTS 5 INSTALL LEVELING LEGS 6 ELECTRICAL INSTALLATION 7 Power Supply Cord Connection 8 Direct Wire Connection 10 VENTING 12 ...Venting Requirements 12 Plan Vent System 13 Install Vent System 14 CONNECT INLET HOSE (STEAM MODEL ONLY 15 CONNECT VENT 16 LEVEL DRYER 17 COMPLETE INSTALLATION CHECKLIST 17 DOOR REVERSAL (OPTIONAL 18 Para una version de estas instrucciones en español, visite www.Whirlpool.com INSTALLATION NOTES...
... INSTRUCTIONS Table of Contents DRYER SAFETY 2 INSTALLATION REQUIREMENTS 3 Tools and Parts 3 LOCATION REQUIREMENTS 4 ELECTRICAL REQUIREMENTS 5 INSTALL LEVELING LEGS 6 ELECTRICAL INSTALLATION 7 Power Supply Cord Connection 8 Direct Wire Connection 10 VENTING 12 ...Venting Requirements 12 Plan Vent System 13 Install Vent System 14 CONNECT INLET HOSE (STEAM MODEL ONLY 15 CONNECT VENT 16 LEVEL DRYER 17 COMPLETE INSTALLATION CHECKLIST 17 DOOR REVERSAL (OPTIONAL 18 Para una version de estas instrucciones en español, visite www.Whirlpool.com INSTALLATION NOTES...
Installation Guide
Page 2
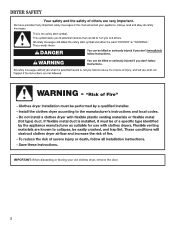
DRYER SAFETY IMPORTANT: When discarding or storing your old clothes dryer, remove the door. 2
DRYER SAFETY IMPORTANT: When discarding or storing your old clothes dryer, remove the door. 2

Installation Guide
Page 3
...SRDT and be required, depending in your "Use and Care Guide" for information about accessories available for use leveling legs supplied with dryer if installing with clothes dryers. The wires that connect to 1" (25 mm) or hex-head socket wrench "Y" connector Parts package is located in ring ...terminals or spade terminals with dryer) ■■Vent clamps ■■Vent elbows and vent work Parts needed : Parts supplied (all models): Flat-blade screwdriver #2 Phillips ...
...SRDT and be required, depending in your "Use and Care Guide" for information about accessories available for use leveling legs supplied with dryer if installing with clothes dryers. The wires that connect to 1" (25 mm) or hex-head socket wrench "Y" connector Parts package is located in ring ...terminals or spade terminals with dryer) ■■Vent clamps ■■Vent elbows and vent work Parts needed : Parts supplied (all models): Flat-blade screwdriver #2 Phillips ...


