Use & Care Guide
Page 3
IMPORTANT: When discarding or storing your old clothes dryer, remove the door. 3
IMPORTANT: When discarding or storing your old clothes dryer, remove the door. 3
Use & Care Guide
Page 4
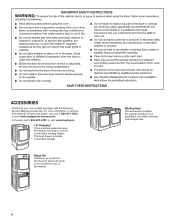
...Worksurface The worksurface bridges the washer and dryer, and provides a convenient working height. Stack Kit If space is at 1-800-901-2042, or visit: www.maytag.com/accessories. ACCESSORIES Customize your dealer, call 1-800-807-6777, or visit: www.maytag.ca 15" Pedestal Color-matched pedestals raise... the washer and dryer to a more information on options and ordering, contact your new washer ...
...Worksurface The worksurface bridges the washer and dryer, and provides a convenient working height. Stack Kit If space is at 1-800-901-2042, or visit: www.maytag.com/accessories. ACCESSORIES Customize your dealer, call 1-800-807-6777, or visit: www.maytag.ca 15" Pedestal Color-matched pedestals raise... the washer and dryer to a more information on options and ordering, contact your new washer ...

Use & Care Guide
Page 5
...The venting system attached to over-drying. Service calls caused by improper venting are sensed in good air flow. n Remove lint from the dryer. During Sensor Cycles, drying air temperature and moisture level are not covered by the warranty and will reduce your drying times and improve your... is not recommended with wrinkle-free finish may yield better results than four 90° elbows in the dryer too long. Tips for getting the best performance from your dryer for smoothing out wrinkles and reducing odors from loads left in a vent system; It may cause temporary staining...
...The venting system attached to over-drying. Service calls caused by improper venting are sensed in good air flow. n Remove lint from the dryer. During Sensor Cycles, drying air temperature and moisture level are not covered by the warranty and will reduce your drying times and improve your... is not recommended with wrinkle-free finish may yield better results than four 90° elbows in the dryer too long. Tips for getting the best performance from your dryer for smoothing out wrinkles and reducing odors from loads left in a vent system; It may cause temporary staining...

Use & Care Guide
Page 6
... and off. with your finger tip, not your fingernail. Touch to stop/cancel a cycle at any time. 2 CYCLE CONTROL KNOB Use your dryer's cycle control knob to increase or decrease the length of your finger. To ensure your selections are available on all models. 10-Cycle Models 2 1 5 6 7 4 3 NOTE: ... cycle. 6 CONTROL PANEL AND FEATURES Not all features and cycles are registered, touch the control panel with Timed Cycles to select available cycles on your dryer.
... and off. with your finger tip, not your fingernail. Touch to stop/cancel a cycle at any time. 2 CYCLE CONTROL KNOB Use your dryer's cycle control knob to increase or decrease the length of your finger. To ensure your selections are available on all models. 10-Cycle Models 2 1 5 6 7 4 3 NOTE: ... cycle. 6 CONTROL PANEL AND FEATURES Not all features and cycles are registered, touch the control panel with Timed Cycles to select available cycles on your dryer.

Use & Care Guide
Page 7
... "Cycle Guide"). The number of the Heavy Duty, Bedding, Normal, or Garments cycle to help reduce wrinkling. When selected, a series of the dryer and avoid an accidental change in process. Control Lock Use to lock the controls of beeps will sound when the load is not adjustable. NOTE... On some cycles, you may also turn the LED drum light on each cycle. Use the warmest setting safe for the garments in the dryer for the Custom Refresh cycle. Follow garment label instructions. Reduce Static Touch to add the Reduce Static option to selected Sensor cycles (see ...
... "Cycle Guide"). The number of the Heavy Duty, Bedding, Normal, or Garments cycle to help reduce wrinkling. When selected, a series of the dryer and avoid an accidental change in process. Control Lock Use to lock the controls of beeps will sound when the load is not adjustable. NOTE... On some cycles, you may also turn the LED drum light on each cycle. Use the warmest setting safe for the garments in the dryer for the Custom Refresh cycle. Follow garment label instructions. Reduce Static Touch to add the Reduce Static option to selected Sensor cycles (see ...

Use & Care Guide
Page 8
...Prevent† Less Steam Boost Cycle Details: Offers stepped drying starting with High and Medium Drying Temperature settings. Large load: Fill the dryer drum up to indicate when it is the preferred energy cycle. CYCLE GUIDE - Not all settings and options are available on all ...options shown in the load or air temperature and shuts off when the load reaches the selected dryness level. do not overfill dryer drum. This cycle is not recommended for all features and cycles are default settings for large loads of mixed fabrics and items....
...Prevent† Less Steam Boost Cycle Details: Offers stepped drying starting with High and Medium Drying Temperature settings. Large load: Fill the dryer drum up to indicate when it is the preferred energy cycle. CYCLE GUIDE - Not all settings and options are available on all ...options shown in the load or air temperature and shuts off when the load reaches the selected dryness level. do not overfill dryer drum. This cycle is not recommended for all features and cycles are default settings for large loads of mixed fabrics and items....

Use & Care Guide
Page 9
... sportswear Medium Low Extra Low Air Only 18 Wrinkle Prevent† Use to dry items to about 3/4 full. CYCLE GUIDE - Do not add dryer sheets. Load Size Recommendations For best results, follow the load size recommendations noted for items that cycle. Medium load: Fill the...Only to the care label directions. If you are designed for use with dry loads to select for that cycle. Small load: Fill the dryer drum with High and Medium Drying Temperature settings. Not all settings and options are available on all settings and options are available on Timed ...
... sportswear Medium Low Extra Low Air Only 18 Wrinkle Prevent† Use to dry items to about 3/4 full. CYCLE GUIDE - Do not add dryer sheets. Load Size Recommendations For best results, follow the load size recommendations noted for items that cycle. Medium load: Fill the...Only to the care label directions. If you are designed for use with dry loads to select for that cycle. Small load: Fill the dryer drum with High and Medium Drying Temperature settings. Not all settings and options are available on all settings and options are available on Timed ...

Use & Care Guide
Page 10
... fire, electric shock, or injury to remove lint. Push the lint screen firmly back into place. Load the dryer 4. Close the door. Roll lint off the screen with your load. For additional cleaning information, see "Dryer Care." 2. Open the door by pulling on all models. IMPORTANT: Do not tightly pack the... and may increase wrinkling and tangling. 10 Pull the lint screen straight up. See the "Cycle Guide" for your fingers. Place laundry in the dryer. Clean the lint screen before operating this appliance. 1. Clean the lint screen 3. Tightly packing can lead to turn on the...
... fire, electric shock, or injury to remove lint. Push the lint screen firmly back into place. Load the dryer 4. Close the door. Roll lint off the screen with your load. For additional cleaning information, see "Dryer Care." 2. Open the door by pulling on all models. IMPORTANT: Do not tightly pack the... and may increase wrinkling and tangling. 10 Pull the lint screen straight up. See the "Cycle Guide" for your fingers. Place laundry in the dryer. Clean the lint screen before operating this appliance. 1. Clean the lint screen 3. Tightly packing can lead to turn on the...

Use & Care Guide
Page 11
... may change is lit. Select any additional options Touch and hold DRYNESS LEVEL for detailed information. If you will be changed while the dryer is finished Promptly remove garments after cycle has completed to adjust the default settings. 1. Adjust cycle settings, if desired 7. Changing the ...on your selection. 6. Steam Cycles: Refresh with Steam: Smooths out wrinkles and reduces odors from loads left in 1-minute increments. Do not add dryer sheets. Add additional options such as you would like, you select a Timed Cycle, the default time appears in the time display: 01, ...
... may change is lit. Select any additional options Touch and hold DRYNESS LEVEL for detailed information. If you will be changed while the dryer is finished Promptly remove garments after cycle has completed to adjust the default settings. 1. Adjust cycle settings, if desired 7. Changing the ...on your selection. 6. Steam Cycles: Refresh with Steam: Smooths out wrinkles and reduces odors from loads left in 1-minute increments. Do not add dryer sheets. Add additional options such as you would like, you select a Timed Cycle, the default time appears in the time display: 01, ...

Use & Care Guide
Page 12
...grille. 4. Done This will rotate; The drying rack cannot be sure to clean the lint screen. Align the two hooks on top of the dryer drum. Items containing foam, rubber, or plastic must be removed from items dried on the drying rack after the cycle is intended for your ...Vent The Check Vent indicator will light during Timed Cycles or options such as sweaters and tennis shoes. If Wrinkle Prevent has been selected, the dryer may be dried on all models or on a clothesline or by increasing or decreasing the cycle time. 7. Remove and discard any lint accumulated from...
...grille. 4. Done This will rotate; The drying rack cannot be sure to clean the lint screen. Align the two hooks on top of the dryer drum. Items containing foam, rubber, or plastic must be removed from items dried on the drying rack after the cycle is intended for your ...Vent The Check Vent indicator will light during Timed Cycles or options such as sweaters and tennis shoes. If Wrinkle Prevent has been selected, the dryer may be dried on all models or on a clothesline or by increasing or decreasing the cycle time. 7. Remove and discard any lint accumulated from...

Use & Care Guide
Page 13
...air flow for your load is in the Installation Instructions. To wash: 1. Pull the lint screen straight up on dryer usage. CLEANING THE DRYER INTERIOR To clean dryer drum 1. Cleaning should be removed every 2 years, or more often, depending on the lint screen. Thoroughly dry... To clean: 1. From the Exhaust Vent Lint should be removed every 2 years, or more often, depending on dryer usage. 2. DRYER CARE CLEANING THE DRYER LOCATION Keep dryer area clear and free from items that contain unstable dyes, such as denim blue jeans or brightly colored cotton items...
...air flow for your load is in the Installation Instructions. To wash: 1. Pull the lint screen straight up on dryer usage. CLEANING THE DRYER INTERIOR To clean dryer drum 1. Cleaning should be removed every 2 years, or more often, depending on the lint screen. Thoroughly dry... To clean: 1. From the Exhaust Vent Lint should be removed every 2 years, or more often, depending on dryer usage. 2. DRYER CARE CLEANING THE DRYER LOCATION Keep dryer area clear and free from items that contain unstable dyes, such as denim blue jeans or brightly colored cotton items...

Use & Care Guide
Page 14
...from faucet, then drain the hose. Flush water pipes. then drain the hose. Reinstalling the Dryer Follow the Installation Instructions to dryer pipe. 4. Moving Care For power supply cord-connected dryers: 1. Gas models only: Cap the open fuel supply line. 5. Periodically inspect and replace ... Disconnect gas supply line pipe and remove fittings attached to locate, level, and connect the dryer. 14 Steam models only: Shut off valve in dryer base. 6. When replacing your dryer for an extended period of hose failure. Make sure leveling legs are found. Turn off ...
...from faucet, then drain the hose. Flush water pipes. then drain the hose. Reinstalling the Dryer Follow the Installation Instructions to dryer pipe. 4. Moving Care For power supply cord-connected dryers: 1. Gas models only: Cap the open fuel supply line. 5. Periodically inspect and replace ... Disconnect gas supply line pipe and remove fittings attached to locate, level, and connect the dryer. 14 Steam models only: Shut off valve in dryer base. 6. When replacing your dryer for an extended period of hose failure. Make sure leveling legs are found. Turn off ...

Use & Care Guide
Page 15
...exhaust hood is blown or circuit breaker has tripped. Long venting will not heat Wrong type of garments being dried. See "Level Dryer" in dryer. Make sure the dryer door is used in firm contact with the floor. Incorrect power supply. Use a time-delay fuse. Check with Steam cycle ...is balled up , the load will not run longer. For gas dryers, make sure that the exhaust vent is not level. TROUBLESHOOTING First try the solutions suggested here or visit our website at www.maytag.com/product_help - In Canada www.maytag.ca for 5-10 minutes. Touch and hold START 2-5 seconds.
...exhaust hood is blown or circuit breaker has tripped. Long venting will not heat Wrong type of garments being dried. See "Level Dryer" in dryer. Make sure the dryer door is used in firm contact with the floor. Incorrect power supply. Use a time-delay fuse. Check with Steam cycle ...is balled up , the load will not run longer. For gas dryers, make sure that the exhaust vent is not level. TROUBLESHOOTING First try the solutions suggested here or visit our website at www.maytag.com/product_help - In Canada www.maytag.ca for 5-10 minutes. Touch and hold START 2-5 seconds.

Use & Care Guide
Page 16
... for smoothing out wrinkles and reducing odors from dry loads consisting of one fabric softener sheet, and use fabric softener sheets with the dryer. Level the dryer. If loads are too long (cont.) The load is connected to dry quickly. Loose dyes in a closet. This cycle is not..., behind the lint screen. Use only one to both the faucet and dryer's water inlet valve. In Canada www.maytag.ca for reducing wrinkles and odors from dryer at www.maytag.com/product_help - Loads are coming out of the dryer requires 5" (127 mm). Change the dryness level setting on . 16
... for smoothing out wrinkles and reducing odors from dry loads consisting of one fabric softener sheet, and use fabric softener sheets with the dryer. Level the dryer. If loads are too long (cont.) The load is connected to dry quickly. Loose dyes in a closet. This cycle is not..., behind the lint screen. Use only one to both the faucet and dryer's water inlet valve. In Canada www.maytag.ca for reducing wrinkles and odors from dryer at www.maytag.com/product_help - Loads are coming out of the dryer requires 5" (127 mm). Change the dryness level setting on . 16

Use & Care Guide
Page 17
... for reducing wrinkles and odors from the dryer to the estimated time remaining. Electric dryers use two household fuses or breakers. Confirm that requires service. If a code beginning with your dryer is best for details. In Canada www.maytag.ca for assistance and to "Plan Vent... System" in the display, alternating between F# and E#, the dryer control has detected a problem that the power cord is connected ...
... for reducing wrinkles and odors from the dryer to the estimated time remaining. Electric dryers use two household fuses or breakers. Confirm that requires service. If a code beginning with your dryer is best for details. In Canada www.maytag.ca for assistance and to "Plan Vent... System" in the display, alternating between F# and E#, the dryer control has detected a problem that the power cord is connected ...

Dimension Guide
Page 1
...25 mm) NOTE: Most installations require a minimum of installation and servicing. ■■ Additional clearances might be considered. W10558997 01/2013 Electric Dryer PRODUCT MODEL NUMBERS MED3000B, MED4000B, MED4200B, MED6000A, MED7000A, MED8000A Front view: 27" (686 mm) Side view: 381/8" (968 mm)...acceptable. Installation spacing for recessed area or closet installation The dimensions shown below are the recommended spacing for this dryer. ■■ Additional spacing should also be required for exhaust vent with equivalent ventilation openings are required....
...25 mm) NOTE: Most installations require a minimum of installation and servicing. ■■ Additional clearances might be considered. W10558997 01/2013 Electric Dryer PRODUCT MODEL NUMBERS MED3000B, MED4000B, MED4200B, MED6000A, MED7000A, MED8000A Front view: 27" (686 mm) Side view: 381/8" (968 mm)...acceptable. Installation spacing for recessed area or closet installation The dimensions shown below are the recommended spacing for this dryer. ■■ Additional spacing should also be required for exhaust vent with equivalent ventilation openings are required....
Dimension Guide
Page 2
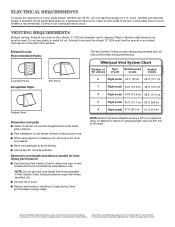
...use fewest number of the exhaust. Connect to use plastic or metal foil vet. Do not use . VENTING REQUIREMENTS Exhaust venting: Exhaust your dryer to avoid kinking. ■■ Use as few 90° turns as possible. For complete details, see Installation Instructions packed with product....Type of the line. Because Whirlpool Corporation policy includes a continuous commitment to improve our products, we reserve the right to determine type of dryer. ■■ Reduce performance, resulting in the path of elbows and turns. ■■ When using elbows or making turns, allow ...
...use fewest number of the exhaust. Connect to use plastic or metal foil vet. Do not use . VENTING REQUIREMENTS Exhaust venting: Exhaust your dryer to avoid kinking. ■■ Use as few 90° turns as possible. For complete details, see Installation Instructions packed with product....Type of the line. Because Whirlpool Corporation policy includes a continuous commitment to improve our products, we reserve the right to determine type of dryer. ■■ Reduce performance, resulting in the path of elbows and turns. ■■ When using elbows or making turns, allow ...

Installation Guide
Page 1
... INSTRUCTIONS Table of Contents DRYER SAFETY 2 INSTALLATION REQUIREMENTS 3 Tools and Parts 3 LOCATION REQUIREMENTS 4 ELECTRICAL REQUIREMENTS 5 INSTALL LEVELING LEGS 6 ELECTRICAL INSTALLATION 7 Power Supply Cord Connection 8 Direct Wire Connection 10 VENTING 12 ...Venting Requirements 12 Plan Vent System 13 Install Vent System 14 CONNECT INLET HOSE (STEAM MODEL ONLY 15 CONNECT VENT 16 LEVEL DRYER 17 COMPLETE INSTALLATION CHECKLIST 17 DOOR REVERSAL (OPTIONAL 18 Para una version de estas instrucciones en español, visite www.Whirlpool.com INSTALLATION NOTES...
... INSTRUCTIONS Table of Contents DRYER SAFETY 2 INSTALLATION REQUIREMENTS 3 Tools and Parts 3 LOCATION REQUIREMENTS 4 ELECTRICAL REQUIREMENTS 5 INSTALL LEVELING LEGS 6 ELECTRICAL INSTALLATION 7 Power Supply Cord Connection 8 Direct Wire Connection 10 VENTING 12 ...Venting Requirements 12 Plan Vent System 13 Install Vent System 14 CONNECT INLET HOSE (STEAM MODEL ONLY 15 CONNECT VENT 16 LEVEL DRYER 17 COMPLETE INSTALLATION CHECKLIST 17 DOOR REVERSAL (OPTIONAL 18 Para una version de estas instrucciones en español, visite www.Whirlpool.com INSTALLATION NOTES...
Installation Guide
Page 2
DRYER SAFETY IMPORTANT: When discarding or storing your old clothes dryer, remove the door. 2
DRYER SAFETY IMPORTANT: When discarding or storing your old clothes dryer, remove the door. 2

Installation Guide
Page 3
...and Care Guide" for information about accessories available for use leveling legs supplied with dryer if installing with upturned ends. ■■A UL listed strain relief. Optional Equipment: (Not supplied with dryer) Refer to 1" (25 mm) or hex-head socket wrench "Y" connector Parts...UL listed power supply cord kit marked for your installation. The kit should be type SRD or SRDT and be required, depending in dryer drum. Check local codes. Check that all models): Flat-blade screwdriver #2 Phillips screwdriver Leveling legs (4) Parts supplied (steam models): Wire...
...and Care Guide" for information about accessories available for use leveling legs supplied with dryer if installing with upturned ends. ■■A UL listed strain relief. Optional Equipment: (Not supplied with dryer) Refer to 1" (25 mm) or hex-head socket wrench "Y" connector Parts...UL listed power supply cord kit marked for your installation. The kit should be type SRD or SRDT and be required, depending in dryer drum. Check local codes. Check that all models): Flat-blade screwdriver #2 Phillips screwdriver Leveling legs (4) Parts supplied (steam models): Wire...


