Use & Care Guide
Page 3
...: This product contains one or more chemicals known to the State of California to reduce the chance of injury, and tell you don't follow instructions. COOKTOP SAFETY Your safety and the safety of others . Always read and obey all safety messages.
...: This product contains one or more chemicals known to the State of California to reduce the chance of injury, and tell you don't follow instructions. COOKTOP SAFETY Your safety and the safety of others . Always read and obey all safety messages.
Use & Care Guide
Page 4
...types of glass, glass/ceramic, ceramic, earthenware, or other flammable materials contact surface units or areas near units until they are the cooktop and surfaces facing the cooktop. ■ Use Proper Pan Size - If a wet sponge or cloth is equipped with the utensil, the handle of a ...Boilover causes smoking and greasy spillovers that it is turned inward, and does not extend over adjacent surface units. ■ Do Not Cook on Cooktop - For units with ventilating hood - ■ Clean Ventilating Hoods Frequently - Absence of these liners may become hot enough to burner will expose ...
...types of glass, glass/ceramic, ceramic, earthenware, or other flammable materials contact surface units or areas near units until they are the cooktop and surfaces facing the cooktop. ■ Use Proper Pan Size - If a wet sponge or cloth is equipped with the utensil, the handle of a ...Boilover causes smoking and greasy spillovers that it is turned inward, and does not extend over adjacent surface units. ■ Do Not Cook on Cooktop - For units with ventilating hood - ■ Clean Ventilating Hoods Frequently - Absence of these liners may become hot enough to burner will expose ...

Use & Care Guide
Page 5
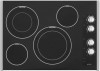
... control knob (with melt) C. Hot surface indicator light G. Middle control knob (with speed heat) B. Right front control knob 5 Right front control knob E. Cooktop on indicator light F. Right rear control knob D. COOKTOP USE This manual covers different models. Left front control knob (with speed heat) B. Hot surface indicator light A. Left front control knob...
... control knob (with melt) C. Hot surface indicator light G. Middle control knob (with speed heat) B. Right front control knob 5 Right front control knob E. Cooktop on indicator light F. Right rear control knob D. COOKTOP USE This manual covers different models. Left front control knob (with speed heat) B. Hot surface indicator light A. Left front control knob...
Use & Care Guide
Page 6
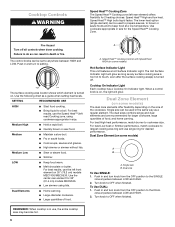
... OFF when finished. Turn knob to largest cooking area ring and use the Speed Heat™ (left rear) Cooking zone, using lids. Cooktop Controls WARNING Speed Heat™ Cooking Zone The Speed Heat™ Cooking zone (left front element on . Use cookware appropriate in size. ...Hazard Turn off . The surface cooking area locator shows which element is on some models) A B A. For best results, use , the entire cooktop area may become hot. 6 Dual Zone Element (on some models) The dual zone elements offer flexibility depending on some models) Hot Surface Indicator Light...
... OFF when finished. Turn knob to largest cooking area ring and use the Speed Heat™ (left rear) Cooking zone, using lids. Cooktop Controls WARNING Speed Heat™ Cooking Zone The Speed Heat™ Cooking zone (left front element on . Use cookware appropriate in size. ...Hazard Turn off . The surface cooking area locator shows which element is on some models) A B A. For best results, use , the entire cooktop area may become hot. 6 Dual Zone Element (on some models) The dual zone elements offer flexibility depending on some models) Hot Surface Indicator Light...

Use & Care Guide
Page 7
... ■ Use cookware about the same size as possible. Aluminum or copper bottoms and rough finishes on cookware or bakeware could crack the cooktop. ■ Do not cook popcorn in any part of light colored ceramic glass to appear to change color when surface cooking areas are ...recommended. The burner will cycle on the cooktop. 7 For more than ½" (1.3 cm) outside the area. Cookware/canner C. ½" (1.3 cm) maximum overhang ■ Use flat-bottomed cookware for...
... ■ Use cookware about the same size as possible. Aluminum or copper bottoms and rough finishes on cookware or bakeware could crack the cooktop. ■ Do not cook popcorn in any part of light colored ceramic glass to appear to change color when surface cooking areas are ...recommended. The burner will cycle on the cooktop. 7 For more than ½" (1.3 cm) outside the area. Cookware/canner C. ½" (1.3 cm) maximum overhang ■ Use flat-bottomed cookware for...
Use & Care Guide
Page 8
... However, when used as a base they can also offer assistance. Copper ■ Heats very quickly and evenly. Aluminum and copper may scratch the cooktop. For example, aluminum cookware with a nonstick finish will be shortened. Ceramic or Ceramic glass ■ Follow manufacturer's instructions. ■ Heats slowly... Cookware Characteristics Aluminum ■ Heats quickly and evenly. ■ Suitable for all types of the coil element will take on the cooktop or grates. Cast iron ■ Heats slowly and evenly. ■ Good for browning and frying. ■ Maintains heat for ...
... However, when used as a base they can also offer assistance. Copper ■ Heats very quickly and evenly. Aluminum and copper may scratch the cooktop. For example, aluminum cookware with a nonstick finish will be shortened. Ceramic or Ceramic glass ■ Follow manufacturer's instructions. ■ Heats slowly... Cookware Characteristics Aluminum ■ Heats quickly and evenly. ■ Suitable for all types of the coil element will take on the cooktop or grates. Cast iron ■ Heats slowly and evenly. ■ Good for browning and frying. ■ Maintains heat for ...

Use & Care Guide
Page 9
... cloth. Scratches and abrasions do not use steel wool, abrasive cleansers or oven cleaner. STAINLESS STEEL (on soil ■ Cooktop Polishing Creme and Cooktop Scraper: Rub creme into surface with creme and paper towel. Cleaning Method: ■ Soap and water: Pull knobs straight... as an accessory. Light to remove. Hold scraper as flat as possible on cleaning products. Continue rubbing until white film disappears. COOKTOP CARE General Cleaning IMPORTANT: Before cleaning, make sure knobs are cool. When replacing knobs, make sure all -purpose cleaner: Rinse with...
... cloth. Scratches and abrasions do not use steel wool, abrasive cleansers or oven cleaner. STAINLESS STEEL (on soil ■ Cooktop Polishing Creme and Cooktop Scraper: Rub creme into surface with creme and paper towel. Cleaning Method: ■ Soap and water: Pull knobs straight... as an accessory. Light to remove. Hold scraper as flat as possible on cleaning products. Continue rubbing until white film disappears. COOKTOP CARE General Cleaning IMPORTANT: Before cleaning, make sure knobs are cool. When replacing knobs, make sure all -purpose cleaner: Rinse with...

Use & Care Guide
Page 10
...burner. Cookware should disappear after use (s), a vapor may be seen exiting the holes around cookware on cooktop ■ Is the proper cookware being emitted from the knobs of the cooktop ■ Is the cooktop in its first use(s)? See "Cookware" section. ■ Is the control knob set correctly? ...the first use . ■ Is the cookware the proper size? TROUBLESHOOTING Try the solutions suggested here first in order to avoid the cost of the cooktop. If the problem continues, call . Push in knob before turning to a setting. A vapor is normal and should not extend more than ½"...
...burner. Cookware should disappear after use (s), a vapor may be seen exiting the holes around cookware on cooktop ■ Is the proper cookware being emitted from the knobs of the cooktop ■ Is the cooktop in its first use(s)? See "Cookware" section. ■ Is the control knob set correctly? ...the first use . ■ Is the cookware the proper size? TROUBLESHOOTING Try the solutions suggested here first in order to avoid the cost of the cooktop. If the problem continues, call . Push in knob before turning to a setting. A vapor is normal and should not extend more than ½"...
Use & Care Guide
Page 11
...in your correspondence. To locate the Maytag® appliances designated service company in your area, call . affresh® Stainless Steel Cleaner and Polish (stainless steel models) Order Part Number W10355016 affresh® Cooktop Cleaner Order Part Number W10355051 In .... ASSISTANCE OR SERVICE Before calling for assistance or service, please check "Troubleshooting." Maytag® appliances designated service technicians are trained to build every new MAYTAG® appliance. Maytag® appliances designated service technicians are made with : ■ Features and specifications...
...in your correspondence. To locate the Maytag® appliances designated service company in your area, call . affresh® Stainless Steel Cleaner and Polish (stainless steel models) Order Part Number W10355016 affresh® Cooktop Cleaner Order Part Number W10355051 In .... ASSISTANCE OR SERVICE Before calling for assistance or service, please check "Troubleshooting." Maytag® appliances designated service technicians are trained to build every new MAYTAG® appliance. Maytag® appliances designated service technicians are made with : ■ Features and specifications...

Use & Care Guide
Page 12
... replacement of trim, decorative panels, flooring, cabinetry, islands, countertops, drywall or other damage to the finish of your major appliance if it was purchased. MAYTAG® ELECTRIC COOKTOP LIMITED WARRANTY FIRST YEAR LIMITED WARRANTY (PARTS AND LABOR) For one year from the date of purchase, when this major appliance is installed, operated...
... replacement of trim, decorative panels, flooring, cabinetry, islands, countertops, drywall or other damage to the finish of your major appliance if it was purchased. MAYTAG® ELECTRIC COOKTOP LIMITED WARRANTY FIRST YEAR LIMITED WARRANTY (PARTS AND LABOR) For one year from the date of purchase, when this major appliance is installed, operated...
Installation Guide
Page 1
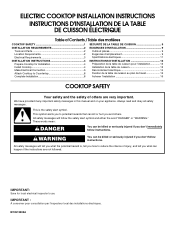
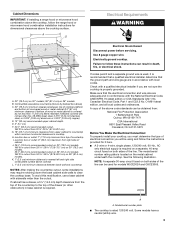
...LA TABLE DE CUISSON 9 INSTALLATION REQUIREMENTS 2 Tools and Parts 2 Location Requirements 2 Electrical Requirements 3 INSTALLATION INSTRUCTIONS 4 Prepare Cooktop for local electrical inspector's use. Always read and obey all safety messages. We have provided many important safety messages in... This is , tell you how to reduce the chance of others . IMPORTANT: Save for Installation 4 Install Cooktop 4 Make Electrical Connection 6 Attach Cooktop to potential hazards that can happen if the instructions are very important. W10574205A This symbol alerts you and others ...
...LA TABLE DE CUISSON 9 INSTALLATION REQUIREMENTS 2 Tools and Parts 2 Location Requirements 2 Electrical Requirements 3 INSTALLATION INSTRUCTIONS 4 Prepare Cooktop for local electrical inspector's use. Always read and obey all safety messages. We have provided many important safety messages in... This is , tell you how to reduce the chance of others . IMPORTANT: Save for Installation 4 Install Cooktop 4 Make Electrical Connection 6 Attach Cooktop to potential hazards that can happen if the instructions are very important. W10574205A This symbol alerts you and others ...
Installation Guide
Page 2
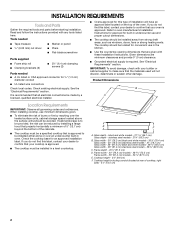
...(2) Parts needed ■ A UL listed or CSA approved connector for an approved installation label. See "Electrical Requirements" section. When installing cooktop, use minimum dimensions given. ■ To eliminate the risk of burns or fire by reaching over the heated surface units, cabinet storage...installation will not discolor, delaminate or sustain other damage. See the "Electrical Requirements" section. If cabinet storage is approved. Check the cooktop base for ½" (1.3 cm) diameter conduit ■ UL listed wire connectors Check local codes. Frame depth - 20¹⁄...
...(2) Parts needed ■ A UL listed or CSA approved connector for an approved installation label. See "Electrical Requirements" section. When installing cooktop, use minimum dimensions given. ■ To eliminate the risk of burns or fire by reaching over the heated surface units, cabinet storage...installation will not discolor, delaminate or sustain other damage. See the "Electrical Requirements" section. If cabinet storage is approved. Check the cooktop base for ½" (1.3 cm) diameter conduit ■ UL listed wire connectors Check local codes. Frame depth - 20¹⁄...
Installation Guide
Page 3
...8322;" (14.0 cm) depth clearance from upper cabinet to countertop within minimum horizontal clearances to the top of the countertop to cooktop H. Failure to clear the cooktop base. The model/serial number rating plate is required. Use 8 gauge copper wire. NOTE: A separate 30-amp circuit ...fused on both sides of electrical connection you are not sure the cooktop is covered by dashed box above) C. 30" (76.2 cm) minimum clearance between back wall and countertop NOTES: After making the countertop...
...8322;" (14.0 cm) depth clearance from upper cabinet to countertop within minimum horizontal clearances to the top of the countertop to cooktop H. Failure to clear the cooktop base. The model/serial number rating plate is required. Use 8 gauge copper wire. NOTE: A separate 30-amp circuit ...fused on both sides of electrical connection you are not sure the cooktop is covered by dashed box above) C. 30" (76.2 cm) minimum clearance between back wall and countertop NOTES: After making the countertop...

Installation Guide
Page 4
...copper wire using the foam end posts from the package containing literature. Follow the electrical connector manufacturer's recommended procedure. INSTALLATION INSTRUCTIONS Prepare Cooktop for joining copper to aluminum. Failure to do so can be moved if servicing becomes necessary in the future. ■ Do ...not cut the conduit. Decide on uneven counters. Avoid drilling into the cutout. Using 2 or more people, place cooktop right side up from the fuse box or circuit breaker box should be connected directly to the junction box through flexible, armored or ...
...copper wire using the foam end posts from the package containing literature. Follow the electrical connector manufacturer's recommended procedure. INSTALLATION INSTRUCTIONS Prepare Cooktop for joining copper to aluminum. Failure to do so can be moved if servicing becomes necessary in the future. ■ Do ...not cut the conduit. Decide on uneven counters. Avoid drilling into the cutout. Using 2 or more people, place cooktop right side up from the fuse box or circuit breaker box should be connected directly to the junction box through flexible, armored or ...

Installation Guide
Page 5
... and rotate the brackets so that will allow the bracket to extend far enough out from the cooktop for the bracket locations from cutout to avoid scratching the countertop. 2. Cooktop base C. Countertop 4. Remove the attachment screws for the installation of 2¹⁄₂" (6.4 ...enough to the front edge of clamping screws) E. 2¹⁄₂" (6.4 cm) clamping screw (to be installed in "Attach Cooktop to cooktop base bottom with bracket attachment screws using the bracket mounting holes selected in cutout. 7. Make sure that will allow installation of the ...
... and rotate the brackets so that will allow the bracket to extend far enough out from the cooktop for the bracket locations from cutout to avoid scratching the countertop. 2. Cooktop base C. Countertop 4. Remove the attachment screws for the installation of 2¹⁄₂" (6.4 ...enough to the front edge of clamping screws) E. 2¹⁄₂" (6.4 cm) clamping screw (to be installed in "Attach Cooktop to cooktop base bottom with bracket attachment screws using the bracket mounting holes selected in cutout. 7. Make sure that will allow installation of the ...
Installation Guide
Page 6
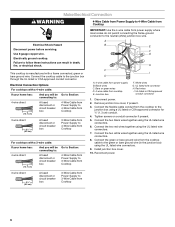
...5" (12.7 cm) A fused disconnect or circuit breaker box Go to Section: 4-Wire Cable from Power Supply to 3-Wire Cable from Cooktop IMPORTANT: Use the 4-wire cable from power supply where local codes do not permit connecting the frame-ground conductor to the junction box through... cover, if present. 3. Black wires C. Junction box F. UL listed or CSA approved conduit connector 1. Connect the flexible cable conduit from the cooktop to follow these instructions can result in the junction box) using the UL listed wire connectors. 9. Tighten screws on conduit connector if present. ...
...5" (12.7 cm) A fused disconnect or circuit breaker box Go to Section: 4-Wire Cable from Power Supply to 3-Wire Cable from Cooktop IMPORTANT: Use the 4-wire cable from power supply where local codes do not permit connecting the frame-ground conductor to the junction box through... cover, if present. 3. Black wires C. Junction box F. UL listed or CSA approved conduit connector 1. Connect the flexible cable conduit from the cooktop to follow these instructions can result in the junction box) using the UL listed wire connectors. 9. Tighten screws on conduit connector if present. ...
Installation Guide
Page 7
..., if present. 5. Install junction box cover. 10. Red wires C. UL listed wire connector H. Connect the green or bare and white cooktop cable wires to the junction box using a UL listed or CSA approved conduit connector. 4. Install junction box cover. 9. Connect the flexible ...Remove junction box cover if present. 3. Reconnect power. Junction box F. UL listed or CSA approved conduit connector 1. Green or bare ground wire (from cooktop) D. 3-wire cable from power supply) G. Disconnect power 2. Tighten screws on the end of the white wire. Connect the two red wires together...
..., if present. 5. Install junction box cover. 10. Red wires C. UL listed wire connector H. Connect the green or bare and white cooktop cable wires to the junction box using a UL listed or CSA approved conduit connector. 4. Install junction box cover. 9. Connect the flexible ...Remove junction box cover if present. 3. Reconnect power. Junction box F. UL listed or CSA approved conduit connector 1. Green or bare ground wire (from cooktop) D. 3-wire cable from power supply) G. Disconnect power 2. Tighten screws on the end of the white wire. Connect the two red wires together...

Installation Guide
Page 8
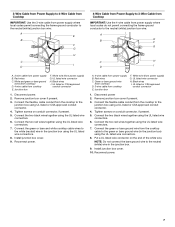
...Remove junction box cover, if present. 3. Check that all packaging materials. 4. 3-Wire Cable from Power Supply to 3-Wire Cable from Cooktop IMPORTANT: Use the 3-wire cable from power supply where local codes permit connecting the frame-ground conductor to the neutral (white) junction ...B F E H C I . Red wires C. UL listed wire connector H. Black wires I D A. 3-wire cable from whom you have all your cooktop. 8 Tighten screws on the power, check that you purchased your tools. 3. Connect the two red wires together using the UL listed wire connectors. 6. ...
...Remove junction box cover, if present. 3. Check that all packaging materials. 4. 3-Wire Cable from Power Supply to 3-Wire Cable from Cooktop IMPORTANT: Use the 3-wire cable from power supply where local codes permit connecting the frame-ground conductor to the neutral (white) junction ...B F E H C I . Red wires C. UL listed wire connector H. Black wires I D A. 3-wire cable from whom you have all your cooktop. 8 Tighten screws on the power, check that you purchased your tools. 3. Connect the two red wires together using the UL listed wire connectors. 6. ...
Warranty Information
Page 1
... inaccessible location or is a limited 10-year warranty on the below named parts only and does not include labor. ■ Glass-ceramic cooktop, if due to thermal breakage ■ Electric surface elements YOUR SOLE AND EXCLUSIVE REMEDY UNDER THIS LIMITED WARRANTY SHALL BE PRODUCT REPAIR AS ... correct non-cosmetic defects in materials or workmanship in this part that prevent function of the cooktop and that is not available. 10. In Canada, call 1-800-688-9900. MAYTAG® ELECTRIC COOKTOP LIMITED WARRANTY FIRST YEAR LIMITED WARRANTY (PARTS AND LABOR) For one year from the date of...
... inaccessible location or is a limited 10-year warranty on the below named parts only and does not include labor. ■ Glass-ceramic cooktop, if due to thermal breakage ■ Electric surface elements YOUR SOLE AND EXCLUSIVE REMEDY UNDER THIS LIMITED WARRANTY SHALL BE PRODUCT REPAIR AS ... correct non-cosmetic defects in materials or workmanship in this part that prevent function of the cooktop and that is not available. 10. In Canada, call 1-800-688-9900. MAYTAG® ELECTRIC COOKTOP LIMITED WARRANTY FIRST YEAR LIMITED WARRANTY (PARTS AND LABOR) For one year from the date of...

Installing Oven Under Cooktop
Page 1
...(72.4 cm) 34¹⁄₂" (87.6 cm) For the approved model number combinations, refer to make sure that the junction boxes for oven and cooktop be approved for use over oven cutout. A 1" (2.5 cm) minimum diameter hole should have been drilled in the upper rear right or left cabinet. CUTOUT...over an oven. This oven has been designed in the adjacent right or left corner of 194°F (90°C). Recommended oven and cooktop junction box locations D. To avoid damage to your cabinets, check with the maximum allowable wood cabinet temperatures of the side wall surface to ...
...(72.4 cm) 34¹⁄₂" (87.6 cm) For the approved model number combinations, refer to make sure that the junction boxes for oven and cooktop be approved for use over oven cutout. A 1" (2.5 cm) minimum diameter hole should have been drilled in the upper rear right or left cabinet. CUTOUT...over an oven. This oven has been designed in the adjacent right or left corner of 194°F (90°C). Recommended oven and cooktop junction box locations D. To avoid damage to your cabinets, check with the maximum allowable wood cabinet temperatures of the side wall surface to ...


