Owners Manual
Page 3
... the safety alert symbol. Always read and obey all safety messages. We have provided many important safety messages in this manual and on your appliance. COOKTOP SAFETY Your safety and the safety of injury, and tell you what can kill or hurt you and others are not followed. 3 These words mean...
... the safety alert symbol. Always read and obey all safety messages. We have provided many important safety messages in this manual and on your appliance. COOKTOP SAFETY Your safety and the safety of injury, and tell you what can kill or hurt you and others are not followed. 3 These words mean...
Owners Manual
Page 4
...element to line surface unit drip bowls, except as suggested in ignition of clothing. Contact a qualified technician immediately. ■ Clean Cooktop With Caution - Improper installation of these pans or bowls during cooking may be hot even though they have had sufficient time to... Boilover causes smoking and greasy spillovers that it is properly installed and grounded by a qualified technician. ■ Never Use Your Cooktop for cooktop service without breaking due to the sudden change in temperature. ■ Utensil Handles Should Be Turned Inward and Not Extend Over Adjacent...
...element to line surface unit drip bowls, except as suggested in ignition of clothing. Contact a qualified technician immediately. ■ Clean Cooktop With Caution - Improper installation of these pans or bowls during cooking may be hot even though they have had sufficient time to... Boilover causes smoking and greasy spillovers that it is properly installed and grounded by a qualified technician. ■ Never Use Your Cooktop for cooktop service without breaking due to the sudden change in temperature. ■ Utensil Handles Should Be Turned Inward and Not Extend Over Adjacent...
Owners Manual
Page 5
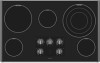
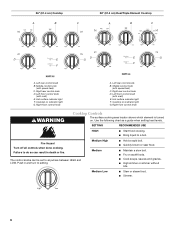
... indicator light E melt F A. Left rear control knob (with speed heat) C. Left front control knob E. The cooktop you have some or all of your model. 30" (76.2 cm) Cooktop 30" (76.2 cm) Dual/Triple Element Cooktop A A B C B C D E D melt F A. Left rear control knob (with speed heat) C. The locations and appearances of the features shown here may...
... indicator light E melt F A. Left rear control knob (with speed heat) C. Left front control knob E. The cooktop you have some or all of your model. 30" (76.2 cm) Cooktop 30" (76.2 cm) Dual/Triple Element Cooktop A A B C B C D E D melt F A. Left rear control knob (with speed heat) C. The locations and appearances of the features shown here may...
Owners Manual
Page 6
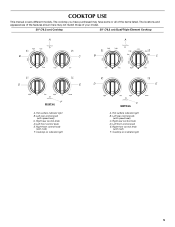
... control knob B. Left front control knob (with speed heat) C. 36" (91.4 cm) Cooktop A B C 36" (91.4 cm) Dual/Triple Element Cooktop A B C D E F melt D G E G F melt A. Right front control knob WARNING Cooktop Controls The surface cooking area locator shows which element is turned on indicator light G. Fire Hazard ...Turn off all controls when done cooking. Failure to do so can be set to a boil. Left rear control knob B. Cooktop on indicator light G. The control knobs can result in and turn to setting. Push in death or fire. Middle control knob ...
... control knob B. Left front control knob (with speed heat) C. 36" (91.4 cm) Cooktop A B C 36" (91.4 cm) Dual/Triple Element Cooktop A B C D E F melt D G E G F melt A. Right front control knob WARNING Cooktop Controls The surface cooking area locator shows which element is turned on indicator light G. Fire Hazard ...Turn off all controls when done cooking. Failure to do so can be set to a boil. Left rear control knob B. Cooktop on indicator light G. The control knobs can result in and turn to setting. Push in death or fire. Middle control knob ...
Owners Manual
Page 7
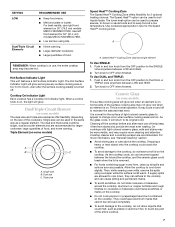
... flexibility for 36" (91.4 cm) models MECC7536/MECC7636. ■ Low simmer using a scraper while the surface is on the size of the entire cooktop. 7 This is removed. ■ For foods containing sugar in and turn knob from stains and provide the most even heating. It may not glow... to boil liquids faster. Single size can cause pitting and permanent marks. ■ To avoid scratches, do not slide cookware or bakeware across the cooktop. Triple Element (on . The Speed Heat™ option can become hot. Use cookware appropriate in the same way as any part of the cookware...
... flexibility for 36" (91.4 cm) models MECC7536/MECC7636. ■ Low simmer using a scraper while the surface is on the size of the entire cooktop. 7 This is removed. ■ For foods containing sugar in and turn knob from stains and provide the most even heating. It may not glow... to boil liquids faster. Single size can cause pitting and permanent marks. ■ To avoid scratches, do not slide cookware or bakeware across the cooktop. Triple Element (on . The Speed Heat™ option can become hot. Use cookware appropriate in the same way as any part of the cookware...
Owners Manual
Page 8
...used as the surface cooking area. B A C A. See "Assistance or Service" for all controls are off and the oven and cooktop are suggested first unless otherwise noted. Use the following chart as its base material. Copper ■ Heats very quickly and evenly. Soap...instructions. ■ Heats slowly, but unevenly. ■ A core or base of medium-to-heavy thickness. Aluminum and copper may scratch the cooktop. Surface cooking area B. Rough finishes may be shortened. Earthenware ■ Follow manufacturer's instructions. ■ Use on a hot surface cooking area,...
...used as the surface cooking area. B A C A. See "Assistance or Service" for all controls are off and the oven and cooktop are suggested first unless otherwise noted. Use the following chart as its base material. Copper ■ Heats very quickly and evenly. Soap...instructions. ■ Heats slowly, but unevenly. ■ A core or base of medium-to-heavy thickness. Aluminum and copper may scratch the cooktop. Surface cooking area B. Rough finishes may be shortened. Earthenware ■ Follow manufacturer's instructions. ■ Use on a hot surface cooking area,...
Owners Manual
Page 9
...GLASS To avoid damage to avoid streaking and staining. Cleaning Method: Always wipe with a clean, wet cloth or sponge and dry thoroughly to the cooktop, do not use steel wool, abrasive powder cleansers, chlorine bleach, rust remover or ammonia. Light to a setting. Continue rubbing until white film... do not remove seals under knobs. Store razor blades out of the reach of an unnecessary service call an electrician. ■ Is the cooktop wired properly? Repeat for regular use steel wool, abrasive cleansers or oven cleaner. Cookware should not extend more than ½" (1.3 cm) ...
...GLASS To avoid damage to avoid streaking and staining. Cleaning Method: Always wipe with a clean, wet cloth or sponge and dry thoroughly to the cooktop, do not use steel wool, abrasive powder cleansers, chlorine bleach, rust remover or ammonia. Light to a setting. Continue rubbing until white film... do not remove seals under knobs. Store razor blades out of the reach of an unnecessary service call an electrician. ■ Is the cooktop wired properly? Repeat for regular use steel wool, abrasive cleansers or oven cleaner. Cookware should not extend more than ½" (1.3 cm) ...
Owners Manual
Page 10
...can write to local dealers, repair parts distributors and service companies. Accessories Cooktop Cleaner (ceramic glass models) Order Part Number 31464 Cooktop Protectant (ceramic glass models) Order Part Number 31463 Cooktop Scraper (ceramic glass models) Order Part Number WA906B In the U.S.A. ... sales. ■ Specialized customer assistance (Spanish speaking, hearing impaired, limited vision, etc.). ■ Referrals to build every new MAYTAG® appliance. If you can also look in the United States. ASSISTANCE OR SERVICE Before calling for assistance or service, please check...
...can write to local dealers, repair parts distributors and service companies. Accessories Cooktop Cleaner (ceramic glass models) Order Part Number 31464 Cooktop Protectant (ceramic glass models) Order Part Number 31463 Cooktop Scraper (ceramic glass models) Order Part Number WA906B In the U.S.A. ... sales. ■ Specialized customer assistance (Spanish speaking, hearing impaired, limited vision, etc.). ■ Referrals to build every new MAYTAG® appliance. If you can also look in the United States. ASSISTANCE OR SERVICE Before calling for assistance or service, please check...
Installation Instructions
Page 1
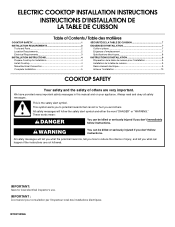
... l'inspecteur local des installations électriques. WARNING You can happen if the instructions are very important. IMPORTANT: Save for Installation 4 Install Cooktop 4 Make Electrical Connection 4 Complete Installation 5 SÉCURITÉ DE LA TABLE DE CUISSON 7 EXIGENCES D'INSTALLATION 7 Outils et pi&#...de la table de cuisson pour l'installation 9 Installation de la table de cuisson 9 Raccordement électrique 9 Achever l'installation 10 COOKTOP SAFETY Your safety and the safety of injury, and tell you don't follow the safety alert symbol and either the word "...
... l'inspecteur local des installations électriques. WARNING You can happen if the instructions are very important. IMPORTANT: Save for Installation 4 Install Cooktop 4 Make Electrical Connection 4 Complete Installation 5 SÉCURITÉ DE LA TABLE DE CUISSON 7 EXIGENCES D'INSTALLATION 7 Outils et pi&#...de la table de cuisson pour l'installation 9 Installation de la table de cuisson 9 Raccordement électrique 9 Achever l'installation 10 COOKTOP SAFETY Your safety and the safety of injury, and tell you don't follow the safety alert symbol and either the word "...
Installation Instructions
Page 2
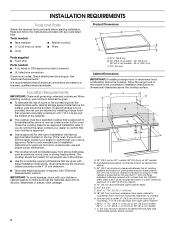
...H H J I . 29 73.8 +/- 0.16 cm) on 30" (76.2 cm) models 34 87.8 +/- 0.16 cm) on 36" (91.4 cm) models J. 1" (2.5 cm) minimum distance to cooktop H. Junction box or outlet: 6" (15.2 cm) minimum from top of counterop; 7" (17.8 cm) maximum from right side of cabinet I A. 30" (76.2 cm) on 30" models...for an approved installation label. INSTALLATION REQUIREMENTS Tools and Parts Gather the required tools and parts before starting installation. When installing cooktop, use minimum dimensions given. ■ To eliminate the risk of burns or fire by reaching over the heated surface units...
...H H J I . 29 73.8 +/- 0.16 cm) on 30" (76.2 cm) models 34 87.8 +/- 0.16 cm) on 36" (91.4 cm) models J. 1" (2.5 cm) minimum distance to cooktop H. Junction box or outlet: 6" (15.2 cm) minimum from top of counterop; 7" (17.8 cm) maximum from right side of cabinet I A. 30" (76.2 cm) on 30" models...for an approved installation label. INSTALLATION REQUIREMENTS Tools and Parts Gather the required tools and parts before starting installation. When installing cooktop, use minimum dimensions given. ■ To eliminate the risk of burns or fire by reaching over the heated surface units...
Installation Instructions
Page 3
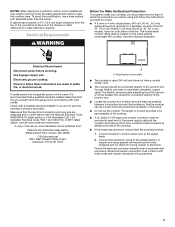
... special connectors and/or tools designed and UL listed for 36" (91.4 cm) models, fused on the metal cabinet underneath the cooktop. Follow the electrical connector manufacturer's recommended procedure. To avoid this modification, use a base cabinet with local codes and industry accepted wiring...8501 East Pleasant Valley Road Cleveland, OH 44131-5575 A A. Electrical Requirements WARNING Before You Make the Electrical Connection: To properly install your cooktop, you must conform with sidewalls wider than the cutout. If codes permit and a separate ground wire is used, it here. ■ ...
... special connectors and/or tools designed and UL listed for 36" (91.4 cm) models, fused on the metal cabinet underneath the cooktop. Follow the electrical connector manufacturer's recommended procedure. To avoid this modification, use a base cabinet with local codes and industry accepted wiring...8501 East Pleasant Valley Road Cleveland, OH 44131-5575 A A. Electrical Requirements WARNING Before You Make the Electrical Connection: To properly install your cooktop, you must conform with sidewalls wider than the cutout. If codes permit and a separate ground wire is used, it here. ■ ...
Installation Instructions
Page 4
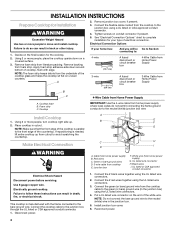
Tighten screws on uneven counters. Decide on the final location for Installation WARNING Excessive Weight Hazard Use two or more people to move and install cooktop. 2. NOTE: Make sure that the front edge of the countertop. Make Electrical Connection WARNING A B E F G C H D I . Connect the 2 black ... the junction box) using a UL listed or CSA approved conduit connector. 4. Junction box F. Using 2 or more people, place the cooktop upside down around bottom of the white wire. Remove junction box cover, if present. 3. Connect the green (or bare) ground wire ...
Tighten screws on uneven counters. Decide on the final location for Installation WARNING Excessive Weight Hazard Use two or more people to move and install cooktop. 2. NOTE: Make sure that the front edge of the countertop. Make Electrical Connection WARNING A B E F G C H D I . Connect the 2 black ... the junction box) using a UL listed or CSA approved conduit connector. 4. Junction box F. Using 2 or more people, place the cooktop upside down around bottom of the white wire. Remove junction box cover, if present. 3. Connect the green (or bare) ground wire ...
Installation Instructions
Page 5
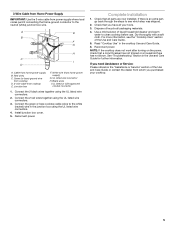
... a mild solution of the Use and Care Guide. 5. 3-Wire Cable from Home Power Supply IMPORTANT: Use the 3-wire cable from cooktop E. Black wires I D A. Reconnect power. Complete Installation 1. Check that all packaging materials. 4. Dispose of the Use and Care ...for further information. Cable from whom you purchased your tools. 3. UL listed wire connector H. Dry thoroughly with a soft cloth. If you have all your cooktop. 5 White wire (from home power supply) G. A E B F G H C I . UL listed or CSA approved conduit connector 1. Install junction...
... a mild solution of the Use and Care Guide. 5. 3-Wire Cable from Home Power Supply IMPORTANT: Use the 3-wire cable from cooktop E. Black wires I D A. Reconnect power. Complete Installation 1. Check that all packaging materials. 4. Dispose of the Use and Care ...for further information. Cable from whom you purchased your tools. 3. UL listed wire connector H. Dry thoroughly with a soft cloth. If you have all your cooktop. 5 White wire (from home power supply) G. A E B F G H C I . UL listed or CSA approved conduit connector 1. Install junction...


