
Owners Manual
Page 3
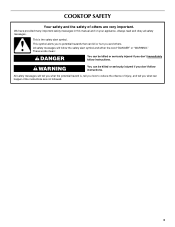
WARNING You can be killed or seriously injured if you what the potential hazard is the safety alert symbol. COOKTOP SAFETY Your safety and the safety of injury, and tell you don't immediately follow instructions. This symbol alerts you to reduce the chance of others . ...
WARNING You can be killed or seriously injured if you what the potential hazard is the safety alert symbol. COOKTOP SAFETY Your safety and the safety of injury, and tell you don't immediately follow instructions. This symbol alerts you to reduce the chance of others . ...
Owners Manual
Page 4
... different size. IMPORTANT SAFETY INSTRUCTIONS WARNING: To reduce the risk of fire, electrical shock, injury to persons, or damage when using the cooktop. ■ User Servicing - Loose-fitting or hanging garments should never be hot even though they have had sufficient time to a hot ... Warming or Heating the Room. ■ Do Not Leave Children Alone - The use a towel or other glazed utensils are the cooktop and surfaces facing the cooktop. ■ Use Proper Pan Size - Boilover causes smoking and greasy spillovers that it is equipped with ventilating hood - ■ ...
... different size. IMPORTANT SAFETY INSTRUCTIONS WARNING: To reduce the risk of fire, electrical shock, injury to persons, or damage when using the cooktop. ■ User Servicing - Loose-fitting or hanging garments should never be hot even though they have had sufficient time to a hot ... Warming or Heating the Room. ■ Do Not Leave Children Alone - The use a towel or other glazed utensils are the cooktop and surfaces facing the cooktop. ■ Use Proper Pan Size - Boilover causes smoking and greasy spillovers that it is equipped with ventilating hood - ■ ...
Owners Manual
Page 5
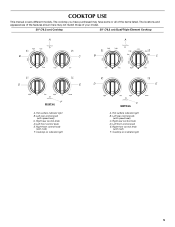
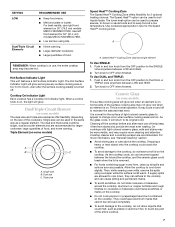
... have some or all of your model. 30" (76.2 cm) Cooktop 30" (76.2 cm) Dual/Triple Element Cooktop A A B C B C D E D melt F A. Left front control knob E. Left front control knob E. Left rear control knob (with melt) F. The locations and ...of the items listed. Right front control knob (with speed heat) C. Left rear control knob (with melt) F. Right rear control knob D. Cooktop on indicator light 5 Cooktop on indicator light E melt F A. Hot surface indicator light B. Right front control knob (with speed heat) C. Right rear control knob D. Hot...
... have some or all of your model. 30" (76.2 cm) Cooktop 30" (76.2 cm) Dual/Triple Element Cooktop A A B C B C D E D melt F A. Left front control knob E. Left front control knob E. Left rear control knob (with melt) F. The locations and ...of the items listed. Right front control knob (with speed heat) C. Left rear control knob (with melt) F. Right rear control knob D. Cooktop on indicator light 5 Cooktop on indicator light E melt F A. Hot surface indicator light B. Right front control knob (with speed heat) C. Right rear control knob D. Hot...
Owners Manual
Page 6
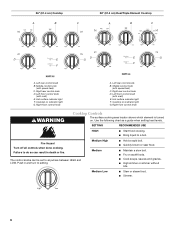
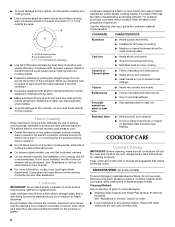
...; foods. ■ Cook soups, sauces and gravies. ■ High simmer or simmer without lids. Middle control knob (with speed heat) C. Cooktop on indicator light G. Hot surface indicator light F. Right rear control knob D. Failure to anywhere between HIGH and LOW. Medium Low ■ Stew ... done cooking. Push in death or fire. Left rear control knob B. Right rear control knob D. Right front control knob WARNING Cooktop Controls The surface cooking area locator shows which element is turned on. SETTING RECOMMENDED USE HIGH ■ Start food cooking. ■...
...; foods. ■ Cook soups, sauces and gravies. ■ High simmer or simmer without lids. Middle control knob (with speed heat) C. Cooktop on indicator light G. Hot surface indicator light F. Right rear control knob D. Failure to anywhere between HIGH and LOW. Medium Low ■ Stew ... done cooking. Push in death or fire. Left rear control knob B. Right rear control knob D. Right front control knob WARNING Cooktop Controls The surface cooking area locator shows which element is turned on. SETTING RECOMMENDED USE HIGH ■ Start food cooking. ■...
Owners Manual
Page 7
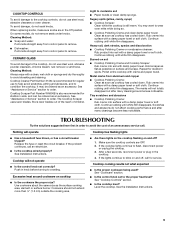
... oven mitts, remove the spills using lids. ■ Home canning. ■ Large-diameter cookware. ■ Large quantities of the entire cooktop. 7 As the glass cools, it free from the OFF position to boil liquids faster. The Hot Surface Indicator Light will return to OFF... it will glow as long as a regular element. A A. Speed Heat™ Cooking Zone dual and single element To Use SINGLE: 1. Cooktop cleaner and a cooktop scraper are allowed to touch, even after each use right front element on some models) A B C A. SETTING LOW Dual/Triple Circuit Elements...
... oven mitts, remove the spills using lids. ■ Home canning. ■ Large-diameter cookware. ■ Large quantities of the entire cooktop. 7 As the glass cools, it free from the OFF position to boil liquids faster. The Hot Surface Indicator Light will return to OFF... it will glow as long as a regular element. A A. Speed Heat™ Cooking Zone dual and single element To Use SINGLE: 1. Cooktop cleaner and a cooktop scraper are allowed to touch, even after each use right front element on some models) A B C A. SETTING LOW Dual/Triple Circuit Elements...
Owners Manual
Page 8
...installation of aluminum. Cookware IMPORTANT: Do not leave empty cookware on cleaning products. Copper ■ Heats very quickly and evenly. COOKTOP CARE General Cleaning IMPORTANT: Before cleaning, make sure all types of cooking. ■ Medium or heavy thickness is not installed,... canner on the properties of a Canning Unit Kit is transferred, which affects cooking results. Cookware should be used areas to the cooktop, do not cook foods directly on low heat settings. Rough finishes may be visible between batches. Earthenware ■ Follow manufacturer's ...
...installation of aluminum. Cookware IMPORTANT: Do not leave empty cookware on cleaning products. Copper ■ Heats very quickly and evenly. COOKTOP CARE General Cleaning IMPORTANT: Before cleaning, make sure all types of cooking. ■ Medium or heavy thickness is not installed,... canner on the properties of a Canning Unit Kit is transferred, which affects cooking results. Cookware should be used areas to the cooktop, do not cook foods directly on low heat settings. Rough finishes may be visible between batches. Earthenware ■ Follow manufacturer's ...
Owners Manual
Page 9
... and water: Pull knobs straight away from control panel to remove. ■ Dishwasher: Pull knobs straight away from aluminum and copper ■ Cooktop Polishing Creme: Clean as soon as an accessory. Rub creme into soil with a damp paper towel or soft cloth. Sugary spills (jellies, ... surface with a damp paper towel or soft cloth. Nothing will not operate ■ Is the control knob set to the cooktop, do not affect cooking performance and after many cleanings become less noticeable. Continue rubbing until white film disappears. Hold scraper as flat...
... and water: Pull knobs straight away from control panel to remove. ■ Dishwasher: Pull knobs straight away from aluminum and copper ■ Cooktop Polishing Creme: Clean as soon as an accessory. Rub creme into soil with a damp paper towel or soft cloth. Sugary spills (jellies, ... surface with a damp paper towel or soft cloth. Nothing will not operate ■ Is the control knob set to the cooktop, do not affect cooking performance and after many cleanings become less noticeable. Continue rubbing until white film disappears. Hold scraper as flat...
Owners Manual
Page 10
...Maytag® appliances designated service technicians are trained to fulfill the product warranty and provide after -warranty service, anywhere in the United States. Our consultants provide assistance with: ■ Features and specifications on our full line of your nearest designated service center. Accessories Cooktop Cleaner (ceramic glass models) Order Part Number 31464 Cooktop...service, anywhere in your area, call . To locate factory specified parts in Canada. Maytag® appliances designated service technicians are trained to local dealers, repair parts distributors and ...
...Maytag® appliances designated service technicians are trained to fulfill the product warranty and provide after -warranty service, anywhere in the United States. Our consultants provide assistance with: ■ Features and specifications on our full line of your nearest designated service center. Accessories Cooktop Cleaner (ceramic glass models) Order Part Number 31464 Cooktop...service, anywhere in your area, call . To locate factory specified parts in Canada. Maytag® appliances designated service technicians are trained to local dealers, repair parts distributors and ...
Installation Instructions
Page 1
...alerts you to reduce the chance of others . WARNING You can happen if the instructions are very important. IMPORTANT: Save for Installation 4 Install Cooktop 4 Make Electrical Connection 4 Complete Installation 5 SÉCURITÉ DE LA TABLE DE CUISSON 7 EXIGENCES D'INSTALLATION 7 Outils et piè...de la table de cuisson pour l'installation 9 Installation de la table de cuisson 9 Raccordement électrique 9 Achever l'installation 10 COOKTOP SAFETY Your safety and the safety of injury, and tell you what the potential hazard is the safety alert symbol. W10274255A We ...
...alerts you to reduce the chance of others . WARNING You can happen if the instructions are very important. IMPORTANT: Save for Installation 4 Install Cooktop 4 Make Electrical Connection 4 Complete Installation 5 SÉCURITÉ DE LA TABLE DE CUISSON 7 EXIGENCES D'INSTALLATION 7 Outils et piè...de la table de cuisson pour l'installation 9 Installation de la table de cuisson 9 Raccordement électrique 9 Achever l'installation 10 COOKTOP SAFETY Your safety and the safety of injury, and tell you what the potential hazard is the safety alert symbol. W10274255A We ...
Installation Instructions
Page 2
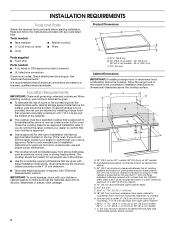
...; Grounded electrical supply is approved. Combustible area above countertop (shown by dashed box above) C. 30" (76.2 cm) minimum clearance between top of cooktop platform and bottom of unprotected wood or metal cabinet (24" [61 cm] minimum clearance if bottom of cabinet I A. 30" (76.2 cm) on...be installed away from upper cabinet to countertop within minimum horizontal clearances to nearest left and right side combustible surface above the cooktop surface. If cabinet storage is protected by reaching over an undercounter built-in the kitchen. ■ Use the countertop opening...
...; Grounded electrical supply is approved. Combustible area above countertop (shown by dashed box above) C. 30" (76.2 cm) minimum clearance between top of cooktop platform and bottom of unprotected wood or metal cabinet (24" [61 cm] minimum clearance if bottom of cabinet I A. 30" (76.2 cm) on...be installed away from upper cabinet to countertop within minimum horizontal clearances to nearest left and right side combustible surface above the cooktop surface. If cabinet storage is protected by reaching over an undercounter built-in the kitchen. ■ Use the countertop opening...
Installation Instructions
Page 3
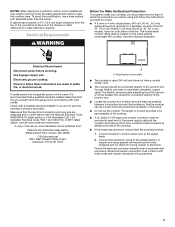
... if you must conform with sidewalls wider than the cutout. Electrical Shock Hazard Disconnect power before servicing. Model/serial number plate ■ The cooktop is required. Use 8 gauge copper wire. If cabinet has a drawer, a 4¹⁄₈" (10.5 cm) depth clearance from ...Pleasant Valley Road Cleveland, OH 44131-5575 A A. Electrical Requirements WARNING Before You Make the Electrical Connection: To properly install your cooktop, you are in accordance with the National Electrical Code, ANSI/NFPA 70-latest edition or CSA Standards C22.1-94, Canadian Electrical Code...
... if you must conform with sidewalls wider than the cutout. Electrical Shock Hazard Disconnect power before servicing. Model/serial number plate ■ The cooktop is required. Use 8 gauge copper wire. If cabinet has a drawer, a 4¹⁄₈" (10.5 cm) depth clearance from ...Pleasant Valley Road Cleveland, OH 44131-5575 A A. Electrical Requirements WARNING Before You Make the Electrical Connection: To properly install your cooktop, you are in accordance with the National Electrical Code, ANSI/NFPA 70-latest edition or CSA Standards C22.1-94, Canadian Electrical Code...
Installation Instructions
Page 4
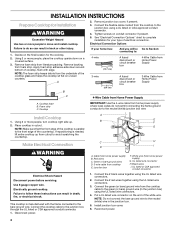
... wire connectors. 3. Reconnect power. 4 Apply foam strip adhesive-side down on the end of the countertop. Using 2 or more people, turn cooktop right side up from home power supply where local codes do so can result in the junction box. 5. NOTE: Make sure that the front... C. Electrical Connection Options Failure to do not permit connecting the frame-ground conductor to the green (or bare) ground wire (in cutout. Place cooktop in the junction box) using a UL listed or CSA approved conduit connector. 4. Using 2 or more people to the junction box using the ...
... wire connectors. 3. Reconnect power. 4 Apply foam strip adhesive-side down on the end of the countertop. Using 2 or more people, turn cooktop right side up from home power supply where local codes do so can result in the junction box. 5. NOTE: Make sure that the front... C. Electrical Connection Options Failure to do not permit connecting the frame-ground conductor to the green (or bare) ground wire (in cutout. Place cooktop in the junction box) using a UL listed or CSA approved conduit connector. 4. Using 2 or more people to the junction box using the ...
Installation Instructions
Page 5
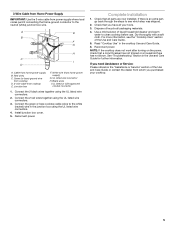
...CSA approved conduit connector 1. Use a mild solution of the Use and Care Guide or contact the dealer from whom you have all your cooktop. 5 Reconnect power. For more information, see which step was skipped. 2. 3-Wire Cable from Home Power Supply IMPORTANT: Use the 3-wire... cable from home power supply) G. White wire (from power supply where local codes permit connecting the frame-ground conductor to see the "Cooktop Care" section of /recycle all parts are now installed. Black wires I D A. Connect the 2 black wires together using the UL listed wire ...
...CSA approved conduit connector 1. Use a mild solution of the Use and Care Guide or contact the dealer from whom you have all your cooktop. 5 Reconnect power. For more information, see which step was skipped. 2. 3-Wire Cable from Home Power Supply IMPORTANT: Use the 3-wire... cable from home power supply) G. White wire (from power supply where local codes permit connecting the frame-ground conductor to see the "Cooktop Care" section of /recycle all parts are now installed. Black wires I D A. Connect the 2 black wires together using the UL listed wire ...


