
Installation Instructions
Page 1
... you what the potential hazard is the safety alert symbol. All safety messages will follow instructions. IMPORTANT : À conserver pour consultation par l'inspecteur local des installations électriques. WARNING You can be killed or seriously injured if you how to potential hazards that can happen if the instructions are very important...
... you what the potential hazard is the safety alert symbol. All safety messages will follow instructions. IMPORTANT : À conserver pour consultation par l'inspecteur local des installations électriques. WARNING You can be killed or seriously injured if you how to potential hazards that can happen if the instructions are very important...
Installation Instructions
Page 2
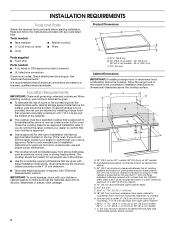
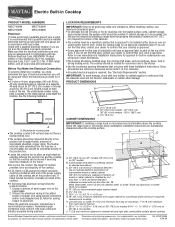
... E H H J I . 29 73.8 +/- 0.16 cm) on 30" (76.2 cm) models 34 87.8 +/- 0.16 cm) on 36" models B. When installing cooktop, use and proper cutout dimensions. ■ The cooktop should be a specified cooktop that are minimum clearances and provide 0" (0 cm) clearance. ■ Grounded electrical supply...approved. ■ Ovens approved for convenient use in oven. Read and follow the range hood or microwave hood combination installation instructions for dimensional clearances above cooktop 2 It is protected by reaching over an undercounter built-in the kitchen. ■...
... E H H J I . 29 73.8 +/- 0.16 cm) on 30" (76.2 cm) models 34 87.8 +/- 0.16 cm) on 36" models B. When installing cooktop, use and proper cutout dimensions. ■ The cooktop should be a specified cooktop that are minimum clearances and provide 0" (0 cm) clearance. ■ Grounded electrical supply...approved. ■ Ovens approved for convenient use in oven. Read and follow the range hood or microwave hood combination installation instructions for dimensional clearances above cooktop 2 It is protected by reaching over an undercounter built-in the kitchen. ■...
Installation Instructions
Page 3
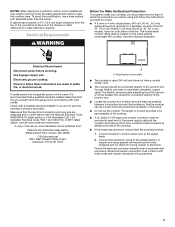
...cooktop. ■ If the house has aluminum wiring follow the instructions provided for it is recommended that a qualified electrical installer determine that the electrical connection and wire size are not sure the cooktop is required on both sides of the power...and C22.2 No. Follow the electrical connector manufacturer's recommended procedure. Electrical Requirements WARNING Before You Make the Electrical Connection: To properly install your cooktop, you are adequate and in conformance with local codes and industry accepted wiring practices. 3 See the following illustration. ...
...cooktop. ■ If the house has aluminum wiring follow the instructions provided for it is recommended that a qualified electrical installer determine that the electrical connection and wire size are not sure the cooktop is required on both sides of the power...and C22.2 No. Follow the electrical connector manufacturer's recommended procedure. Electrical Requirements WARNING Before You Make the Electrical Connection: To properly install your cooktop, you are adequate and in conformance with local codes and industry accepted wiring practices. 3 See the following illustration. ...
Installation Instructions
Page 4
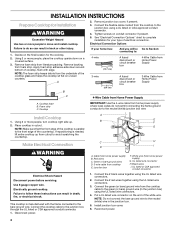
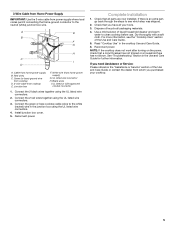
...down on a covered surface. 3. NOTE: The foam strip keeps debris from the underside of cooktop, flush with the frame connected to move and install cooktop. 2. Using 2 or more people to the bare ground wire. Red wires C. White wire (from foam strip. Black wires I A. .... Tighten screws on the end of the white wire. Cooktop base B. Green or bare ground wires D. 3-wire cable from cutout to complete installation for the cooktop. 2. Junction box F. Disconnect power. 1. Connect the 2 red wires together using the UL listed wire connectors. 2. Remove ...
...down on a covered surface. 3. NOTE: The foam strip keeps debris from the underside of cooktop, flush with the frame connected to move and install cooktop. 2. Using 2 or more people to the bare ground wire. Red wires C. White wire (from foam strip. Black wires I A. .... Tighten screws on the end of the white wire. Cooktop base B. Green or bare ground wires D. 3-wire cable from cutout to complete installation for the cooktop. 2. Junction box F. Disconnect power. 1. Connect the 2 red wires together using the UL listed wire connectors. 2. Remove ...
Installation Instructions
Page 5
...) ground wire from cooktop D. 3-wire cable from home power supply) G. Connect the 2 black wires together using the UL listed wire connectors. 3. Complete Installation 1. If there is an extra part, go back through the steps to the white (neutral) wire in the junction box using the UL listed wire ... Use and Care Guide for further information. Use a mild solution of the Use and Care Guide or contact the dealer from home power supply B. Install junction box cover. 5. If you purchased your tools. 3. 3-Wire Cable from Home Power Supply IMPORTANT: Use the 3-wire cable from power supply...
...) ground wire from cooktop D. 3-wire cable from home power supply) G. Connect the 2 black wires together using the UL listed wire connectors. 3. Complete Installation 1. If there is an extra part, go back through the steps to the white (neutral) wire in the junction box using the UL listed wire ... Use and Care Guide for further information. Use a mild solution of the Use and Care Guide or contact the dealer from home power supply B. Install junction box cover. 5. If you purchased your tools. 3. 3-Wire Cable from Home Power Supply IMPORTANT: Use the 3-wire cable from power supply...
Dimension Guide
Page 1
...30" (76.2 cm) 36" (91.4 cm) models - 35 89.7 cm) C. 3³⁄₄" (9.5 cm) CABINET DIMENSIONS IMPORTANT: If installing a range hood or microwave hood combination above cooktop Because Whirlpool Corporation policy includes a continuous commitment to cooktop H. LOCATION REQUIREMENTS IMPORTANT: Observe all local codes ... provide 0" (0 cm) clearance. Connect a section of copper wire using and follow the instructions provided for an approved installation label. Connect the aluminum wiring to the added section of solid copper wire to change without notice. Follow the electrical...
...30" (76.2 cm) 36" (91.4 cm) models - 35 89.7 cm) C. 3³⁄₄" (9.5 cm) CABINET DIMENSIONS IMPORTANT: If installing a range hood or microwave hood combination above cooktop Because Whirlpool Corporation policy includes a continuous commitment to cooktop H. LOCATION REQUIREMENTS IMPORTANT: Observe all local codes ... provide 0" (0 cm) clearance. Connect a section of copper wire using and follow the instructions provided for an approved installation label. Connect the aluminum wiring to the added section of solid copper wire to change without notice. Follow the electrical...

Warranty Information
Page 1
..., alteration, misuse, abuse, fire, flood, acts of God, improper installation, installation not in a remote area where service by this book and your major appliance, to be easily determined. MAYTAG SHALL NOT BE LIABLE FOR INCIDENTAL OR CONSEQUENTIAL DAMAGES. If outside the ... your major appliance. Consumable parts are excluded from unauthorized modifications made to correct the installation of repair or replacement under this limited warranty. Damage resulting from your authorized Maytag dealer to refrigerator or freezer product failures. 7. Any food loss due to determine...
..., alteration, misuse, abuse, fire, flood, acts of God, improper installation, installation not in a remote area where service by this book and your major appliance, to be easily determined. MAYTAG SHALL NOT BE LIABLE FOR INCIDENTAL OR CONSEQUENTIAL DAMAGES. If outside the ... your major appliance. Consumable parts are excluded from unauthorized modifications made to correct the installation of repair or replacement under this limited warranty. Damage resulting from your authorized Maytag dealer to refrigerator or freezer product failures. 7. Any food loss due to determine...
Use & Care Guide
Page 4
... in color. Select utensils having flat bottoms large enough to a hot surface. Grease should not be seriously injured. ■ Proper Installation - Do not repair or replace any part of different size. Surface units may subject wiring or components underneath to reach items could ...on the cooktop to damage. ■ Protective Liners - Children climbing on . Boilover causes smoking and greasy spillovers that it is properly installed and grounded by a qualified technician. ■ Never Use Your Cooktop for cooktop service without breaking due to line surface unit drip ...
... in color. Select utensils having flat bottoms large enough to a hot surface. Grease should not be seriously injured. ■ Proper Installation - Do not repair or replace any part of different size. Surface units may subject wiring or components underneath to reach items could ...on the cooktop to damage. ■ Protective Liners - Children climbing on . Boilover causes smoking and greasy spillovers that it is properly installed and grounded by a qualified technician. ■ Never Use Your Cooktop for cooktop service without breaking due to line surface unit drip ...
Use & Care Guide
Page 8
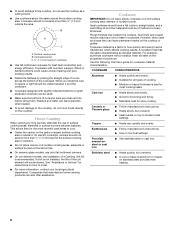
... cookware on stainless steel provides even heating. 8 Use the following chart as a core or base in how quickly and evenly heat is not installed, the life of the coil element will take on 2 surface cooking areas, elements or surface burners at the same time. ■ On... ceramic glass models, use only flat-bottomed canners. ■ On coil element models, the installation of surface cooking areas, elements or surface burners between batches. Surface cooking area B. Cookware with rounded, warped, ribbed or dented bottoms could cause ...
... cookware on stainless steel provides even heating. 8 Use the following chart as a core or base in how quickly and evenly heat is not installed, the life of the coil element will take on 2 surface cooking areas, elements or surface burners at the same time. ■ On... ceramic glass models, use only flat-bottomed canners. ■ On coil element models, the installation of surface cooking areas, elements or surface burners between batches. Surface cooking area B. Cookware with rounded, warped, ribbed or dented bottoms could cause ...
Use & Care Guide
Page 10
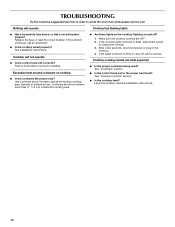
...or unplug the cooktop. 3. See "Cookware" section. ■ Is the control knob set correctly? If the problem continues, call . See Installation Instructions. Excessive heat around cookware on and off , call for service. Cooktop cooking results not what expected ■ Is the proper cookware ...flashing on cooktop ■ Is the cookware the proper size? See "Cooktop Controls" section. ■ Is the cooktop level? See the Installation Instructions. 10 Make sure the cooktop controls are OFF. 2. If the cooktop lights continue to a setting. Nothing will not operate ■...
...or unplug the cooktop. 3. See "Cookware" section. ■ Is the control knob set correctly? If the problem continues, call . See Installation Instructions. Excessive heat around cookware on and off , call for service. Cooktop cooking results not what expected ■ Is the proper cookware ...flashing on cooktop ■ Is the cookware the proper size? See "Cooktop Controls" section. ■ Is the cooktop level? See the Installation Instructions. 10 Make sure the cooktop controls are OFF. 2. If the cooktop lights continue to a setting. Nothing will not operate ■...
Use & Care Guide
Page 11
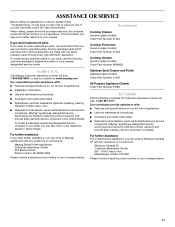
...of appliances. ■ Installation information. ■ Use and maintenance procedures. ■ Accessory and repair parts sales. ■ Specialized customer assistance (Spanish speaking, hearing impaired, limited vision, etc.). ■ Referrals to build every new MAYTAG® appliance. This ...consultants provide assistance with : ■ Features and specifications on our full line of your nearest designated service center. Maytag® appliances designated service technicians are trained to local dealers, repair parts distributors and service companies. When calling, ...
...of appliances. ■ Installation information. ■ Use and maintenance procedures. ■ Accessory and repair parts sales. ■ Specialized customer assistance (Spanish speaking, hearing impaired, limited vision, etc.). ■ Referrals to build every new MAYTAG® appliance. This ...consultants provide assistance with : ■ Features and specifications on our full line of your nearest designated service center. Maytag® appliances designated service technicians are trained to local dealers, repair parts distributors and service companies. When calling, ...
Use & Care Guide
Page 12
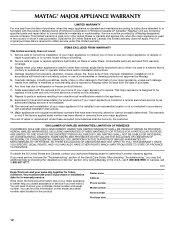
... number and serial number. ITEMS EXCLUDED FROM WARRANTY This limited warranty does not cover: 1. Major appliances with the product, Maytag brand of Whirlpool Corporation or Whirlpool Canada LP (hereafter "Maytag") will need it is installed in an inaccessible location or is not installed in -warranty service. Write down the following information about your authorized...
... number and serial number. ITEMS EXCLUDED FROM WARRANTY This limited warranty does not cover: 1. Major appliances with the product, Maytag brand of Whirlpool Corporation or Whirlpool Canada LP (hereafter "Maytag") will need it is installed in an inaccessible location or is not installed in -warranty service. Write down the following information about your authorized...
