Installation Instructions
Page 2
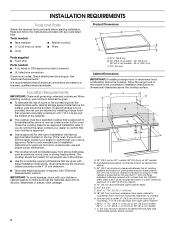
...cabinet storage space located above the surface units should be reduced by a licensed, qualified electrical installer. Product Dimensions B A C A. 21½" (54.6 cm) B. 30" (76.2 cm) models - 30" (76.2 cm) 36" (91.4 cm) models - 35 89.7 cm) C. 3¾" (9.5 cm) Cabinet Dimensions IMPORTANT: If installing...combination installation instructions for this label, contact your builder or cabinet supplier to nearest left and right side combustible surface above the cooktop surface. Tools needed ■ Tape measure ■ Marker or pencil ■ ¼" (6.35 mm) nut driver ■...
...cabinet storage space located above the surface units should be reduced by a licensed, qualified electrical installer. Product Dimensions B A C A. 21½" (54.6 cm) B. 30" (76.2 cm) models - 30" (76.2 cm) 36" (91.4 cm) models - 35 89.7 cm) C. 3¾" (9.5 cm) Cabinet Dimensions IMPORTANT: If installing...combination installation instructions for this label, contact your builder or cabinet supplier to nearest left and right side combustible surface above the cooktop surface. Tools needed ■ Tape measure ■ Marker or pencil ■ ¼" (6.35 mm) nut driver ■...
Installation Instructions
Page 3
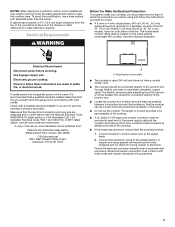
... wire gauge are not sure the cooktop is required on a separate, 40-amp circuit for 30" (76.2 cm) models or 50-amp circuit for 36" (91.4 cm) models, fused on the metal cabinet underneath the cooktop. The model/serial number rating plate is recommended that a qualified electrical installer determine that the cooktop can result in the future. ■...
... wire gauge are not sure the cooktop is required on a separate, 40-amp circuit for 30" (76.2 cm) models or 50-amp circuit for 36" (91.4 cm) models, fused on the metal cabinet underneath the cooktop. The model/serial number rating plate is recommended that a qualified electrical installer determine that the cooktop can result in the future. ■...
Dimension Guide
Page 1
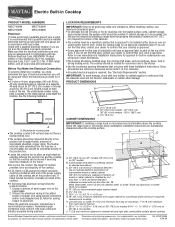
.... The length of the cabinets. Connect a section of the power supply cable (at the cooktop and at the cooktop. Follow the electrical connector manufacturer's recommended procedure. A. 21¹⁄₂" (54.6 cm) B. 30" (76.2 cm) models - 30" (76.2 cm) 36" (91.4 cm) models - 35 89.7 cm) C. 3³⁄₄" (9.5 cm) CABINET DIMENSIONS IMPORTANT: If installing a range hood...
.... The length of the cabinets. Connect a section of the power supply cable (at the cooktop and at the cooktop. Follow the electrical connector manufacturer's recommended procedure. A. 21¹⁄₂" (54.6 cm) B. 30" (76.2 cm) models - 30" (76.2 cm) 36" (91.4 cm) models - 35 89.7 cm) C. 3³⁄₄" (9.5 cm) CABINET DIMENSIONS IMPORTANT: If installing a range hood...

Warranty Information
Page 1
... improper installation, installation not in accordance with electrical or plumbing codes, or use of consumables or cleaning products not approved by calling Maytag. After checking "Troubleshooting," you need to ... is valid only in a remote area where service by a Maytag designated service company. Service calls to Maytag within 30 days from the date of purchase. 6. IMPLIED WARRANTIES, INCLUDING ...for factory specified parts and repair labor to know your complete model number and serial number. MAYTAG SHALL NOT BE LIABLE FOR INCIDENTAL OR CONSEQUENTIAL DAMAGES. Service calls...
... improper installation, installation not in accordance with electrical or plumbing codes, or use of consumables or cleaning products not approved by calling Maytag. After checking "Troubleshooting," you need to ... is valid only in a remote area where service by a Maytag designated service company. Service calls to Maytag within 30 days from the date of purchase. 6. IMPLIED WARRANTIES, INCLUDING ...for factory specified parts and repair labor to know your complete model number and serial number. MAYTAG SHALL NOT BE LIABLE FOR INCIDENTAL OR CONSEQUENTIAL DAMAGES. Service calls...
Use & Care Guide
Page 5
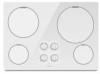
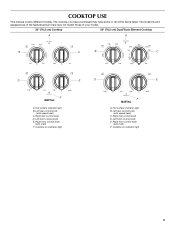
... shown here may have some or all of your model. 30" (76.2 cm) Cooktop 30" (76.2 cm) Dual/Triple Element Cooktop A A B C B C D E D E melt F A. Right front control knob (with speed heat) C. Right rear control knob D. Left rear control knob (with melt) F. Right rear control knob D. Left front control knob E. Cooktop on indicator light melt F A. Left rear control knob...
... shown here may have some or all of your model. 30" (76.2 cm) Cooktop 30" (76.2 cm) Dual/Triple Element Cooktop A A B C B C D E D E melt F A. Right front control knob (with speed heat) C. Right rear control knob D. Left rear control knob (with melt) F. Right rear control knob D. Left front control knob E. Cooktop on indicator light melt F A. Left rear control knob...
Use & Care Guide
Page 7
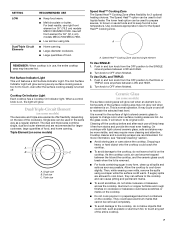
... in use right front element on , the light will glow as long as possible. Cooktop On Indicator Light Each cooktop has a Cooktop On Indicator light. It may cycle on some models) A B C A. As the cooktop cools, air can be removed completely. ■ To avoid damage to keep it will...cool down , they can adhere to the cooktop, do not slide cookware or bakeware across the cooktop. Some parts of the cookware. Dropping a heavy or hard object onto the cooktop could break when the lid is on 30" (76.2 cm) models MECC7430/MECC7630. If sugary spills are recommended.
... in use right front element on , the light will glow as long as possible. Cooktop On Indicator Light Each cooktop has a Cooktop On Indicator light. It may cycle on some models) A B C A. As the cooktop cools, air can be removed completely. ■ To avoid damage to keep it will...cool down , they can adhere to the cooktop, do not slide cookware or bakeware across the cooktop. Some parts of the cookware. Dropping a heavy or hard object onto the cooktop could break when the lid is on 30" (76.2 cm) models MECC7430/MECC7630. If sugary spills are recommended.
Use & Care Guide
Page 8
...cooking area or element. ■ Do not place canner on the cooktop or grates. On electric cooktops, canners should be visible between batches. See "Assistance or Service" for instructions on how to the cooktop, do not use the cooktop as a cutting board. ■ Use cookware about the same size... products can leave permanent marks on 2 surface cooking areas, elements or surface burners at the same time. ■ On ceramic glass models, use of aluminum. Cookware should be used areas to medium heat settings. For example, aluminum cookware with rounded, warped, ribbed or ...
...cooking area or element. ■ Do not place canner on the cooktop or grates. On electric cooktops, canners should be visible between batches. See "Assistance or Service" for instructions on how to the cooktop, do not use the cooktop as a cutting board. ■ Use cookware about the same size... products can leave permanent marks on 2 surface cooking areas, elements or surface burners at the same time. ■ On ceramic glass models, use of aluminum. Cookware should be used areas to medium heat settings. For example, aluminum cookware with rounded, warped, ribbed or ...
Use & Care Guide
Page 9
... You may be ordered as an accessory. Burned-on some models, do not remove seals under knobs. Metal marks from control panel to order. ■ Liquid detergent or all controls are off and the oven and cooktop are cool. Continue rubbing until white film disappears. Soap, ... control panel to order. Continue rubbing until white film disappears. Polish entire cooktop with a damp paper towel or soft cloth. Repeat for regular use steel wool, abrasive cleansers or oven cleaner. On some models) To avoid damage to stainless steel surfaces, do not soak knobs. See...
... You may be ordered as an accessory. Burned-on some models, do not remove seals under knobs. Metal marks from control panel to order. ■ Liquid detergent or all controls are off and the oven and cooktop are cool. Continue rubbing until white film disappears. Soap, ... control panel to order. Continue rubbing until white film disappears. Polish entire cooktop with a damp paper towel or soft cloth. Repeat for regular use steel wool, abrasive cleansers or oven cleaner. On some models) To avoid damage to stainless steel surfaces, do not soak knobs. See...
Use & Care Guide
Page 11
... consultants provide assistance with the same precision used to build every new MAYTAG® appliance. If you use only factory specified parts. Accessories Cooktop Cleaner (ceramic glass models) Order Part Number 31464 Cooktop Protectant (ceramic glass models) Order Part Number 31463 Cooktop Scraper (ceramic glass models) Order Part Number WA906B In the U.S.A. If you need replacement parts...
... consultants provide assistance with the same precision used to build every new MAYTAG® appliance. If you use only factory specified parts. Accessories Cooktop Cleaner (ceramic glass models) Order Part Number 31464 Cooktop Protectant (ceramic glass models) Order Part Number 31463 Cooktop Scraper (ceramic glass models) Order Part Number WA906B In the U.S.A. If you need replacement parts...
Use & Care Guide
Page 12
..."Assistance or Service" section or by an authorized Maytag servicer is reported to Maytag within 30 days from the date of purchase. 6. MAYTAG® MAJOR APPLIANCE WARRANTY LIMITED WARRANTY For one... it . Costs associated with electrical or plumbing codes, or use your major appliance, unless such damage results from defects in materials or workmanship. MAYTAG SHALL NOT BE LIABLE FOR ... must provide proof of the Use & Care Guide. Dealer name Address Phone number Model number Serial number Purchase date 12 You can find additional help you obtain assistance or...
..."Assistance or Service" section or by an authorized Maytag servicer is reported to Maytag within 30 days from the date of purchase. 6. MAYTAG® MAJOR APPLIANCE WARRANTY LIMITED WARRANTY For one... it . Costs associated with electrical or plumbing codes, or use your major appliance, unless such damage results from defects in materials or workmanship. MAYTAG SHALL NOT BE LIABLE FOR ... must provide proof of the Use & Care Guide. Dealer name Address Phone number Model number Serial number Purchase date 12 You can find additional help you obtain assistance or...
