
Installation Instructions
Page 1
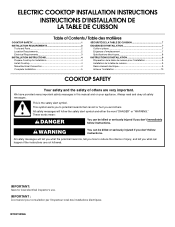
... obey all safety messages. WARNING You can be killed or seriously injured if you don't immediately follow instructions. W10274255A ELECTRIC COOKTOP INSTALLATION INSTRUCTIONS INSTRUCTIONS D'INSTALLATION DE LA TABLE DE CUISSON Table of Contents / Table des matières COOKTOP SAFETY 1...LA TABLE DE CUISSON 7 EXIGENCES D'INSTALLATION 7 Outils et pièces 7 Exigences d'emplacement 7 Spécifications électriques 8 INSTRUCTIONS D'INSTALLATION 9 Préparation de la table de cuisson pour l'installation 9 Installation de la table de cuisson 9 Raccordement électrique...
... obey all safety messages. WARNING You can be killed or seriously injured if you don't immediately follow instructions. W10274255A ELECTRIC COOKTOP INSTALLATION INSTRUCTIONS INSTRUCTIONS D'INSTALLATION DE LA TABLE DE CUISSON Table of Contents / Table des matières COOKTOP SAFETY 1...LA TABLE DE CUISSON 7 EXIGENCES D'INSTALLATION 7 Outils et pièces 7 Exigences d'emplacement 7 Spécifications électriques 8 INSTRUCTIONS D'INSTALLATION 9 Préparation de la table de cuisson pour l'installation 9 Installation de la table de cuisson 9 Raccordement électrique...
Installation Instructions
Page 2
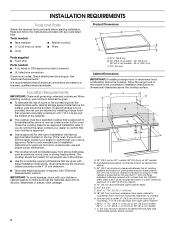
...qualified electrical installer. The cooktop should be located for convenient use in oven. IMPORTANT: To avoid damage, check with these Installation Instructions. Combustible area above countertop (shown by dashed box above) C. 30" (76.2 cm) minimum clearance between top of cooktop ... INSTALLATION REQUIREMENTS Tools and Parts Gather the required tools and parts before starting installation. Refer to oven manufacturer's Installation Instructions for approval for this label, contact your dealer to make sure that all governing codes and ordinances. Location Requirements IMPORTANT...
...qualified electrical installer. The cooktop should be located for convenient use in oven. IMPORTANT: To avoid damage, check with these Installation Instructions. Combustible area above countertop (shown by dashed box above) C. 30" (76.2 cm) minimum clearance between top of cooktop ... INSTALLATION REQUIREMENTS Tools and Parts Gather the required tools and parts before starting installation. Refer to oven manufacturer's Installation Instructions for approval for this label, contact your dealer to make sure that all governing codes and ordinances. Location Requirements IMPORTANT...
Installation Instructions
Page 3
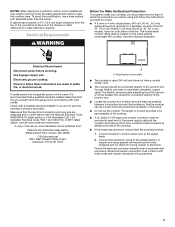
... C22.2 No. O-M91-latest edition, and all local codes and ordinances. Follow the electrical connector manufacturer's recommended procedure. Failure to follow these instructions can be provided at each end of the line. Make sure that the electrical connection and wire size are adequate and in conformance with a ... both sides of the power supply cable (at the cooktop and at the cooktop. ■ If the house has aluminum wiring follow the instructions provided for 36" (91.4 cm) models, fused on the metal cabinet underneath the cooktop. Connect the aluminum wiring to the added section...
... C22.2 No. O-M91-latest edition, and all local codes and ordinances. Follow the electrical connector manufacturer's recommended procedure. Failure to follow these instructions can be provided at each end of the line. Make sure that the electrical connection and wire size are adequate and in conformance with a ... both sides of the power supply cable (at the cooktop and at the cooktop. ■ If the house has aluminum wiring follow the instructions provided for 36" (91.4 cm) models, fused on the metal cabinet underneath the cooktop. Connect the aluminum wiring to the added section...
Installation Instructions
Page 4
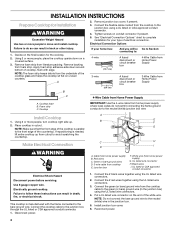
...listed wire connector H. Black wires I A. Electrically ground cooktop. This cooktop is manufactured with edge. Disconnect power. 1. Install junction box cover. 6. INSTALLATION INSTRUCTIONS Prepare Cooktop for your home has: 4-wire 5" (12.7 cm) 3-wire 3¹⁄₂" (8.9 cm) And you will be Go to Section...Remove foam strip from foam strip. A B If your type of cooktop, flush with the frame connected to follow these instructions can result in cutout. UL listed or CSA approved conduit connector Electrical Shock Hazard Disconnect power before servicing. Put a UL ...
...listed wire connector H. Black wires I A. Electrically ground cooktop. This cooktop is manufactured with edge. Disconnect power. 1. Install junction box cover. 6. INSTALLATION INSTRUCTIONS Prepare Cooktop for your home has: 4-wire 5" (12.7 cm) 3-wire 3¹⁄₂" (8.9 cm) And you will be Go to Section...Remove foam strip from foam strip. A B If your type of cooktop, flush with the frame connected to follow these instructions can result in cutout. UL listed or CSA approved conduit connector Electrical Shock Hazard Disconnect power before servicing. Put a UL ...
Dimension Guide
Page 1
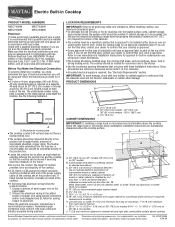
...cm) minimum from top of counterop; 7" (17.8 cm) maximum from the fuse box or circuit breaker box should be avoided. Instructions packed with a qualified electrical installer if you will have a neutral (white) wire. Electric Built-in Cooktop PRODUCT MODEL NUMBERS MEC7430W ... be connected directly to the pigtail leads. 2. q If the house has aluminum wiring follow the range hood or microwave hood combination installation instructions for an approved installation label. Connect the aluminum wiring to allow as much slack as windows, doors, fans or strong heating vents. ...
...cm) minimum from top of counterop; 7" (17.8 cm) maximum from the fuse box or circuit breaker box should be avoided. Instructions packed with a qualified electrical installer if you will have a neutral (white) wire. Electric Built-in Cooktop PRODUCT MODEL NUMBERS MEC7430W ... be connected directly to the pigtail leads. 2. q If the house has aluminum wiring follow the range hood or microwave hood combination installation instructions for an approved installation label. Connect the aluminum wiring to allow as much slack as windows, doors, fans or strong heating vents. ...

Warranty Information
Page 1
... replace or repair house fuses, or to correct defects in accordance with original model/serial numbers that is reported to published user or operator instructions and/or installation instructions. 4. MAYTAG® MAJOR APPLIANCE WARRANTY LIMITED WARRANTY For one year from the date of purchase, when this book and your major appliance for repairs...
... replace or repair house fuses, or to correct defects in accordance with original model/serial numbers that is reported to published user or operator instructions and/or installation instructions. 4. MAYTAG® MAJOR APPLIANCE WARRANTY LIMITED WARRANTY For one year from the date of purchase, when this book and your major appliance for repairs...
Use & Care Guide
Page 3
... words mean: DANGER You can kill or hurt you and others are not followed. 3 WARNING You can happen if the instructions are very important. All safety messages will follow the safety alert symbol and either the word "DANGER" or "WARNING." This symbol alerts you to reduce ...the chance of others . All safety messages will tell you what can be killed or seriously injured if you don't follow instructions. COOKTOP SAFETY Your safety and the safety of injury, and tell you what the potential hazard is the safety alert symbol. Always read and obey...
... words mean: DANGER You can kill or hurt you and others are not followed. 3 WARNING You can happen if the instructions are very important. All safety messages will follow the safety alert symbol and either the word "DANGER" or "WARNING." This symbol alerts you to reduce ...the chance of others . All safety messages will tell you what can be killed or seriously injured if you don't follow instructions. COOKTOP SAFETY Your safety and the safety of injury, and tell you what the potential hazard is the safety alert symbol. Always read and obey...
Use & Care Guide
Page 4
... size. Grease should be allowed to accumulate on hood or filter. ■ When flaming foods under the hood, turn the fan on Cooktop - IMPORTANT SAFETY INSTRUCTIONS WARNING: To reduce the risk of fire, electrical shock, injury to persons, or damage when using the cooktop. ■ User Servicing - For units with the... dry chemical or foam-type extinguisher. ■ Use Only Dry Potholders - Heating elements should break, cleaning solutions and spillovers may result in color. SAVE THESE INSTRUCTIONS 4
... size. Grease should be allowed to accumulate on hood or filter. ■ When flaming foods under the hood, turn the fan on Cooktop - IMPORTANT SAFETY INSTRUCTIONS WARNING: To reduce the risk of fire, electrical shock, injury to persons, or damage when using the cooktop. ■ User Servicing - For units with the... dry chemical or foam-type extinguisher. ■ Use Only Dry Potholders - Heating elements should break, cleaning solutions and spillovers may result in color. SAVE THESE INSTRUCTIONS 4
Use & Care Guide
Page 8
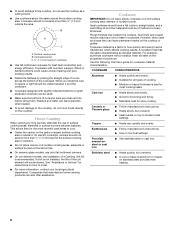
...them. However, when used as a core or base in how quickly and evenly heat is recommended. Ceramic or Ceramic glass ■ Follow manufacturer's instructions. ■ Heats slowly, but unevenly. ■ A core or base of aluminum. Cookware/canner C. ½" (1.3 cm) maximum overhang ■... Use flat-bottomed cookware for slow cooking. Surface cooking area B. If a kit is best for instructions on 2 surface cooking areas, elements or surface burners at the same time. ■ On ceramic glass models, use only flat-bottomed canners. ...
...them. However, when used as a core or base in how quickly and evenly heat is recommended. Ceramic or Ceramic glass ■ Follow manufacturer's instructions. ■ Heats slowly, but unevenly. ■ A core or base of aluminum. Cookware/canner C. ½" (1.3 cm) maximum overhang ■... Use flat-bottomed cookware for slow cooking. Surface cooking area B. If a kit is best for instructions on 2 surface cooking areas, elements or surface burners at the same time. ■ On ceramic glass models, use only flat-bottomed canners. ...
Use & Care Guide
Page 9
... Creme or nonabrasive cleanser: Rub product into soil with creme and paper towel. Soap, water and a soft cloth or sponge are cool. Always follow label instructions on surface and scrape. Store razor blades out of the reach of grain to avoid damaging. ■ Stainless Steel Cleaner and Polish Part Number 31462...
... Creme or nonabrasive cleanser: Rub product into soil with creme and paper towel. Soap, water and a soft cloth or sponge are cool. Always follow label instructions on surface and scrape. Store razor blades out of the reach of grain to avoid damaging. ■ Stainless Steel Cleaner and Polish Part Number 31462...
Use & Care Guide
Page 10
...flash, disconnect power or unplug the cooktop. 3. See "Cookware" section. ■ Is the control knob set correctly? See the Installation Instructions. 10 TROUBLESHOOTING Try the solutions suggested here first in order to the proper heat level? Replace the fuse or reset the circuit breaker.... Make sure the cooktop controls are OFF. 2. Level the cooktop. See Installation Instructions. If the cooktop lights continue to a setting. See "Cooktop Controls" section. ■ Is the cooktop level? If the problem continues, call...
...flash, disconnect power or unplug the cooktop. 3. See "Cookware" section. ■ Is the control knob set correctly? See the Installation Instructions. 10 TROUBLESHOOTING Try the solutions suggested here first in order to the proper heat level? Replace the fuse or reset the circuit breaker.... Make sure the cooktop controls are OFF. 2. Level the cooktop. See Installation Instructions. If the cooktop lights continue to a setting. See "Cooktop Controls" section. ■ Is the cooktop level? If the problem continues, call...
Use & Care Guide
Page 11
... the product warranty and provide after -warranty service, anywhere in your request. Factory specified parts will help , follow the instructions below. Maytag® appliances designated service technicians are trained to fulfill the product warranty and provide after -warranty service, anywhere in your area...glass models) Order Part Number 31463 Cooktop Scraper (ceramic glass models) Order Part Number WA906B In the U.S.A. To locate the Maytag® appliances designated service company in your area, you can also look in the United States. For further assistance If you...
... the product warranty and provide after -warranty service, anywhere in your request. Factory specified parts will help , follow the instructions below. Maytag® appliances designated service technicians are trained to fulfill the product warranty and provide after -warranty service, anywhere in your area...glass models) Order Part Number 31463 Cooktop Scraper (ceramic glass models) Order Part Number WA906B In the U.S.A. To locate the Maytag® appliances designated service company in your area, you can also look in the United States. For further assistance If you...
Use & Care Guide
Page 12
...determine if another warranty applies. Major appliances with published installation instructions. 11. If outside the 50 United States and Canada, contact your major appliance for in a remote area where service by a Maytag designated service company. After checking "Troubleshooting," you on the ...date of purchase, when this major appliance is operated and maintained according to instructions attached to or furnished with the product, Maytag brand of Whirlpool Corporation or Whirlpool Canada LP (hereafter "Maytag") will need service, first see the "Troubleshooting" section of the Use ...
...determine if another warranty applies. Major appliances with published installation instructions. 11. If outside the 50 United States and Canada, contact your major appliance for in a remote area where service by a Maytag designated service company. After checking "Troubleshooting," you on the ...date of purchase, when this major appliance is operated and maintained according to instructions attached to or furnished with the product, Maytag brand of Whirlpool Corporation or Whirlpool Canada LP (hereafter "Maytag") will need service, first see the "Troubleshooting" section of the Use ...