
Use & Care Guide
Page 5
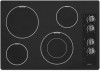
... control knob (with speed heat) B. Left rear control knob (with speed heat) B. Left front control knob E. The cooktop you have some or all of your model. 30" (76.2 cm) Cooktop 36" (91.4 cm) Cooktop A B C A B D G E F C D E F A. Left front control knob (with melt) C. Right front control knob E. Right front control knob 5 Right rear control...
... control knob (with speed heat) B. Left rear control knob (with speed heat) B. Left front control knob E. The cooktop you have some or all of your model. 30" (76.2 cm) Cooktop 36" (91.4 cm) Cooktop A B C A B D G E F C D E F A. Left front control knob (with melt) C. Right front control knob E. Right front control knob 5 Right rear control...
Use & Care Guide
Page 6
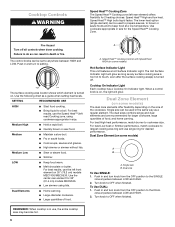
.... ■ Large quantities of food. Dual Zone Element (on the size of the cookware. Dual Zone Element (on some models) The dual zone elements offer flexibility depending on some models) A B A. Turn knob to a boil. REMEMBER: When cooktop is in use the Speed Heat™ (left rear)...Hold a rapid boil. ■ Quickly brown or sear food. Speed Heat™ Cooking Control with Speed Heat HIGH (on 30" (76.2 cm) models MEC7430/MEC9530. To Use DUAL: 1. For best Low heat or Simmer performance, match cookware to the DUAL zone anywhere between LOW and HIGH. 2. For...
.... ■ Large quantities of food. Dual Zone Element (on the size of the cookware. Dual Zone Element (on some models) The dual zone elements offer flexibility depending on some models) A B A. Turn knob to a boil. REMEMBER: When cooktop is in use the Speed Heat™ (left rear)...Hold a rapid boil. ■ Quickly brown or sear food. Speed Heat™ Cooking Control with Speed Heat HIGH (on 30" (76.2 cm) models MEC7430/MEC9530. To Use DUAL: 1. For best Low heat or Simmer performance, match cookware to the DUAL zone anywhere between LOW and HIGH. 2. For...
Use & Care Guide
Page 8
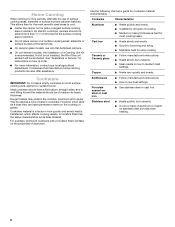
Home Canning When canning for long periods, alternate the use only flat-bottomed canners. ■ On coil element models, the installation of a Canning Unit Kit is recommended. Ideal cookware should have a flat bottom, straight sides, and a well-fitting lid and the ... area or element. ■ Do not place canner on 2 surface cooking areas, elements or surface burners at the same time. ■ On ceramic glass models, use of medium-to order. ■ For more information, contact your local agricultural department. Cookware material is a factor in cookware. A nonstick finish has ...
Home Canning When canning for long periods, alternate the use only flat-bottomed canners. ■ On coil element models, the installation of a Canning Unit Kit is recommended. Ideal cookware should have a flat bottom, straight sides, and a well-fitting lid and the ... area or element. ■ Do not place canner on 2 surface cooking areas, elements or surface burners at the same time. ■ On ceramic glass models, use of medium-to order. ■ For more information, contact your local agricultural department. Cookware material is a factor in cookware. A nonstick finish has ...

Use & Care Guide
Page 9
...soon as cooktop has cooled down . See "Assistance or Service" section to order. See "Assistance or Service" section to order. Burned-on some models, do not soak knobs. Polish entire cooktop with a damp paper towel or soft cloth. To avoid damage, do not remove seals under knobs.... suggested first unless otherwise noted. Continue rubbing until white film disappears. Soap, water and a soft cloth or sponge are cool. On some models) To avoid damage to stainless steel surfaces, do not use to help avoid scratches, pitting and abrasions, and to the cooktop controls, do...
...soon as cooktop has cooled down . See "Assistance or Service" section to order. See "Assistance or Service" section to order. Burned-on some models, do not soak knobs. Polish entire cooktop with a damp paper towel or soft cloth. To avoid damage, do not remove seals under knobs.... suggested first unless otherwise noted. Continue rubbing until white film disappears. Soap, water and a soft cloth or sponge are cool. On some models) To avoid damage to stainless steel surfaces, do not use to help avoid scratches, pitting and abrasions, and to the cooktop controls, do...
Use & Care Guide
Page 11
... parts sales. ■ Specialized customer assistance (Spanish speaking, hearing impaired, limited vision, etc.). ■ Referrals to build every new MAYTAG® appliance. When calling, please know the purchase date and the complete model and serial number of a service call the following customer assistance telephone number or your telephone directory Yellow Pages. Accessories...
... parts sales. ■ Specialized customer assistance (Spanish speaking, hearing impaired, limited vision, etc.). ■ Referrals to build every new MAYTAG® appliance. When calling, please know the purchase date and the complete model and serial number of a service call the following customer assistance telephone number or your telephone directory Yellow Pages. Accessories...

Use & Care Guide
Page 12
...original purchase, when this major appliance is installed, operated and maintained according to instructions attached to or furnished with the product, Maytag will pay for factory specified parts for the following components to the appliance. 9. Repairs to parts or systems resulting from ...due to province. Major appliances with the removal from state to state or province to product failure. 7. Costs associated with original model/serial numbers that vary from warranty coverage. 3. This warranty gives you specific legal rights, and you are excluded from state to...
...original purchase, when this major appliance is installed, operated and maintained according to instructions attached to or furnished with the product, Maytag will pay for factory specified parts for the following components to the appliance. 9. Repairs to parts or systems resulting from ...due to province. Major appliances with the removal from state to state or province to product failure. 7. Costs associated with original model/serial numbers that vary from warranty coverage. 3. This warranty gives you specific legal rights, and you are excluded from state to...

Use & Care Guide
Page 13
You will need it. Dealer name Address Phone number Model number Serial number Purchase date 13 Write down the following information about your major appliance to better help you obtain assistance or service if you ever need to know your sales slip together for in-warranty service. You can find this book and your complete model number and serial number. Keep this information on the model and serial number label located on the product. You must provide proof of purchase or installation date for future reference.
You will need it. Dealer name Address Phone number Model number Serial number Purchase date 13 Write down the following information about your major appliance to better help you obtain assistance or service if you ever need to know your sales slip together for in-warranty service. You can find this book and your complete model number and serial number. Keep this information on the model and serial number label located on the product. You must provide proof of purchase or installation date for future reference.
Installation Guide
Page 2
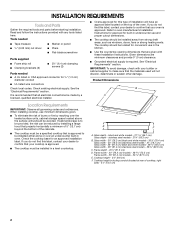
...Product Dimensions B A Location Requirements IMPORTANT: Observe all electrical connections be avoided. stainless steel models - 21¾" (55.3 cm) B. Frame width - 30" (76.2 cm) models - 28 73.5 cm) Frame width - 36" (91.4 cm) models - 34 87.5 cm) E. Check the cooktop base for ½" (1.3 cm) ...use and proper cutout dimensions. ■ The cooktop should be made by reaching over an undercounter built-in oven. black and white models - 21 55.1 cm) Glass depth - Read and follow the instructions provided with these Installation Instructions. Tools needed ■ Tape measure...
...Product Dimensions B A Location Requirements IMPORTANT: Observe all electrical connections be avoided. stainless steel models - 21¾" (55.3 cm) B. Frame width - 30" (76.2 cm) models - 28 73.5 cm) Frame width - 36" (91.4 cm) models - 34 87.5 cm) E. Check the cooktop base for ½" (1.3 cm) ...use and proper cutout dimensions. ■ The cooktop should be made by reaching over an undercounter built-in oven. black and white models - 21 55.1 cm) Glass depth - Read and follow the instructions provided with these Installation Instructions. Tools needed ■ Tape measure...
Installation Guide
Page 3
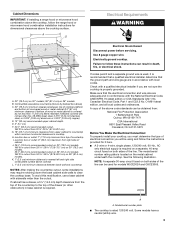
... Electrically ground cooktop. A copy of the above code standards can be obtained from 34 35 87.8-90.3 cm) on 30" (76.2 cm) models. The model/serial number rating plate is located on both sides of electrical connection you will be used , it here. ■ A 3-wire or 4-wire,...or outlet: 9" (23.0 cm) maximum from the top of the countertop to follow the range hood or microwave hood combination installation instructions for models W5CE3024 and G9CE3065. Some models have a neutral (white) wire. 3 G. 18" (45.7 cm) minimum clearance from 20³⁄₈"-20 51.8-52.2 cm)....
... Electrically ground cooktop. A copy of the above code standards can be obtained from 34 35 87.8-90.3 cm) on 30" (76.2 cm) models. The model/serial number rating plate is located on both sides of electrical connection you will be used , it here. ■ A 3-wire or 4-wire,...or outlet: 9" (23.0 cm) maximum from the top of the countertop to follow the range hood or microwave hood combination installation instructions for models W5CE3024 and G9CE3065. Some models have a neutral (white) wire. 3 G. 18" (45.7 cm) minimum clearance from 20³⁄₈"-20 51.8-52.2 cm)....

Installation Guide
Page 4
... sure that the front edge of the cooktop glass. Remove one strip at cooktop base ends. 30" (76.2 cm) and 36" (91.4 cm) traditional knob models A B C B C A. Cooktop base B. ¼" (0.64 cm) Foam strip C. Clamping bracket 2. Use the length of the cooktop glass from the package containing literature. The roll contains four...
... sure that the front edge of the cooktop glass. Remove one strip at cooktop base ends. 30" (76.2 cm) and 36" (91.4 cm) traditional knob models A B C B C A. Cooktop base B. ¼" (0.64 cm) Foam strip C. Clamping bracket 2. Use the length of the cooktop glass from the package containing literature. The roll contains four...
Warranty Information
Page 1
...resulting from unauthorized modifications made to repair or replace appliance light bulbs, air filters or water filters. Major appliances with original model/serial numbers that have been removed, altered or cannot be provided by this warranty. 8. DISCLAIMER OF IMPLIED WARRANTIES IMPLIED WARRANTIES... or replacement of the product. This major appliance is designed to be found by checking the "Assistance or Service" section or by Maytag. 5. Removal or replacement of trim, decorative panels, flooring, cabinetry, islands, countertops, drywall or other than the representations contained in...
...resulting from unauthorized modifications made to repair or replace appliance light bulbs, air filters or water filters. Major appliances with original model/serial numbers that have been removed, altered or cannot be provided by this warranty. 8. DISCLAIMER OF IMPLIED WARRANTIES IMPLIED WARRANTIES... or replacement of the product. This major appliance is designed to be found by checking the "Assistance or Service" section or by Maytag. 5. Removal or replacement of trim, decorative panels, flooring, cabinetry, islands, countertops, drywall or other than the representations contained in...

Warranty Information
Page 2
Write down the following information about your major appliance to know your sales slip together for in-warranty service. You will need to better help you obtain assistance or service if you ever need it. You can find this book and your complete model number and serial number. Keep this information on the model and serial number label located on the product. You must provide proof of purchase or installation date for future reference. Dealer name Address Phone number Model number Serial number Purchase date 13
Write down the following information about your major appliance to know your sales slip together for in-warranty service. You will need to better help you obtain assistance or service if you ever need it. You can find this book and your complete model number and serial number. Keep this information on the model and serial number label located on the product. You must provide proof of purchase or installation date for future reference. Dealer name Address Phone number Model number Serial number Purchase date 13

Installing Oven Under Cooktop
Page 1
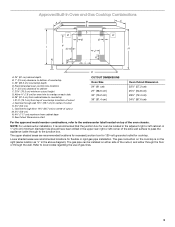
... 22¹⁄₂" (57.2 cm) 25¹⁄₂" (64.8 cm) 28½" (72.4 cm) 34¹⁄₂" (87.6 cm) For the approved model number combinations, refer to your cabinets, check with the maximum allowable wood cabinet temperatures of the cooktop burner box. To avoid damage to the undercounter...
... 22¹⁄₂" (57.2 cm) 25¹⁄₂" (64.8 cm) 28½" (72.4 cm) 34¹⁄₂" (87.6 cm) For the approved model number combinations, refer to your cabinets, check with the maximum allowable wood cabinet temperatures of the cooktop burner box. To avoid damage to the undercounter...

Installing Oven Under Cooktop
Page 2
...) 30" (76.2 cm) Oven Cutout Dimension 22¹⁄₂" (57.2 cm) 25¹⁄₂" (64.8 cm) 28½" (72.4 cm) For the approved model number combinations, refer to the undercounter label located on top of the cooktop burner box. H. If dimension "F" is recommended that the junction boxes for oven...
...) 30" (76.2 cm) Oven Cutout Dimension 22¹⁄₂" (57.2 cm) 25¹⁄₂" (64.8 cm) 28½" (72.4 cm) For the approved model number combinations, refer to the undercounter label located on top of the cooktop burner box. H. If dimension "F" is recommended that the junction boxes for oven...
Installing Oven Under Cooktop
Page 3
... 22¹⁄₂" (57.2 cm) 25¹⁄₂" (64.8 cm) 28½" (72.4 cm) 34¹⁄₂" (87.6 cm) For the approved model number combinations, refer to the undercounter label located on the right (same location as "J" in the adjacent right or left corner of cutout K. 3¼" (8.3 cm...
... 22¹⁄₂" (57.2 cm) 25¹⁄₂" (64.8 cm) 28½" (72.4 cm) 34¹⁄₂" (87.6 cm) For the approved model number combinations, refer to the undercounter label located on the right (same location as "J" in the adjacent right or left corner of cutout K. 3¼" (8.3 cm...
