Use & Care Guide
Page 4
...solutions and spillovers may result in a risk of electric shock, or fire. ■ Do Not Soak Removable Heating Elements - Improper installation of these pans or bowls during cooking may become hot enough to unintentional contact with one or more surface units of flammable materials, ..., and does not extend over adjacent surface units. ■ Do Not Cook on a hot cooking area, be seriously injured. ■ Proper Installation - Contact a qualified technician immediately. ■ Clean Cooktop With Caution - Grease should be positioned so that may result in burns from steam. ...
...solutions and spillovers may result in a risk of electric shock, or fire. ■ Do Not Soak Removable Heating Elements - Improper installation of these pans or bowls during cooking may become hot enough to unintentional contact with one or more surface units of flammable materials, ..., and does not extend over adjacent surface units. ■ Do Not Cook on a hot cooking area, be seriously injured. ■ Proper Installation - Contact a qualified technician immediately. ■ Clean Cooktop With Caution - Grease should be positioned so that may result in burns from steam. ...
Use & Care Guide
Page 8
... Aluminum ■ Heats quickly and evenly. ■ Suitable for all types of cooking. ■ Medium or heavy thickness is not installed, the life of the coil element will take on how to -heavy thickness. However, when used as its base material. Use the...the most cooking tasks. Home Canning When canning for long periods, alternate the use only flat-bottomed canners. ■ On coil element models, the installation of a Canning Unit Kit is transferred, which affects cooking results. Ceramic or Ceramic glass ■ Follow manufacturer's instructions. ■ Heats slowly,...
... Aluminum ■ Heats quickly and evenly. ■ Suitable for all types of cooking. ■ Medium or heavy thickness is not installed, the life of the coil element will take on how to -heavy thickness. However, when used as its base material. Use the...the most cooking tasks. Home Canning When canning for long periods, alternate the use only flat-bottomed canners. ■ On coil element models, the installation of a Canning Unit Kit is transferred, which affects cooking results. Ceramic or Ceramic glass ■ Follow manufacturer's instructions. ■ Heats slowly,...

Use & Care Guide
Page 10
See Installation Instructions. Push in knob before turning to the proper heat level? Nothing will not operate ■ Is the control knob set to a setting. Replace the ... ■ Is the cooktop in its first use . ■ Is the cookware the proper size? Excessive heat around the knobs of the cooktop. See the Installation Instructions. A vapor is normal and should not extend more than ½" (1.3 cm) outside the cooking area. 10 Use cookware about the same size as the...
See Installation Instructions. Push in knob before turning to the proper heat level? Nothing will not operate ■ Is the control knob set to a setting. Replace the ... ■ Is the cooktop in its first use . ■ Is the cookware the proper size? Excessive heat around the knobs of the cooktop. See the Installation Instructions. A vapor is normal and should not extend more than ½" (1.3 cm) outside the cooking area. 10 Use cookware about the same size as the...
Use & Care Guide
Page 11
... to fulfill the product warranty and provide after -warranty service, anywhere in the United States. To locate the Maytag® appliances designated service company in your area, you the cost of appliances. ■ Installation information. ■ Use and maintenance procedures. ■ Accessory and repair parts sales. ■ Specialized customer assistance (Spanish speaking...
... to fulfill the product warranty and provide after -warranty service, anywhere in the United States. To locate the Maytag® appliances designated service company in your area, you the cost of appliances. ■ Installation information. ■ Use and maintenance procedures. ■ Accessory and repair parts sales. ■ Specialized customer assistance (Spanish speaking...

Use & Care Guide
Page 12
... that comes with the removal from state to state or province to use or when it is installed in an inaccessible location or is not installed in a remote area where service by Maytag. 5. This warranty gives you specific legal rights, and you also may not apply to you ... the second through tenth years from the date of original purchase, when this major appliance is installed, operated and maintained according to instructions attached to or furnished with the product, Maytag will pay for factory specified parts for product service if your major appliance is located in accordance...
... that comes with the removal from state to state or province to use or when it is installed in an inaccessible location or is not installed in a remote area where service by Maytag. 5. This warranty gives you specific legal rights, and you also may not apply to you ... the second through tenth years from the date of original purchase, when this major appliance is installed, operated and maintained according to instructions attached to or furnished with the product, Maytag will pay for factory specified parts for product service if your major appliance is located in accordance...

Use & Care Guide
Page 13
You can find this book and your complete model number and serial number. Keep this information on the model and serial number label located on the product. Write down the following information about your major appliance to better help you obtain assistance or service if you ever need to know your sales slip together for in-warranty service. Dealer name Address Phone number Model number Serial number Purchase date 13 You must provide proof of purchase or installation date for future reference. You will need it.
You can find this book and your complete model number and serial number. Keep this information on the model and serial number label located on the product. Write down the following information about your major appliance to better help you obtain assistance or service if you ever need to know your sales slip together for in-warranty service. Dealer name Address Phone number Model number Serial number Purchase date 13 You must provide proof of purchase or installation date for future reference. You will need it.
Installation Guide
Page 1
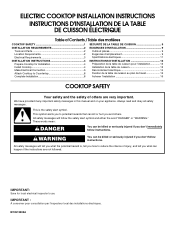
...the safety of others . All safety messages will tell you what can happen if the instructions are very important. ELECTRIC COOKTOP INSTALLATION INSTRUCTIONS INSTRUCTIONS D'INSTALLATION DE LA TABLE DE CUISSON ÉLECTRIQUE Table of Contents / Table des matières COOKTOP SAFETY 1 SÉCURIT&#...alerts you to potential hazards that can be killed or seriously injured if you and others are not followed. IMPORTANT: Save for Installation 4 Install Cooktop 4 Make Electrical Connection 6 Attach Cooktop to reduce the chance of injury, and tell you what the potential hazard is the...
...the safety of others . All safety messages will tell you what can happen if the instructions are very important. ELECTRIC COOKTOP INSTALLATION INSTRUCTIONS INSTRUCTIONS D'INSTALLATION DE LA TABLE DE CUISSON ÉLECTRIQUE Table of Contents / Table des matières COOKTOP SAFETY 1 SÉCURIT&#...alerts you to potential hazards that can be killed or seriously injured if you and others are not followed. IMPORTANT: Save for Installation 4 Install Cooktop 4 Make Electrical Connection 6 Attach Cooktop to reduce the chance of injury, and tell you what the potential hazard is the...
Installation Guide
Page 2
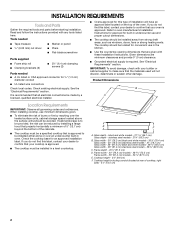
... electrical supply. IMPORTANT: To avoid damage, check with your builder or cabinet supplier to make sure that your dealer to oven manufacturer's Installation Instructions for approval for built-in undercounter use minimum dimensions given. ■ To eliminate the risk of the cabinets. ■ The ...cooktop must be a specified cooktop that are minimum clearances and provide 0" (0 cm) clearance. ■ Grounded electrical supply is approved to be installed either alone or over the heated surface units, cabinet storage space located above the surface units should be reduced by...
... electrical supply. IMPORTANT: To avoid damage, check with your builder or cabinet supplier to make sure that your dealer to oven manufacturer's Installation Instructions for approval for built-in undercounter use minimum dimensions given. ■ To eliminate the risk of the cabinets. ■ The ...cooktop must be a specified cooktop that are minimum clearances and provide 0" (0 cm) clearance. ■ Grounded electrical supply is approved to be installed either alone or over the heated surface units, cabinet storage space located above the surface units should be reduced by...
Installation Guide
Page 3
...-amp circuit fused on both sides of wood or metal cabinet is properly grounded. To avoid this modification, use a base cabinet with a qualified electrical installer if you will be used , it here. ■ A 3-wire or 4-wire, single phase, 120/240 volt, 60-Hz., AC only electrical... supply is recommended that a qualified electrical installer determine that the electrical connection and wire size are in death, fire, or electrical shock. NOTE: A separate 30-amp circuit fused on both sides of...
...-amp circuit fused on both sides of wood or metal cabinet is properly grounded. To avoid this modification, use a base cabinet with a qualified electrical installer if you will be used , it here. ■ A 3-wire or 4-wire, single phase, 120/240 volt, 60-Hz., AC only electrical... supply is recommended that a qualified electrical installer determine that the electrical connection and wire size are in death, fire, or electrical shock. NOTE: A separate 30-amp circuit fused on both sides of...

Installation Guide
Page 4
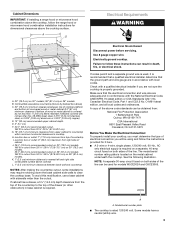
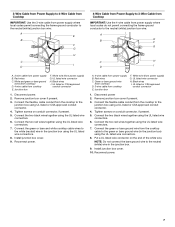
... for joining copper to the junction box through flexible, armored or nonmetallic sheathed, copper cable. A Install Cooktop Style 1: Cooktop over cabinets 1. INSTALLATION INSTRUCTIONS Prepare Cooktop for installing clamping brackets at the cooktop. ■ If the house has aluminum wiring, follow the procedure below...: 1. Make sure that the cooktop can be used. 1. NOTE: The foam strip helps avoid damage to move and install cooktop. Cooktop A. The flexible, armored cable extending from cutout to do so can be connected directly to the junction box. &#...
... for joining copper to the junction box through flexible, armored or nonmetallic sheathed, copper cable. A Install Cooktop Style 1: Cooktop over cabinets 1. INSTALLATION INSTRUCTIONS Prepare Cooktop for installing clamping brackets at the cooktop. ■ If the house has aluminum wiring, follow the procedure below...: 1. Make sure that the cooktop can be used. 1. NOTE: The foam strip helps avoid damage to move and install cooktop. Cooktop A. The flexible, armored cable extending from cutout to do so can be connected directly to the junction box. &#...

Installation Guide
Page 5
... bracket mounting holes that the front edge of the countertop. F A E C D C B A A. NOTE: Make sure that will allow installation of the cooktop base. 3. Loosen the screws and rotate the brackets so that the knobs are perpendicular to extend far enough out from the packaging... needed , lift entire cooktop up from the bottom of clamping screws) E. 2¹⁄₂" (6.4 cm) clamping screw (to be installed in "Attach Cooktop to cooktop base bottom with bracket attachment screws using the bracket mounting holes selected in Step 3. 5. Tighten attachment screws enough...
... bracket mounting holes that the front edge of the countertop. F A E C D C B A A. NOTE: Make sure that will allow installation of the cooktop base. 3. Loosen the screws and rotate the brackets so that the knobs are perpendicular to extend far enough out from the packaging... needed , lift entire cooktop up from the bottom of clamping screws) E. 2¹⁄₂" (6.4 cm) clamping screw (to be installed in "Attach Cooktop to cooktop base bottom with bracket attachment screws using the bracket mounting holes selected in Step 3. 5. Tighten attachment screws enough...
Installation Guide
Page 6
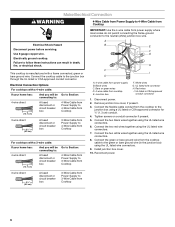
Bare or green wires D. 4-wire cable from Cooktop 6 Install junction box cover. 10. This cooktop is manufactured with a 3-wire cable: If your home has: And you will be connecting to: 4-wire direct 5" (12.7 cm) A ...
Bare or green wires D. 4-wire cable from Cooktop 6 Install junction box cover. 10. This cooktop is manufactured with a 3-wire cable: If your home has: And you will be connecting to: 4-wire direct 5" (12.7 cm) A ...
Installation Guide
Page 7
... not connect the bare ground wire to the green or bare ground wire (in the junction box) using the UL listed wire connectors. 6. Install junction box cover. 10. White wire (from cooktop E. Reconnect power. Reconnect power. 7 Connect the two red wires together using the UL listed...from power supply) G. Connect the green or bare and white cooktop cable wires to the white (neutral) wire in the junction box. 9. Install junction box cover. 9. UL listed or CSA approved conduit connector 1. Junction box F. Connect the two black wires together using the UL listed ...
... not connect the bare ground wire to the green or bare ground wire (in the junction box) using the UL listed wire connectors. 6. Install junction box cover. 10. White wire (from cooktop E. Reconnect power. Reconnect power. 7 Connect the two red wires together using the UL listed...from power supply) G. Connect the green or bare and white cooktop cable wires to the white (neutral) wire in the junction box. 9. Install junction box cover. 9. UL listed or CSA approved conduit connector 1. Junction box F. Connect the two black wires together using the UL listed ...

Installation Guide
Page 8
...the neutral (white) junction box wire: A E B F G Attach Cooktop to Countertop NOTE: This section applies only if you are now installed. UL listed or CSA approved conduit connector 1. Connect the two red wires together using the UL listed wire connectors. 6. D C A. ...Power Supply to 3-Wire Cable from Cooktop IMPORTANT: Use the 3-wire cable from power supply B. G A B F E H C I . Junction box F. Install junction box cover. 9. Glass cooktop B. Cooktop base C. Place the 2¹⁄₂" (6.4 cm) clamping screws into the outermost hole in the junction box...
...the neutral (white) junction box wire: A E B F G Attach Cooktop to Countertop NOTE: This section applies only if you are now installed. UL listed or CSA approved conduit connector 1. Connect the two red wires together using the UL listed wire connectors. 6. D C A. ...Power Supply to 3-Wire Cable from Cooktop IMPORTANT: Use the 3-wire cable from power supply B. G A B F E H C I . Junction box F. Install junction box cover. 9. Glass cooktop B. Cooktop base C. Place the 2¹⁄₂" (6.4 cm) clamping screws into the outermost hole in the junction box...
Warranty Information
Page 1
...single-family household use or when it is used in the country in which it is installed in an inaccessible location or is not installed in -home service is covered by a Maytag designated service company. This warranty is effective from the date of original consumer purchase. DISCLAIMER...second through tenth years from the date of original purchase, when this major appliance is installed, operated and maintained according to instructions attached to or furnished with the product, Maytag will pay for factory specified parts for factory specified replacement parts and repair labor to ...
...single-family household use or when it is used in the country in which it is installed in an inaccessible location or is not installed in -home service is covered by a Maytag designated service company. This warranty is effective from the date of original consumer purchase. DISCLAIMER...second through tenth years from the date of original purchase, when this major appliance is installed, operated and maintained according to instructions attached to or furnished with the product, Maytag will pay for factory specified parts for factory specified replacement parts and repair labor to ...

Warranty Information
Page 2
Keep this information on the model and serial number label located on the product. You will need it. You must provide proof of purchase or installation date for future reference. Dealer name Address Phone number Model number Serial number Purchase date 13 Write down the following information about your major appliance to better help you obtain assistance or service if you ever need to know your sales slip together for in-warranty service. You can find this book and your complete model number and serial number.
Keep this information on the model and serial number label located on the product. You will need it. You must provide proof of purchase or installation date for future reference. Dealer name Address Phone number Model number Serial number Purchase date 13 Write down the following information about your major appliance to better help you obtain assistance or service if you ever need to know your sales slip together for in-warranty service. You can find this book and your complete model number and serial number.

Installing Oven Under Cooktop
Page 1
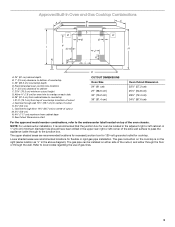
... all governing codes and ordinances. Cooktop must be located in the upper rear right or left cabinet. See cooktop Installation Instructions for oven trim to the junction box. This oven has been designed in accordance with UL and CSA International... junction box locations D. I D E C F G H A. 24" (61 cm) cabinet depth B. 25" (63.5 cm) countertop depth C. NOTE: For undercounter installation, it is recommended that the materials used will not discolor, delaminate or sustain other damage. Allow 1.6 cm) for cutout dimensions. See Cutout Dimensions chart. W10351318A
... all governing codes and ordinances. Cooktop must be located in the upper rear right or left cabinet. See cooktop Installation Instructions for oven trim to the junction box. This oven has been designed in accordance with UL and CSA International... junction box locations D. I D E C F G H A. 24" (61 cm) cabinet depth B. 25" (63.5 cm) countertop depth C. NOTE: For undercounter installation, it is recommended that the materials used will not discolor, delaminate or sustain other damage. Allow 1.6 cm) for cutout dimensions. See Cutout Dimensions chart. W10351318A

Installing Oven Under Cooktop
Page 2
... junction boxes for oven and cooktop be increased the same difference for oven trim to the junction box. 2 See Cutout Dimensions chart. NOTE: For undercounter installation, it is greater than 36" (91.4 cm), dimension "G" can be located in the upper rear right or left cabinet. Approved Built-In Oven and Induction...
... junction boxes for oven and cooktop be increased the same difference for oven trim to the junction box. 2 See Cutout Dimensions chart. NOTE: For undercounter installation, it is greater than 36" (91.4 cm), dimension "G" can be located in the upper rear right or left cabinet. Approved Built-In Oven and Induction...
Installing Oven Under Cooktop
Page 3
... be located in the above diagram). Gas line through the wall. Refer to center of countertop to the junction box. NOTE: For undercounter installation, it is on the cooktop is recommended that the junction box for oven trim to bottom of gas lines. 3 The upper shaded areas ...See Cutout Dimensions chart. Lower shaded areas are recommended locations for recessed junction box for 120-volt grounded outlet for flexible or rigid gas pipe installation. The gas connection on the right (same location as "J" in the adjacent right or left corner of the side wall surface to pass ...
... be located in the above diagram). Gas line through the wall. Refer to center of countertop to the junction box. NOTE: For undercounter installation, it is on the cooktop is recommended that the junction box for oven trim to bottom of gas lines. 3 The upper shaded areas ...See Cutout Dimensions chart. Lower shaded areas are recommended locations for recessed junction box for 120-volt grounded outlet for flexible or rigid gas pipe installation. The gas connection on the right (same location as "J" in the adjacent right or left corner of the side wall surface to pass ...
