
Installation Instructions
Page 2
...d'evacuation 27 Achever I 'evacuation 24 INSTRUCTIONS D'INSTALLATION - Always read and obey all safety messages. GAS DRYER 10 install Coin Slide and Coin Box 10 Make Gas Connection 10 Connect Vent 10 Complete Installation 10 iNSTALLATiON iNSTRUCTiONS- We have provided many important safety messages in... not store or use in a prominent location, instructions for the customer's use gasoline or other appliance. This is recommended that can be obtained from your appliance. These words mean: You can happen if the instructions are very important. This information should be...
...d'evacuation 27 Achever I 'evacuation 24 INSTRUCTIONS D'INSTALLATION - Always read and obey all safety messages. GAS DRYER 10 install Coin Slide and Coin Box 10 Make Gas Connection 10 Connect Vent 10 Complete Installation 10 iNSTALLATiON iNSTRUCTiONS- We have provided many important safety messages in... not store or use in a prominent location, instructions for the customer's use gasoline or other appliance. This is recommended that can be obtained from your appliance. These words mean: You can happen if the instructions are very important. This information should be...

Installation Instructions
Page 3
...risk of fire, electric shock, or injury to light any appliance. • Do not touch any servicing unless specifically recommended in this or any other appliance. = WHAT TO DO iF YOU SMELL GAS: • Do not try to persons when using the dryer. [] Do not place items exposed to cooking oils in... the dryer. Close supervision of children is necessary when the dryer is used near children. [] Before the dryer is removed from service...
...risk of fire, electric shock, or injury to light any appliance. • Do not touch any servicing unless specifically recommended in this or any other appliance. = WHAT TO DO iF YOU SMELL GAS: • Do not try to persons when using the dryer. [] Do not place items exposed to cooking oils in... the dryer. Close supervision of children is necessary when the dryer is used near children. [] Before the dryer is removed from service...
Installation Instructions
Page 4
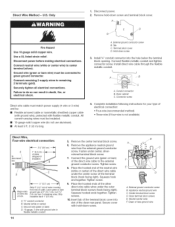
... Additional spacing should be found on the serial tag on the dryer. Louvered doors with any tools listed here. The dryer must not be installed in death, explosion, or fire. If installing a gas dryer: iMPORTANT: Observe all parts were included. [] Wedge cone [] Foot boot (4) [] Dryer foot (4) [] %6"-18 x 21/2" bolt [] 3 pin timing... wrench [] Utility knife [] Vent clamps [] Pipe-joint compound resistant to water and/or weather. Failure to permit adequate clearance of clothes dryers in a recessed area or closet. No other fuel-burning appliance may be exhausted outdoors.
... Additional spacing should be found on the serial tag on the dryer. Louvered doors with any tools listed here. The dryer must not be installed in death, explosion, or fire. If installing a gas dryer: iMPORTANT: Observe all parts were included. [] Wedge cone [] Foot boot (4) [] Dryer foot (4) [] %6"-18 x 21/2" bolt [] 3 pin timing... wrench [] Utility knife [] Vent clamps [] Pipe-joint compound resistant to water and/or weather. Failure to permit adequate clearance of clothes dryers in a recessed area or closet. No other fuel-burning appliance may be exhausted outdoors.
Installation Instructions
Page 8
... is recommended that may also be r/2" minimum. Flexible metal appliance connector: [] It is more than 20 ft. (6.1 m), larger tubing will be used . The valve is a registered trademark of LP gas must not be used . Gas supply line B. To dryer 1-(8)TEFLON is for connecting the dryer to the dryer. [] Must include a shutoff valve: The supply line must be...
... is recommended that may also be r/2" minimum. Flexible metal appliance connector: [] It is more than 20 ft. (6.1 m), larger tubing will be used . The valve is a registered trademark of LP gas must not be used . Gas supply line B. To dryer 1-(8)TEFLON is for connecting the dryer to the dryer. [] Must include a shutoff valve: The supply line must be...
Installation Instructions
Page 12
... be identified by a green cover and the neutral conductor by a white cover. 5. Fasten under the center screw of the dryer rear panel. t0. Insert tab of the terminal block cover into the hole below the terminal block opening. A. Outer terminal ... terminal block screw. 7. Connect the other wires to the external ground conductor screw. Secure cover with hold the two clamp sections together. Appliance neutral ground wire C. A. Terminal block cover D. Tighten screw. 8. Removheold-dowsncrewandtheterminablockcover. _D 3= Assemble 3/4" UL-listed strain relief (UL ...
... be identified by a green cover and the neutral conductor by a white cover. 5. Fasten under the center screw of the dryer rear panel. t0. Insert tab of the terminal block cover into the hole below the terminal block opening. A. Outer terminal ... terminal block screw. 7. Connect the other wires to the external ground conductor screw. Secure cover with hold the two clamp sections together. Appliance neutral ground wire C. A. Terminal block cover D. Tighten screw. 8. Removheold-dowsncrewandtheterminablockcover. _D 3= Assemble 3/4" UL-listed strain relief (UL ...

Installation Instructions
Page 13
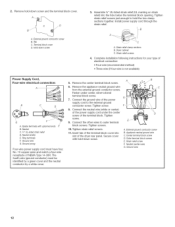
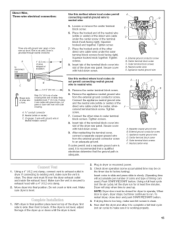
...of NEMA Type 10-30R. Separate copper ground wire B. Appliance neutral ground wire D. Ring terminals C. Loosen or remove the center terminal F-'__ 0block screw. Connect the neutral wire (white or center) of the dryer rear panel. terminal block. D C A. Neutral (center...t0. Strain relief screw G. Secure cover with hold -down screw. Remove the appliance neutral ground wire from the external ground conductor screw to the center, silver-colored terminal screw of the dryer rear panel. Tighten screws. 8. Power Supply Cord, Three=wire electrical connection: ...
...of NEMA Type 10-30R. Separate copper ground wire B. Appliance neutral ground wire D. Ring terminals C. Loosen or remove the center terminal F-'__ 0block screw. Connect the neutral wire (white or center) of the dryer rear panel. terminal block. D C A. Neutral (center...t0. Strain relief screw G. Secure cover with hold -down screw. Remove the appliance neutral ground wire from the external ground conductor screw to the center, silver-colored terminal screw of the dryer rear panel. Tighten screws. 8. Power Supply Cord, Three=wire electrical connection: ...
Installation Instructions
Page 14
... B. Connector screw 4= Complete installation following instructions for your type of the direct wire cable to do not use aluminum). [] At least 5 ft. (1.52 m) long. Place the hooked end of the neutral wire (white or center) of cable. Secure cover with flexible metallic conduit. Outer...death, fire, or electrical shock. Direct Wire Method - Connect neutral wire (white or center wire) to remaining 2 terminals (gold). Dryer cabinet C. Remove the appliance neutral ground wire from the external ground conductor screw. Neutral (center wire) F. Tighten screw. 9.
... B. Connector screw 4= Complete installation following instructions for your type of the direct wire cable to do not use aluminum). [] At least 5 ft. (1.52 m) long. Place the hooked end of the neutral wire (white or center) of cable. Secure cover with flexible metallic conduit. Outer...death, fire, or electrical shock. Direct Wire Method - Connect neutral wire (white or center wire) to remaining 2 terminals (gold). Dryer cabinet C. Remove the appliance neutral ground wire from the external ground conductor screw. Neutral (center wire) F. Tighten screw. 9.
Installation Instructions
Page 15
...with hold -down screw. A. Neutral (center wire) E. Strip insulation back 1" (2.5 cm). Connect the appliance neutral ground wire and the neutral wire (white or center) of the dryer rear panel. After reattaching the terminal cover, connect a separate copper ground wire from end of timing cam... wire in flexible metallic conduit 7. Tighten screws. 8. A. _4" conduit connector 6. Remove the appliance neutral ground wire from the external ground conductor screw. Insert tab of the dryer, first side to factory testing). If codes permit and a separate ground wire is used up or...
...with hold -down screw. A. Neutral (center wire) E. Strip insulation back 1" (2.5 cm). Connect the appliance neutral ground wire and the neutral wire (white or center) of the dryer rear panel. After reattaching the terminal cover, connect a separate copper ground wire from end of timing cam... wire in flexible metallic conduit 7. Tighten screws. 8. A. _4" conduit connector 6. Remove the appliance neutral ground wire from the external ground conductor screw. Insert tab of the dryer, first side to factory testing). If codes permit and a separate ground wire is used up or...
Installation Instructions
Page 17
...6o Repairs to parts or systems resulting from unauthorized modifications made to the commercial appliance. 7o The removal and reinstallation of your commercial appliance is required to obtain service under this commercial appliance is excluded from all warranty coverage. 9o Changes to the building, ... HAVE OTHER RIGHTS, WHICH VARY FROM STATE TO STATE OR PROVINCE TO PROVINCE. MAYTAG COMMERCIAL WASHER, DRYER, STACKED DRYER/ DRYER, COMMERCIAL STACK LAUNDRY, AND MULTI-LOAD COIN OPERATED COMMERCIAL WASHERS AND DRYERS WARRANTY LiMiTED WARRANTY ON PARTS For the first five years from the date of ...
...6o Repairs to parts or systems resulting from unauthorized modifications made to the commercial appliance. 7o The removal and reinstallation of your commercial appliance is required to obtain service under this commercial appliance is excluded from all warranty coverage. 9o Changes to the building, ... HAVE OTHER RIGHTS, WHICH VARY FROM STATE TO STATE OR PROVINCE TO PROVINCE. MAYTAG COMMERCIAL WASHER, DRYER, STACKED DRYER/ DRYER, COMMERCIAL STACK LAUNDRY, AND MULTI-LOAD COIN OPERATED COMMERCIAL WASHERS AND DRYERS WARRANTY LiMiTED WARRANTY ON PARTS For the first five years from the date of ...