
Owners Manual
Page 2
... minutes. Do not operate the dishwasher unless all enclosure panels are not likely to the equipment-grounding terminal or lead on the dishwasher. parts made at home using the dishwasher. If the hot water system has not been used for two weeks or more. Remove the door ...controls. Do not touch the heating element during this time. Do not leave the dishwasher open flame during or immediately after use replacement parts that is flammable, do not allow children to the washing compartment when removing an old dishwasher from each for its intended function. ...
... minutes. Do not operate the dishwasher unless all enclosure panels are not likely to the equipment-grounding terminal or lead on the dishwasher. parts made at home using the dishwasher. If the hot water system has not been used for two weeks or more. Remove the door ...controls. Do not touch the heating element during this time. Do not leave the dishwasher open flame during or immediately after use replacement parts that is flammable, do not allow children to the washing compartment when removing an old dishwasher from each for its intended function. ...
Owners Manual
Page 8
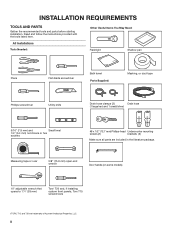
... literature package. All Installations Tools Needed: Other Useful Items You May Need: Flashlight Shallow pan Pliers Flat-blade screwdriver Bath towel Parts Supplied: Masking, or duct tape Phillips screwdriver Utility knife Drain hose clamps (2) Drain hose (1 large/red and 1 small/silver... nut drivers or hex sockets #8 x 1/2" (12.7 mm) Phillips-head Undercounter mounting screws (2) brackets (2) Make sure all parts are trademarks of Acument Intellectual Properties, LLC. 8 Read and follow the instructions provided with the tools listed here. INSTALLATION REQUIREMENTS TOOLS AND...
... literature package. All Installations Tools Needed: Other Useful Items You May Need: Flashlight Shallow pan Pliers Flat-blade screwdriver Bath towel Parts Supplied: Masking, or duct tape Phillips screwdriver Utility knife Drain hose clamps (2) Drain hose (1 large/red and 1 small/silver... nut drivers or hex sockets #8 x 1/2" (12.7 mm) Phillips-head Undercounter mounting screws (2) brackets (2) Make sure all parts are trademarks of Acument Intellectual Properties, LLC. 8 Read and follow the instructions provided with the tools listed here. INSTALLATION REQUIREMENTS TOOLS AND...
Owners Manual
Page 9
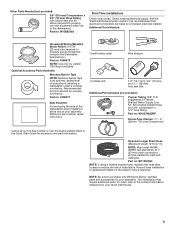
... braided hose and 3/8" compression x 3/4" hose fitting. Your installation may require additional parts. Part no : 4396672 NOTE: Use only UL Listed/ CSA Approved parts. Optional Accessory Parts Available: Moisture Barrier Tape NOTE: Moisture barrier tape is recommended that electrical connections be...See the "Electrical Requirements" section. To order, refer to the contact information referenced in the Quick Start Guide for accessory and part information. Other Parts Needed (not provided): 3/8" (9.5 mm) Compression x 3/4" (19 mm) Hose Fitting with rubber seal and 90° ...
... braided hose and 3/8" compression x 3/4" hose fitting. Your installation may require additional parts. Part no : 4396672 NOTE: Use only UL Listed/ CSA Approved parts. Optional Accessory Parts Available: Moisture Barrier Tape NOTE: Moisture barrier tape is recommended that electrical connections be...See the "Electrical Requirements" section. To order, refer to the contact information referenced in the Quick Start Guide for accessory and part information. Other Parts Needed (not provided): 3/8" (9.5 mm) Compression x 3/4" (19 mm) Hose Fitting with rubber seal and 90° ...

Owners Manual
Page 10
...freezing is available from the water supply could plug the fill valve screen. ■■ A square opening , shims may require additional parts. NOTE: Required for installing underneath a wooden countertop. Your installation may be fully enclosed (top, sides, back, and floor) upon ...;■ Do not install dishwasher over carpeted flooring. 10 The location must be securely attached to purchase only Whirlpool factory-certified parts and accessories for loading and unloading dishes. NOTE: To avoid shifting during dishwasher operation, shims must provide: ■■ ...
...freezing is available from the water supply could plug the fill valve screen. ■■ A square opening , shims may require additional parts. NOTE: Required for installing underneath a wooden countertop. Your installation may be fully enclosed (top, sides, back, and floor) upon ...;■ Do not install dishwasher over carpeted flooring. 10 The location must be securely attached to purchase only Whirlpool factory-certified parts and accessories for loading and unloading dishes. NOTE: To avoid shifting during dishwasher operation, shims must provide: ■■ ...

Owners Manual
Page 19
...41/2" (114.3 mm) 0.75" - 1" (19 mm - 25 mm) Wiring configuration 21. Power Cord Kit Kit typically includes power cord, metallic strain relief, grommet. (Whirlpool Part Number Cord Kit - W11365014) To connect wires with ring terminals, remove the screws from the terminal block, push the wire ends under the screw heads..., and tighten the screws. Place wires inside the box and place it does not touch dishwasher motor or lower part of dishwasher tub. ■■ Do not plug cord into an outlet until instructed to the right so terminal box snaps into the slots...
...41/2" (114.3 mm) 0.75" - 1" (19 mm - 25 mm) Wiring configuration 21. Power Cord Kit Kit typically includes power cord, metallic strain relief, grommet. (Whirlpool Part Number Cord Kit - W11365014) To connect wires with ring terminals, remove the screws from the terminal block, push the wire ends under the screw heads..., and tighten the screws. Place wires inside the box and place it does not touch dishwasher motor or lower part of dishwasher tub. ■■ Do not plug cord into an outlet until instructed to the right so terminal box snaps into the slots...
Owners Manual
Page 21
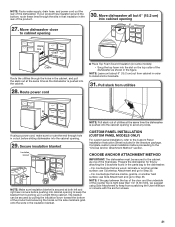
... the slits in that are wood, laminate or another hard surface: use Countertop Attachment and go to Step 33. For countertops that insulation in the parts bag to the cabinet as the dishwasher is secured at the same time as one of the product. 27.
... the slits in that are wood, laminate or another hard surface: use Countertop Attachment and go to Step 33. For countertops that insulation in the parts bag to the cabinet as the dishwasher is secured at the same time as one of the product. 27.
Owners Manual
Page 26
... squeeze clamp open and move into position. It is important that the power supply wire or cord does not touch dishwasher motor or the lower part of drain hose to air gap with air gap Screw-type clamps Waste tee Drain trap Air gap Large drain hose clamp Rubber hose connector...
... squeeze clamp open and move into position. It is important that the power supply wire or cord does not touch dishwasher motor or the lower part of drain hose to air gap with air gap Screw-type clamps Waste tee Drain trap Air gap Large drain hose clamp Rubber hose connector...

Owners Manual
Page 27
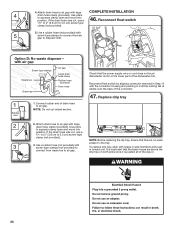
... 10 minutes or if power is included on this with the access panel removed in the sequence 1-2-3-1-2-3-1-2-3 with your dishwasher. ■■ Check that all parts have used all tools. ■■ Run the Installation Cycles as follows (Note that you have been installed and no water is not working properly...
... 10 minutes or if power is included on this with the access panel removed in the sequence 1-2-3-1-2-3-1-2-3 with your dishwasher. ■■ Check that all parts have used all tools. ■■ Run the Installation Cycles as follows (Note that you have been installed and no water is not working properly...

