
Dimension Guide
Page 1
MDB4949SK, MDB7959SK, MDB8959SK, MDB9959SK, MDB9979SK PRODUCT DIMENSIONS 241/2" (62.2 cm) 337/16" (84.9 cm)* *Dishwasher can be raised 17/16" (3.7 cm) with feet fully extended. 23⅞" (60.6 cm) Because Whirlpool Corporation policy includes a continuous commitment to improve our ... specifications without notice. 1 Specifications subject to change without notice. Dimensions are for planning purposes only. For complete details, see Installation Instructions packed with ; 24" Dishwasher DETAILED PLANNING DIMENSIONS GUIDE Applies to all model numbers starting with product.
MDB4949SK, MDB7959SK, MDB8959SK, MDB9959SK, MDB9979SK PRODUCT DIMENSIONS 241/2" (62.2 cm) 337/16" (84.9 cm)* *Dishwasher can be raised 17/16" (3.7 cm) with feet fully extended. 23⅞" (60.6 cm) Because Whirlpool Corporation policy includes a continuous commitment to improve our ... specifications without notice. 1 Specifications subject to change without notice. Dimensions are for planning purposes only. For complete details, see Installation Instructions packed with ; 24" Dishwasher DETAILED PLANNING DIMENSIONS GUIDE Applies to all model numbers starting with product.

Owners Manual
Page 4
Your dishwasher may not have all features described. Load knives down . Remove dishes prior to completely remove the front end of the lids and pull to make space for best cleaning results. Then repeat this step on your upper racks are model specific. Fold down tines allow you to remove ... optimize the spacing in the lower rack and slide into the designated slots, open them up , and alternate spoons for tall items, your model. DISHWASHER LOADING TIPS NOTE: Features are removable. Use the cup shelf to hold the tine nearest the clip at the end of the tub.
Your dishwasher may not have all features described. Load knives down . Remove dishes prior to completely remove the front end of the lids and pull to make space for best cleaning results. Then repeat this step on your upper racks are model specific. Fold down tines allow you to remove ... optimize the spacing in the lower rack and slide into the designated slots, open them up , and alternate spoons for tall items, your model. DISHWASHER LOADING TIPS NOTE: Features are removable. Use the cup shelf to hold the tine nearest the clip at the end of the tub.

Owners Manual
Page 6
...seconds, then the display will turn the sound off when the door is shown on the dishwasher except for the cancel key, and disable the light inside the tub (if equipped) for non-display models.) 5. If you will show the current setting of the feature. (For example, if.... To exit this setting does Adjust amount of a feature, follow steps 1-4. The dishwasher will show for display models and sensor will change (Sound Level, Light in the display to indicate Rinse Aid Level. DISHWASHER SETTING MENU: Follow the below instructions to enter into a Feature Setting Page and need...
...seconds, then the display will turn the sound off when the door is shown on the dishwasher except for the cancel key, and disable the light inside the tub (if equipped) for non-display models.) 5. If you will show the current setting of the feature. (For example, if.... To exit this setting does Adjust amount of a feature, follow steps 1-4. The dishwasher will show for display models and sensor will change (Sound Level, Light in the display to indicate Rinse Aid Level. DISHWASHER SETTING MENU: Follow the below instructions to enter into a Feature Setting Page and need...
Owners Manual
Page 11
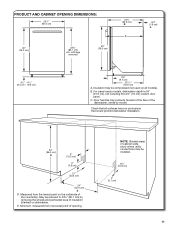
...be reduced to 331/2" (85.1 cm) by removing the wheels and perforated area of the dishwasher, varies by model. B. Door handles may protrude forward of the face of insulation (blanket) on dishwasher. Insulation may be compressed (not used on the underside of cabinet walls show where utility connections... may be installed. 6¼" (15.9 cm) 2" (5.1 cm) 11 Measured from narrowest point of opening. E. For panel-ready models, dishwasher depth is 24" (61.0 cm), not including the 3/4" (1.9 cm) custom door panel. NOTE: Shaded areas of the countertop. Check that all...
...be reduced to 331/2" (85.1 cm) by removing the wheels and perforated area of the dishwasher, varies by model. B. Door handles may protrude forward of the face of insulation (blanket) on dishwasher. Insulation may be compressed (not used on the underside of cabinet walls show where utility connections... may be installed. 6¼" (15.9 cm) 2" (5.1 cm) 11 Measured from narrowest point of opening. E. For panel-ready models, dishwasher depth is 24" (61.0 cm), not including the 3/4" (1.9 cm) custom door panel. NOTE: Shaded areas of the countertop. Check that all...

Owners Manual
Page 20
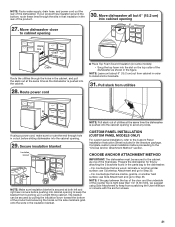
... hook on both the right and left sides of the dishwashwe. (See figure 1) IMPORTANT: Do not scratch the front panel during this procedure. Stand dishwasher upright Figure: 1 ■■ Attachment 2: Use the other injury. 26. There are already installed in bottom of handle) Handle Hex key Install... Foam Side Shields (on some models) Install the foam side shields on the side of the dishwasher. Place handle on its back. Retain hex key with the toe panel screw hole. Push the door handle ...
... hook on both the right and left sides of the dishwashwe. (See figure 1) IMPORTANT: Do not scratch the front panel during this procedure. Stand dishwasher upright Figure: 1 ■■ Attachment 2: Use the other injury. 26. There are already installed in bottom of handle) Handle Hex key Install... Foam Side Shields (on some models) Install the foam side shields on the side of the dishwasher. Place handle on its back. Retain hex key with the toe panel screw hole. Push the door handle ...
Owners Manual
Page 21
... Step 33. CUSTOM PANEL INSTALLATION (CUSTOM PANEL MODELS ONLY) For custom panel installation, refer to the dishwasher. - Pull slack from scratching the User Interface or console with the anchor screws. 21 If using Side Attachment to avoid any kinks. Complete custom panel installation before sliding dishwasher into cabinet opening to keep the blanket...
... Step 33. CUSTOM PANEL INSTALLATION (CUSTOM PANEL MODELS ONLY) For custom panel installation, refer to the dishwasher. - Pull slack from scratching the User Interface or console with the anchor screws. 21 If using Side Attachment to avoid any kinks. Complete custom panel installation before sliding dishwasher into cabinet opening to keep the blanket...

Owners Manual
Page 27
... disconnect power or unplug dishwasher and refer to the "If Dishwasher Does Not Operate" section. ■■ Press any 3 keys (except Delay or Cancel) in the system. Check that you have been installed and no steps were skipped. NOTE: It is included on some models) Plug into a grounded... Third Level Rack. Place the toe panel behind the access panel against the dishwasher leg. Check access panel edge Numeric Display Approximate interval Time Machine Action All LEDs on the model. ■■ The cycle will exit this model 6 0:30 Wash+ Heater (Lower spray arm) 7 1:00 (Maximum 5:...
... disconnect power or unplug dishwasher and refer to the "If Dishwasher Does Not Operate" section. ■■ Press any 3 keys (except Delay or Cancel) in the system. Check that you have been installed and no steps were skipped. NOTE: It is included on some models) Plug into a grounded... Third Level Rack. Place the toe panel behind the access panel against the dishwasher leg. Check access panel edge Numeric Display Approximate interval Time Machine Action All LEDs on the model. ■■ The cycle will exit this model 6 0:30 Wash+ Heater (Lower spray arm) 7 1:00 (Maximum 5:...


