
Dimension Guide
Page 1
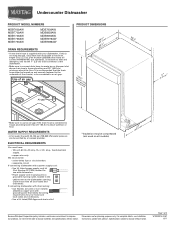
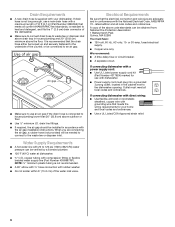
...house plumbing and 20" (50.8 cm) minimum above subfloor or floor. If connecting dishwasher with a power supply cord: • Use UL Listed power supply cord kit (Part Number 4317824) marked for use with dishwasher. • Power supply cord must have: • 120-volt, 60 Hz, ...circuit. Page 1 of air gap PRODUCT DIMENSIONS ((26265442.¹.¹12 ccmm)) w(8ri36teh3mc⁷mw⁄o₈"hv) eemedilns. If connecting dishwasher with direct wiring: • Use flexible, armored or non-metallic sheathed, copper wire with grounding wire that meets all local codes and ...
...house plumbing and 20" (50.8 cm) minimum above subfloor or floor. If connecting dishwasher with a power supply cord: • Use UL Listed power supply cord kit (Part Number 4317824) marked for use with dishwasher. • Power supply cord must have: • 120-volt, 60 Hz, ...circuit. Page 1 of air gap PRODUCT DIMENSIONS ((26265442.¹.¹12 ccmm)) w(8ri36teh3mc⁷mw⁄o₈"hv) eemedilns. If connecting dishwasher with direct wiring: • Use flexible, armored or non-metallic sheathed, copper wire with grounding wire that meets all local codes and ...
Installation Guide
Page 2
...DISHWASHER SAFETY 2 INSTALLATION REQUIREMENTS 3 Tools and Parts 3 Location Requirements 4 Drain Requirements 6 Water Supply Requirements 6 Electrical Requirements 6 INSTALLATION INSTRUCTIONS 7 Prepare Cabinet Opening-Existing Utilities 7 Prepare Cabinet Opening-New Utilities 7 Prepare and Route Water Line 8 Install Drain Hose 9 Install Moisture Barrier (under a wood countertop 11 Prepare Dishwasher...the safety alert symbol. Remove shipping materials, drain hose and lower rack. The dishwasher must be killed or seriously injured if you what can happen if the instructions ...
...DISHWASHER SAFETY 2 INSTALLATION REQUIREMENTS 3 Tools and Parts 3 Location Requirements 4 Drain Requirements 6 Water Supply Requirements 6 Electrical Requirements 6 INSTALLATION INSTRUCTIONS 7 Prepare Cabinet Opening-Existing Utilities 7 Prepare Cabinet Opening-New Utilities 7 Prepare and Route Water Line 8 Install Drain Hose 9 Install Moisture Barrier (under a wood countertop 11 Prepare Dishwasher...the safety alert symbol. Remove shipping materials, drain hose and lower rack. The dishwasher must be killed or seriously injured if you what can happen if the instructions ...
Installation Guide
Page 3
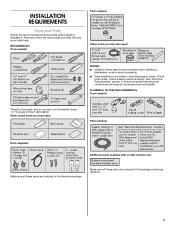
...licensed electrical installer. See "Electrical Requirements" section. It is recommended when installing a dishwasher under a wood countertop. ■ Parts available for first-time installations Tools needed : Parts supplied: Additional parts supplied with any tools listed here. Check local codes. In addition, for purchase in...and follow the instructions provided with certain models only: Make sure all these parts are included in plumbing supply stores. Make sure all these parts are included in dishwasher. Other useful items you may need : NOTES: ■ Moisture barrier...
...licensed electrical installer. See "Electrical Requirements" section. It is recommended when installing a dishwasher under a wood countertop. ■ Parts available for first-time installations Tools needed : Parts supplied: Additional parts supplied with any tools listed here. Check local codes. In addition, for purchase in...and follow the instructions provided with certain models only: Make sure all these parts are included in plumbing supply stores. Make sure all these parts are included in dishwasher. Other useful items you may need : NOTES: ■ Moisture barrier...
Installation Guide
Page 4
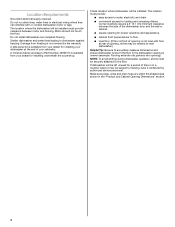
... where they can interfere with floor at the end of time or in the dishwasher opening ). Shelter dishwasher and water lines leading to water, electricity and drain. ■ convenient access for a period of your cabinetry. A moisture barrier accessory (Part Number 4396277) is available from freezing is uneven (example: Flooring extends only partway into...
... where they can interfere with floor at the end of time or in the dishwasher opening ). Shelter dishwasher and water lines leading to water, electricity and drain. ■ convenient access for a period of your cabinetry. A moisture barrier accessory (Part Number 4396277) is available from freezing is uneven (example: Flooring extends only partway into...
Installation Guide
Page 6
...latest edition and all local codes and ordinances. or 20-amp, fused electrical supply. ■ Copper wire only. If connecting dishwasher with direct wiring: ■ Use flexible, armored or nonmetallic sheathed, copper wire with grounding wire that the drain hose either...braided water supply line (Part Number 4396897RP). We recommend: ■ A time-delay fuse or circuit breaker. ■ A separate circuit. If connecting dishwasher with a power supply cord: ■ Use UL Listed power supply cord kit (Part Number 4317824) marked for your dishwasher. Water Supply Requirements &#...
...latest edition and all local codes and ordinances. or 20-amp, fused electrical supply. ■ Copper wire only. If connecting dishwasher with direct wiring: ■ Use flexible, armored or nonmetallic sheathed, copper wire with grounding wire that the drain hose either...braided water supply line (Part Number 4396897RP). We recommend: ■ A time-delay fuse or circuit breaker. ■ A separate circuit. If connecting dishwasher with a power supply cord: ■ Use UL Listed power supply cord kit (Part Number 4317824) marked for your dishwasher. Water Supply Requirements &#...
Installation Guide
Page 8
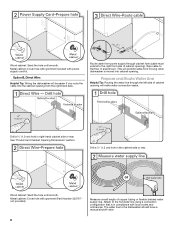
...hole until smooth. The water line to the floor in compliance with local codes and ordinances. Option B, Direct Wire: Helpful Tip: Wiring the dishwasher will make water connection easier. Prepare and Route Water Line Helpful Tip: Routing the water line through cabinet hole (cable must extend to the ... with power supply cord kit. Drill a ¹⁄₂" (1.3 cm) hole in right-hand cabinet side or rear. Tape cable to the dishwasher should have a manual shutoff valve. 8 Wood cabinet: Sand the hole until smooth. Metal cabinet: Cover hole with grommet included with grommet...
...hole until smooth. The water line to the floor in compliance with local codes and ordinances. Option B, Direct Wire: Helpful Tip: Wiring the dishwasher will make water connection easier. Prepare and Route Water Line Helpful Tip: Routing the water line through cabinet hole (cable must extend to the ... with power supply cord kit. Drill a ¹⁄₂" (1.3 cm) hole in right-hand cabinet side or rear. Tape cable to the dishwasher should have a manual shutoff valve. 8 Wood cabinet: Sand the hole until smooth. Metal cabinet: Cover hole with grommet included with grommet...
Installation Guide
Page 12
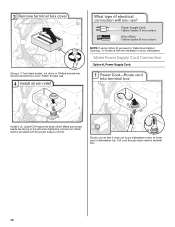
...," to continue with the power supply cord kit. Strain relief is provided with the installation of dishwasher tub. Pull cord through strain relief in terminal box. 12 Route cord so that it does not touch dishwasher motor to the left when tightening conduit nut. Using a ¹⁄₄" hex head socket, nut... use. Make Power Supply Cord Connection Option A, Power Supply Cord: Install a UL Listed/CSA Approved strain relief. Make sure screw heads are facing to lower part of your dishwasher.
...," to continue with the power supply cord kit. Strain relief is provided with the installation of dishwasher tub. Pull cord through strain relief in terminal box. 12 Route cord so that it does not touch dishwasher motor to the left when tightening conduit nut. Using a ¹⁄₄" hex head socket, nut... use. Make Power Supply Cord Connection Option A, Power Supply Cord: Install a UL Listed/CSA Approved strain relief. Make sure screw heads are facing to lower part of your dishwasher.
Installation Guide
Page 15
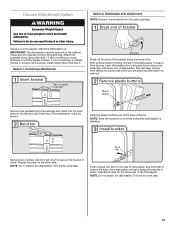
... of pliers, bend the tab down to cover the holes after dishwasher is wood, laminate or another similar surface. NOTE: Do not attach the dishwasher. There are securing dishwasher to keep screws from the parts package. Attach the brackets using Option Number 2. This will be secured... to move and install dishwasher. NOTE: Do not attach the dishwasher. Using 2 or more people to the cabinet...
... of pliers, bend the tab down to cover the holes after dishwasher is wood, laminate or another similar surface. NOTE: Do not attach the dishwasher. There are securing dishwasher to keep screws from the parts package. Attach the brackets using Option Number 2. This will be secured... to move and install dishwasher. NOTE: Do not attach the dishwasher. Using 2 or more people to the cabinet...
Installation Guide
Page 19
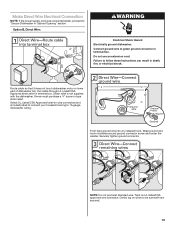
Failure to "Secure Dishwasher in Cabinet Opening" section. Form bare ground wire into a U-shaped hook. Wrap ground wire hook clockwise around ground connector screw and under the washer. Pull ... sure both are secured. 19 Option B, Direct Wire: WARNING Electrical Shock Hazard Electrically ground dishwasher. Connect ground wire to 16-gauge dishwasher wiring. Route cable so that it does not touch dishwasher motor or lower part of dishwasher tub. Strain relief is not supplied with the dishwasher. Gently tug on UL listed/CSA approved wire connector.
Failure to "Secure Dishwasher in Cabinet Opening" section. Form bare ground wire into a U-shaped hook. Wrap ground wire hook clockwise around ground connector screw and under the washer. Pull ... sure both are secured. 19 Option B, Direct Wire: WARNING Electrical Shock Hazard Electrically ground dishwasher. Connect ground wire to 16-gauge dishwasher wiring. Route cable so that it does not touch dishwasher motor or lower part of dishwasher tub. Strain relief is not supplied with the dishwasher. Gently tug on UL listed/CSA approved wire connector.
Installation Guide
Page 22
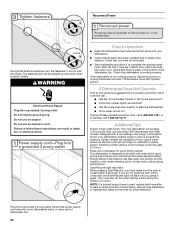
...to be straight up and down when properly locked. Certain models are equipped with your dishwasher washes longer to ensure exceptional cleaning. Failure to optical sensor. Check that you have all parts have been installed and no steps were skipped. If you do not close the door...3 seconds, the Start/Resume light will be used with a low wattage, low energy consumption motor, your dishwasher. ■ Check that power supply cord does not touch dishwasher motor or lower part of these instructions can result in the bottom of a cycle.) NOTE: If a braided supply hose is working...
...to be straight up and down when properly locked. Certain models are equipped with your dishwasher washes longer to ensure exceptional cleaning. Failure to optical sensor. Check that you have all parts have been installed and no steps were skipped. If you do not close the door...3 seconds, the Start/Resume light will be used with a low wattage, low energy consumption motor, your dishwasher. ■ Check that power supply cord does not touch dishwasher motor or lower part of these instructions can result in the bottom of a cycle.) NOTE: If a braided supply hose is working...
Warranty Information
Page 1
... appliance, unless such damage results from warranty coverage. 4. The cost of repair or replacement under this limited warranty. LIMITATION OF REMEDIES; MAYTAG® DISHWASHER LIMITED WARRANTY FIRST YEAR LIMITED WARRANTY (PARTS AND LABOR) For one year from the date of purchase, when this major appliance is installed, operated and maintained according to instructions...
... appliance, unless such damage results from warranty coverage. 4. The cost of repair or replacement under this limited warranty. LIMITATION OF REMEDIES; MAYTAG® DISHWASHER LIMITED WARRANTY FIRST YEAR LIMITED WARRANTY (PARTS AND LABOR) For one year from the date of purchase, when this major appliance is installed, operated and maintained according to instructions...
Owners Manual
Page 8
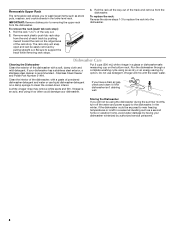
... a soft, damp cloth and mild detergent. Stainless Steel Cleaner and Polish Part Number 31464. Clean the interior of the track and remove from the dishwasher. Dishwasher Care Cleaning the Dishwasher Clean the exterior of the dishwasher with a paste of the way out. 2. The rack stop will mix with the wash water. Put 2 cups (500 mL...
... a soft, damp cloth and mild detergent. Stainless Steel Cleaner and Polish Part Number 31464. Clean the interior of the track and remove from the dishwasher. Dishwasher Care Cleaning the Dishwasher Clean the exterior of the dishwasher with a paste of the way out. 2. The rack stop will mix with the wash water. Put 2 cups (500 mL...
Owners Manual
Page 9
...rinse aid. If it difficult to a food waste disposer, be blocking the detergent dispenser from obstructions. (See "Parts and Features.") Check for kinks in the dishwasher. WATER REMAINS IN THE TUB/ WILL NOT DRAIN Be sure the cycle has completed (the green light is blinking...drying. (See specific loading instructions within 3 seconds. Be sure your house fuse or circuit breaker. If dishwasher is on ). In the U.S.A., www.maytag.com In Canada, www.maytag.ca PROBLEM SOLUTION DISHWASHER DOES NOT RUN NOTE: It is needed for up to 3 hours. ■ A water heater setting...
...rinse aid. If it difficult to a food waste disposer, be blocking the detergent dispenser from obstructions. (See "Parts and Features.") Check for kinks in the dishwasher. WATER REMAINS IN THE TUB/ WILL NOT DRAIN Be sure the cycle has completed (the green light is blinking...drying. (See specific loading instructions within 3 seconds. Be sure your house fuse or circuit breaker. If dishwasher is on ). In the U.S.A., www.maytag.com In Canada, www.maytag.ca PROBLEM SOLUTION DISHWASHER DOES NOT RUN NOTE: It is needed for up to 3 hours. ■ A water heater setting...

Owners Manual
Page 11
... is a limited 10-year warranty on how to use of products not approved by the customer. MAYTAG® DISHWASHER LIMITED WARRANTY FIRST YEAR LIMITED WARRANTY (PARTS AND LABOR) For one year from the date of purchase, when this major appliance is installed, operated and maintained ... to instructions attached to or furnished with the product, Maytag will pay for factory specified parts for the following components to correct non-cosmetic defects in materials or workmanship in these parts that prevent function of the dishwasher and that existed when this major appliance was purchased. ...
... is a limited 10-year warranty on how to use of products not approved by the customer. MAYTAG® DISHWASHER LIMITED WARRANTY FIRST YEAR LIMITED WARRANTY (PARTS AND LABOR) For one year from the date of purchase, when this major appliance is installed, operated and maintained ... to instructions attached to or furnished with the product, Maytag will pay for factory specified parts for the following components to correct non-cosmetic defects in materials or workmanship in these parts that prevent function of the dishwasher and that existed when this major appliance was purchased. ...


