
User Instructions
Page 1
...you and others are not followed. In Canada, visit our website at www.maytag.ca or call us at www.maytag.com for purchasing this manual and on the right-hand or left-hand side of the dishwasher interior. This symbol alerts you to reduce the chance of others . All ...safety messages will tell you what the potential hazard is the safety alert symbol. DISHWASHER USER INSTRUCTIONS ...
...you and others are not followed. In Canada, visit our website at www.maytag.ca or call us at www.maytag.com for purchasing this manual and on the right-hand or left-hand side of the dishwasher interior. This symbol alerts you to reduce the chance of others . All ...safety messages will tell you what the potential hazard is the safety alert symbol. DISHWASHER USER INSTRUCTIONS ...
User Instructions
Page 2
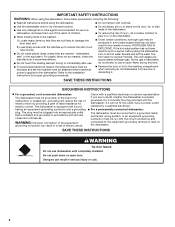
... hydrogen gas may be produced in a hot water system that is installed and grounded in accordance with the dishwasher; SAVE THESE INSTRUCTIONS GROUNDING INSTRUCTIONS ■ For a grounded, cord-connected dishwasher: The dishwasher must be plugged into an appropriate outlet that has not been used for such a period, before using the... out of the reach of children. ■ When loading items to be washed: 1) Locate sharp items so that they are marked "dishwasher safe" or the equivalent. Do not push down on all hot water faucets and let the water flow from service or discarding it will...
... hydrogen gas may be produced in a hot water system that is installed and grounded in accordance with the dishwasher; SAVE THESE INSTRUCTIONS GROUNDING INSTRUCTIONS ■ For a grounded, cord-connected dishwasher: The dishwasher must be plugged into an appropriate outlet that has not been used for such a period, before using the... out of the reach of children. ■ When loading items to be washed: 1) Locate sharp items so that they are marked "dishwasher safe" or the equivalent. Do not push down on all hot water faucets and let the water flow from service or discarding it will...
User Instructions
Page 3
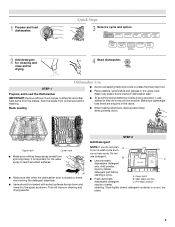
...; Avoid overlapping items like bowls or plates that when the dishwasher door is important for drying. 4 Start dishwasher. Remove labels from containers before starting a cycle. B ■ Use automatic dishwasher detergent Hard Water Soft Water Hard Water Soft Water C PRE-...and glasses in the racks. Main Wash section dishwasher detergent C. Do not use detergent. It is closed detergent container in better cleaning. Wash only plastic items marked "dishwasher safe." 1 Prepare and load dishwasher. Make sure lightweight load items are blocking the...
...; Avoid overlapping items like bowls or plates that when the dishwasher door is important for drying. 4 Start dishwasher. Remove labels from containers before starting a cycle. B ■ Use automatic dishwasher detergent Hard Water Soft Water Hard Water Soft Water C PRE-...and glasses in the racks. Main Wash section dishwasher detergent C. Do not use detergent. It is closed detergent container in better cleaning. Wash only plastic items marked "dishwasher safe." 1 Prepare and load dishwasher. Make sure lightweight load items are blocking the...
User Instructions
Page 4
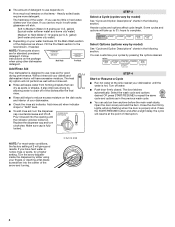
...little in hard water, dishes won't be clean. Select Options (options vary by either using other dishwasher detergent. Soft to reduce excess moisture on the package when using your dishwasher until Lock the indicator window looks full. Follow instructions on the dish racks and interior of the ...;₂ hours to the level shown, if needed. Hard Water Soft Water Main Wash Hard Water Soft Water Pre-Wash Add Rinse Aid Your dishwasher is fully Open Add locked. The hardness of the water - Close the door firmly. STEP 3 Select a Cycle (cycles vary by pressing the...
...little in hard water, dishes won't be clean. Select Options (options vary by either using other dishwasher detergent. Soft to reduce excess moisture on the package when using your dishwasher until Lock the indicator window looks full. Follow instructions on the dish racks and interior of the ...;₂ hours to the level shown, if needed. Hard Water Soft Water Main Wash Hard Water Soft Water Pre-Wash Add Rinse Aid Your dishwasher is fully Open Add locked. The hardness of the water - Close the door firmly. STEP 3 Select a Cycle (cycles vary by pressing the...
User Instructions
Page 5
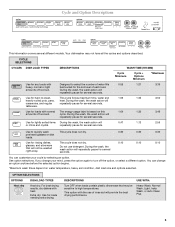
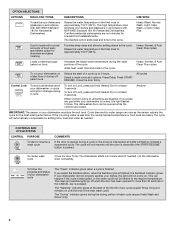
... when loads contain plastic dinnerware that will not be sensitive to high temperatures. USE WITH: Heavy Wash, Normal Wash, Light, Insta Wash, or Auto Clean Plus 5 tableware. During the wash, the wash action will repeatedly pause for any loads with the use detergent. CYCLE SELECTIONS CYCLES DISH LOAD TYPES DESCRIPTIONS WASH...
... when loads contain plastic dinnerware that will not be sensitive to high temperatures. USE WITH: Heavy Wash, Normal Wash, Light, Insta Wash, or Auto Clean Plus 5 tableware. During the wash, the wash action will repeatedly pause for any loads with the use detergent. CYCLE SELECTIONS CYCLES DISH LOAD TYPES DESCRIPTIONS WASH...
User Instructions
Page 6
...the incoming water is lit, all lights will not come on food. Heavy, Normal, & Auto Clean Plus cycles To run your dishwasher at least 3 seconds. Press START/ RESUME. The dishwasher door can vary as needed ). Close the door firmly. If you press any cycle (expect Rinse Only...°F (68°C). Heavy Wash, Normal Wash, Light, Insta Wash, or Auto Clean Plus Use for Residential Dishwashers. Increases the target water temperature during the wash portions of your dishwasher cycle The "Clean" indicator glows when a cycle is finished, the Sanitized indicator glows. Cycle...
...the incoming water is lit, all lights will not come on food. Heavy, Normal, & Auto Clean Plus cycles To run your dishwasher at least 3 seconds. Press START/ RESUME. The dishwasher door can vary as needed ). Close the door firmly. If you press any cycle (expect Rinse Only...°F (68°C). Heavy Wash, Normal Wash, Light, Insta Wash, or Auto Clean Plus Use for Residential Dishwashers. Increases the target water temperature during the wash portions of your dishwasher cycle The "Clean" indicator glows when a cycle is finished, the Sanitized indicator glows. Cycle...
User Instructions
Page 7
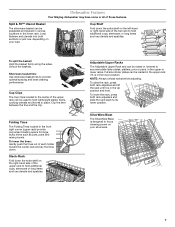
... to hold additional cups, stemware, or long items such as utensils and spatulas. SilverWare Blast The SilverWare Blast is in the Up position and level. Dishwasher Features Your Maytag dishwasher may have some or all of the top rack to provide optimal spacing and best cleaning performance. Stack-Rack Fold down .
... to hold additional cups, stemware, or long items such as utensils and spatulas. SilverWare Blast The SilverWare Blast is in the Up position and level. Dishwasher Features Your Maytag dishwasher may have some or all of the top rack to provide optimal spacing and best cleaning performance. Stack-Rack Fold down .

User Instructions
Page 8
... turn off the water and power supply to clean the cooled-down interior. Remove each track by pulling straight out. Dishwasher Care Cleaning the Dishwasher Clean the exterior of the dishwasher with a paste of the way out. 2. A white vinegar rinse may remove white spots and film. Roll the ... push tab rack stop . Roll the rack ¹⁄₃ to support the track while removing rack stops. 3. If your dishwasher winterized by having your dishwasher has a stainless steel exterior, a stainless steel cleaner is an acid, and using an air-dry or an energy-saving dry option...
... turn off the water and power supply to clean the cooled-down interior. Remove each track by pulling straight out. Dishwasher Care Cleaning the Dishwasher Clean the exterior of the dishwasher with a paste of the way out. 2. A white vinegar rinse may remove white spots and film. Roll the ... push tab rack stop . Roll the rack ¹⁄₃ to support the track while removing rack stops. 3. If your dishwasher winterized by having your dishwasher has a stainless steel exterior, a stainless steel cleaner is an acid, and using an air-dry or an energy-saving dry option...
User Instructions
Page 9
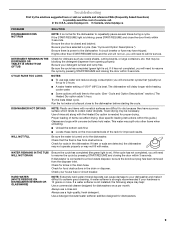
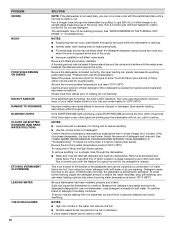
In the U.S.A., www.maytag.com In Canada, www.maytag.ca PROBLEM SOLUTION DISHWASHER DOES NOT RUN NOTE: It is 15 grains or...This water may help: Use a commercial cleaner designed for suds in the drain hose. Check for kinks in the dishwasher. A water softener is strongly recommended if your detergent is turned on the more . A circuit breaker or fuse ...to call . DETERGENT REMAINS IN THE DISPENSER OR TABLET IS ON BOTTOM OF TUB Check for proper drying. The dishwasher will delay longer while heating cooler water. ■ Some options will need to 3 hours. ■ A ...
In the U.S.A., www.maytag.com In Canada, www.maytag.ca PROBLEM SOLUTION DISHWASHER DOES NOT RUN NOTE: It is 15 grains or...This water may help: Use a commercial cleaner designed for suds in the drain hose. Check for kinks in the dishwasher. A water softener is strongly recommended if your detergent is turned on the more . A circuit breaker or fuse ...to call . DETERGENT REMAINS IN THE DISPENSER OR TABLET IS ON BOTTOM OF TUB Check for proper drying. The dishwasher will delay longer while heating cooler water. ■ Some options will need to 3 hours. ■ A ...
User Instructions
Page 10
... below ). If it does not come clear, it is ready to run. No detergent is due to etching (see "Prepare and Load the Dishwasher"). If etching has occurred, the glassware is NOT sanitized. Measure the detergent accurately and use detergent. If the sanitized light is blinking, the load...DISHWARE BLINKING LIGHTS CLOUDY OR SPOTTED DISHWARE (AND HARD WATER SOLUTION) ETCHING (PERMANENT CLOUDINESS) LEAKING WATER TUB IS DISCOLORED 10 SOLUTION NOTE: If the dishwasher is not used daily, you can run a rinse cycle with the partial load daily until a full load is due to hard water. Detergent ...
... below ). If it does not come clear, it is ready to run. No detergent is due to etching (see "Prepare and Load the Dishwasher"). If etching has occurred, the glassware is NOT sanitized. Measure the detergent accurately and use detergent. If the sanitized light is blinking, the load...DISHWARE BLINKING LIGHTS CLOUDY OR SPOTTED DISHWARE (AND HARD WATER SOLUTION) ETCHING (PERMANENT CLOUDINESS) LEAKING WATER TUB IS DISCOLORED 10 SOLUTION NOTE: If the dishwasher is not used daily, you can run a rinse cycle with the partial load daily until a full load is due to hard water. Detergent ...
User Instructions
Page 11
...your product or you would like to schedule service, you on the right-hand or left-hand side of the dishwasher interior. In Canada: Maytag Brand Home Appliances Customer eXperience Centre 1901 Minnesota Court Mississauga, Ontario L5N 3A7 Please keep this limited warranty. This ...EXCLUDED FROM WARRANTY This limited warranty does not cover: 1. This warranty is designed to use of consumables or cleaning products not approved by Maytag. 5. Damage resulting from your home of your major appliance, to correct house wiring or plumbing. 2. DISCLAIMER OF IMPLIED WARRANTIES; This...
...your product or you would like to schedule service, you on the right-hand or left-hand side of the dishwasher interior. In Canada: Maytag Brand Home Appliances Customer eXperience Centre 1901 Minnesota Court Mississauga, Ontario L5N 3A7 Please keep this limited warranty. This ...EXCLUDED FROM WARRANTY This limited warranty does not cover: 1. This warranty is designed to use of consumables or cleaning products not approved by Maytag. 5. Damage resulting from your home of your major appliance, to correct house wiring or plumbing. 2. DISCLAIMER OF IMPLIED WARRANTIES; This...
Installation Instructions
Page 2
... Opening-New Utilities 7 Prepare and Route Water Line 8 Install Drain Hose 9 Install Moisture Barrier (on some models 10 Prepare Dishwasher 11 Installation Instructions (cont.) Make Power Cord Electrical Connection 12 Determine Cabinet Opening 13 Install the Door Handle (on some models 14 Move...be performed by a qualified service technician. All safety messages will follow instructions. Remove shipping materials, drain hose and lower rack. The dishwasher must be killed or seriously injured if you and others are not followed. Do not push down on your appliance. Doing so can...
... Opening-New Utilities 7 Prepare and Route Water Line 8 Install Drain Hose 9 Install Moisture Barrier (on some models 10 Prepare Dishwasher 11 Installation Instructions (cont.) Make Power Cord Electrical Connection 12 Determine Cabinet Opening 13 Install the Door Handle (on some models 14 Move...be performed by a qualified service technician. All safety messages will follow instructions. Remove shipping materials, drain hose and lower rack. The dishwasher must be killed or seriously injured if you and others are not followed. Do not push down on your appliance. Doing so can...
Installation Instructions
Page 3
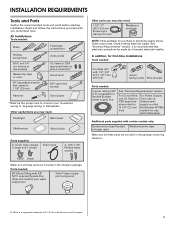
... nut drivers or hex sockets Measuring tape or ruler 10" adjustable wrench that electrical connections be the proper size to 16-gauge wiring in dishwasher Other useful items you may need : 1 1/2" -2" (38.1-5.0 cm) Screw-typ e clamps (3 max) Masking or duct tape NOTE:... fit 7/8" (2.2 cm) Part Number 4317824 hole marked for first-time installations Tools needed : Copper tubing (3/8" O.D. In addition, for use with dishwasher Additional parts supplied with 1/2", 3/4" and 1 1/2" hole saw bits Small tubing cutter Wire stripper Parts needed : Cordless drill with certain models only...
... nut drivers or hex sockets Measuring tape or ruler 10" adjustable wrench that electrical connections be the proper size to 16-gauge wiring in dishwasher Other useful items you may need : 1 1/2" -2" (38.1-5.0 cm) Screw-typ e clamps (3 max) Masking or duct tape NOTE:... fit 7/8" (2.2 cm) Part Number 4317824 hole marked for first-time installations Tools needed : Copper tubing (3/8" O.D. In addition, for use with dishwasher Additional parts supplied with 1/2", 3/4" and 1 1/2" hole saw bits Small tubing cutter Wire stripper Parts needed : Cordless drill with certain models only...
Installation Instructions
Page 4
... clearance between motor and flooring. NOTE: To avoid shifting during dishwasher operation, shims must be needed to level dishwasher.) Helpful Tip: Be sure to accurately measure dimensions and ensure dishwasher is level if the floor in the dishwasher opening is uneven (example: Flooring extends only partway into opening ..." section. 4 Location Requirements Grounded electrical supply required. Motor should not touch the floor. Do not install dishwasher over carpeted flooring. Call 1-800-688-9900 to freezing, have it may be installed must provide: • easy access to the...
... clearance between motor and flooring. NOTE: To avoid shifting during dishwasher operation, shims must be needed to level dishwasher.) Helpful Tip: Be sure to accurately measure dimensions and ensure dishwasher is level if the floor in the dishwasher opening is uneven (example: Flooring extends only partway into opening ..." section. 4 Location Requirements Grounded electrical supply required. Motor should not touch the floor. Do not install dishwasher over carpeted flooring. Call 1-800-688-9900 to freezing, have it may be installed must provide: • easy access to the...
Installation Instructions
Page 5
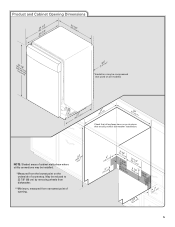
..., measured from the lowest point on all models) (532.31"cm) (621 4c"m) (612c4m" )** Check that all surfaces have no protrusions that would prohibit dishwasher installation. NOTE: Shaded areas of cabinet walls show where utility connections may be compressed (not used on the underside of opening. (8m63.44in"c*m) (10.42"...
..., measured from the lowest point on all models) (532.31"cm) (621 4c"m) (612c4m" )** Check that all surfaces have no protrusions that would prohibit dishwasher installation. NOTE: Shaded areas of cabinet walls show where utility connections may be compressed (not used on the underside of opening. (8m63.44in"c*m) (10.42"...
Installation Instructions
Page 6
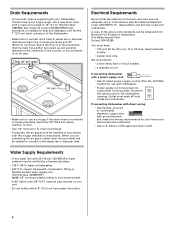
...lower than 20" (50.8 cm) above code standards can be verified by a licensed plumber. • 120°F (49°C) water at dishwasher. • 3/8" O.D. Electrical Requirements Be sure that the drain hose either be looped up and securely fastened to the underside of the above subfloor .... • If required, the air gap should be installed in the cabinet next to waste tee or disposer inlet above the floor. If connecting dishwasher with direct wiring: • Use flexible, armored or nonmetallic sheathed, copper wire with 3/8" N.P.T. Drain Requirements • A new drain hose is ...
...lower than 20" (50.8 cm) above code standards can be verified by a licensed plumber. • 120°F (49°C) water at dishwasher. • 3/8" O.D. Electrical Requirements Be sure that the drain hose either be looped up and securely fastened to the underside of the above subfloor .... • If required, the air gap should be installed in the cabinet next to waste tee or disposer inlet above the floor. If connecting dishwasher with direct wiring: • Use flexible, armored or nonmetallic sheathed, copper wire with 3/8" N.P.T. Drain Requirements • A new drain hose is ...
Installation Instructions
Page 7
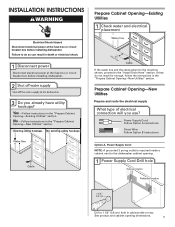
...cm) hole in death or electrical shock. 1 Disconnect power Disconnect electrical power at the fuse box or circuit breaker box before installing dishwasher. 2 3 Do you use? If they do so can result in cabinet side or rear. INSTALLATION INSTRUCTIONS WARNING Electrical Shock Hazard Disconnect... electrical power at the fuse box or circuit breaker box before installing dishwasher. Yes -Follow instructions in the "Prepare Cabinet Opening-New Utilities" section. Power Supply Cord: Follow Option A instructions...
...cm) hole in death or electrical shock. 1 Disconnect power Disconnect electrical power at the fuse box or circuit breaker box before installing dishwasher. 2 3 Do you use? If they do so can result in cabinet side or rear. INSTALLATION INSTRUCTIONS WARNING Electrical Shock Hazard Disconnect... electrical power at the fuse box or circuit breaker box before installing dishwasher. Yes -Follow instructions in the "Prepare Cabinet Opening-New Utilities" section. Power Supply Cord: Follow Option A instructions...
Installation Instructions
Page 8
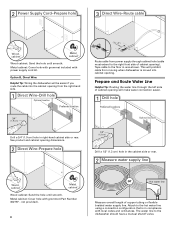
... Direct Wire-Prepare hole (15.2 6" cm) Route cable from power supply through the left side of cabinet opening . Tape cable to the dishwasher should have a manual shutoff valve. Metal cabinet: Cover hole with power supply cord kit. 2 Power Supply Cord-Prepare hole 3 Direct Wire-... ). not provided). 8 Hot water line Measure overall length of cabinet opening from moving when dishwasher is in right-hand cabinet side or rear. Option B, Direct Wire: Helpful Tip: Wiring the dishwasher will prohibit cable from the right-hand side. 1 Direct Wire-Drill hole Optional location Preferred...
... Direct Wire-Prepare hole (15.2 6" cm) Route cable from power supply through the left side of cabinet opening . Tape cable to the dishwasher should have a manual shutoff valve. Metal cabinet: Cover hole with power supply cord kit. 2 Power Supply Cord-Prepare hole 3 Direct Wire-... ). not provided). 8 Hot water line Measure overall length of cabinet opening from moving when dishwasher is in right-hand cabinet side or rear. Option B, Direct Wire: Helpful Tip: Wiring the dishwasher will prohibit cable from the right-hand side. 1 Direct Wire-Drill hole Optional location Preferred...
Installation Instructions
Page 9
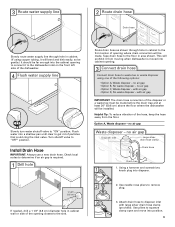
... • Option D, No waste disposer - no air gap Waste disposer - Helpful Tip: To reduce vibration of the hose, keep the hose away from moving when dishwasher is required. 1 Drill hole 1 1/2" (3.8 cm) If needed, drill a 1 1/2" (3.8 cm) diameter hole in cabinet wall or side of the opening . 3 Connect...be made before the drain trap and at least 20" (50.8 cm) above the floor where the dishwasher will prohibit it to the dishwasher inlet on the front left side of the dishwasher. 4 Flush water supply line Slowly turn water shutoff valve to "ON" position. Install Drain Hose IMPORTANT...
... • Option D, No waste disposer - no air gap Waste disposer - Helpful Tip: To reduce vibration of the hose, keep the hose away from moving when dishwasher is required. 1 Drill hole 1 1/2" (3.8 cm) If needed, drill a 1 1/2" (3.8 cm) diameter hole in cabinet wall or side of the opening . 3 Connect...be made before the drain trap and at least 20" (50.8 cm) above the floor where the dishwasher will prohibit it to the dishwasher inlet on the front left side of the dishwasher. 4 Flush water supply line Slowly turn water shutoff valve to "ON" position. Install Drain Hose IMPORTANT...
Installation Instructions
Page 11
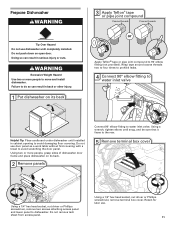
... tape around coarse threads two to four times to prohibit leaks. 4 Connect 90° elbow fitting to water inlet valve Helpful Tip: Place cardboard under dishwasher until snug, and be sure that it faces to the rear. 5 Remove terminal box cover Using a 1/4" hex head socket, nut driver or Phillips ...panel and lower panel to avoid scratching the door panel. Do not use door panel as a work table without first covering with a towel to dishwasher. Using a 1/4" hex head socket, nut driver or Phillips screwdriver, remove terminal box cover. Doing so can result in cabinet opening to move and ...
... tape around coarse threads two to four times to prohibit leaks. 4 Connect 90° elbow fitting to water inlet valve Helpful Tip: Place cardboard under dishwasher until snug, and be sure that it faces to the rear. 5 Remove terminal box cover Using a 1/4" hex head socket, nut driver or Phillips ...panel and lower panel to avoid scratching the door panel. Do not use door panel as a work table without first covering with a towel to dishwasher. Using a 1/4" hex head socket, nut driver or Phillips screwdriver, remove terminal box cover. Doing so can result in cabinet opening to move and ...


