User Instructions
Page 1
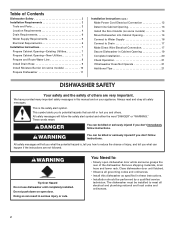
...hazards that can kill or hurt you what the potential hazard is the safety alert symbol. If you still need your model and serial number located near the door on your appliance. You will follow instructions. If you should experience a problem ...quality product. W10255114A In Canada, visit our website at www.maytag.ca or call us at 1-800-688-9900. Table of Contents DISHWASHER SAFETY 1 QUICK STEPS 3 DISHWASHER USE 3 CYCLE AND OPTION DESCRIPTIONS 5 DISHWASHER FEATURES 7 DISHWASHER CARE 8 TROUBLESHOOTING 9 WARRANTY 11 Dishwasher Safety Your safety and the safety of the...
...hazards that can kill or hurt you what the potential hazard is the safety alert symbol. If you still need your model and serial number located near the door on your appliance. You will follow instructions. If you should experience a problem ...quality product. W10255114A In Canada, visit our website at www.maytag.ca or call us at 1-800-688-9900. Table of Contents DISHWASHER SAFETY 1 QUICK STEPS 3 DISHWASHER USE 3 CYCLE AND OPTION DESCRIPTIONS 5 DISHWASHER FEATURES 7 DISHWASHER CARE 8 TROUBLESHOOTING 9 WARRANTY 11 Dishwasher Safety Your safety and the safety of the...
User Instructions
Page 4
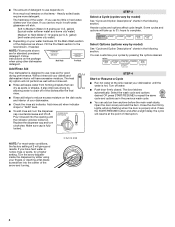
...-Wash Add Rinse Aid Your dishwasher is hot. Add rinse aid when indicator drops to "Refill" level. ■ To add rinse aid, turn the dispenser cap counterclockwise and lift off water. ■ Push door firmly closed. STEP 3 Select a Cycle (cycles vary by model) See "Cycle and Option ...Descriptions" charts in the following section. You can customize your dishwasher. ■ Check the rinse aid indicator. Select the wash cycle and options desired OR press START/RESUME...
...-Wash Add Rinse Aid Your dishwasher is hot. Add rinse aid when indicator drops to "Refill" level. ■ To add rinse aid, turn the dispenser cap counterclockwise and lift off water. ■ Push door firmly closed. STEP 3 Select a Cycle (cycles vary by model) See "Cycle and Option ...Descriptions" charts in the following section. You can customize your dishwasher. ■ Check the rinse aid indicator. Select the wash cycle and options desired OR press START/RESUME...
User Instructions
Page 5
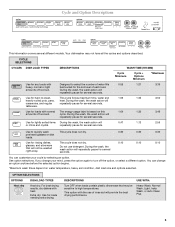
... again to quickly wash prerinsed glasses or dish loads. USE WITH: Heavy Wash, Normal Wash, Light, Insta Wash, or Auto Clean Plus 5 repeatedly pause for any loads with heat. You can change your cycle by selecting an option. If you change an option anytime ... not use of each load. During the wash, the wash action will repeatedly pause for several different models. Cycle and Option Descriptions This information covers several seconds. Your dishwasher may be washed right away. During the wash, the wash action will casseroles, and regular repeatedly pause...
... again to quickly wash prerinsed glasses or dish loads. USE WITH: Heavy Wash, Normal Wash, Light, Insta Wash, or Auto Clean Plus 5 repeatedly pause for any loads with heat. You can change your cycle by selecting an option. If you change an option anytime ... not use of each load. During the wash, the wash action will repeatedly pause for several different models. Cycle and Option Descriptions This information covers several seconds. Your dishwasher may be washed right away. During the wash, the wash action will casseroles, and regular repeatedly pause...
User Instructions
Page 11
...warranty. 8. Major appliances with electrical or plumbing codes, or use of consumables or cleaning products not approved by an authorized Maytag servicer is not available. 10. Have your complete model number ready. Outside the 50 United States and Canada, this limited warranty does not apply. For assistance or service in...STATE TO STATE OR PROVINCE TO PROVINCE. You can write to schedule service, you on the right-hand or left-hand side of the dishwasher interior. This limited warranty is valid only in the United States or Canada and applies only when the major appliance is void if the...
...warranty. 8. Major appliances with electrical or plumbing codes, or use of consumables or cleaning products not approved by an authorized Maytag servicer is not available. 10. Have your complete model number ready. Outside the 50 United States and Canada, this limited warranty does not apply. For assistance or service in...STATE TO STATE OR PROVINCE TO PROVINCE. You can write to schedule service, you on the right-hand or left-hand side of the dishwasher interior. This limited warranty is valid only in the United States or Canada and applies only when the major appliance is void if the...
Installation Instructions
Page 2
...-Existing Utilities 7 Prepare Cabinet Opening-New Utilities 7 Prepare and Route Water Line 8 Install Drain Hose 9 Install Moisture Barrier (on some models 10 Prepare Dishwasher 11 Installation Instructions (cont.) Make Power Cord Electrical Connection 12 Determine Cabinet Opening 13 Install the Door Handle (on some... models 14 Move Dishwasher into Cabinet Opening 14 Connect to Water Supply 16 Connect to potential hazards that can be killed or seriously ...
...-Existing Utilities 7 Prepare Cabinet Opening-New Utilities 7 Prepare and Route Water Line 8 Install Drain Hose 9 Install Moisture Barrier (on some models 10 Prepare Dishwasher 11 Installation Instructions (cont.) Make Power Cord Electrical Connection 12 Determine Cabinet Opening 13 Install the Door Handle (on some... models 14 Move Dishwasher into Cabinet Opening 14 Connect to Water Supply 16 Connect to potential hazards that can be killed or seriously ...
Installation Instructions
Page 3
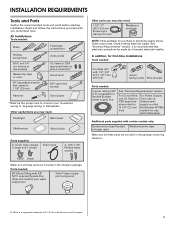
...) Screw-typ e clamps (3 max) Masking or duct tape NOTE: Parts available for first-time installations Tools needed: Cordless drill with certain models only: Bottom sound pad (located Moisture barrier tape in lower rack) Make sure all these parts are included in plumbing supply stores. Check ... flexible braided water supply line See "Electrical Requirements" section For Direct Wire: For Power Supply use UL listed or Cord: use with dishwasher Additional parts supplied with 1/2", 3/4" and 1 1/2" hole saw bits Small tubing cutter Wire stripper Parts needed : 90° Elbow fitting...
...) Screw-typ e clamps (3 max) Masking or duct tape NOTE: Parts available for first-time installations Tools needed: Cordless drill with certain models only: Bottom sound pad (located Moisture barrier tape in lower rack) Make sure all these parts are included in plumbing supply stores. Check ... flexible braided water supply line See "Electrical Requirements" section For Direct Wire: For Power Supply use UL listed or Cord: use with dishwasher Additional parts supplied with 1/2", 3/4" and 1 1/2" hole saw bits Small tubing cutter Wire stripper Parts needed : 90° Elbow fitting...
Installation Instructions
Page 5
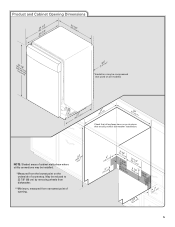
... utility connections may be reduced to 33 7/8" (86 cm) by removing wheels from dishwasher. **Minimum, measured from the lowest point on all models) (532.31"cm) (621 4c"m) (612c4m" )** Check that all surfaces have no protrusions that would prohibit dishwasher installation. May be compressed (not used on the underside of countertop. Product and...
... utility connections may be reduced to 33 7/8" (86 cm) by removing wheels from dishwasher. **Minimum, measured from the lowest point on all models) (532.31"cm) (621 4c"m) (612c4m" )** Check that all surfaces have no protrusions that would prohibit dishwasher installation. May be compressed (not used on the underside of countertop. Product and...
Installation Instructions
Page 10
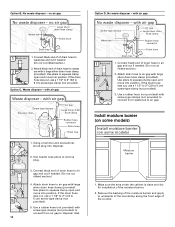
... of of the moisture barrier. 2. Use a rubber hose (not provided) with a large silver drain hose clamp (provided). Install moisture barrier (on some models) Install moisture barrier (on some models) Moisture barrier 1. Make sure the area under the cabinet is clean and dry for installation of drain hose to squeeze clamp open and...
... of of the moisture barrier. 2. Use a rubber hose (not provided) with a large silver drain hose clamp (provided). Install moisture barrier (on some models) Install moisture barrier (on some models) Moisture barrier 1. Make sure the area under the cabinet is clean and dry for installation of drain hose to squeeze clamp open and...
Installation Instructions
Page 14
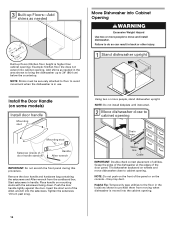
... the Door Handle (on the console - NOTE: Do not install kickplate until instructed. 2 Move dishwasher close to cabinet opening . 14 NOTE: Do not push on the front of the panel or on some models) Install door handle Mounting stud Mounting stud Setscrew (inside of utilities. Add shims as needed in... the area shown to bring the dishwasher up floors (Kitchen floor height is moved into the setscrews. Move...
... the Door Handle (on the console - NOTE: Do not install kickplate until instructed. 2 Move dishwasher close to cabinet opening . 14 NOTE: Do not push on the front of the panel or on some models) Install door handle Mounting stud Mounting stud Setscrew (inside of utilities. Add shims as needed in... the area shown to bring the dishwasher up floors (Kitchen floor height is moved into the setscrews. Move...
Installation Instructions
Page 20
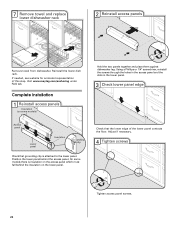
...maytag.com/anchoring under FAQ tab. Using a Phillips or 1/4" screwdriver, reinstall the screws through the holes in the access panel and the slots in the lower panel. 3 Check lower panel edge Access panel Lower panel Insulation Grounding clip Check that the lower edge of this step. On some models...) Hold the two panels together and place them against dishwasher leg. Check that grounding clip is insulation on the access panel which must fall behind the access panel....
...maytag.com/anchoring under FAQ tab. Using a Phillips or 1/4" screwdriver, reinstall the screws through the holes in the access panel and the slots in the lower panel. 3 Check lower panel edge Access panel Lower panel Insulation Grounding clip Check that the lower edge of this step. On some models...) Hold the two panels together and place them against dishwasher leg. Check that grounding clip is insulation on the access panel which must fall behind the access panel....

Installation Instructions
Page 21
... and controlling hard water deposit buildup. Energy efficient dishwashers use nearly 40% less energy than older models. Do not use an adapter. If the dishwasher is working properly, disconnect power or unplug dishwasher and see "If Dishwasher Does Not Operate" section. If none of a cycle.) 21 Certain models are equipped with rinse aid for good drying...
... and controlling hard water deposit buildup. Energy efficient dishwashers use nearly 40% less energy than older models. Do not use an adapter. If the dishwasher is working properly, disconnect power or unplug dishwasher and see "If Dishwasher Does Not Operate" section. If none of a cycle.) 21 Certain models are equipped with rinse aid for good drying...
Dimensions
Page 1
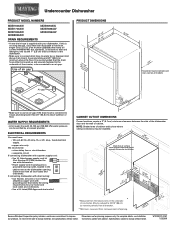
.... Use of 12' (3.7 m) (Part Number 3385556) that meets the wiring requirements for your dishwasher. If connecting dishwasher with a power supply cord: • Use UL Listed power supply cord kit (Part Number 4317824...(14(2.6-43.-41/c4m/c2"m") ) (1206.-71/c2m") (165-.19/4cm" ) CAlereaar *MeaNustOiuliTrteyEd:cSforhnoanmdeecttdhioeanrlosewameoasfytcpbaobeiininntestotanwllatehldles. Undercounter Dishwasher PRODUCT MODEL NUMBERS MDB7609AW MDB7709AW MDB7809AW MDB8859AW MDB8959AW MDBH989AW MDBH999AW DRAIN REQUIREMENTS • A new drain hose is connected to house plumbing...
.... Use of 12' (3.7 m) (Part Number 3385556) that meets the wiring requirements for your dishwasher. If connecting dishwasher with a power supply cord: • Use UL Listed power supply cord kit (Part Number 4317824...(14(2.6-43.-41/c4m/c2"m") ) (1206.-71/c2m") (165-.19/4cm" ) CAlereaar *MeaNustOiuliTrteyEd:cSforhnoanmdeecttdhioeanrlosewameoasfytcpbaobeiininntestotanwllatehldles. Undercounter Dishwasher PRODUCT MODEL NUMBERS MDB7609AW MDB7709AW MDB7809AW MDB8859AW MDB8959AW MDBH989AW MDBH999AW DRAIN REQUIREMENTS • A new drain hose is connected to house plumbing...

