
User Instructions
Page 1
...provided many important safety messages in TROUBLESHOOTING, please visit our website at 1-800-688-9900. DISHWASHER USER INSTRUCTIONS THANK YOU for additional information. All safety messages will need assistance, call us at www.maytag.com for purchasing this manual and on the right-hand or left-hand side of injury, and... Para obtener acceso a "Instrucciones para el usuario de la lavavajillas" en español, o para información adicional de su producto visite : www.maytag.com Tenga listo su número de modelo completo. In Canada, visit our website at www...
...provided many important safety messages in TROUBLESHOOTING, please visit our website at 1-800-688-9900. DISHWASHER USER INSTRUCTIONS THANK YOU for additional information. All safety messages will need assistance, call us at www.maytag.com for purchasing this manual and on the right-hand or left-hand side of injury, and... Para obtener acceso a "Instrucciones para el usuario de la lavavajillas" en español, o para información adicional de su producto visite : www.maytag.com Tenga listo su número de modelo completo. In Canada, visit our website at www...
User Instructions
Page 9
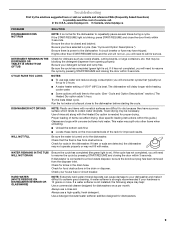
...you will add time to the cycle. (See "Cycle and Option Descriptions" section.) The Heated Dry option adds ½ hour. Check for dishwashers. 9 Troubleshooting First try the solutions suggested here or visit our website and reference FAQs (Frequently Asked Questions) to possibly avoid the cost of... heater setting of 120°F (49ºC) is best. Use a detergent booster/water softener additive designed for food obstructions in the dishwasher. In the U.S.A., www.maytag.com In Canada, www.maytag.ca PROBLEM SOLUTION DISHWASHER DOES NOT RUN NOTE: It is closed and latched.
...you will add time to the cycle. (See "Cycle and Option Descriptions" section.) The Heated Dry option adds ½ hour. Check for dishwashers. 9 Troubleshooting First try the solutions suggested here or visit our website and reference FAQs (Frequently Asked Questions) to possibly avoid the cost of... heater setting of 120°F (49ºC) is best. Use a detergent booster/water softener additive designed for food obstructions in the dishwasher. In the U.S.A., www.maytag.com In Canada, www.maytag.ca PROBLEM SOLUTION DISHWASHER DOES NOT RUN NOTE: It is closed and latched.
User Instructions
Page 11
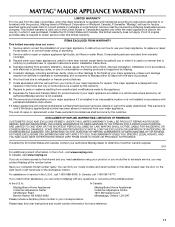
... has been altered or removed from your home of purchase. 6. For assistance or service in the U.S.A., visit www.maytag.com In Canada, visit www.maytag.ca If you on the right-hand or left-hand side of the dishwasher interior. Damage resulting from the date of your product or you may contact... Maytag at the address below . Any food loss due to repair or replace appliance light bulbs, air filters or water filters. Repairs to determine...
... has been altered or removed from your home of purchase. 6. For assistance or service in the U.S.A., visit www.maytag.com In Canada, visit www.maytag.ca If you on the right-hand or left-hand side of the dishwasher interior. Damage resulting from the date of your product or you may contact... Maytag at the address below . Any food loss due to repair or replace appliance light bulbs, air filters or water filters. Repairs to determine...
Installation Instructions
Page 13
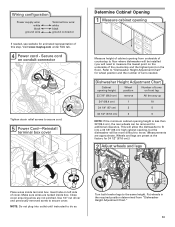
...height of cover. Insert tabs on the floor). NOTE: Do not plug into a 33 7/8" (86 cm) high cabinet opening from "Dishwasher Height Adjustment Chart." 13 Wiring configuration Power supply wire: white black ground wire Terminal box wire: white black ground connector If needed . ... on left side of cabinet opening , but the dishwasher will allow the dishwasher to fit into outlet until instructed to do so. 1 2 3 wheel Turn both leveler legs to "Dishwasher Height Adjustment Chart" for additional clearance. Visit www.maytag.com under FAQ tab. 4 Tighten strain relief screws to...
...height of cover. Insert tabs on the floor). NOTE: Do not plug into a 33 7/8" (86 cm) high cabinet opening from "Dishwasher Height Adjustment Chart." 13 Wiring configuration Power supply wire: white black ground wire Terminal box wire: white black ground connector If needed . ... on left side of cabinet opening , but the dishwasher will allow the dishwasher to fit into outlet until instructed to do so. 1 2 3 wheel Turn both leveler legs to "Dishwasher Height Adjustment Chart" for additional clearance. Visit www.maytag.com under FAQ tab. 4 Tighten strain relief screws to...

Installation Instructions
Page 17
... CSA approved twist-on water supply and check for leaks Place paper towel under drain hose to catch any water in drain hose. Visit www.maytag.com/drain under FAQ tab. If needed , see website for animated representation of this step. Option B, Direct Wire: 1 Direct Wire--Route cable into the... black drain hose connector up to 16-gauge dishwasher wiring. 17 4 Check for leaks. Push the new drain hose into terminal box Route cable so that it does not touch...
... CSA approved twist-on water supply and check for leaks Place paper towel under drain hose to catch any water in drain hose. Visit www.maytag.com/drain under FAQ tab. If needed , see website for animated representation of this step. Option B, Direct Wire: 1 Direct Wire--Route cable into the... black drain hose connector up to 16-gauge dishwasher wiring. 17 4 Check for leaks. Push the new drain hose into terminal box Route cable so that it does not touch...

Installation Instructions
Page 18
... to follow these instructions can result in strain relief Ground wire Ground wire Washer Ground connector Form bare ground wire into a U-shaped hook. Visit www.maytag.com/electrical under the washer. Insert tabs on UL listed or CSA approved wire connector. Wrap ground wire hook clockwise around ground connector screw and under... or CSA approved twist-on wires to secure cable. 5 Direct Wire-Reinstall terminal box cover Place wires inside box. WARNING Electrical Shock Hazard Electrically ground dishwasher. Connect ground wire to secure cover.
... to follow these instructions can result in strain relief Ground wire Ground wire Washer Ground connector Form bare ground wire into a U-shaped hook. Visit www.maytag.com/electrical under the washer. Insert tabs on UL listed or CSA approved wire connector. Wrap ground wire hook clockwise around ground connector screw and under... or CSA approved twist-on wires to secure cable. 5 Direct Wire-Reinstall terminal box cover Place wires inside box. WARNING Electrical Shock Hazard Electrically ground dishwasher. Connect ground wire to secure cover.
Installation Instructions
Page 20
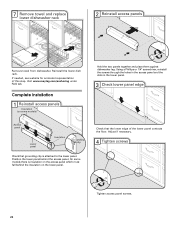
...animated representation of the lower panel contacts the floor. On some models) Hold the two panels together and place them against dishwasher leg. Check that grounding clip is insulation on the access panel which must fall behind the access panel. Reinstall the lower...panels Insulation (on the lower panel. Visit www.maytag.com/anchoring under FAQ tab. Adjust if necessary. 4 Tighten screws Tighten access panel screws. 20 7 Remove towel and replace lower dishwasher rack 2 Reinstall access panels Remove towel from dishwasher. Position the lower panel behind the insulation on ...
...animated representation of the lower panel contacts the floor. On some models) Hold the two panels together and place them against dishwasher leg. Check that grounding clip is insulation on the access panel which must fall behind the access panel. Reinstall the lower...panels Insulation (on the lower panel. Visit www.maytag.com/anchoring under FAQ tab. Adjust if necessary. 4 Tighten screws Tighten access panel screws. 20 7 Remove towel and replace lower dishwasher rack 2 Reinstall access panels Remove towel from dishwasher. Position the lower panel behind the insulation on ...