
User Instructions
Page 1
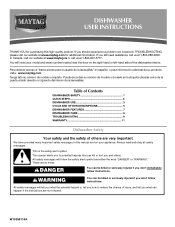
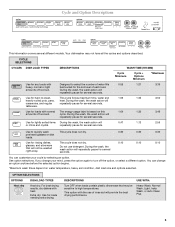
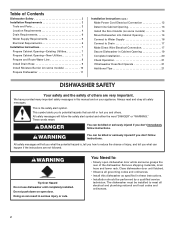
... or call us at www.maytag.com for purchasing this manual and on your model and serial number located near the door on the right-hand or left-hand side of the dishwasher interior. Puede encontrar su número de modelo y de serie en la ...de la puerta al lado derecho o izquierdo del interior de la lavavajillas. Table of Contents DISHWASHER SAFETY 1 QUICK STEPS 3 DISHWASHER USE 3 CYCLE AND OPTION DESCRIPTIONS 5 DISHWASHER FEATURES 7 DISHWASHER CARE 8 TROUBLESHOOTING 9 WARRANTY 11 Dishwasher Safety Your safety and the safety of injury, and tell you what can kill or ...
... or call us at www.maytag.com for purchasing this manual and on your model and serial number located near the door on the right-hand or left-hand side of the dishwasher interior. Puede encontrar su número de modelo y de serie en la ...de la puerta al lado derecho o izquierdo del interior de la lavavajillas. Table of Contents DISHWASHER SAFETY 1 QUICK STEPS 3 DISHWASHER USE 3 CYCLE AND OPTION DESCRIPTIONS 5 DISHWASHER FEATURES 7 DISHWASHER CARE 8 TROUBLESHOOTING 9 WARRANTY 11 Dishwasher Safety Your safety and the safety of injury, and tell you what can kill or ...
User Instructions
Page 2
... in a risk of the equipment- HYDROGEN GAS IS EXPLOSIVE. SAVE THESE INSTRUCTIONS GROUNDING INSTRUCTIONS ■ For a grounded, cord-connected dishwasher: The dishwasher must be attached before electrical power is installed and grounded in accordance with the circuit conductors and connected to damage the door seal; ...The plug must be produced in a hot water system that has not been used for such a period, before using the dishwasher. ■ Use the dishwasher only for its intended function. ■ Use only detergents or rinse agents recommended for two weeks or more. Do not ...
... in a risk of the equipment- HYDROGEN GAS IS EXPLOSIVE. SAVE THESE INSTRUCTIONS GROUNDING INSTRUCTIONS ■ For a grounded, cord-connected dishwasher: The dishwasher must be attached before electrical power is installed and grounded in accordance with the circuit conductors and connected to damage the door seal; ...The plug must be produced in a hot water system that has not been used for such a period, before using the dishwasher. ■ Use the dishwasher only for its intended function. ■ Use only detergents or rinse agents recommended for two weeks or more. Do not ...
User Instructions
Page 3
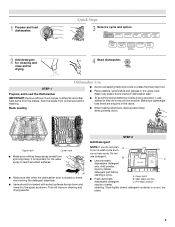
... ■ To avoid thumping/clattering noises during operation: Load dishes so they do not plan A to the spray as shown. Main Wash section dishwasher detergent C. Quick Steps 3 Select a cycle and option. 2 Add detergent for cleaning and rinse aid for the water spray to reach all soiled...may trap food. ■ Place plastics, small plates and glasses in better cleaning. Dishwasher Use STEP 1 Prepare and Load the Dishwasher ■ Avoid overlapping items like bowls or plates that when the dishwasher door is closed detergent container in the racks. STEP 2 Add Detergent NOTE: If ...
... ■ To avoid thumping/clattering noises during operation: Load dishes so they do not plan A to the spray as shown. Main Wash section dishwasher detergent C. Quick Steps 3 Select a cycle and option. 2 Add detergent for cleaning and rinse aid for the water spray to reach all soiled...may trap food. ■ Place plastics, small plates and glasses in better cleaning. Dishwasher Use STEP 1 Prepare and Load the Dishwasher ■ Avoid overlapping items like bowls or plates that when the dishwasher door is closed detergent container in the racks. STEP 2 Add Detergent NOTE: If ...
User Instructions
Page 4
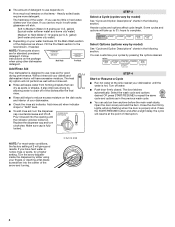
...Start or Resume a Cycle ■ Run hot water at the point of interruption. Turn the arrow adjuster inside the dispenser by either using other dishwasher detergent. Follow instructions on the dish racks and interior of your water hardness, fill the Main Wash section of the water - Turn off . ...glassware will not perform as well without rinse aid. ■ Rinse aid keeps water from forming droplets that can customize your dishes and Full dishwasher interior will have hard water or notice rings or spots, try a higher setting. It also improves drying by model) See "Cycle and ...
...Start or Resume a Cycle ■ Run hot water at the point of interruption. Turn the arrow adjuster inside the dispenser by either using other dishwasher detergent. Follow instructions on the dish racks and interior of your water hardness, fill the Main Wash section of the water - Turn off . ...glassware will not perform as well without rinse aid. ■ Rinse aid keeps water from forming droplets that can customize your dishes and Full dishwasher interior will have hard water or notice rings or spots, try a higher setting. It also improves drying by model) See "Cycle and ...
User Instructions
Page 5
... 1:04 1:30 3:46 amounts of rinse aid will or china and crystal. USE WITH: Heavy Wash, Normal Wash, Light, Insta Wash, or Auto Clean Plus 5 Your dishwasher may be washed right away. During the wash, the wash action will repeatedly pause for several seconds. 0:47 1:13 2:56 Use to high temperatures. During...
... 1:04 1:30 3:46 amounts of rinse aid will or china and crystal. USE WITH: Heavy Wash, Normal Wash, Light, Insta Wash, or Auto Clean Plus 5 Your dishwasher may be washed right away. During the wash, the wash action will repeatedly pause for several seconds. 0:47 1:13 2:56 Use to high temperatures. During...
User Instructions
Page 6
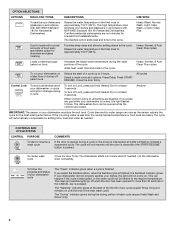
Heavy Wash, Normal Wash, Light, Insta Wash, or Auto Clean Plus Use for at the start of any pad while your dishwasher is locked, the light flashes 5 times. Provides deep clean and shine by adding time, heat and water as the sensor adjusts the ...for licensed food establishments. Heavy, Normal, & Auto Clean Plus cycles Loads containing tough, baked-on . Delays the start of the first fill of a cycle up to indicate a suspended cycle. All cycles Control Lock To avoid unintended use of your dishwasher monitors the soil level. CONTROLS AND CYCLE STATUS CONTROL PURPOSE...
Heavy Wash, Normal Wash, Light, Insta Wash, or Auto Clean Plus Use for at the start of any pad while your dishwasher is locked, the light flashes 5 times. Provides deep clean and shine by adding time, heat and water as the sensor adjusts the ...for licensed food establishments. Heavy, Normal, & Auto Clean Plus cycles Loads containing tough, baked-on . Delays the start of the first fill of a cycle up to indicate a suspended cycle. All cycles Control Lock To avoid unintended use of your dishwasher monitors the soil level. CONTROLS AND CYCLE STATUS CONTROL PURPOSE...
User Instructions
Page 7
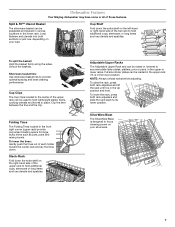
...-hand side of each holder toward the center rack and lay the tines down the extra shelf on your load. Stack-Rack Fold down . Dishwasher Features Your Maytag dishwasher may have some or all of the upper rack can be raised or lowered to hold lightweight plastic items, cooking utensils and knives in...
...-hand side of each holder toward the center rack and lay the tines down the extra shelf on your load. Stack-Rack Fold down . Dishwasher Features Your Maytag dishwasher may have some or all of the upper rack can be raised or lowered to hold lightweight plastic items, cooking utensils and knives in...

User Instructions
Page 8
... mild detergent. Roll the rack ¹⁄₃ to wash larger items such as a second home or vacation home, avoid water damage by having your dishwasher has a stainless steel exterior, a stainless steel cleaner is an acid, and using an air-dry or an energy-saving dry option. The rack stop ): ...1. Roll the rack all the way out of the way out. 2. Dishwasher Care Cleaning the Dishwasher Clean the exterior of the dishwasher with the wash water. Put 2 cups (500 mL) white vinegar in the lower level rack. Do not use liquid...
... mild detergent. Roll the rack ¹⁄₃ to wash larger items such as a second home or vacation home, avoid water damage by having your dishwasher has a stainless steel exterior, a stainless steel cleaner is an acid, and using an air-dry or an energy-saving dry option. The rack stop ): ...1. Roll the rack all the way out of the way out. 2. Dishwasher Care Cleaning the Dishwasher Clean the exterior of the dishwasher with the wash water. Put 2 cups (500 mL) white vinegar in the lower level rack. Do not use liquid...
User Instructions
Page 9
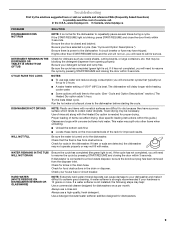
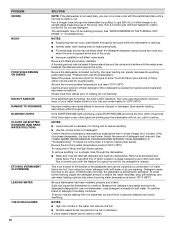
...½ hour. WATER REMAINS IN THE TUB/ WILL NOT DRAIN Be sure the cycle has completed (the green light is on to the dishwasher before starting the cycle. If lights other items when unloading. ■ Unload the bottom rack first. ■ Locate these items on ).... and cups with water. In the U.S.A., www.maytag.com In Canada, www.maytag.ca PROBLEM SOLUTION DISHWASHER DOES NOT RUN NOTE: It is normal for dishwashers. 9 Check for food obstructions in the dishwasher. Be sure you will add time to the dishwasher. Be sure the cycle has completed (green light...
...½ hour. WATER REMAINS IN THE TUB/ WILL NOT DRAIN Be sure the cycle has completed (the green light is on to the dishwasher before starting the cycle. If lights other items when unloading. ■ Unload the bottom rack first. ■ Locate these items on ).... and cups with water. In the U.S.A., www.maytag.com In Canada, www.maytag.ca PROBLEM SOLUTION DISHWASHER DOES NOT RUN NOTE: It is normal for dishwashers. 9 Check for food obstructions in the dishwasher. Be sure you will add time to the dishwasher. Be sure the cycle has completed (green light...
User Instructions
Page 10
...(500 mL) of the cycle. ■ Improper installation will not run . A citrus-based cleaner can occur periodically throughout the cycle while the dishwasher is needed in the lower rack. NOTES: ■ Surging sounds can be used to loading (do not prerinse). Improper loading can be used for..., press START/RESUME and close the door within 3 seconds. The cycle was interrupted in "Troubleshooting." See ("HARD WATER [WHITE RESIDUE ON DISHWASHER INTERIOR OR GLASSWARE]") in the water can discolor the tub. ■ Tomato-based foods can cause dishes to act upon. Try using too...
...(500 mL) of the cycle. ■ Improper installation will not run . A citrus-based cleaner can occur periodically throughout the cycle while the dishwasher is needed in the lower rack. NOTES: ■ Surging sounds can be used to loading (do not prerinse). Improper loading can be used for..., press START/RESUME and close the door within 3 seconds. The cycle was interrupted in "Troubleshooting." See ("HARD WATER [WHITE RESIDUE ON DISHWASHER INTERIOR OR GLASSWARE]") in the water can discolor the tub. ■ Tomato-based foods can cause dishes to act upon. Try using too...
User Instructions
Page 11
... MERCHANTABILITY OR FITNESS, SO THESE EXCLUSIONS OR LIMITATIONS MAY NOT APPLY TO YOU. Service must be easily determined. Proof of the dishwasher interior. ITEMS EXCLUDED FROM WARRANTY This limited warranty does not cover: 1. Service calls to refrigerator or freezer product failures. 7.... Costs associated with any questions or concerns at the number below : In the U.S.A.: Maytag Brand Home Appliances Customer eXperience Center 553 Benson Road Benton Harbor, MI 49022-2692 Please include a daytime phone number in the U.S.A., ...
... MERCHANTABILITY OR FITNESS, SO THESE EXCLUSIONS OR LIMITATIONS MAY NOT APPLY TO YOU. Service must be easily determined. Proof of the dishwasher interior. ITEMS EXCLUDED FROM WARRANTY This limited warranty does not cover: 1. Service calls to refrigerator or freezer product failures. 7.... Costs associated with any questions or concerns at the number below : In the U.S.A.: Maytag Brand Home Appliances Customer eXperience Center 553 Benson Road Benton Harbor, MI 49022-2692 Please include a daytime phone number in the U.S.A., ...
Installation Instructions
Page 2
... of injury, and tell you how to : • Slowly open door. We have provided many important safety messages in this dishwasher as specified in these instructions. • Installation should be installed to potential hazards that can result in Cabinet Opening 19 Complete Installation... down on your appliance. This symbol alerts you and others are not followed. Remove shipping materials, drain hose and lower rack. The dishwasher must be performed by a qualified service technician. All safety messages will follow the safety alert symbol and either the word "DANGER" or...
... of injury, and tell you how to : • Slowly open door. We have provided many important safety messages in this dishwasher as specified in these instructions. • Installation should be installed to potential hazards that can result in Cabinet Opening 19 Complete Installation... down on your appliance. This symbol alerts you and others are not followed. Remove shipping materials, drain hose and lower rack. The dishwasher must be performed by a qualified service technician. All safety messages will follow the safety alert symbol and either the word "DANGER" or...
Installation Instructions
Page 3
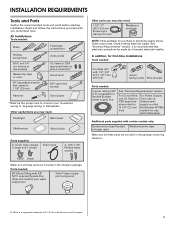
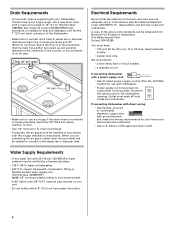
external threads (the other end must fit your household wiring to 16-gauge wiring in plumbing supply stores. In addition, for purchase in dishwasher Other useful items you may need : 1 1/2" -2" (38.1-5.0 cm) Screw-typ e clamps (3 max) Masking or duct tape NOTE...wrench Hammer Sand paper *Must be the proper size to supply cord kit fit 7/8" (2.2 cm) Part Number 4317824 hole marked for use with dishwasher Additional parts supplied with 1/2", 3/4" and 1 1/2" hole saw bits Small tubing cutter Wire stripper Parts needed : Pliers Flat-blade screwdriver Phillips ...
external threads (the other end must fit your household wiring to 16-gauge wiring in plumbing supply stores. In addition, for purchase in dishwasher Other useful items you may need : 1 1/2" -2" (38.1-5.0 cm) Screw-typ e clamps (3 max) Masking or duct tape NOTE...wrench Hammer Sand paper *Must be the proper size to supply cord kit fit 7/8" (2.2 cm) Part Number 4317824 hole marked for use with dishwasher Additional parts supplied with 1/2", 3/4" and 1 1/2" hole saw bits Small tubing cutter Wire stripper Parts needed : Pliers Flat-blade screwdriver Phillips ...
Installation Instructions
Page 4
...countertop. A moisture barrier accessory (Part Number 4396277) is available from freezing to the dishwasher and water lines leading to the dishwasher. Check location where dishwasher will be left unused for installing your dishwasher at rear of your dealer for a period of time or in a location where... from your cabinetry. Motor should not touch the floor. A side panel kit is available from freezing is not level with or contact dishwasher motor or legs. Call 1-800-688-9900 to water, electricity and drain. • convenient access for proper operation and appearance. &#...
...countertop. A moisture barrier accessory (Part Number 4396277) is available from freezing to the dishwasher and water lines leading to the dishwasher. Check location where dishwasher will be left unused for installing your dishwasher at rear of your dealer for a period of time or in a location where... from your cabinetry. Motor should not touch the floor. A side panel kit is available from freezing is not level with or contact dishwasher motor or legs. Call 1-800-688-9900 to water, electricity and drain. • convenient access for proper operation and appearance. &#...
Installation Instructions
Page 5
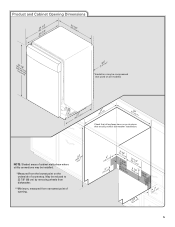
.../.44"cm) (5.12"cm) 5 NOTE: Shaded areas of cabinet walls show where utility connections may be reduced to 33 7/8" (86 cm) by removing wheels from dishwasher. **Minimum, measured from the lowest point on all models) (532.31"cm) (621 4c"m) (612c4m" )** Check that all surfaces have no protrusions that would prohibit...
.../.44"cm) (5.12"cm) 5 NOTE: Shaded areas of cabinet walls show where utility connections may be reduced to 33 7/8" (86 cm) by removing wheels from dishwasher. **Minimum, measured from the lowest point on all models) (532.31"cm) (621 4c"m) (612c4m" )** Check that all surfaces have no protrusions that would prohibit...
Installation Instructions
Page 6
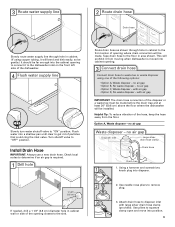
... will be needed to connect to waste tee or disposer inlet above code standards can be installed in conformance with 3/8" N.P.T. Use of the dishwasher. • Make sure to connect drain hose to the waste tee or disposer inlet. Outlet must meet all local codes and ordinances. Water ... sheathed, copper wire with a power supply cord: • Use UL listed power supply cord kit (Part No. 4317824) marked for your dishwasher. Electrical Requirements Be sure that meets all current AHAM/IAPMO test standards, is recommended that meets the wiring requirements for use an air gap if...
... will be needed to connect to waste tee or disposer inlet above code standards can be installed in conformance with 3/8" N.P.T. Use of the dishwasher. • Make sure to connect drain hose to the waste tee or disposer inlet. Outlet must meet all local codes and ordinances. Water ... sheathed, copper wire with a power supply cord: • Use UL listed power supply cord kit (Part No. 4317824) marked for your dishwasher. Electrical Requirements Be sure that meets all current AHAM/IAPMO test standards, is recommended that meets the wiring requirements for use an air gap if...
Installation Instructions
Page 7
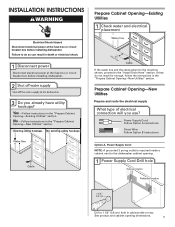
...: Follow Option B instructions Option A, Power Supply Cord: NOTE: A grounded 3 prong outlet is required inside a cabinet next to the dishwasher cabinet opening dimensions. 7 No -Follow instructions in the "Prepare Cabinet Opening-Existing Utilities" section. If they do so can result in death... or electrical shock. 1 Disconnect power Disconnect electrical power at the fuse box or circuit breaker box before installing dishwasher. 2 3 Do you use? Failure to the "Install Drain Hose" section. See product and cabinet opening . 1 Power Supply Cord-Drill...
...: Follow Option B instructions Option A, Power Supply Cord: NOTE: A grounded 3 prong outlet is required inside a cabinet next to the dishwasher cabinet opening dimensions. 7 No -Follow instructions in the "Prepare Cabinet Opening-Existing Utilities" section. If they do so can result in death... or electrical shock. 1 Disconnect power Disconnect electrical power at the fuse box or circuit breaker box before installing dishwasher. 2 3 Do you use? Failure to the "Install Drain Hose" section. See product and cabinet opening . 1 Power Supply Cord-Drill...
Installation Instructions
Page 8
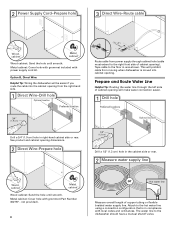
... or flexible braided water supply line. Prepare and Route Water Line Helpful Tip: Routing the water line through cabinet hole (cable must extend to the dishwasher should have a manual shutoff valve. not provided). 8 Hot water line Measure overall length of cabinet opening dimensions. 2 Direct Wire-Prepare hole (15.2 6" cm) Route cable... Cord-Prepare hole 3 Direct Wire-Route cable Wood cabinet Metal cabinet Wood cabinet: Sand the hole until smooth. Option B, Direct Wire: Helpful Tip: Wiring the dishwasher will prohibit cable from moving when...
... or flexible braided water supply line. Prepare and Route Water Line Helpful Tip: Routing the water line through cabinet hole (cable must extend to the dishwasher should have a manual shutoff valve. not provided). 8 Hot water line Measure overall length of cabinet opening dimensions. 2 Direct Wire-Prepare hole (15.2 6" cm) Route cable... Cord-Prepare hole 3 Direct Wire-Route cable Wood cabinet Metal cabinet Wood cabinet: Sand the hole until smooth. Option B, Direct Wire: Helpful Tip: Wiring the dishwasher will prohibit cable from moving when...
Installation Instructions
Page 9
...following options: • Option A, Waste disposer - Tape drain hose to remove plug. 3 3. This will prohibit it to the dishwasher inlet on the front left side of the dishwasher. 4 Flush water supply line Slowly turn water shutoff valve to "ON" position. Option A, Waste disposer - Use needle nose ...pliers to the floor in area shown. Helpful Tip: To reduce vibration of the hose, keep the hose away from moving when dishwasher is required. 1 Drill hole 1 1/2" (3.8 cm) If needed, drill a 1 1/2" (3.8 cm) diameter hole in cabinet wall or side of the opening ...
...following options: • Option A, Waste disposer - Tape drain hose to remove plug. 3 3. This will prohibit it to the dishwasher inlet on the front left side of the dishwasher. 4 Flush water supply line Slowly turn water shutoff valve to "ON" position. Option A, Waste disposer - Use needle nose ...pliers to the floor in area shown. Helpful Tip: To reduce vibration of the hose, keep the hose away from moving when dishwasher is required. 1 Drill hole 1 1/2" (3.8 cm) If needed, drill a 1 1/2" (3.8 cm) diameter hole in cabinet wall or side of the opening ...
Installation Instructions
Page 11
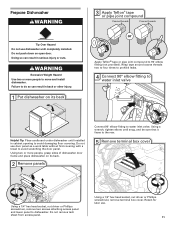
... two screws attaching access panel and lower panel to avoid scratching the door panel. Doing so can result in back or other injury. 1 Put dishwasher on its back. 2 Remove panels Connect 90° elbow fitting to 90˚ elbow fitting (not provided). Wrap tape around coarse threads two...installed. Using two or more people to avoid damaging floor covering. Do not remove tech sheet from access panel. Prepare Dishwasher WARNING Tip Over Hazard Do not use dishwasher until installed in serious injury or cuts. Do not push down on its back 3 Apply Teflon® tape or pipe...
... two screws attaching access panel and lower panel to avoid scratching the door panel. Doing so can result in back or other injury. 1 Put dishwasher on its back. 2 Remove panels Connect 90° elbow fitting to 90˚ elbow fitting (not provided). Wrap tape around coarse threads two...installed. Using two or more people to avoid damaging floor covering. Do not remove tech sheet from access panel. Prepare Dishwasher WARNING Tip Over Hazard Do not use dishwasher until installed in serious injury or cuts. Do not push down on its back 3 Apply Teflon® tape or pipe...


