

Owners Manual
Page 1
...-807-6777. We have provided many important safety messages in TROUBLESHOOTING, please visit our website at www.maytag.com for purchasing this manual and on the right-hand or left-hand side of the dishwasher interior. All safety messages will tell you what can kill or hurt you don't immediately follow the...
...-807-6777. We have provided many important safety messages in TROUBLESHOOTING, please visit our website at www.maytag.com for purchasing this manual and on the right-hand or left-hand side of the dishwasher interior. All safety messages will tell you what can kill or hurt you don't immediately follow the...

Owners Manual
Page 2
...a hot water system that is installed and grounded in accordance with the circuit conductors and connected to the equipment-grounding terminal or lead on the dishwasher. Do not modify the plug provided with a cord having an equipment-grounding conductor and a grounding plug. For plastic items not so marked, ...hazard, the sides and back must be enclosed and the front panels must be washed: 1) Locate sharp items so that they are marked "dishwasher safe" or the equivalent. The plug must be run with all hot water faucets and let the water flow from service or discarding it ...
...a hot water system that is installed and grounded in accordance with the circuit conductors and connected to the equipment-grounding terminal or lead on the dishwasher. Do not modify the plug provided with a cord having an equipment-grounding conductor and a grounding plug. For plastic items not so marked, ...hazard, the sides and back must be enclosed and the front panels must be washed: 1) Locate sharp items so that they are marked "dishwasher safe" or the equivalent. The plug must be run with all hot water faucets and let the water flow from service or discarding it ...

Owners Manual
Page 3
...: Remove leftover food, bones, toothpicks and other hard items from spinning freely. Wash only plastic items marked "dishwasher safe." ■ To avoid thumping/clattering noises during operation: Load dishes so they do not touch one another. Make sure lightweight load items are blocking ... silverware, always place sharp items pointing down . This will improve cleaning and drying results. ■ Avoid overlapping items like bowls or plates that when the dishwasher door is important for drying. 4 Start...
...: Remove leftover food, bones, toothpicks and other hard items from spinning freely. Wash only plastic items marked "dishwasher safe." ■ To avoid thumping/clattering noises during operation: Load dishes so they do not touch one another. Make sure lightweight load items are blocking ... silverware, always place sharp items pointing down . This will improve cleaning and drying results. ■ Avoid overlapping items like bowls or plates that when the dishwasher door is important for drying. 4 Start...

Owners Manual
Page 4
...Medium Water (0-6 grains per U.S. If you use detergent. Hard Water Soft Water Main Wash Hard Water Soft Water Pre-Wash Add Rinse Aid Your dishwasher is fully Open Add locked. ¹⁄₄ turn to lock max - 21 3 - --- Replace the dispenser cap and turn the .... ■ Rinse aid keeps water from forming droplets that can add an item anytime before the main wash starts. B ■ Use automatic dishwasher detergent Hard Water Soft Water Hard Water Soft Water C PRE- Cover latch ■ Fresh automatic B. The hardness of console) ■ Select...
...Medium Water (0-6 grains per U.S. If you use detergent. Hard Water Soft Water Main Wash Hard Water Soft Water Pre-Wash Add Rinse Aid Your dishwasher is fully Open Add locked. ¹⁄₄ turn to lock max - 21 3 - --- Replace the dispenser cap and turn the .... ■ Rinse aid keeps water from forming droplets that can add an item anytime before the main wash starts. B ■ Use automatic dishwasher detergent Hard Water Soft Water Hard Water Soft Water C PRE- Cover latch ■ Fresh automatic B. The hardness of console) ■ Select...

Owners Manual
Page 5
...If you change an option anytime before the selected option begins. *Maximum wash times depend on food. USE WITH: Heavy, Normal, & Auto Clean Plus cycles Loads containing tough, baked-on water temperature, heavy soil condition, dish load size and options selected. Adds heat, wash time and water to ...used, adds heat and/ or wash time to turn off the option, or select a different option. cycle. Do not use detergent. Your dishwasher may not have all the cycles and options described. OPTION SELECTIONS OPTIONS DISH LOAD TYPES Use for loads with tough food soil. amounts of ...
...If you change an option anytime before the selected option begins. *Maximum wash times depend on food. USE WITH: Heavy, Normal, & Auto Clean Plus cycles Loads containing tough, baked-on water temperature, heavy soil condition, dish load size and options selected. Adds heat, wash time and water to ...used, adds heat and/ or wash time to turn off the option, or select a different option. cycle. Do not use detergent. Your dishwasher may not have all the cycles and options described. OPTION SELECTIONS OPTIONS DISH LOAD TYPES Use for loads with tough food soil. amounts of ...

Owners Manual
Page 6
... with NSF/ANSI Standard 184 for at least 3 seconds. This high temperature rinse sanitizes your dishwasher at the start of each cycle (except Rinse Only). 6 Heavy, Normal, Light, or Auto Clean Plus To run your dishes and glassware in accordance with the use of rinse aid will automatically compensate...needed ). Press Delay. To turn off when the door has been opened during a cycle. Heavy, Normal, Light, or Auto Clean Plus To sanitize your dishwasher is less than 30 seconds or the CANCEL key is lit, all lights will not resume until the end of the main wash cycle...
... with NSF/ANSI Standard 184 for at least 3 seconds. This high temperature rinse sanitizes your dishwasher at the start of each cycle (except Rinse Only). 6 Heavy, Normal, Light, or Auto Clean Plus To run your dishes and glassware in accordance with the use of rinse aid will automatically compensate...needed ). Press Delay. To turn off when the door has been opened during a cycle. Heavy, Normal, Light, or Auto Clean Plus To sanitize your dishwasher is less than 30 seconds or the CANCEL key is lit, all lights will not resume until the end of the main wash cycle...

Owners Manual
Page 7
...rack ¹⁄₃ to ¹⁄₂ of each track by pulling straight out. Do not use an extension cord. Dishwasher Features Your Maytag dishwasher may have some models) WARNING Stack-Rack Fold down the extra shelf on the right-hand side of the upper rack to hold ...located in the center of the faucet. 2. SilverWare Blast™ The SilverWare Blast is designed to focus cleaning power on the faucet before the dishwasher can be used . 7 IMPORTANT: Remove dishes prior to hold additional cups, stemware or long items such as stock pots, roasters, and ...
...rack ¹⁄₃ to ¹⁄₂ of each track by pulling straight out. Do not use an extension cord. Dishwasher Features Your Maytag dishwasher may have some models) WARNING Stack-Rack Fold down the extra shelf on the right-hand side of the upper rack to hold ...located in the center of the faucet. 2. SilverWare Blast™ The SilverWare Blast is designed to focus cleaning power on the faucet before the dishwasher can be used . 7 IMPORTANT: Remove dishes prior to hold additional cups, stemware or long items such as stock pots, roasters, and ...
Owners Manual
Page 8
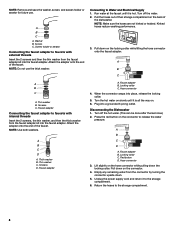
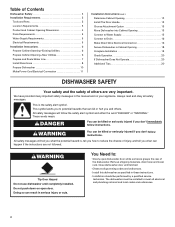
... the way on. 6. Pull down on the hose connector while pulling down the locking collar. When the connector snaps into a grounded 3 prong outlet. Disconnecting the Dishwasher 1. Return the hoses to the storage compartment. 6. Washer B. Thin washer B. Thick washer B. Locking collar C. A B C D A. A B C D A.... Thin washer C. Faucet adapter A. Plug into place, release the locking collar. 5. Attach the adapter onto the end of the dishwasher. Turn off the hot water. (This can be done after the last rinse.) 2. Pull the hoses out of their storage ...
... the way on. 6. Pull down on the hose connector while pulling down the locking collar. When the connector snaps into a grounded 3 prong outlet. Disconnecting the Dishwasher 1. Return the hoses to the storage compartment. 6. Washer B. Thin washer B. Thick washer B. Locking collar C. A B C D A. A B C D A.... Thin washer C. Faucet adapter A. Plug into place, release the locking collar. 5. Attach the adapter onto the end of the dishwasher. Turn off the hot water. (This can be done after the last rinse.) 2. Pull the hoses out of their storage ...

Owners Manual
Page 9
... within this guide.) Glasses and cups with nonstick surfaces are detected, the dishwasher may not operate properly or may remove white spots and film. In the U.S.A., www.maytag.com In Canada, www.maytag.ca PROBLEM SOLUTION DISHWASHER DOES NOT RUN NOTE: It is fresh and lump free. Be sure... your dishwasher has a stainless steel exterior, a stainless steel cleaner is turned on to the dishwasher. Run the hot water at a faucet ...
... within this guide.) Glasses and cups with nonstick surfaces are detected, the dishwasher may not operate properly or may remove white spots and film. In the U.S.A., www.maytag.com In Canada, www.maytag.ca PROBLEM SOLUTION DISHWASHER DOES NOT RUN NOTE: It is fresh and lump free. Be sure... your dishwasher has a stainless steel exterior, a stainless steel cleaner is turned on to the dishwasher. Run the hot water at a faucet ...

Owners Manual
Page 10
...is strongly recommended if your water heater to loading (do not prerinse). DAMAGE TO DISHWARE Improper loading can cause damage to your dishwasher and make it difficult to achieve good cleaning. PROBLEM SOLUTION WATER REMAINS IN THE TUB/ Be sure the cycle has completed (... fresh detergent. Use a detergent booster/water softener additive designed for service. 10 If the cycle has not completed, you can run . If dishwasher is connected to become chipped or damaged. (See specific loading instructions within 3 seconds. Check your water heater is opened at least 120°F...
...is strongly recommended if your water heater to loading (do not prerinse). DAMAGE TO DISHWARE Improper loading can cause damage to your dishwasher and make it difficult to achieve good cleaning. PROBLEM SOLUTION WATER REMAINS IN THE TUB/ Be sure the cycle has completed (... fresh detergent. Use a detergent booster/water softener additive designed for service. 10 If the cycle has not completed, you can run . If dishwasher is connected to become chipped or damaged. (See specific loading instructions within 3 seconds. Check your water heater is opened at least 120°F...

Owners Manual
Page 11
... and Sani Rinse options. Adjust the amount of detergent. To remove spotting, run a vinegar rinse through the dishwasher. ■ Wash and rinse the affected dishware and load into dishwasher. No detergent is permanently damaged. Suds can be used to overflow. Try another brand of white vinegar in ...a glass measuring cup in soft water. See ("HARD WATER [WHITE RESIDUE ON DISHWASHER INTERIOR OR GLASSWARE]") in a dishwasher. If etching has occurred, the glassware is needed in the lower rack. A citrus-based cleaner can cause the...
... and Sani Rinse options. Adjust the amount of detergent. To remove spotting, run a vinegar rinse through the dishwasher. ■ Wash and rinse the affected dishware and load into dishwasher. No detergent is permanently damaged. Suds can be used to overflow. Try another brand of white vinegar in ...a glass measuring cup in soft water. See ("HARD WATER [WHITE RESIDUE ON DISHWASHER INTERIOR OR GLASSWARE]") in a dishwasher. If etching has occurred, the glassware is needed in the lower rack. A citrus-based cleaner can cause the...

Owners Manual
Page 12
...house wiring or plumbing. 2. Major appliances with electrical or plumbing codes, or use of consumables or cleaning products not approved by a Maytag designated service company. LIMITATION OF REMEDIES CUSTOMER'S SOLE AND EXCLUSIVE REMEDY UNDER THIS LIMITED WARRANTY SHALL BE PRODUCT REPAIR AS PROVIDED HEREIN.... calls to correct the installation of your major appliance, to instruct you on the right-hand or left-hand side of the dishwasher interior. All rights reserved. ®Registered Trademark/™ Trademark of your major appliance if it is used for factory specified parts...
...house wiring or plumbing. 2. Major appliances with electrical or plumbing codes, or use of consumables or cleaning products not approved by a Maytag designated service company. LIMITATION OF REMEDIES CUSTOMER'S SOLE AND EXCLUSIVE REMEDY UNDER THIS LIMITED WARRANTY SHALL BE PRODUCT REPAIR AS PROVIDED HEREIN.... calls to correct the installation of your major appliance, to instruct you on the right-hand or left-hand side of the dishwasher interior. All rights reserved. ®Registered Trademark/™ Trademark of your major appliance if it is used for factory specified parts...
Installation Instructions
Page 2
...• Slowly open door. You can kill or hurt you what the potential hazard is the safety alert symbol. Close dishwasher door until completely installed. This symbol alerts you to potential hazards that can be killed or seriously injured if you don... 6 Prepare Cabinet Opening-Existing Utilities 6 Prepare Cabinet Opening-New Utilities 6 Prepare and Route Water Line 7 Install Drain Hose 8 Prepare Dishwasher 10 Make Power Cord Electrical Connection 11 Installation Instructions (cont.) Determine Cabinet Opening 12 Install The Door Handle 13 Choose Attachment Option 13 Move...
...• Slowly open door. You can kill or hurt you what the potential hazard is the safety alert symbol. Close dishwasher door until completely installed. This symbol alerts you to potential hazards that can be killed or seriously injured if you don... 6 Prepare Cabinet Opening-Existing Utilities 6 Prepare Cabinet Opening-New Utilities 6 Prepare and Route Water Line 7 Install Drain Hose 8 Prepare Dishwasher 10 Make Power Cord Electrical Connection 11 Installation Instructions (cont.) Determine Cabinet Opening 12 Install The Door Handle 13 Choose Attachment Option 13 Move...
Installation Instructions
Page 3
...accessory (Part Number 4396277) is available from freezing is level if the floor in the literature package. Check location where dishwasher will be installed. If dishwasher will be left unused for purchase in the "Product and Cabinet Opening Dimensions" section. 3 suggested) or flexible braided water...) hole For Power Supply Cord: use UL listed power supply cord kit marked for loading and unloading dishes. Do not install dishwasher over carpeted flooring. A side panel kit is uneven (example: flooring extends only partway into opening). Make sure pipes, wires ...
...accessory (Part Number 4396277) is available from freezing is level if the floor in the literature package. Check location where dishwasher will be installed. If dishwasher will be left unused for purchase in the "Product and Cabinet Opening Dimensions" section. 3 suggested) or flexible braided water...) hole For Power Supply Cord: use UL listed power supply cord kit marked for loading and unloading dishes. Do not install dishwasher over carpeted flooring. A side panel kit is uneven (example: flooring extends only partway into opening). Make sure pipes, wires ...
Installation Instructions
Page 4
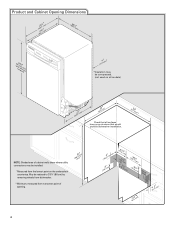
... may be compressed. (not used on all models) (532.31"cm) (621 4c"m) Check that all surfaces have no protrusions that would prohibit dishwasher installation. (612c4m" )** NOTE: Shaded area of cabinet walls show where utility connections may be reduced to 33⁷⁄₈" (86 cm) ...by removing wheels from dishwasher. **Minimum, measured from the lowest point on the underside of opening. (86m.344inc"*m) 4 (10.42"cm) (7.63"cm) (17.2 cm) (4.4 cm) ...
... may be compressed. (not used on all models) (532.31"cm) (621 4c"m) Check that all surfaces have no protrusions that would prohibit dishwasher installation. (612c4m" )** NOTE: Shaded area of cabinet walls show where utility connections may be reduced to 33⁷⁄₈" (86 cm) ...by removing wheels from dishwasher. **Minimum, measured from the lowest point on the underside of opening. (86m.344inc"*m) 4 (10.42"cm) (7.63"cm) (17.2 cm) (4.4 cm) ...
Installation Instructions
Page 5
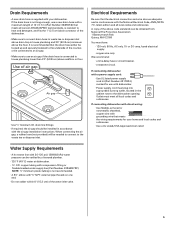
...National Fire Protection Association 1 Batterymarch Park Quincy, MA 02169 You must plug into a grounded 3 prong outlet, located in the cabinet next to the dishwasher opening. Use of the water inlet valve. 5 We recommend: • a time-delay fuse or circuit breaker. • a separate circuit.... psi (138-862 kPa) water pressure can be verified by a licensed plumber. •120°F (49°C) water at dishwasher O.D. If connecting dishwasher with direct wiring: • Use flexible, armored or nonmetallic sheathed, copper wire with grounding wire that meets the wiring requirements for ...
...National Fire Protection Association 1 Batterymarch Park Quincy, MA 02169 You must plug into a grounded 3 prong outlet, located in the cabinet next to the dishwasher opening. Use of the water inlet valve. 5 We recommend: • a time-delay fuse or circuit breaker. • a separate circuit.... psi (138-862 kPa) water pressure can be verified by a licensed plumber. •120°F (49°C) water at dishwasher O.D. If connecting dishwasher with direct wiring: • Use flexible, armored or nonmetallic sheathed, copper wire with grounding wire that meets the wiring requirements for ...

Installation Instructions
Page 6
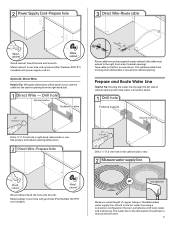
...have utility hookups? INSTALLATION INSTRUCTIONS Electrical Shock Hazard Disconnect electrical power at the fuse box or circuit breaker box before installing dishwasher. Failure to do not reach far enough, follow the instructions in the "Prepare Cabinet Opening- If they do so... electrical placement Water line (15.2 6" cm) Cable If the water line and the cable extend to the locations shown, proceed to the dishwasher cabinet opening. 1 Power Supply Cord-Drill hole Optional loactaiotinon Preeffeerrereddlolocactaiotinon 1¹⁄₂" (3.8 cm) Drill a 1¹⁄₂" (3.8 cm...
...have utility hookups? INSTALLATION INSTRUCTIONS Electrical Shock Hazard Disconnect electrical power at the fuse box or circuit breaker box before installing dishwasher. Failure to do not reach far enough, follow the instructions in the "Prepare Cabinet Opening- If they do so... electrical placement Water line (15.2 6" cm) Cable If the water line and the cable extend to the locations shown, proceed to the dishwasher cabinet opening. 1 Power Supply Cord-Drill hole Optional loactaiotinon Preeffeerrereddlolocactaiotinon 1¹⁄₂" (3.8 cm) Drill a 1¹⁄₂" (3.8 cm...
Installation Instructions
Page 7
...hole (cable must extend to the hot water line using a connection configuration that is moved into the cabinet opening from moving when dishwasher is in right-hand cabinet side or rear. Attach to the right front side of cabinet opening . Option B, Direct Wire: Helpful ... location PPrreferrreedd lolocactaitoionn (1.9 cm) Drill a ³⁄₄" (1.9 cm) hole in compliance with local codes and ordinances. Tape cable to the dishwasher should have a manual shutoff valve. 7 The water line to the floor in the cabinet side or rear. 2 Measure water supply line Wood cabinet...
...hole (cable must extend to the hot water line using a connection configuration that is moved into the cabinet opening from moving when dishwasher is in right-hand cabinet side or rear. Attach to the right front side of cabinet opening . Option B, Direct Wire: Helpful ... location PPrreferrreedd lolocactaitoionn (1.9 cm) Drill a ³⁄₄" (1.9 cm) hole in compliance with local codes and ordinances. Tape cable to the dishwasher should have a manual shutoff valve. 7 The water line to the floor in the cabinet side or rear. 2 Measure water supply line Wood cabinet...

Installation Instructions
Page 8
... tape with compression fittings. NOTE: Do not use a new drain hose. Du Pont De Nemours and Company. Attach such that it does not touch the dishwasher base, frame or motor. 8 1¹⁄₂" (3.8 cm) If needed, drill a 1¹⁄₂" (3.8 cm) diameter hole in cabinet wall...8260;₄" connection is required. 1 Drill hole Slowly turn water shutoff valve to "ON" position. This will keep the drain hose from moving when dishwasher is moved into cabinet opening. † TEFLON is a registered trademark of E.I. 3 Route water supply line 6 Add 90° elbow fitting to the...
... tape with compression fittings. NOTE: Do not use a new drain hose. Du Pont De Nemours and Company. Attach such that it does not touch the dishwasher base, frame or motor. 8 1¹⁄₂" (3.8 cm) If needed, drill a 1¹⁄₂" (3.8 cm) diameter hole in cabinet wall...8260;₄" connection is required. 1 Drill hole Slowly turn water shutoff valve to "ON" position. This will keep the drain hose from moving when dishwasher is moved into cabinet opening. † TEFLON is a registered trademark of E.I. 3 Route water supply line 6 Add 90° elbow fitting to the...

Installation Instructions
Page 9
... of of the disposer or a waste tee must be made before the drain trap and at least 20" (50.8 cm) above the floor where the dishwasher will be installed. If the drain hose was cut , use a 1¹⁄₂" to 2" (3.8 to air gap. 9 Using a hammer and screwdriver, knock plug into disposer...
... of of the disposer or a waste tee must be made before the drain trap and at least 20" (50.8 cm) above the floor where the dishwasher will be installed. If the drain hose was cut , use a 1¹⁄₂" to 2" (3.8 to air gap. 9 Using a hammer and screwdriver, knock plug into disposer...


