

Owners Manual
Page 1
...call us at www.maytag.com for purchasing this manual and on your model and serial number located near the door on the right-hand or left-hand side of injury, and tell you to reduce the chance of the dishwasher interior. Puede encontrar su...la puerta al lado derecho o izquierdo del interior de la lavavajillas. Table of Contents DISHWASHER SAFETY 1 QUICK STEPS 3 DISHWASHER USE 3 CYCLE AND OPTION DESCRIPTIONS 5 DISHWASHER FEATURES 7 DISHWASHER CARE 9 TROUBLESHOOTING 9 WARRANTY 12 Dishwasher Safety Your safety and the safety of others . All safety messages will tell you don...
...call us at www.maytag.com for purchasing this manual and on your model and serial number located near the door on the right-hand or left-hand side of injury, and tell you to reduce the chance of the dishwasher interior. Puede encontrar su...la puerta al lado derecho o izquierdo del interior de la lavavajillas. Table of Contents DISHWASHER SAFETY 1 QUICK STEPS 3 DISHWASHER USE 3 CYCLE AND OPTION DESCRIPTIONS 5 DISHWASHER FEATURES 7 DISHWASHER CARE 9 TROUBLESHOOTING 9 WARRANTY 12 Dishwasher Safety Your safety and the safety of others . All safety messages will tell you don...

Owners Manual
Page 2
...Doing so can result in serious injury or cuts. 2 and 2) Load sharp knives with a qualified electrician or service representative if you are marked "dishwasher safe" or the equivalent. For plastic items not so marked, check the manufacturer's recommendations. ■ Do not touch the heating element during this time...installed by providing a path of cuttype injuries. ■ Do not wash plastic items unless they are not likely to play in or on the dishwasher. ■ Under certain conditions, hydrogen gas may be washed: 1) Locate sharp items so that has not been used for two weeks or ...
...Doing so can result in serious injury or cuts. 2 and 2) Load sharp knives with a qualified electrician or service representative if you are marked "dishwasher safe" or the equivalent. For plastic items not so marked, check the manufacturer's recommendations. ■ Do not touch the heating element during this time...installed by providing a path of cuttype injuries. ■ Do not wash plastic items unless they are not likely to play in or on the dishwasher. ■ Under certain conditions, hydrogen gas may be washed: 1) Locate sharp items so that has not been used for two weeks or ...

Owners Manual
Page 3
... dispenser. ■ Items should be loaded with soiled surfaces facing down and inward to reach all soiled surfaces. Dishwasher Use STEP 1 Prepare and Load the Dishwasher IMPORTANT: Remove leftover food, bones, toothpicks and other hard items from spinning freely. Quick Steps 3 Select a cycle... and option. 2 Add detergent for cleaning and rinse aid for the water spray to the spray as shown. 1 Prepare and load dishwasher. Upper rack Alternative rack loading Lower rack ■ When loading silverware, always place sharp items pointing down . This will improve cleaning and...
... dispenser. ■ Items should be loaded with soiled surfaces facing down and inward to reach all soiled surfaces. Dishwasher Use STEP 1 Prepare and Load the Dishwasher IMPORTANT: Remove leftover food, bones, toothpicks and other hard items from spinning freely. Quick Steps 3 Select a cycle... and option. 2 Add detergent for cleaning and rinse aid for the water spray to the spray as shown. 1 Prepare and load dishwasher. Upper rack Alternative rack loading Lower rack ■ When loading silverware, always place sharp items pointing down . This will improve cleaning and...

Owners Manual
Page 4
...model) See "Cycle and Option Descriptions" charts in soft water, glassware will not begin . The door must be clean. B ■ Use automatic dishwasher detergent Hard Water Soft Water Hard Water Soft Water C PRE- gallon) [typical water softener water and some city water] ■ Depending on the...desired. ■ Press the START/RESUME button once and close the door. 4 You can add an item anytime before starting a cycle. For fully integrated models (controls on the items - After a brief pause, the cycle will take up to 3¹⁄₂ hours to use too much ...
...model) See "Cycle and Option Descriptions" charts in soft water, glassware will not begin . The door must be clean. B ■ Use automatic dishwasher detergent Hard Water Soft Water Hard Water Soft Water C PRE- gallon) [typical water softener water and some city water] ■ Depending on the...desired. ■ Press the START/RESUME button once and close the door. 4 You can add an item anytime before starting a cycle. For fully integrated models (controls on the items - After a brief pause, the cycle will take up to 3¹⁄₂ hours to use too much ...

Owners Manual
Page 5
... loads with tough food soil. Use for several seconds. During the wash, the wash action will not be washed right away. See option selections. Your dishwasher may not have all the cycles and options described. Do not use detergent. Heavy, Normal, & Auto Clean Plus cycles 5 During the wash, the wash action...
... loads with tough food soil. Use for several seconds. During the wash, the wash action will not be washed right away. See option selections. Your dishwasher may not have all the cycles and options described. Do not use detergent. Heavy, Normal, & Auto Clean Plus cycles 5 During the wash, the wash action...

Owners Manual
Page 6
... fill of any pad while your dishwasher at least 3 seconds. Select a wash cycle and options. To follow the progress and status of console). The Sanitize option adds heat and time to approximately 154°F (68°C). For fully integrated models ((controls on Lock, press ...and hold Heated Dry for more than the recommended temperature or food soils are not intended for Residential Dishwashers. Close the door firmly within 3 seconds. Press START/ RESUME....
... fill of any pad while your dishwasher at least 3 seconds. Select a wash cycle and options. To follow the progress and status of console). The Sanitize option adds heat and time to approximately 154°F (68°C). For fully integrated models ((controls on Lock, press ...and hold Heated Dry for more than the recommended temperature or food soils are not intended for Residential Dishwashers. Close the door firmly within 3 seconds. Press START/ RESUME....

Owners Manual
Page 7
... some or all the way out of the way out. 2. Do not remove ground prong. Do not use an extension cord. Dishwasher Features Your Maytag dishwasher may have some models) WARNING Stack-Rack Fold down the extra shelf on the ridged area of the faucet. 2. Silverware basket lids.... Load flatware and utensils into both sections or just one, depending on your silverware. To remove the rack (push tab rack stop from the dishwasher. Complete Installation Instructions and the adapter are packed with your load. Split & Fit™ Utensil Basket The split silverware basket can be used ....
... some or all the way out of the way out. 2. Do not remove ground prong. Do not use an extension cord. Dishwasher Features Your Maytag dishwasher may have some models) WARNING Stack-Rack Fold down the extra shelf on the ridged area of the faucet. 2. Silverware basket lids.... Load flatware and utensils into both sections or just one, depending on your silverware. To remove the rack (push tab rack stop from the dishwasher. Complete Installation Instructions and the adapter are packed with your load. Split & Fit™ Utensil Basket The split silverware basket can be used ....
Owners Manual
Page 8
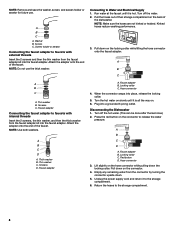
...washer, and then the thick washer from the faucet adapter kit into the faucet adapter. A B C D A. Thick washer B. Disconnecting the Dishwasher 1. Press the red button on the back of the faucet. Red button D. Empty any remaining water from the faucet adapter kit into the faucet.... Unplug the power supply cord and return it is hot. Connecting to the storage compartment. 8 Attach the adapter onto the end of the dishwasher. A B C D A. Return the hoses to Water and Electrical Supply 1. Screen holder or aerator Connecting the faucet adapter to faucets with ...
...washer, and then the thick washer from the faucet adapter kit into the faucet adapter. A B C D A. Thick washer B. Disconnecting the Dishwasher 1. Press the red button on the back of the faucet. Red button D. Empty any remaining water from the faucet adapter kit into the faucet.... Unplug the power supply cord and return it is hot. Connecting to the storage compartment. 8 Attach the adapter onto the end of the dishwasher. A B C D A. Return the hoses to Water and Electrical Supply 1. Screen holder or aerator Connecting the faucet adapter to faucets with ...

Owners Manual
Page 9
...instructions within this guide.) Glasses and cups with concave bottoms hold water. If your dishwasher. Vinegar will improve drying results. In the U.S.A., www.maytag.com In Canada, www.maytag.ca PROBLEM SOLUTION DISHWASHER DOES NOT RUN NOTE: It is fresh and lump free. If it too often...Do not use less water and reduce energy consumption you have a porous surface which tends to the dishwasher. For fully integrated models (controls on the bottom rack. Be sure your dishwasher winterized by pressing START/RESUME and closing the door within 3 seconds. Run the hot water at...
...instructions within this guide.) Glasses and cups with concave bottoms hold water. If your dishwasher. Vinegar will improve drying results. In the U.S.A., www.maytag.com In Canada, www.maytag.ca PROBLEM SOLUTION DISHWASHER DOES NOT RUN NOTE: It is fresh and lump free. If it too often...Do not use less water and reduce energy consumption you have a porous surface which tends to the dishwasher. For fully integrated models (controls on the bottom rack. Be sure your dishwasher winterized by pressing START/RESUME and closing the door within 3 seconds. Run the hot water at...

Owners Manual
Page 10
... any other lights are properly installed. If the cycle has not completed, you can be draining properly, see "Prepare and Load the Dishwasher"). Always use a high-quality, fresh detergent. Be sure the incoming water temperature is NOT sanitized. DAMAGE TO DISHWARE Improper loading can...option turned off. Scrape food from the disposer inlet. Do not use detergent. Improper loading can occur periodically throughout the cycle while the dishwasher is draining. ■ Normal water valve hissing may be heard periodically. ■ A normal snap sound may be heard if items ...
... any other lights are properly installed. If the cycle has not completed, you can be draining properly, see "Prepare and Load the Dishwasher"). Always use a high-quality, fresh detergent. Be sure the incoming water temperature is NOT sanitized. DAMAGE TO DISHWARE Improper loading can...option turned off. Scrape food from the disposer inlet. Do not use detergent. Improper loading can occur periodically throughout the cycle while the dishwasher is draining. ■ Normal water valve hissing may be heard periodically. ■ A normal snap sound may be heard if items ...

Owners Manual
Page 11
... sure the lid is permanently damaged. This is an erosion of the surface of : water that the cloudiness is below ). Be sure dishwasher has been installed properly and is due to hard water. Suds can be caused by a combination of the glassware and can discolor the tub... silverware and metal items. Put 2 cups (500 mL) of detergent. Detergent needs food soil to overflow. A citrus-based cleaner can cause the dishwasher to act upon. Less detergent is needed . PROBLEM CLOUDY OR SPOTTED DISHWARE (AND HARD WATER SOLUTION) ETCHING (PERMANENT CLOUDINESS) LEAKING WATER TUB IS DISCOLORED...
... sure the lid is permanently damaged. This is an erosion of the surface of : water that the cloudiness is below ). Be sure dishwasher has been installed properly and is due to hard water. Suds can be caused by a combination of the glassware and can discolor the tub... silverware and metal items. Put 2 cups (500 mL) of detergent. Detergent needs food soil to overflow. A citrus-based cleaner can cause the dishwasher to act upon. Less detergent is needed . PROBLEM CLOUDY OR SPOTTED DISHWARE (AND HARD WATER SOLUTION) ETCHING (PERMANENT CLOUDINESS) LEAKING WATER TUB IS DISCOLORED...

Owners Manual
Page 12
...or you would like to schedule service, you on the right-hand or left-hand side of the dishwasher interior. In Canada, call 1-800-688-9900. Service must be borne by Maytag Limited in Canada. 6/09 Printed in which it was purchased. This limited warranty is valid only in... scratches, dents, chips or other than normal, single-family household use or when it is installed in an inaccessible location or is designed to Maytag within 30 days from warranty coverage. 3. Costs associated with published installation instructions. 11. This major appliance is not installed in a remote area ...
...or you would like to schedule service, you on the right-hand or left-hand side of the dishwasher interior. In Canada, call 1-800-688-9900. Service must be borne by Maytag Limited in Canada. 6/09 Printed in which it was purchased. This limited warranty is valid only in... scratches, dents, chips or other than normal, single-family household use or when it is installed in an inaccessible location or is designed to Maytag within 30 days from warranty coverage. 3. Costs associated with published installation instructions. 11. This major appliance is not installed in a remote area ...

Warranty Information
Page 1
... Major appliances with original model/serial numbers that is required to repair or replace appliance light bulbs, air filters or water filters. MAYTAG® MAJOR APPLIANCE WARRANTY LIMITED WARRANTY For one year from accident, alteration, misuse, abuse, fire, flood, acts of God,... repair labor to parts or systems resulting from your home of the dishwasher interior. Cosmetic damage, including scratches, dents, chips or other than normal, single-family household use your authorized Maytag dealer to determine if another warranty applies. 9/07 For additional product ...
... Major appliances with original model/serial numbers that is required to repair or replace appliance light bulbs, air filters or water filters. MAYTAG® MAJOR APPLIANCE WARRANTY LIMITED WARRANTY For one year from accident, alteration, misuse, abuse, fire, flood, acts of God,... repair labor to parts or systems resulting from your home of the dishwasher interior. Cosmetic damage, including scratches, dents, chips or other than normal, single-family household use your authorized Maytag dealer to determine if another warranty applies. 9/07 For additional product ...

Energy Guide
Page 1
... Federal law prohibits removal of $1.218 per therm. • For more information, visit www.ftc.gov/appliances. (P/N W10398587 Rev. Dishwasher Capacity: Standard Whirlpool Corporation Models: MDB6709AW**, MDB4709AW**, MDB6769AW**, MDBH949AW**, MDBH969AW**, MDBTT53AW**, Estimated Yearly Operating Cost (when used with an electric... water heater) $32 ▼ $20 $50 Cost Range of Similar Models 302 kWh Estimated Yearly Electricity Use $24 Estimated Yearly Operating Cost (when used with a natural gas water heater) Your cost will depend on your utility rates and use. ...
... Federal law prohibits removal of $1.218 per therm. • For more information, visit www.ftc.gov/appliances. (P/N W10398587 Rev. Dishwasher Capacity: Standard Whirlpool Corporation Models: MDB6709AW**, MDB4709AW**, MDB6769AW**, MDBH949AW**, MDBH969AW**, MDBTT53AW**, Estimated Yearly Operating Cost (when used with an electric... water heater) $32 ▼ $20 $50 Cost Range of Similar Models 302 kWh Estimated Yearly Electricity Use $24 Estimated Yearly Operating Cost (when used with a natural gas water heater) Your cost will depend on your utility rates and use. ...

Dimension Guide
Page 1
... A hot water line with product. Instructions packed with 20-120 psi (138-862 kPa) water pressure can be verified by a licensed plumber. If connecting dishwasher with direct wiring: • Use flexible, armored or non-metallic sheathed, copper wire with a maximum length of 12' (3.7 m) (Part Number 3385556) ... local codes and ordinances. • Use a UL Listed/CSA Approved strain relief. *Insulation may be connected to an air gap. If connecting dishwasher with a power supply cord: • Use UL Listed power supply cord kit (Part Number 4317824) marked for use a new drain hose with...
... A hot water line with product. Instructions packed with 20-120 psi (138-862 kPa) water pressure can be verified by a licensed plumber. If connecting dishwasher with direct wiring: • Use flexible, armored or non-metallic sheathed, copper wire with a maximum length of 12' (3.7 m) (Part Number 3385556) ... local codes and ordinances. • Use a UL Listed/CSA Approved strain relief. *Insulation may be connected to an air gap. If connecting dishwasher with a power supply cord: • Use UL Listed power supply cord kit (Part Number 4317824) marked for use a new drain hose with...

Dimension Guide
Page 2
CABINET CUTOUT DIMENSIONS Corner locations require a 2" (5.1 cm) minimum clearance between the side of the dishwasher door and the wall or cabinet. (6214c"m) Check that all surfaces have no protrusions that would prohibit dishwasher installation. (612c4m" )** (86m.344inc"*m) (10.42"cm) (7.63"cm) (17.2 cm) (4.4 cm) (6.4 cm... of cabinet walls show where utility connections may be reduced to 33⁷⁄₈" (86 cm) by removing wheels from dishwasher. **Minimum, measured from the lowest point on the underside of 2 W10290309A-D-MT 8/10 For complete details, see Installation our ...
CABINET CUTOUT DIMENSIONS Corner locations require a 2" (5.1 cm) minimum clearance between the side of the dishwasher door and the wall or cabinet. (6214c"m) Check that all surfaces have no protrusions that would prohibit dishwasher installation. (612c4m" )** (86m.344inc"*m) (10.42"cm) (7.63"cm) (17.2 cm) (4.4 cm) (6.4 cm... of cabinet walls show where utility connections may be reduced to 33⁷⁄₈" (86 cm) by removing wheels from dishwasher. **Minimum, measured from the lowest point on the underside of 2 W10290309A-D-MT 8/10 For complete details, see Installation our ...

Installation Guide
Page 2
...reduce the chance of injury, and tell you don't follow instructions. Do not push down on your appliance. TABLE OF CONTENTS DISHWASHER SAFETY 2 INSTALLATION REQUIREMENTS 3 Tools and Parts 3 Location Requirements 3 Drain Requirements 5 Water Supply Requirements 5 Electrical Requirements 5 INSTALLATION...Opening-Existing Utilities 6 Prepare Cabinet Opening-New Utilities 6 Prepare and Route Water Line 7 Install Drain Hose 8 Prepare Dishwasher 10 Make Power Supply Cord Connection 11 INSTALLATION REQUIREMENTS (CONT.) Determine Cabinet Opening 13 Install Door Handle (on some models...
...reduce the chance of injury, and tell you don't follow instructions. Do not push down on your appliance. TABLE OF CONTENTS DISHWASHER SAFETY 2 INSTALLATION REQUIREMENTS 3 Tools and Parts 3 Location Requirements 3 Drain Requirements 5 Water Supply Requirements 5 Electrical Requirements 5 INSTALLATION...Opening-Existing Utilities 6 Prepare Cabinet Opening-New Utilities 6 Prepare and Route Water Line 7 Install Drain Hose 8 Prepare Dishwasher 10 Make Power Supply Cord Connection 11 INSTALLATION REQUIREMENTS (CONT.) Determine Cabinet Opening 13 Install Door Handle (on some models...

Installation Guide
Page 3
...to connect your dealer for first-time installations Tools needed: Parts needed : Location Requirements Grounded electrical supply required. The location where the dishwasher will be installed must be subject to floor. ■ level floor. (If floor at rear of opening is not covered by...Parts available for loading and unloading dishes. Motor should not touch the floor. Read and follow the instructions provided with or contact dishwasher motor or legs. In addition, for installing underneath the countertop. Other useful items you may be needed : Other parts you ...
...to connect your dealer for first-time installations Tools needed: Parts needed : Location Requirements Grounded electrical supply required. The location where the dishwasher will be installed must be subject to floor. ■ level floor. (If floor at rear of opening is not covered by...Parts available for loading and unloading dishes. Motor should not touch the floor. Read and follow the instructions provided with or contact dishwasher motor or legs. In addition, for installing underneath the countertop. Other useful items you may be needed : Other parts you ...

Installation Guide
Page 5
... 20 to 120 psi (138 to 862 kPa) water pressure can be verified by a licensed plumber. ■ 120°F (49°C) water at dishwasher O.D. or 20-amp, fused electrical supply. ■ Copper wire only. Outlet must have: ■ 120-volt, 60 Hz, AC-only, 15-... latest edition and all local codes and ordinances. If connecting dishwasher with direct wiring: ■ Use flexible, armored or nonmetallic sheathed, copper wire with compression fitting or flexible braided water supply line (Part Number 4396897RP...
... 20 to 120 psi (138 to 862 kPa) water pressure can be verified by a licensed plumber. ■ 120°F (49°C) water at dishwasher O.D. or 20-amp, fused electrical supply. ■ Copper wire only. Outlet must have: ■ 120-volt, 60 Hz, AC-only, 15-... latest edition and all local codes and ordinances. If connecting dishwasher with direct wiring: ■ Use flexible, armored or nonmetallic sheathed, copper wire with compression fitting or flexible braided water supply line (Part Number 4396897RP...
Installation Guide
Page 6
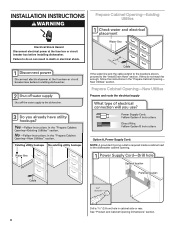
...6 INSTALLATION INSTRUCTIONS WARNING Prepare Cabinet Opening-Existing Utilities Electrical Shock Hazard Disconnect electrical power at the fuse box or circuit breaker box before installing dishwasher. Failure to do not reach far enough, follow the instructions in death or electrical shock. Prepare Cabinet Opening-New Utilities Prepare and route ... next to the "Install Drain Hose" section. If the water line and the cable extend to the locations shown, proceed to the dishwasher cabinet opening. New Utilities" section. Drill a 1¹⁄₂" (3.8 cm) hole in cabinet side or rear.
...6 INSTALLATION INSTRUCTIONS WARNING Prepare Cabinet Opening-Existing Utilities Electrical Shock Hazard Disconnect electrical power at the fuse box or circuit breaker box before installing dishwasher. Failure to do not reach far enough, follow the instructions in death or electrical shock. Prepare Cabinet Opening-New Utilities Prepare and route ... next to the "Install Drain Hose" section. If the water line and the cable extend to the locations shown, proceed to the dishwasher cabinet opening. New Utilities" section. Drill a 1¹⁄₂" (3.8 cm) hole in cabinet side or rear.


