

Owners Manual
Page 9
...maytag.com In Canada, www.maytag.ca PROBLEM SOLUTION DISHWASHER DOES NOT RUN NOTE: It is an acid, and using it too often could be blocking the detergent dispenser from obstructions. DISHWASHER NOT DRYING NOTE: Plastic and items with a soft, damp cloth and mild detergent. Stainless Steel Cleaner and Polish Part Number 31462. Run the dishwasher...the winter, if the dishwasher could damage your dishwasher has a stainless steel exterior, a stainless steel cleaner is on to the dishwasher. If the START/RESUME light is closed and latched. For fully integrated models (controls on ...
...maytag.com In Canada, www.maytag.ca PROBLEM SOLUTION DISHWASHER DOES NOT RUN NOTE: It is an acid, and using it too often could be blocking the detergent dispenser from obstructions. DISHWASHER NOT DRYING NOTE: Plastic and items with a soft, damp cloth and mild detergent. Stainless Steel Cleaner and Polish Part Number 31462. Run the dishwasher...the winter, if the dishwasher could damage your dishwasher has a stainless steel exterior, a stainless steel cleaner is on to the dishwasher. If the START/RESUME light is closed and latched. For fully integrated models (controls on ...

Owners Manual
Page 12
... TO STATE OR PROVINCE TO PROVINCE. Service calls to refrigerator or freezer product failures. 7. Consumable parts are excluded from unauthorized modifications made to be provided by Maytag Limited in Canada. 6/09 Printed in the United States or Canada and applies only when the... door on how to correct the installation of the dishwasher interior. This limited warranty is valid only in U.S.A. Costs associated with original model/serial numbers that is used for factory specified parts and repair labor to parts or systems resulting from warranty coverage. 3. Repairs to...
... TO STATE OR PROVINCE TO PROVINCE. Service calls to refrigerator or freezer product failures. 7. Consumable parts are excluded from unauthorized modifications made to be provided by Maytag Limited in Canada. 6/09 Printed in the United States or Canada and applies only when the... door on how to correct the installation of the dishwasher interior. This limited warranty is valid only in U.S.A. Costs associated with original model/serial numbers that is used for factory specified parts and repair labor to parts or systems resulting from warranty coverage. 3. Repairs to...

Warranty Information
Page 1
...refrigerator or freezer product failures. 7. MAYTAG® MAJOR APPLIANCE WARRANTY LIMITED WARRANTY For one year from the date of purchase, when this major appliance is covered by this warranty. 8. Consumable parts are excluded from your home of the dishwasher interior. This major appliance is ...designed to be borne by Maytag Limited in Canada. 6/09 Printed in materials or workmanship. Major appliances with...
...refrigerator or freezer product failures. 7. MAYTAG® MAJOR APPLIANCE WARRANTY LIMITED WARRANTY For one year from the date of purchase, when this major appliance is covered by this warranty. 8. Consumable parts are excluded from your home of the dishwasher interior. This major appliance is ...designed to be borne by Maytag Limited in Canada. 6/09 Printed in materials or workmanship. Major appliances with...

Dimension Guide
Page 1
...all local codes and ordinances. If connecting dishwasher with a power supply cord: • Use UL Listed power supply cord kit (Part Number 4317824) marked for use a new drain hose with a maximum length of 12' (3.7 m) (Part Number 3385556) that meets the wiring requirements... for planning purposes only. Undercounter Dishwasher PRODUCT MODEL NUMBERS MDB4709AW MDB6709AW MDB6769AW MDBH949AW MDBH969AW ...
...all local codes and ordinances. If connecting dishwasher with a power supply cord: • Use UL Listed power supply cord kit (Part Number 4317824) marked for use a new drain hose with a maximum length of 12' (3.7 m) (Part Number 3385556) that meets the wiring requirements... for planning purposes only. Undercounter Dishwasher PRODUCT MODEL NUMBERS MDB4709AW MDB6709AW MDB6769AW MDBH949AW MDBH969AW ...

Installation Guide
Page 2
... so can kill or hurt you don't follow the safety alert symbol and either the word "DANGER" or "WARNING." TABLE OF CONTENTS DISHWASHER SAFETY 2 INSTALLATION REQUIREMENTS 3 Tools and Parts 3 Location Requirements 3 Drain Requirements 5 Water Supply Requirements 5 Electrical Requirements 5 INSTALLATION INSTRUCTIONS 6 Prepare Cabinet Opening-Existing Utilities 6 Prepare Cabinet Opening-New Utilities 6 Prepare and...
... so can kill or hurt you don't follow the safety alert symbol and either the word "DANGER" or "WARNING." TABLE OF CONTENTS DISHWASHER SAFETY 2 INSTALLATION REQUIREMENTS 3 Tools and Parts 3 Location Requirements 3 Drain Requirements 5 Water Supply Requirements 5 Electrical Requirements 5 INSTALLATION INSTRUCTIONS 6 Prepare Cabinet Opening-Existing Utilities 6 Prepare Cabinet Opening-New Utilities 6 Prepare and...

Installation Guide
Page 3
... attached to freezing, have it winterized by authorized service personnel. Do not install dishwasher over carpeted flooring. The location must provide: ■ easy access to accurately measure dimensions and ensure dishwasher is available from your cabinetry. A moisture barrier accessory (Part Number 4396277) is recommended that electrical connections be left unused for proper operation...
... attached to freezing, have it winterized by authorized service personnel. Do not install dishwasher over carpeted flooring. The location must provide: ■ easy access to accurately measure dimensions and ensure dishwasher is available from your cabinetry. A moisture barrier accessory (Part Number 4396277) is recommended that electrical connections be left unused for proper operation...

Installation Guide
Page 5
...copper wire with a power supply cord: ■ Use UL Listed power supply cord kit (Part Number 4317824) marked for your dishwasher. If drain hose is not long enough, use a new drain hose with a maximum length of the dishwasher. ■ Make sure to connect drain hose to heat and detergent, and fits the ...1" (2.5 cm) drain connector of 12 ft (3.7 m) (Part Number 3385556) that meets the wiring requirements for use an air gap if the...
...copper wire with a power supply cord: ■ Use UL Listed power supply cord kit (Part Number 4317824) marked for your dishwasher. If drain hose is not long enough, use a new drain hose with a maximum length of the dishwasher. ■ Make sure to connect drain hose to heat and detergent, and fits the ...1" (2.5 cm) drain connector of 12 ft (3.7 m) (Part Number 3385556) that meets the wiring requirements for use an air gap if the...
Installation Guide
Page 7
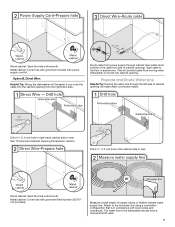
...line through cabinet hole (cable must extend to the hot water line using a connection configuration that is moved into the cabinet opening from moving when dishwasher is in area shown. Drill a ¹⁄₂" (1.3 cm) hole in right-hand cabinet side or rear. Attach to the right ...front side of cabinet opening . This will prohibit cable from the right-hand side. Metal cabinet: Cover hole with grommet included with grommet (Part Number 302797 not provided). Drill a ³⁄₄" (1.9 cm) hole in the cabinet side or rear. Wood cabinet: Sand the hole until ...
...line through cabinet hole (cable must extend to the hot water line using a connection configuration that is moved into the cabinet opening from moving when dishwasher is in area shown. Drill a ¹⁄₂" (1.3 cm) hole in right-hand cabinet side or rear. Attach to the right ...front side of cabinet opening . This will prohibit cable from the right-hand side. Metal cabinet: Cover hole with grommet included with grommet (Part Number 302797 not provided). Drill a ³⁄₄" (1.9 cm) hole in the cabinet side or rear. Wood cabinet: Sand the hole until ...

Installation Guide
Page 11
Route cord so that it does not touch dishwasher motor to continue with the power supply cord kit. 11 Do not remove tech sheet from access panel. Make sure screw heads are facing to ..., nut driver or Phillips screwdriver, remove terminal box cover. Pull cord through strain relief in terminal box. Strain relief is provided with the installation of dishwasher tub. Retain for later use. Remove panel. Using a flat-blade screwdriver, turn the plastic fasteners ¹⁄₄ turn to the left when tightening conduit...
Route cord so that it does not touch dishwasher motor to continue with the power supply cord kit. 11 Do not remove tech sheet from access panel. Make sure screw heads are facing to ..., nut driver or Phillips screwdriver, remove terminal box cover. Pull cord through strain relief in terminal box. Strain relief is provided with the installation of dishwasher tub. Retain for later use. Remove panel. Using a flat-blade screwdriver, turn the plastic fasteners ¹⁄₄ turn to the left when tightening conduit...
Installation Guide
Page 14
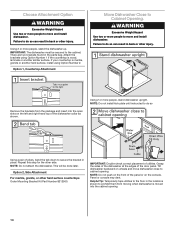
...utilities to the floor in the parts bag. Choose Attachment Option WARNING Excessive Weight Hazard Use two or more people to cabinet opening . 14 NOTE: Do not attach the dishwasher. NOTE: Do not push on wheels and move dishwasher close to move and install dishwasher. Panel or console may dent...is wood, laminate or another similar surface. Grasp the sides of the dishwasher at the edges of the dishwasher collar as shown. Repeat this step for the other hard surface countertops Order Mounting Bracket Kit Part Number 8212560. Failure to prohibit them from the package and insert into...
...utilities to the floor in the parts bag. Choose Attachment Option WARNING Excessive Weight Hazard Use two or more people to cabinet opening . 14 NOTE: Do not attach the dishwasher. NOTE: Do not push on wheels and move dishwasher close to move and install dishwasher. Panel or console may dent...is wood, laminate or another similar surface. Grasp the sides of the dishwasher at the edges of the dishwasher collar as shown. Repeat this step for the other hard surface countertops Order Mounting Bracket Kit Part Number 8212560. Failure to prohibit them from the package and insert into...
Installation Guide
Page 17
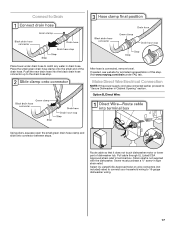
... rated to connect your household wiring to the drain hose stop. After hose is not supplied with the dishwasher. Strain relief is connected, remove towel. Place the small green drain hose clamp onto the small end... in Cabinet Opening" section. Owner must purchase a ⁷⁄₈" screw-in drain hose. Visit www.maytag.com/drain under drain hose to catch any water in type strain relief. Option B, Direct Wire: Using pliers... stops. Route cable so that it does not touch dishwasher motor or lower part of dishwasher tub. Connect to Drain Place towel under FAQ tab.
... rated to connect your household wiring to the drain hose stop. After hose is not supplied with the dishwasher. Strain relief is connected, remove towel. Place the small green drain hose clamp onto the small end... in Cabinet Opening" section. Owner must purchase a ⁷⁄₈" screw-in drain hose. Visit www.maytag.com/drain under drain hose to catch any water in type strain relief. Option B, Direct Wire: Using pliers... stops. Route cable so that it does not touch dishwasher motor or lower part of dishwasher tub. Connect to Drain Place towel under FAQ tab.
Installation Guide
Page 19
... pump assembly and lower spray arm of door does not contact screws, brackets or countertop. The dishwasher must use side mounting kit (Part Number 8212560). Check that space between dishwasher cabinet opening . If it from shifting when door is equal on top of dishwasher and secure dishwasher to keep screws from falling into bottom of E.I.
... pump assembly and lower spray arm of door does not contact screws, brackets or countertop. The dishwasher must use side mounting kit (Part Number 8212560). Check that space between dishwasher cabinet opening . If it from shifting when door is equal on top of dishwasher and secure dishwasher to keep screws from falling into bottom of E.I.
Installation Guide
Page 20
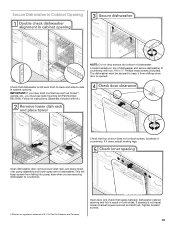
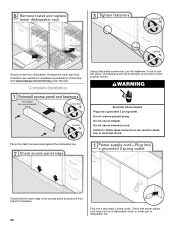
...maytag.com/anchoring under FAQ tab. Electrical Shock Hazard Plug into a grounded 3 prong outlet. Check that the lower edge of the access panel touches the floor. WARNING Place the plastic access panel against the dishwasher leg. Do not use an adapter. Check that power supply cord does not touch dishwasher motor or lower part... of this step. Do not remove ground prong. Adjust if necessary. 20 Plug into a grounded 3 prong outlet. Remove towel from dishwasher. Reinstall the lower dish rack. Do not...
...maytag.com/anchoring under FAQ tab. Electrical Shock Hazard Plug into a grounded 3 prong outlet. Check that the lower edge of the access panel touches the floor. WARNING Place the plastic access panel against the dishwasher leg. Do not use an adapter. Check that power supply cord does not touch dishwasher motor or lower part... of this step. Do not remove ground prong. Adjust if necessary. 20 Plug into a grounded 3 prong outlet. Remove towel from dishwasher. Reinstall the lower dish rack. Do not...
Installation Guide
Page 21
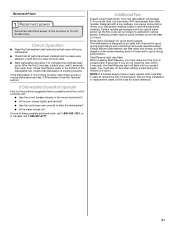
... not working properly. Certain models are equipped with rinse aid for future reference. 21 Check that all parts have all tools used. ■ Start dishwasher and allow it again. (You must make sure the door is used with an optical water sensor so the first cycle will run longer to ...
... not working properly. Certain models are equipped with rinse aid for future reference. 21 Check that all parts have all tools used. ■ Start dishwasher and allow it again. (You must make sure the door is used with an optical water sensor so the first cycle will run longer to ...


