User Instructions
Page 1
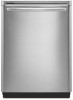
DISHWASHER USER INSTRUCTIONS THANK YOU for additional information. If you don't follow instructions. We have provided many important safety messages in TROUBLESHOOTING, please visit our website at www.maytag.com for purchasing this manual and on your model and ...call us at 1-800-807-6777. Table of Contents DISHWASHER SAFETY 1 QUICK STEPS 3 DISHWASHER USE 3 CYCLE AND OPTION DESCRIPTIONS 5 DISHWASHER FEATURES 7 DISHWASHER CARE 8 TROUBLESHOOTING 8 WARRANTY 10 Dishwasher Safety Your safety and the safety of the dishwasher interior. This is , tell you how to potential...
DISHWASHER USER INSTRUCTIONS THANK YOU for additional information. If you don't follow instructions. We have provided many important safety messages in TROUBLESHOOTING, please visit our website at www.maytag.com for purchasing this manual and on your model and ...call us at 1-800-807-6777. Table of Contents DISHWASHER SAFETY 1 QUICK STEPS 3 DISHWASHER USE 3 CYCLE AND OPTION DESCRIPTIONS 5 DISHWASHER FEATURES 7 DISHWASHER CARE 8 TROUBLESHOOTING 8 WARRANTY 10 Dishwasher Safety Your safety and the safety of the dishwasher interior. This is , tell you how to potential...

User Instructions
Page 2
...outlet that is installed and grounded in a risk of the equipment- grounding conductor can result in or on open flame during or immediately after use dishwasher until completely installed. if it . The plug must be run with the circuit conductors and connected to reduce the risk of children. ■ ...WARNING Tip Over Hazard Do not use . ■ Do not abuse, sit on, or stand on the door, lid, or dish racks of the dishwasher. ■ To reduce the risk of least resistance for two weeks or more. Refer to the installation instructions for proper grounding procedures. ■ Remove...
...outlet that is installed and grounded in a risk of the equipment- grounding conductor can result in or on open flame during or immediately after use dishwasher until completely installed. if it . The plug must be run with the circuit conductors and connected to reduce the risk of children. ■ ...WARNING Tip Over Hazard Do not use . ■ Do not abuse, sit on, or stand on the door, lid, or dish racks of the dishwasher. ■ To reduce the risk of least resistance for two weeks or more. Refer to the installation instructions for proper grounding procedures. ■ Remove...

User Instructions
Page 3
.... This will improve cleaning and drying results. ■ Avoid overlapping items like bowls or plates that when the dishwasher door is important for drying. 4 Start dishwasher. Remove labels from spinning freely. Rack™ Shelf (on the rack under the Stack- STEP... dispenser. ■ Items should be loaded with soiled surfaces facing down and avoid "nesting" as shown. 1 Prepare and load dishwasher. Wash only plastic items marked "dishwasher safe." ■ To avoid thumping/clattering noises during operation: Load dishes so they do not touch one another. Quick Steps 3...
.... This will improve cleaning and drying results. ■ Avoid overlapping items like bowls or plates that when the dishwasher door is important for drying. 4 Start dishwasher. Remove labels from spinning freely. Rack™ Shelf (on the rack under the Stack- STEP... dispenser. ■ Items should be loaded with soiled surfaces facing down and avoid "nesting" as shown. 1 Prepare and load dishwasher. Wash only plastic items marked "dishwasher safe." ■ To avoid thumping/clattering noises during operation: Load dishes so they do not touch one another. Quick Steps 3...

User Instructions
Page 4
... and Option Descriptions" charts in the following section. STEP 4 Start or Resume a Cycle ■ Run hot water at the sink nearest your dishwasher. ■ Check the rinse aid indicator. Open the door slowly and add the item. Press Start/ Resume and close the door firmly within ... dispenser cap counterclockwise and lift off of the arrow and turning. The Start light will etch. If you use detergent. ■ Use automatic dishwasher detergent only. gallon) [typical water softener water and some city water] ■ Depending on the items - Without rinse aid your fingers or...
... and Option Descriptions" charts in the following section. STEP 4 Start or Resume a Cycle ■ Run hot water at the sink nearest your dishwasher. ■ Check the rinse aid indicator. Open the door slowly and add the item. Press Start/ Resume and close the door firmly within ... dispenser cap counterclockwise and lift off of the arrow and turning. The Start light will etch. If you use detergent. ■ Use automatic dishwasher detergent only. gallon) [typical water softener water and some city water] ■ Depending on the items - Without rinse aid your fingers or...

User Instructions
Page 5
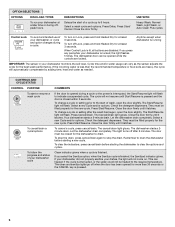
..., heat. This high temperature rinse sanitizes your dishes and glassware in the final rinse to select the number of food soil. Certified residential dishwashers are not intended for rinsing dishes, This cycle does not dry. Depending on this 2:02 2:17 2:49 amounts of water fills best ...You can customize your mind, press the option again to high temperatures. The Sanitize option adds heat and time to the cycle. Your dishwasher may be washed right away. Loads containing tough, baked-on water temperature, heavy soil condition, dish load size and options selected. Cycle ...
..., heat. This high temperature rinse sanitizes your dishes and glassware in the final rinse to select the number of food soil. Certified residential dishwashers are not intended for rinsing dishes, This cycle does not dry. Depending on this 2:02 2:17 2:49 amounts of water fills best ...You can customize your mind, press the option again to high temperatures. The Sanitize option adds heat and time to the cycle. Your dishwasher may be washed right away. Loads containing tough, baked-on water temperature, heavy soil condition, dish load size and options selected. Cycle ...
User Instructions
Page 6
...Resume light will automatically compensate by adding time, heat and water as the sensor adjusts the cycle for at least 3 seconds. Let the dishwasher drain completely. To cancel a cycle, press cancel/drain. Remember to clear the options and cycles. DESCRIPTIONS Delays the start or resume a .... Press Start/Resume. They must be heated to stop the drain. To clear the indicators, press cancel/drain before starting the dishwasher to drain the dishwasher before starting a new cycle. To change a cycle or setting prior to indicate a suspended cycle. Close the door firmly until it...
...Resume light will automatically compensate by adding time, heat and water as the sensor adjusts the cycle for at least 3 seconds. Let the dishwasher drain completely. To cancel a cycle, press cancel/drain. Remember to clear the options and cycles. DESCRIPTIONS Delays the start or resume a .... Press Start/Resume. They must be heated to stop the drain. To clear the indicators, press cancel/drain before starting the dishwasher to drain the dishwasher before starting a new cycle. To change a cycle or setting prior to indicate a suspended cycle. Close the door firmly until it...

User Instructions
Page 7
... rotate it to the left to snug items against the outer rack or rotate it to the right to removing the upper rack from the dishwasher. IMPORTANT: Remove dishes prior to rest on your load. Locate the rack stops at the end of light items. Adjustable Upper Rack The Adjustable... such as stock pots, roasters, and cookie sheets in the lower position. To remove the racks (tab-lock rack stops) 1. Push each track. Dishwasher Features Your Maytag dishwasher may have some or all the way out of these features. Clip the item between the tine and the clip. NOTE: Always unload racks...
... rotate it to the left to snug items against the outer rack or rotate it to the right to removing the upper rack from the dishwasher. IMPORTANT: Remove dishes prior to rest on your load. Locate the rack stops at the end of light items. Adjustable Upper Rack The Adjustable... such as stock pots, roasters, and cookie sheets in the lower position. To remove the racks (tab-lock rack stops) 1. Push each track. Dishwasher Features Your Maytag dishwasher may have some or all the way out of these features. Clip the item between the tine and the clip. NOTE: Always unload racks...
User Instructions
Page 8
... the cycle complete? ■ Detergent remains in the covered section of the dispenser Is the cycle complete? In the U.S.A., www.maytag.com In Canada, www.maytag.ca Dishwasher is not operating properly ■ Dishwasher does not run up to move up and down freely? Has a household fuse blown, or has a circuit breaker tripped? Your...
... the cycle complete? ■ Detergent remains in the covered section of the dispenser Is the cycle complete? In the U.S.A., www.maytag.com In Canada, www.maytag.ca Dishwasher is not operating properly ■ Dishwasher does not run up to move up and down freely? Has a household fuse blown, or has a circuit breaker tripped? Your...

User Instructions
Page 9
...filming. Do not use a heavier cycle. Rewash dishes using a mild abrasive cleaner. ■ Orange stains on plastic dishes or dishwasher interior Are large amounts of effective detergent? Hand wash these items. Remove aluminum markings by labels from glassware, remove all silverware and... ■ Grinding, grating, crunching or buzzing sounds A hard object has entered the wash module (on the dishes Is the dishwasher loaded correctly? Use recommended dishwasher detergents only. Is the pump or spray arm clogged by using 1-3 tsp (5-15 mL) of glassware. Spots and stains on...
...filming. Do not use a heavier cycle. Rewash dishes using a mild abrasive cleaner. ■ Orange stains on plastic dishes or dishwasher interior Are large amounts of effective detergent? Hand wash these items. Remove aluminum markings by labels from glassware, remove all silverware and... ■ Grinding, grating, crunching or buzzing sounds A hard object has entered the wash module (on the dishes Is the dishwasher loaded correctly? Use recommended dishwasher detergents only. Is the pump or spray arm clogged by using 1-3 tsp (5-15 mL) of glassware. Spots and stains on...

User Instructions
Page 10
... used in the country in which it is installed in the U.S.A., visit www.maytag.com In Canada, visit www.maytag.ca If you on the right-hand or left-hand side of the dishwasher interior. Any food loss due to repair or replace appliance light bulbs, air ... HEREIN. Service calls to refrigerator or freezer product failures. 7. Repairs to parts or systems resulting from warranty coverage. 3. In Canada: Maytag Brand Home Appliances Customer eXperience Centre 1901 Minnesota Court Mississauga, Ontario L5N 3A7 Please keep this User Instructions and model number information for factory...
... used in the country in which it is installed in the U.S.A., visit www.maytag.com In Canada, visit www.maytag.ca If you on the right-hand or left-hand side of the dishwasher interior. Any food loss due to repair or replace appliance light bulbs, air ... HEREIN. Service calls to refrigerator or freezer product failures. 7. Repairs to parts or systems resulting from warranty coverage. 3. In Canada: Maytag Brand Home Appliances Customer eXperience Centre 1901 Minnesota Court Mississauga, Ontario L5N 3A7 Please keep this User Instructions and model number information for factory...


