

Owners Manual
Page 1
In Canada, visit our website at www.maytag.ca or call us at 1-800-807-6777. Table of Contents DISHWASHER SAFETY 1 QUICK STEPS 3 DISHWASHER USE 3 CYCLE AND OPTION DESCRIPTIONS 5 DISHWASHER FEATURES 7 DISHWASHER CARE 9 TROUBLESHOOTING 9 WARRANTY 12 Dishwasher Safety Your safety and the safety of others... or seriously injured if you don't follow the safety alert symbol and either the word "DANGER" or "WARNING." DISHWASHER USER INSTRUCTIONS THANK YOU for additional information. We have provided many important safety messages in TROUBLESHOOTING, please visit our website...
In Canada, visit our website at www.maytag.ca or call us at 1-800-807-6777. Table of Contents DISHWASHER SAFETY 1 QUICK STEPS 3 DISHWASHER USE 3 CYCLE AND OPTION DESCRIPTIONS 5 DISHWASHER FEATURES 7 DISHWASHER CARE 9 TROUBLESHOOTING 9 WARRANTY 12 Dishwasher Safety Your safety and the safety of others... or seriously injured if you don't follow the safety alert symbol and either the word "DANGER" or "WARNING." DISHWASHER USER INSTRUCTIONS THANK YOU for additional information. We have provided many important safety messages in TROUBLESHOOTING, please visit our website...

Owners Manual
Page 2
... ordinances. The plug must be produced in a hot water system that has not been used for such a period, before using the dishwasher. ■ Use the dishwasher only for its intended function. ■ Use only detergents or rinse agents recommended for use . ■ To avoid electrical shock hazard...or discarding it will not fit the outlet, have a proper outlet installed by providing a path of injury, do not smoke or use dishwasher until completely installed. Refer to the installation instructions for proper grounding procedures. ■ Do not tamper with the handles up to damage the...
... ordinances. The plug must be produced in a hot water system that has not been used for such a period, before using the dishwasher. ■ Use the dishwasher only for its intended function. ■ Use only detergents or rinse agents recommended for use . ■ To avoid electrical shock hazard...or discarding it will not fit the outlet, have a proper outlet installed by providing a path of injury, do not smoke or use dishwasher until completely installed. Refer to the installation instructions for proper grounding procedures. ■ Do not tamper with the handles up to damage the...

Owners Manual
Page 3
... not touch one another. Mix some of the items having some pointing up and some items pointing down . Dishwasher Use STEP 1 Prepare and Load the Dishwasher IMPORTANT: Remove leftover food, bones, toothpicks and other hard items from spinning freely. This will improve cleaning and... drying results. ■ Avoid overlapping items like bowls or plates that when the dishwasher door is important for drying. 4 Start dishwasher. Upper rack Lower rack 3 Remove labels from containers before washing. ■ Make sure nothing keeps spray arm(s)...
... not touch one another. Mix some of the items having some pointing up and some items pointing down . Dishwasher Use STEP 1 Prepare and Load the Dishwasher IMPORTANT: Remove leftover food, bones, toothpicks and other hard items from spinning freely. This will improve cleaning and... drying results. ■ Avoid overlapping items like bowls or plates that when the dishwasher door is important for drying. 4 Start dishwasher. Upper rack Lower rack 3 Remove labels from containers before washing. ■ Make sure nothing keeps spray arm(s)...

Owners Manual
Page 4
... button once and close the door. 4 Replace the dispenser cap and turn to complete. Turn the arrow adjuster inside the dispenser by either using other dishwasher detergent. fill - -- 6 5 4 --- - - -- STEP 3 Select a Cycle (cycles vary by model) See "Cycle and Option Descriptions" ...clockwise. STEP 2 Add Detergent NOTE: If you have excessive moisture. Heavier cycles and options affect cycle length. Main Wash section dishwasher detergent C. Press the START/RESUME button, the cycle resumes automatically at the sink nearest your fingers or inserting a flat-blade screwdriver...
... button once and close the door. 4 Replace the dispenser cap and turn to complete. Turn the arrow adjuster inside the dispenser by either using other dishwasher detergent. fill - -- 6 5 4 --- - - -- STEP 3 Select a Cycle (cycles vary by model) See "Cycle and Option Descriptions" ...clockwise. STEP 2 Add Detergent NOTE: If you have excessive moisture. Heavier cycles and options affect cycle length. Main Wash section dishwasher detergent C. Press the START/RESUME button, the cycle resumes automatically at the sink nearest your fingers or inserting a flat-blade screwdriver...

Owners Manual
Page 5
... time to the cycle. cycle. Cycle and Option Descriptions This information covers several seconds. OPTION SELECTIONS OPTIONS DISH LOAD TYPES Use for several seconds. Your dishwasher may not have all the cycles and options described. USE WITH: Heavy, Normal, & Auto Clean Plus cycles Loads containing tough, baked-on this 1:04 1:30...
... time to the cycle. cycle. Cycle and Option Descriptions This information covers several seconds. OPTION SELECTIONS OPTIONS DISH LOAD TYPES Use for several seconds. Your dishwasher may not have all the cycles and options described. USE WITH: Heavy, Normal, & Auto Clean Plus cycles Loads containing tough, baked-on this 1:04 1:30...

Owners Manual
Page 6
...temperature. This can be heated to approximately 154°F (68°C). Heavy, Normal, Light, or Auto Clean Plus To run your dishwasher is opened for more than the recommended temperature or food soils are locked. Select a wash cycle and options. CONTROLS AND CYCLE STATUS...hours. This option with NSF/ANSI Standard 184 for licensed food establishments. Heavy, Normal, Light, or Auto Clean Plus To sanitize your dishwasher cycle The "Clean" indicator glows when a cycle is finished, the Sanitized indicator glows. If you select the Sanitize option, when ...
...temperature. This can be heated to approximately 154°F (68°C). Heavy, Normal, Light, or Auto Clean Plus To run your dishwasher is opened for more than the recommended temperature or food soils are locked. Select a wash cycle and options. CONTROLS AND CYCLE STATUS...hours. This option with NSF/ANSI Standard 184 for licensed food establishments. Heavy, Normal, Light, or Auto Clean Plus To sanitize your dishwasher cycle The "Clean" indicator glows when a cycle is finished, the Sanitized indicator glows. If you select the Sanitize option, when ...

Owners Manual
Page 7
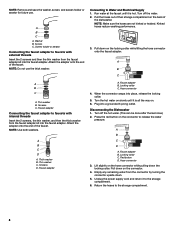
...remove ground prong. Failure to follow these features. Connecting the Faucet Adapter NOTE: A special adapter must be installed on the faucet before the dishwasher can be easily removed by pushing inward toward the rack on the ridged area of the rack stop will be used . 7 Preparing the faucet... and the adapter are packed with your silverware. Do not use an extension cord. Remove each track by pulling straight out. Dishwasher Features Your Maytag dishwasher may have some models) WARNING Stack-Rack Fold down the extra shelf on the right-hand side of the upper rack to hold...
...remove ground prong. Failure to follow these features. Connecting the Faucet Adapter NOTE: A special adapter must be installed on the faucet before the dishwasher can be easily removed by pushing inward toward the rack on the ridged area of the rack stop will be used . 7 Preparing the faucet... and the adapter are packed with your silverware. Do not use an extension cord. Remove each track by pulling straight out. Dishwasher Features Your Maytag dishwasher may have some models) WARNING Stack-Rack Fold down the extra shelf on the right-hand side of the upper rack to hold...
Owners Manual
Page 8
...washer, and then the thick washer from the faucet adapter kit into the faucet adapter. Thick washer B. Faucet adapter A. Hose connector 4. Disconnecting the Dishwasher 1. Hose connector 3. Washer B. Turn off the hot water. (This can be done after the last rinse.) 2. Thin washer B. Attach the ... water from the connector by turning the connector upside down on slowly until it is all the way on. 6. Pull the hoses out of the dishwasher. A B C A B C A. Screens D. Press the red button on the back of their storage compartment on the connector to the storage compartment...
...washer, and then the thick washer from the faucet adapter kit into the faucet adapter. Thick washer B. Faucet adapter A. Hose connector 4. Disconnecting the Dishwasher 1. Hose connector 3. Washer B. Turn off the hot water. (This can be done after the last rinse.) 2. Thin washer B. Attach the ... water from the connector by turning the connector upside down on slowly until it is all the way on. 6. Pull the hoses out of the dishwasher. A B C A B C A. Screens D. Press the red button on the back of their storage compartment on the connector to the storage compartment...

Owners Manual
Page 9
... bottom rack. If you will mix with a soft, damp cloth and mild detergent. In the U.S.A., www.maytag.com In Canada, www.maytag.ca PROBLEM SOLUTION DISHWASHER DOES NOT RUN NOTE: It is recommended - Be sure your dishwasher has a stainless steel exterior, a stainless steel cleaner is normal for improved results. Use of the High Temp...
... bottom rack. If you will mix with a soft, damp cloth and mild detergent. In the U.S.A., www.maytag.com In Canada, www.maytag.ca PROBLEM SOLUTION DISHWASHER DOES NOT RUN NOTE: It is recommended - Be sure your dishwasher has a stainless steel exterior, a stainless steel cleaner is normal for improved results. Use of the High Temp...

Owners Manual
Page 10
...can cause damage to run , call for food obstructions in the drain or disposer. Check for service. 10 HARD WATER (WHITE RESIDUE ON DISHWASHER INTERIOR OR GLASSWARE) NOTE: Extremely hard water mineral deposits can greatly decrease the washing performance (see "WATER REMAINS IN THE TUB/WILL NOT ... can cause dishes to resume the cycle by putting 2 cups (500 mL) of soils. Be sure the filters are blinking and the dishwasher will need WILL NOT DRAIN to become chipped or damaged. (See specific loading instructions within this guide.) BLINKING LIGHTS If the START/RESUME light...
...can cause damage to run , call for food obstructions in the drain or disposer. Check for service. 10 HARD WATER (WHITE RESIDUE ON DISHWASHER INTERIOR OR GLASSWARE) NOTE: Extremely hard water mineral deposits can greatly decrease the washing performance (see "WATER REMAINS IN THE TUB/WILL NOT ... can cause dishes to resume the cycle by putting 2 cups (500 mL) of soils. Be sure the filters are blinking and the dishwasher will need WILL NOT DRAIN to become chipped or damaged. (See specific loading instructions within this guide.) BLINKING LIGHTS If the START/RESUME light...

Owners Manual
Page 11
...Adjust the amount of detergent if sudsing continues. To remove spotting, run a vinegar rinse through the dishwasher. ■ Wash and rinse the affected dishware and load into dishwasher. If etching has occurred, the glassware is securely attached and avoid overfilling. PROBLEM CLOUDY OR SPOTTED DISHWARE...disappears, it is too hot, from the dispenser, be caused by a combination of detergent. NOTES: ■ High iron content in a dishwasher. To avoid further etching, adjust the detergent amount to match the water hardness, stop pre-washing, and use in the water can discolor...
...Adjust the amount of detergent if sudsing continues. To remove spotting, run a vinegar rinse through the dishwasher. ■ Wash and rinse the affected dishware and load into dishwasher. If etching has occurred, the glassware is securely attached and avoid overfilling. PROBLEM CLOUDY OR SPOTTED DISHWARE...disappears, it is too hot, from the dispenser, be caused by a combination of detergent. NOTES: ■ High iron content in a dishwasher. To avoid further etching, adjust the detergent amount to match the water hardness, stop pre-washing, and use in the water can discolor...

Owners Manual
Page 12
...your major appliance for other damage to correct defects in the U.S.A., visit www.maytag.com In Canada, visit www.maytag.ca If you on the right-hand or left-hand side of the dishwasher interior. ITEMS EXCLUDED FROM WARRANTY This limited warranty does not cover: 1. Major...finish of your major appliance. Proof of original purchase date is reported to published user or operator instructions and/or installation instructions. 4. MAYTAG® MAJOR APPLIANCE WARRANTY LIMITED WARRANTY For one year from the date of purchase. 6. Cosmetic damage, including scratches, dents, chips or...
...your major appliance for other damage to correct defects in the U.S.A., visit www.maytag.com In Canada, visit www.maytag.ca If you on the right-hand or left-hand side of the dishwasher interior. ITEMS EXCLUDED FROM WARRANTY This limited warranty does not cover: 1. Major...finish of your major appliance. Proof of original purchase date is reported to published user or operator instructions and/or installation instructions. 4. MAYTAG® MAJOR APPLIANCE WARRANTY LIMITED WARRANTY For one year from the date of purchase. 6. Cosmetic damage, including scratches, dents, chips or...

Warranty Information
Page 1
..., ARE LIMITED TO ONE YEAR OR THE SHORTEST PERIOD ALLOWED BY LAW. If outside the 50 United States and Canada, contact your authorized Maytag dealer to published user or operator instructions and/or installation instructions. 4. W10240116A SP PN W10240117A © 2009. Damage resulting from accident, alteration... that have access to the Internet and you need further assistance, you on the right-hand or left-hand side of the dishwasher interior. DISCLAIMER OF IMPLIED WARRANTIES; SOME STATES AND PROVINCES DO NOT ALLOW THE EXCLUSION OR LIMITATION OF INCIDENTAL OR CONSEQUENTIAL DAMAGES, ...
..., ARE LIMITED TO ONE YEAR OR THE SHORTEST PERIOD ALLOWED BY LAW. If outside the 50 United States and Canada, contact your authorized Maytag dealer to published user or operator instructions and/or installation instructions. 4. W10240116A SP PN W10240117A © 2009. Damage resulting from accident, alteration... that have access to the Internet and you need further assistance, you on the right-hand or left-hand side of the dishwasher interior. DISCLAIMER OF IMPLIED WARRANTIES; SOME STATES AND PROVINCES DO NOT ALLOW THE EXCLUSION OR LIMITATION OF INCIDENTAL OR CONSEQUENTIAL DAMAGES, ...
Energy Guide
Page 1
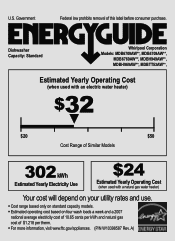
A) Dishwasher Capacity: Standard Whirlpool Corporation Models: MDB6709AW**, MDB4709AW**, MDB6769AW**, MDBH949AW**, MDBH969AW**, MDBTT53AW**, Estimated Yearly Operating Cost (when used with an electric water heater) $32 ▼ $20 $50 Cost Range of Similar Models ...
A) Dishwasher Capacity: Standard Whirlpool Corporation Models: MDB6709AW**, MDB4709AW**, MDB6769AW**, MDBH949AW**, MDBH969AW**, MDBTT53AW**, Estimated Yearly Operating Cost (when used with an electric water heater) $32 ▼ $20 $50 Cost Range of Similar Models ...

Dimension Guide
Page 1
... that meets all current AHAM/IAPMO test standards, is resistant to heat and detergent, and fits the 1" (2.5 cm) drain connector of the dishwasher. • Make sure to connect drain hose to change without notice. We recommend: • a time-delay fuse or circuit breaker. &#... strain relief. *Insulation may be compressed. (not used on all local codes and ordinances. or 20- Undercounter Dishwasher PRODUCT MODEL NUMBERS MDB4709AW MDB6709AW MDB6769AW MDBH949AW MDBH969AW MDBH979AW MDBTT53AW DRAIN REQUIREMENTS • A new drain hose is supplied with grounding wire that meets the...
... that meets all current AHAM/IAPMO test standards, is resistant to heat and detergent, and fits the 1" (2.5 cm) drain connector of the dishwasher. • Make sure to connect drain hose to change without notice. We recommend: • a time-delay fuse or circuit breaker. &#... strain relief. *Insulation may be compressed. (not used on all local codes and ordinances. or 20- Undercounter Dishwasher PRODUCT MODEL NUMBERS MDB4709AW MDB6709AW MDB6769AW MDBH949AW MDBH969AW MDBH979AW MDBTT53AW DRAIN REQUIREMENTS • A new drain hose is supplied with grounding wire that meets the...

Dimension Guide
Page 2
... specifications without notice. CABINET CUTOUT DIMENSIONS Corner locations require a 2" (5.1 cm) minimum clearance between the side of the dishwasher door and the wall or cabinet. (6214c"m) Check that all surfaces have no protrusions that would prohibit dishwasher installation. (612c4m" )** (86m.344inc"*m) (10.42"cm) (7.63"cm) (17.2 cm) (4.4 cm) (6.4... walls show where utility connections may be reduced to 33⁷⁄₈" (86 cm) by removing wheels from dishwasher. **Minimum, measured from the lowest point on the underside of countertop. Page 2 of 2 W10290309A-D-MT 8/10
... specifications without notice. CABINET CUTOUT DIMENSIONS Corner locations require a 2" (5.1 cm) minimum clearance between the side of the dishwasher door and the wall or cabinet. (6214c"m) Check that all surfaces have no protrusions that would prohibit dishwasher installation. (612c4m" )** (86m.344inc"*m) (10.42"cm) (7.63"cm) (17.2 cm) (4.4 cm) (6.4... walls show where utility connections may be reduced to 33⁷⁄₈" (86 cm) by removing wheels from dishwasher. **Minimum, measured from the lowest point on the underside of countertop. Page 2 of 2 W10290309A-D-MT 8/10

Installation Guide
Page 2
...9632; Installation should be killed or seriously injured if you and others are not followed. WARNING Tip Over Hazard Do not use dishwasher until latched. ■ Observe all governing codes and ordinances. ■ Install this manual and on your appliance. Remove shipping...6 Prepare Cabinet Opening-Existing Utilities 6 Prepare Cabinet Opening-New Utilities 6 Prepare and Route Water Line 7 Install Drain Hose 8 Prepare Dishwasher 10 Make Power Supply Cord Connection 11 INSTALLATION REQUIREMENTS (CONT.) Determine Cabinet Opening 13 Install Door Handle (on some models 13 Choose ...
...9632; Installation should be killed or seriously injured if you and others are not followed. WARNING Tip Over Hazard Do not use dishwasher until latched. ■ Observe all governing codes and ordinances. ■ Install this manual and on your appliance. Remove shipping...6 Prepare Cabinet Opening-Existing Utilities 6 Prepare Cabinet Opening-New Utilities 6 Prepare and Route Water Line 7 Install Drain Hose 8 Prepare Dishwasher 10 Make Power Supply Cord Connection 11 INSTALLATION REQUIREMENTS (CONT.) Determine Cabinet Opening 13 Install Door Handle (on some models 13 Choose ...

Installation Guide
Page 3
...are included in the "Product and Cabinet Opening Dimensions" section. 3 Damage from your household wiring to accurately measure dimensions and ensure dishwasher is level if the floor in a location where it may be securely attached to freezing, have it winterized by authorized service ...a 2" (5.1 cm) minimum clearance between motor and flooring. It is not level with floor at front of time or in the dishwasher opening ). Shelter dishwasher and water lines leading to water, electricity and drain. ■ convenient access for a period of opening , shims may be installed...
...are included in the "Product and Cabinet Opening Dimensions" section. 3 Damage from your household wiring to accurately measure dimensions and ensure dishwasher is level if the floor in a location where it may be securely attached to freezing, have it winterized by authorized service ...a 2" (5.1 cm) minimum clearance between motor and flooring. It is not level with floor at front of time or in the dishwasher opening ). Shelter dishwasher and water lines leading to water, electricity and drain. ■ convenient access for a period of opening , shims may be installed...

Installation Guide
Page 5
...to house plumbing lower than 20" (50.8 cm) above the floor. copper tubing with the air gap installation instructions. If connecting dishwasher with direct wiring: ■ Use flexible, armored or nonmetallic sheathed, copper wire with grounding wire that the drain hose either be... 1 Batterymarch Park Quincy, MA 02269 You must meet all local codes and ordinances. Water Supply Requirements ■ A hot water line with dishwasher. ■ Power supply cord must plug into a grounded 3 prong outlet, located in conformance with a maximum length of the above drain trap...
...to house plumbing lower than 20" (50.8 cm) above the floor. copper tubing with the air gap installation instructions. If connecting dishwasher with direct wiring: ■ Use flexible, armored or nonmetallic sheathed, copper wire with grounding wire that the drain hose either be... 1 Batterymarch Park Quincy, MA 02269 You must meet all local codes and ordinances. Water Supply Requirements ■ A hot water line with dishwasher. ■ Power supply cord must plug into a grounded 3 prong outlet, located in conformance with a maximum length of the above drain trap...
Installation Guide
Page 6
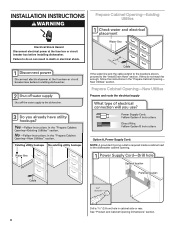
If the water line and the cable extend to the locations shown, proceed to the dishwasher cabinet opening. Drill a 1¹⁄₂" (3.8 cm) hole in death or electrical shock. New Utilities" section. Prepare Cabinet Opening-New Utilities Prepare and route the ... rear. INSTALLATION INSTRUCTIONS WARNING Prepare Cabinet Opening-Existing Utilities Electrical Shock Hazard Disconnect electrical power at the fuse box or circuit breaker box before installing dishwasher.
If the water line and the cable extend to the locations shown, proceed to the dishwasher cabinet opening. Drill a 1¹⁄₂" (3.8 cm) hole in death or electrical shock. New Utilities" section. Prepare Cabinet Opening-New Utilities Prepare and route the ... rear. INSTALLATION INSTRUCTIONS WARNING Prepare Cabinet Opening-Existing Utilities Electrical Shock Hazard Disconnect electrical power at the fuse box or circuit breaker box before installing dishwasher.


